
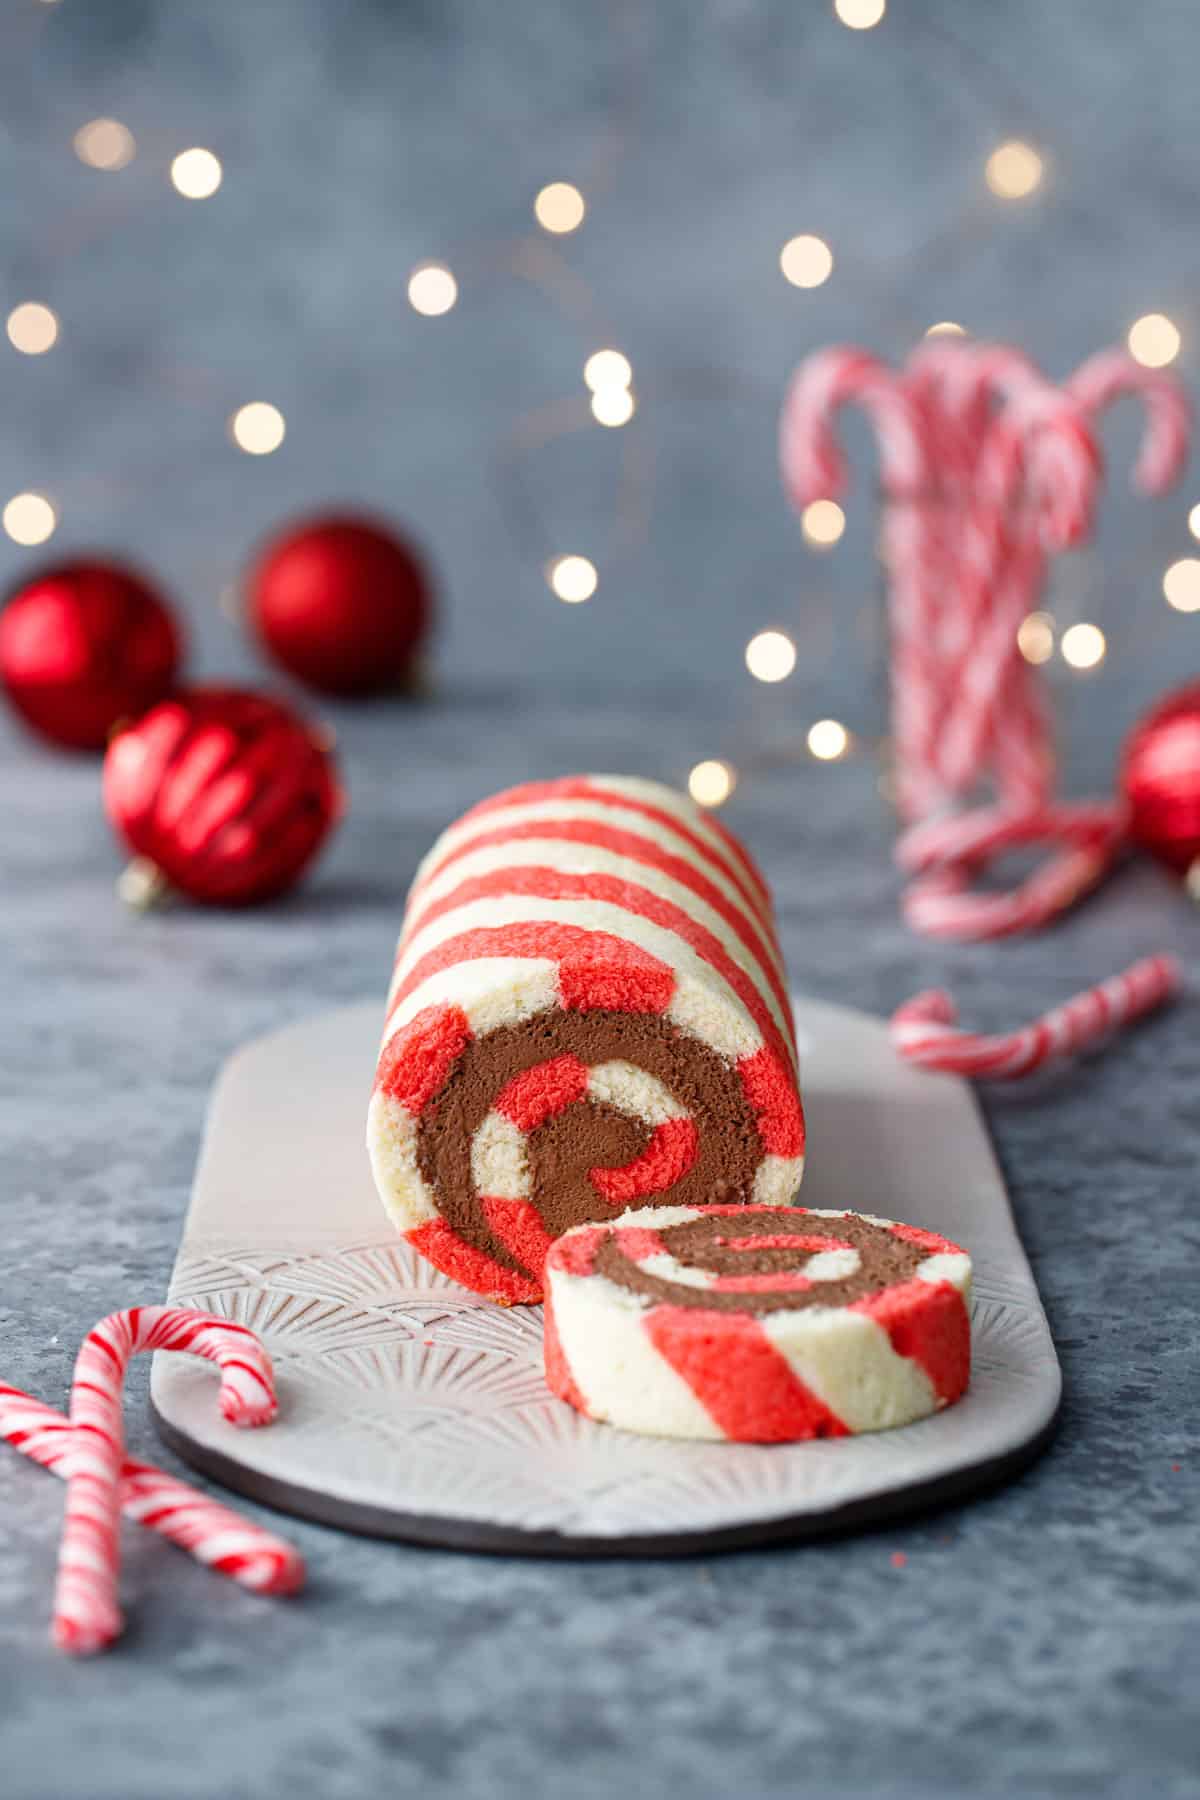
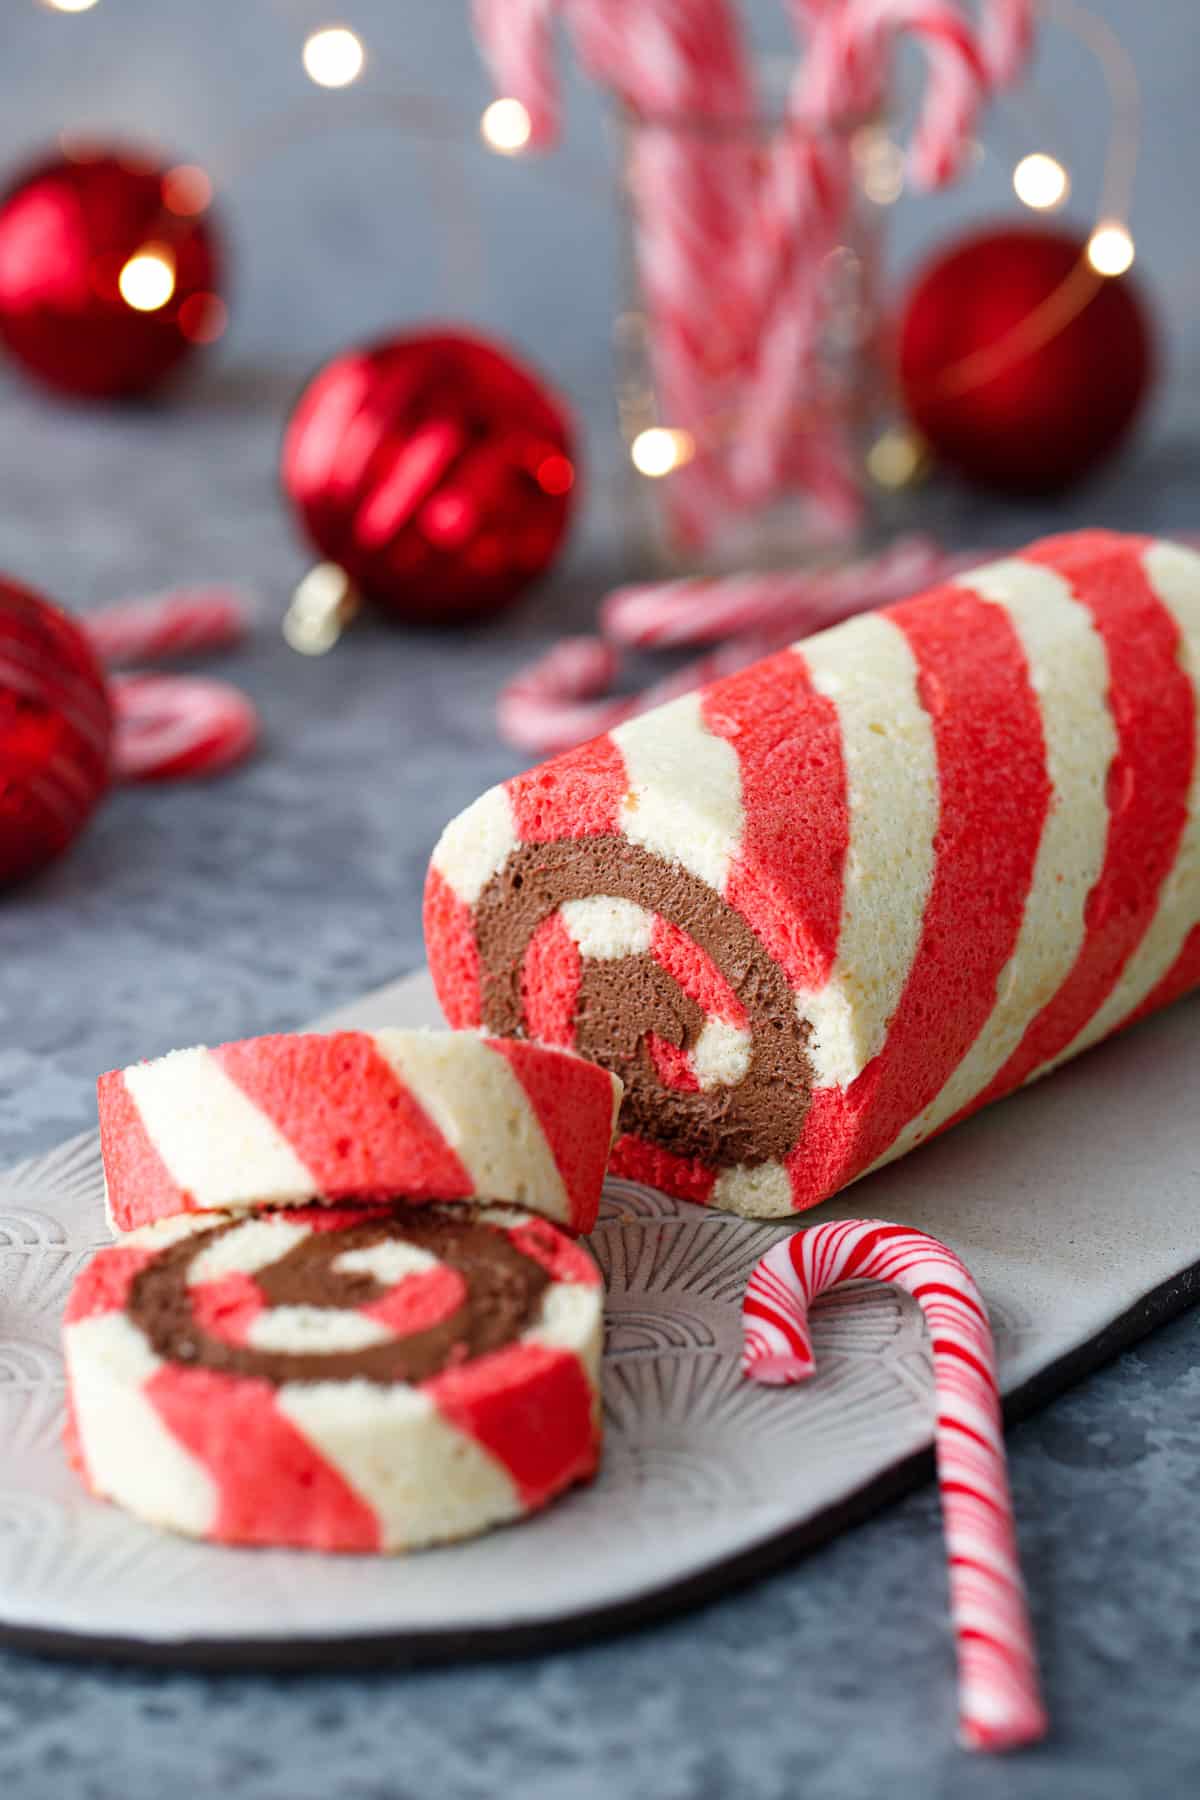
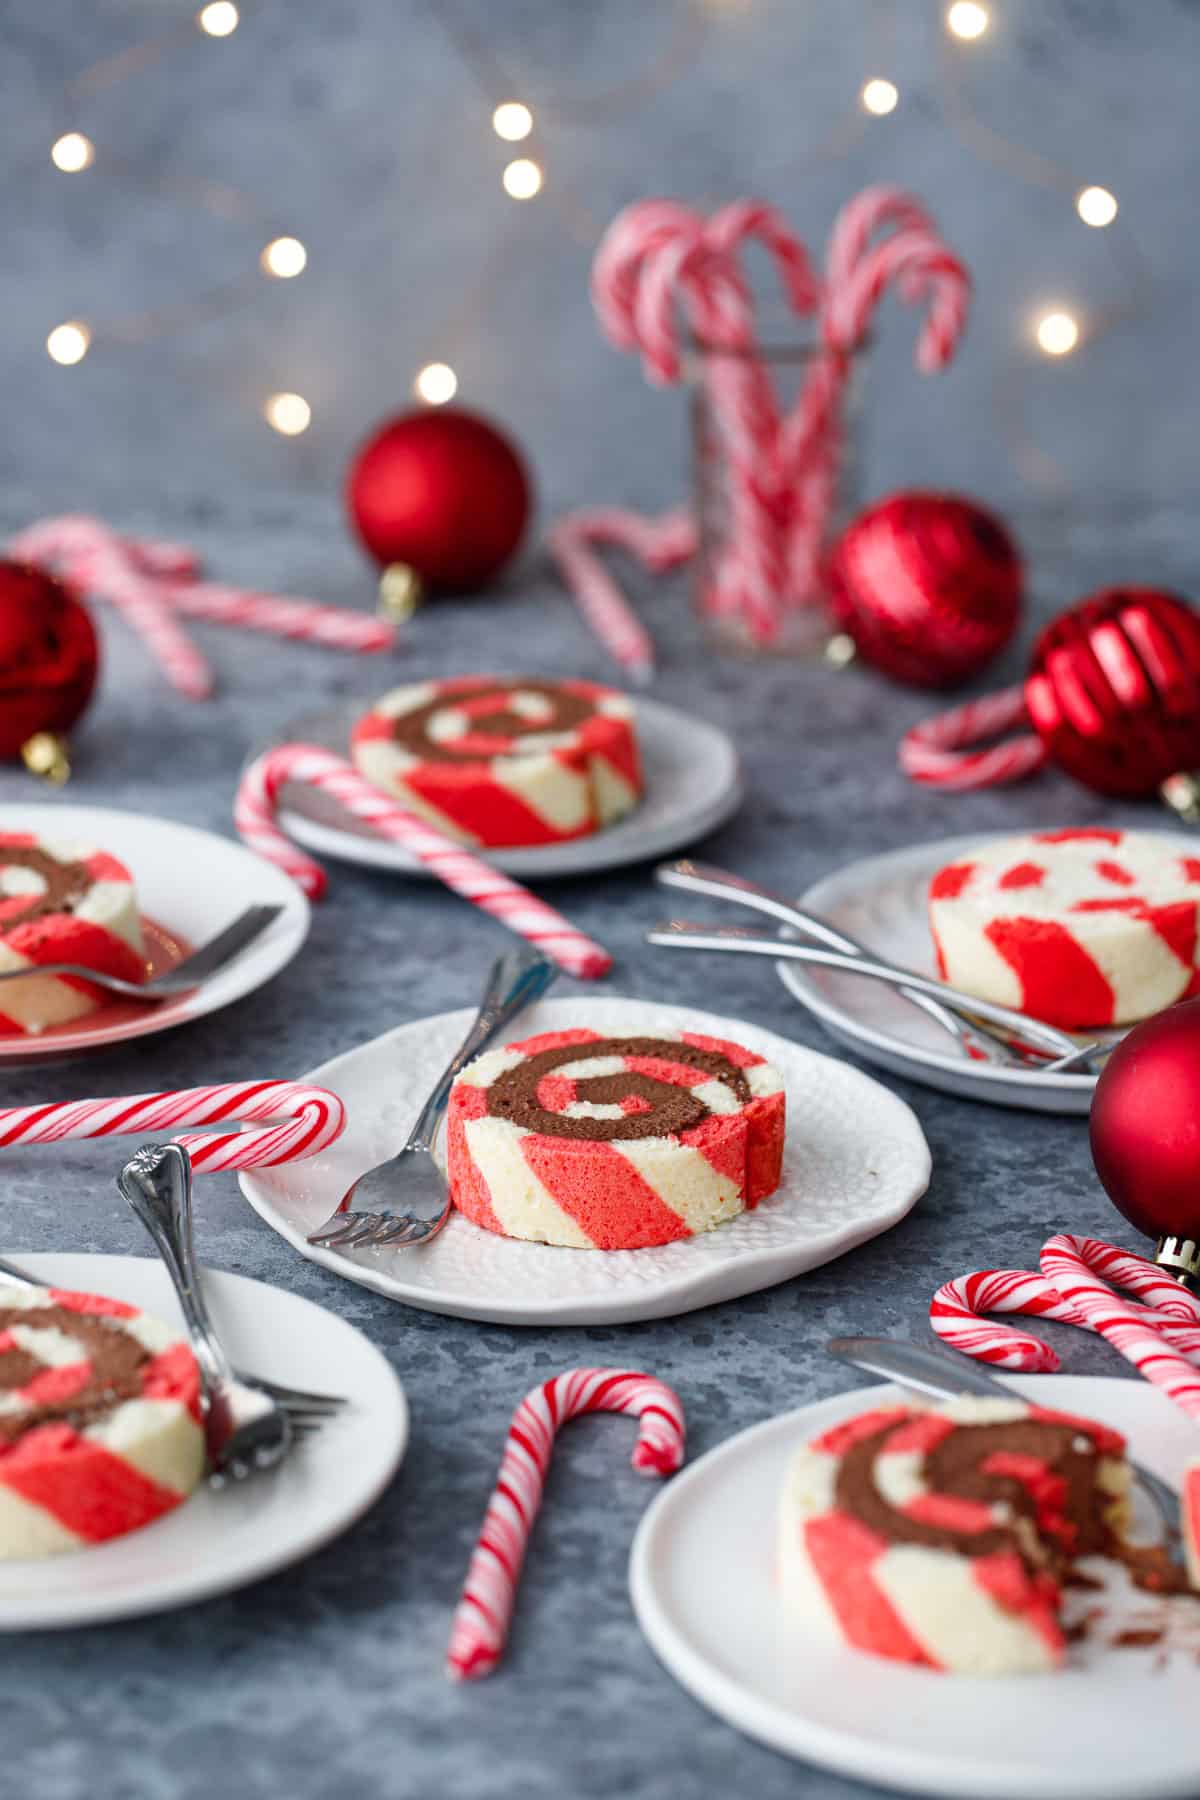
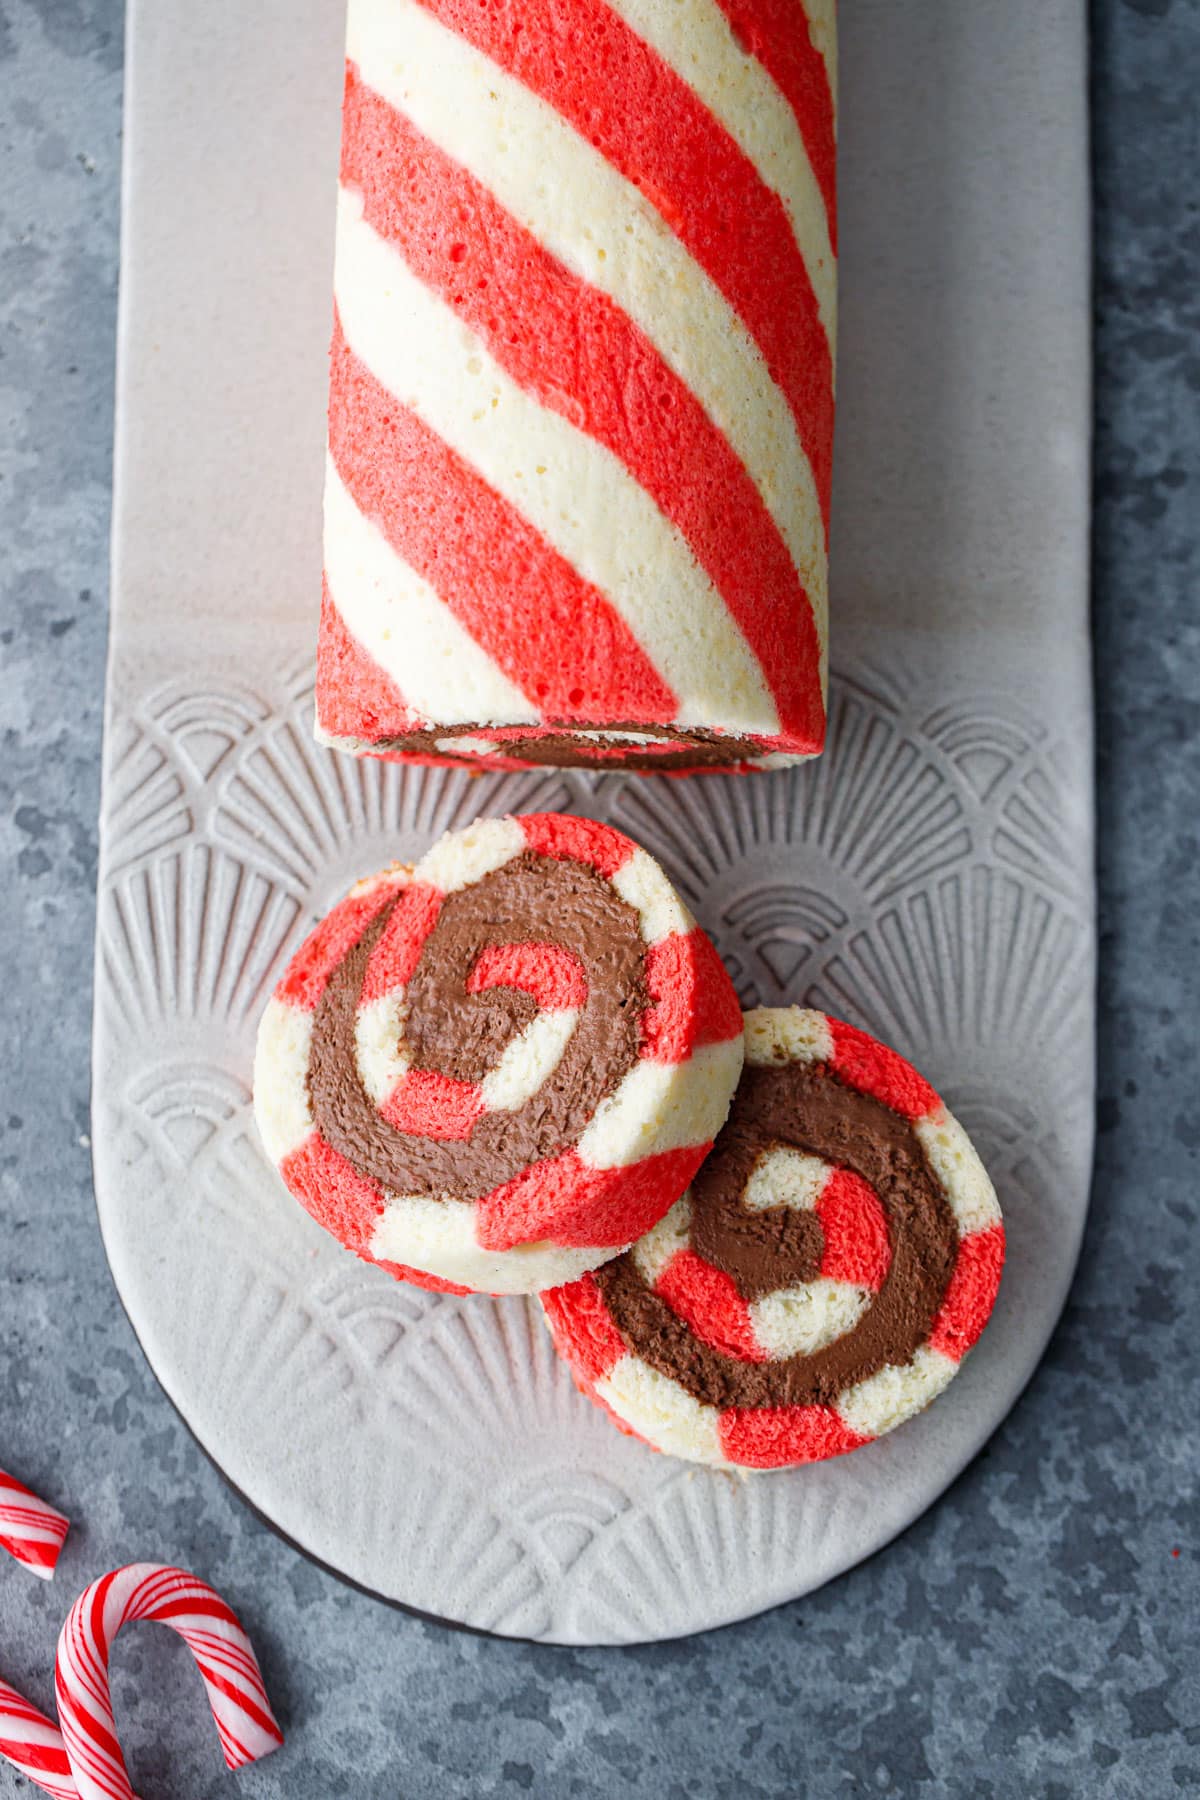
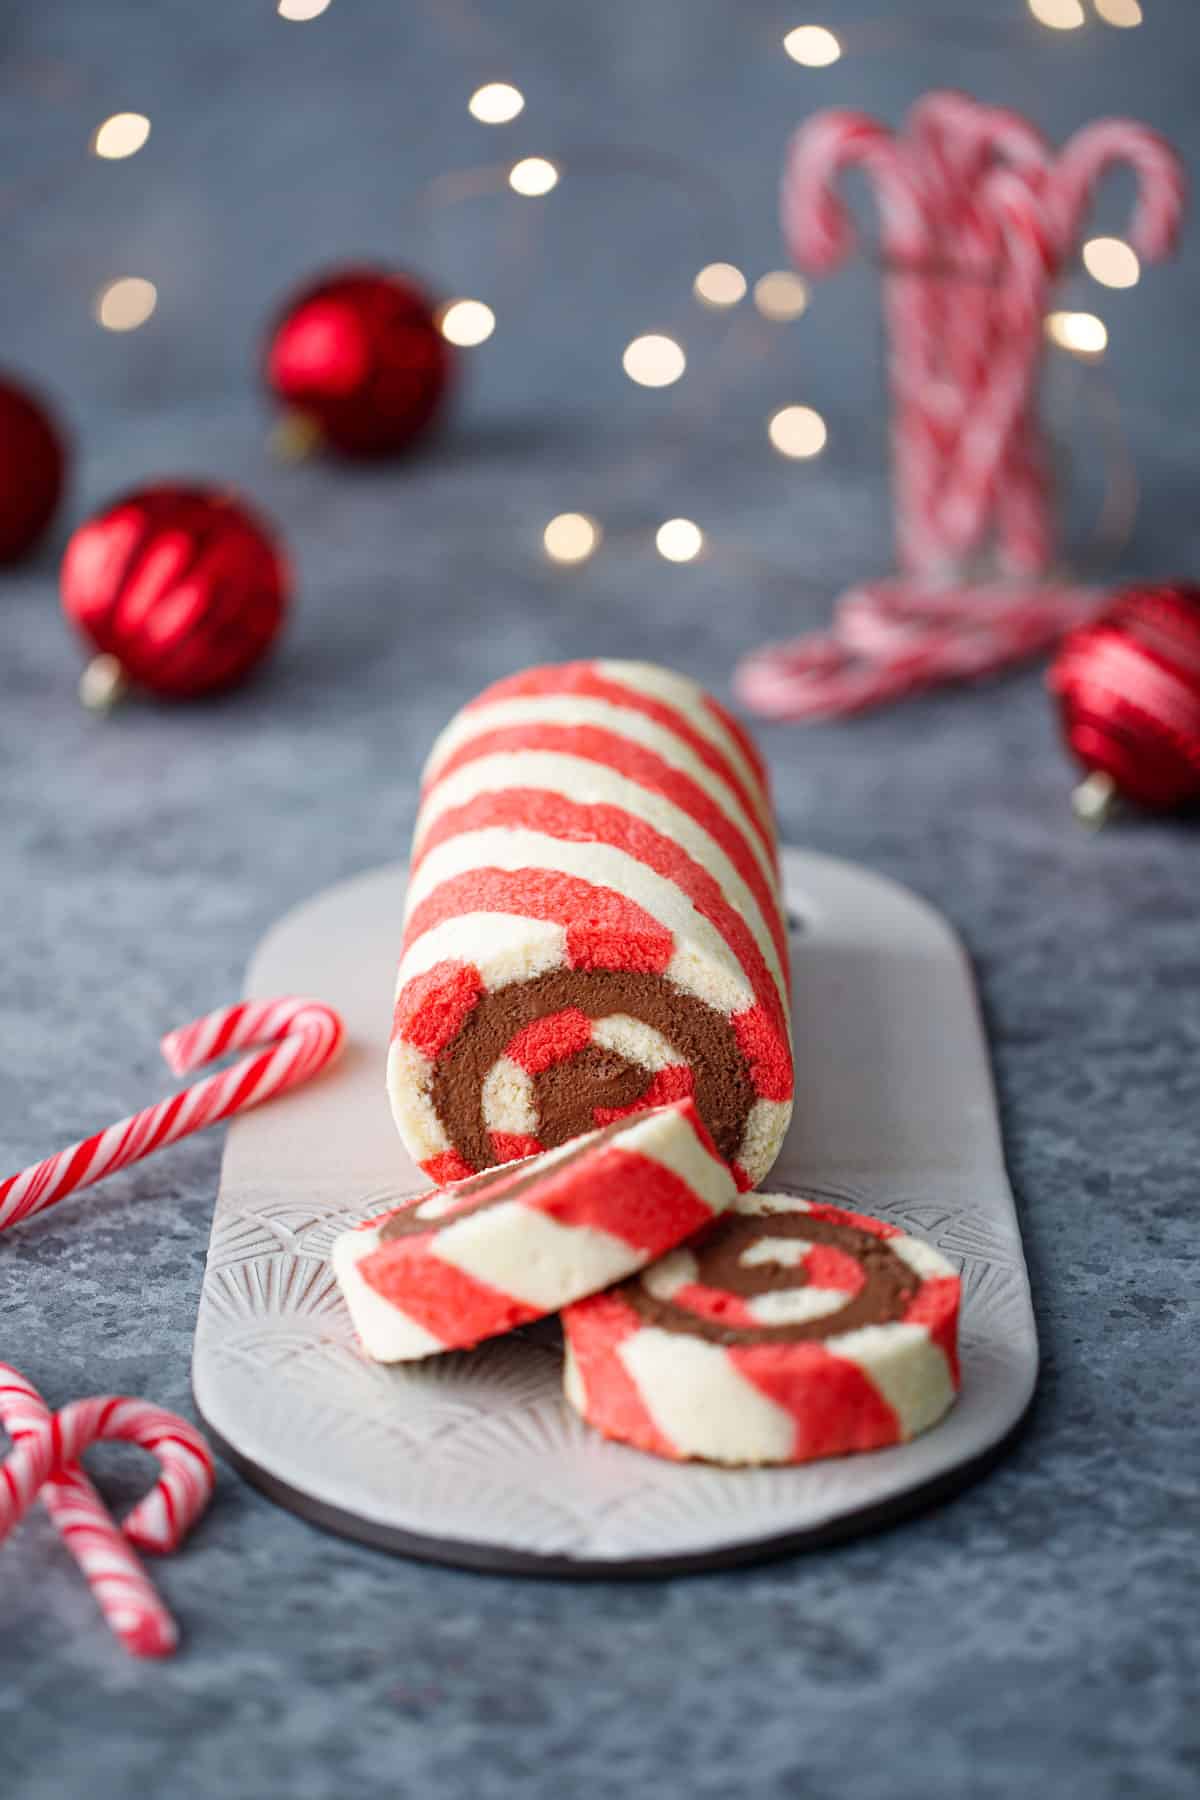
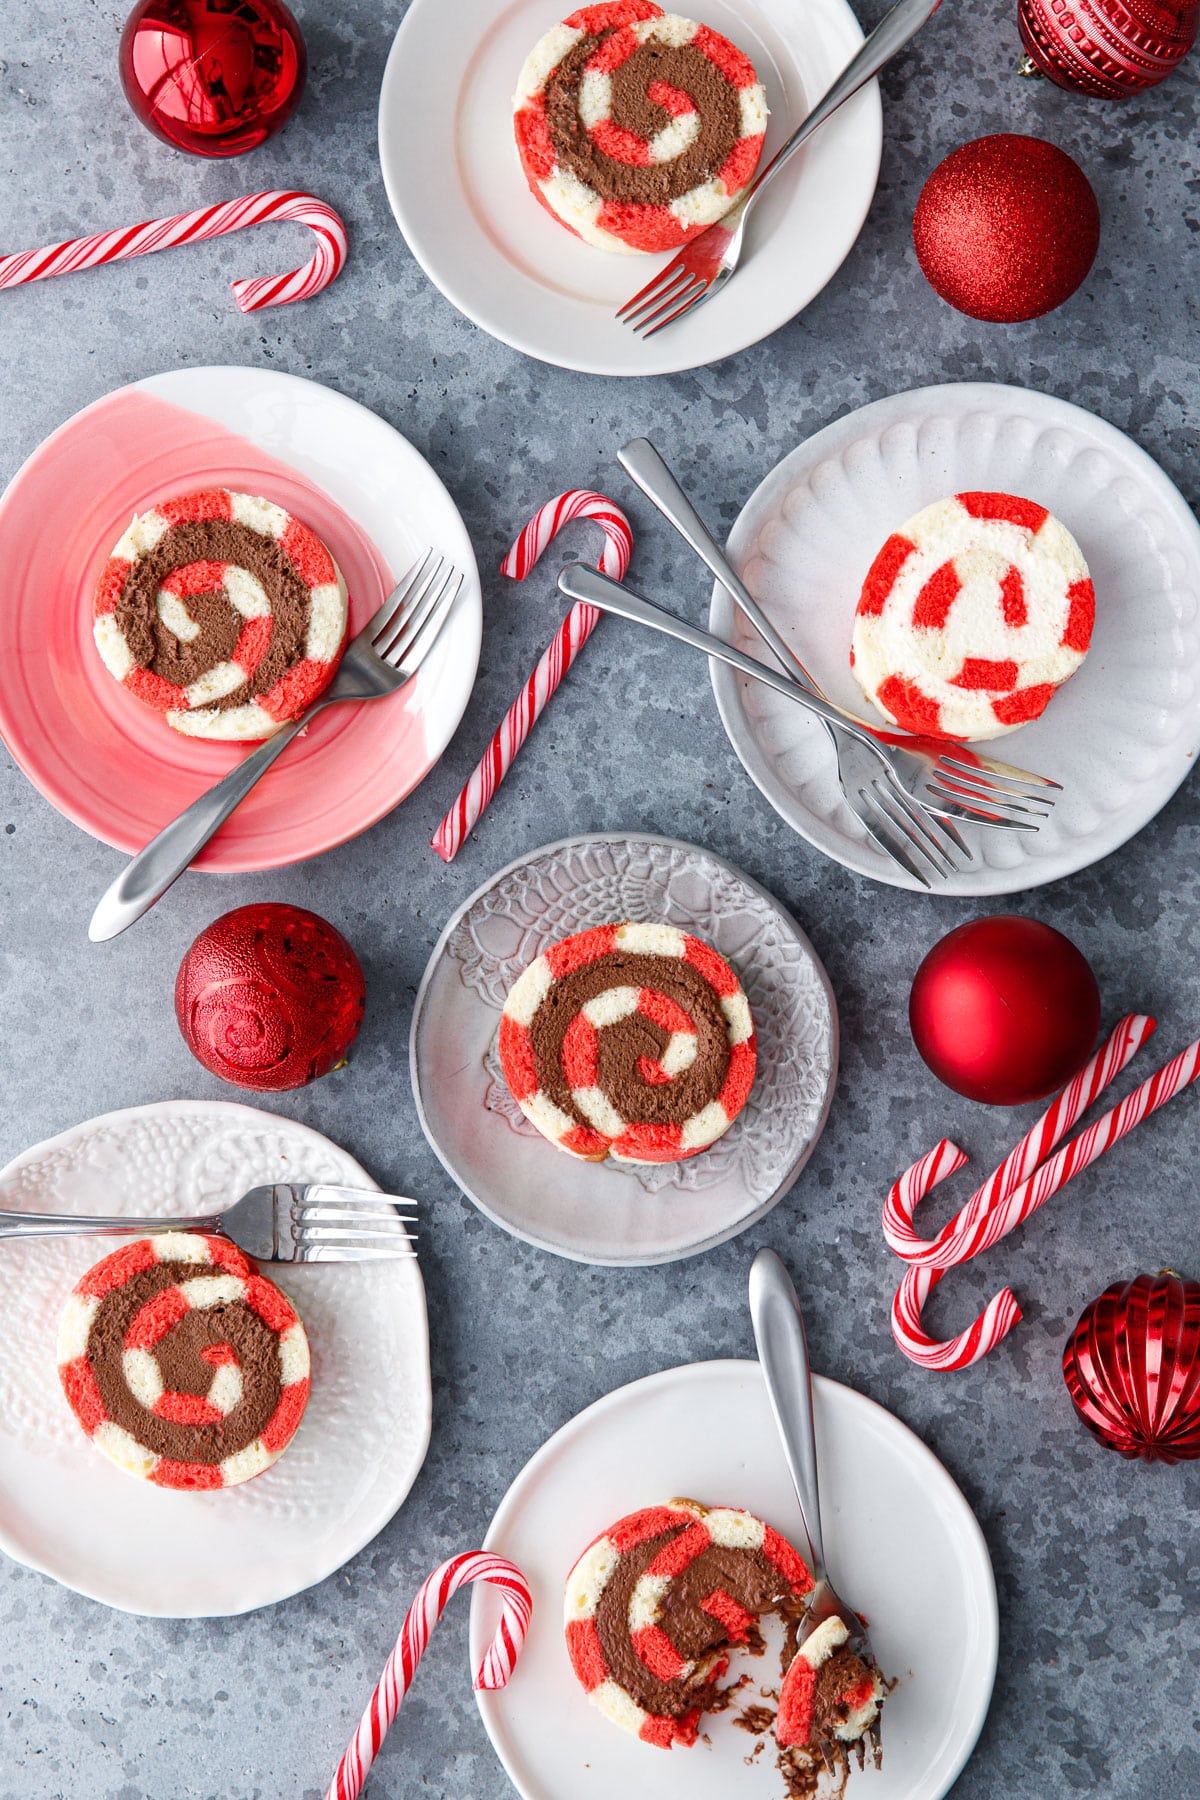
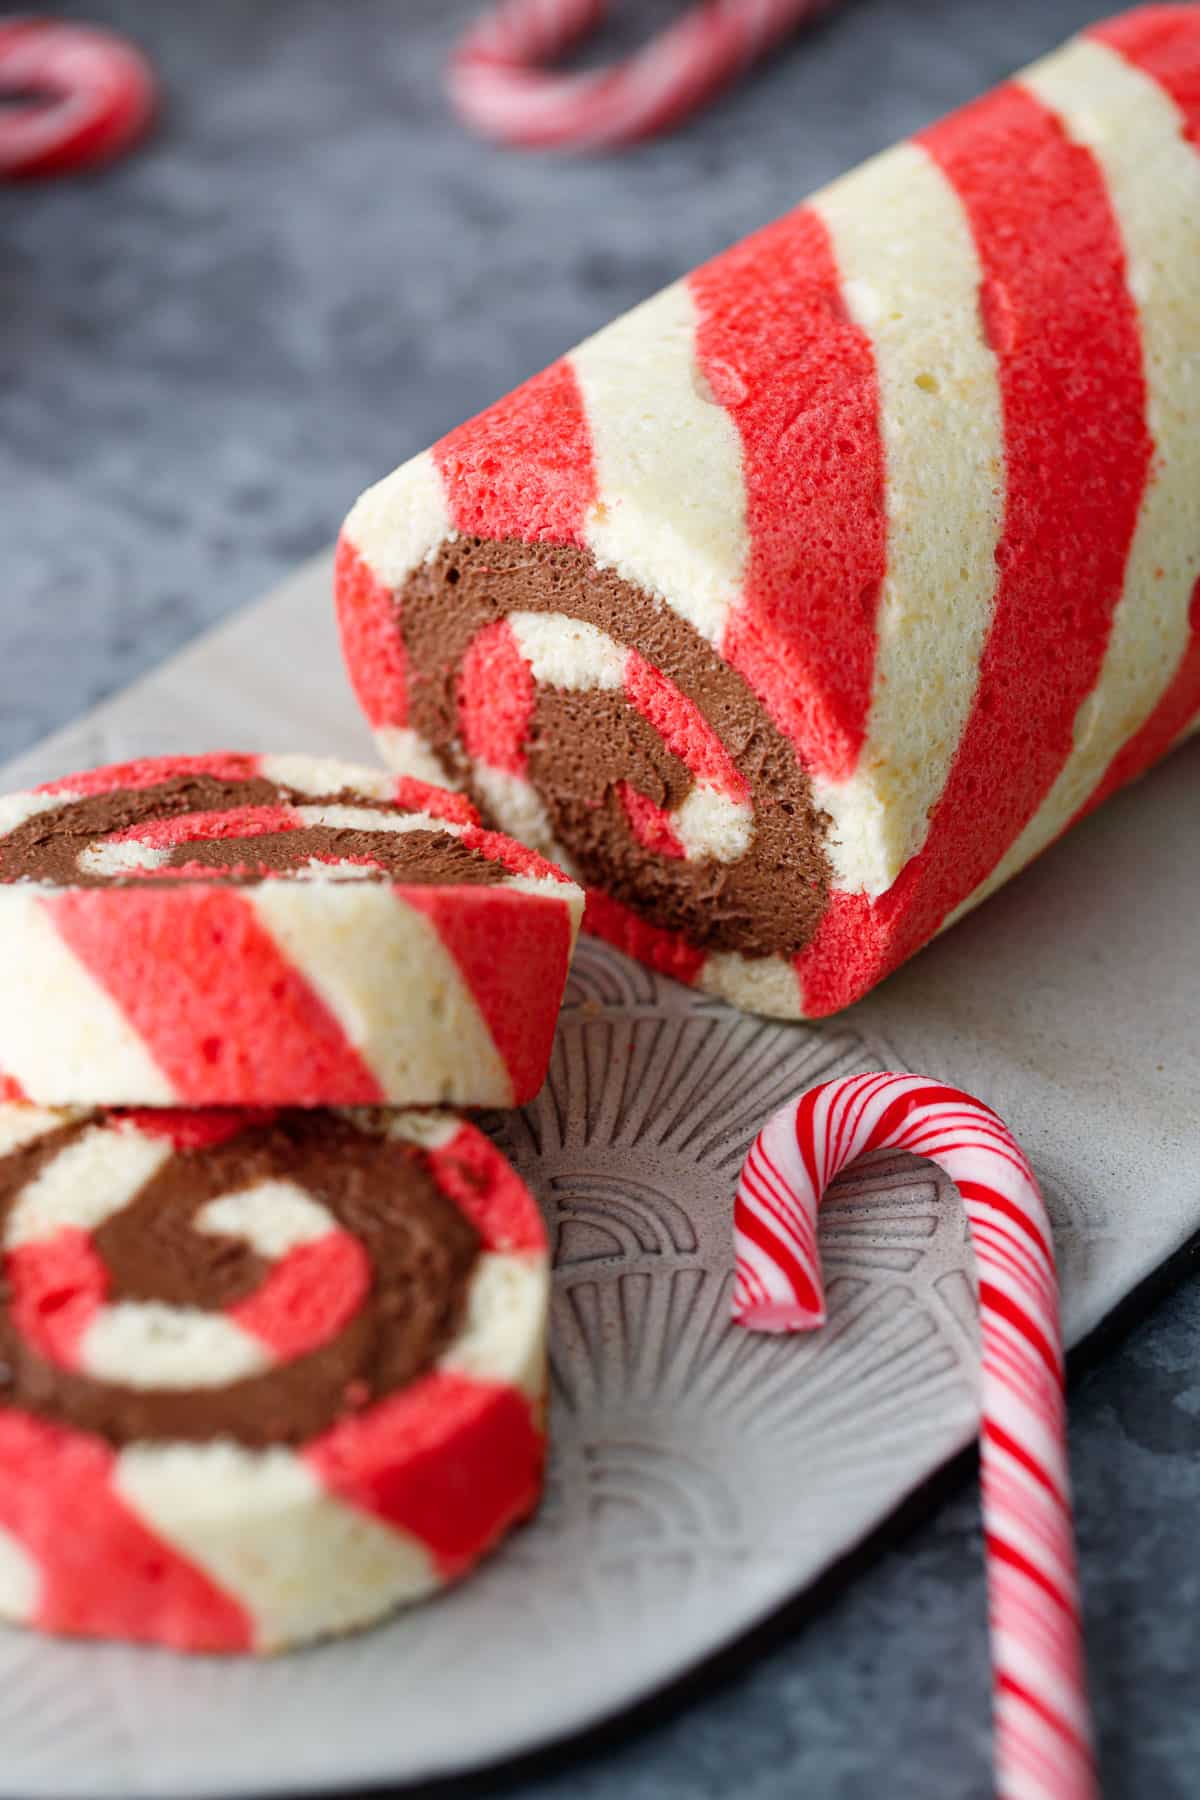
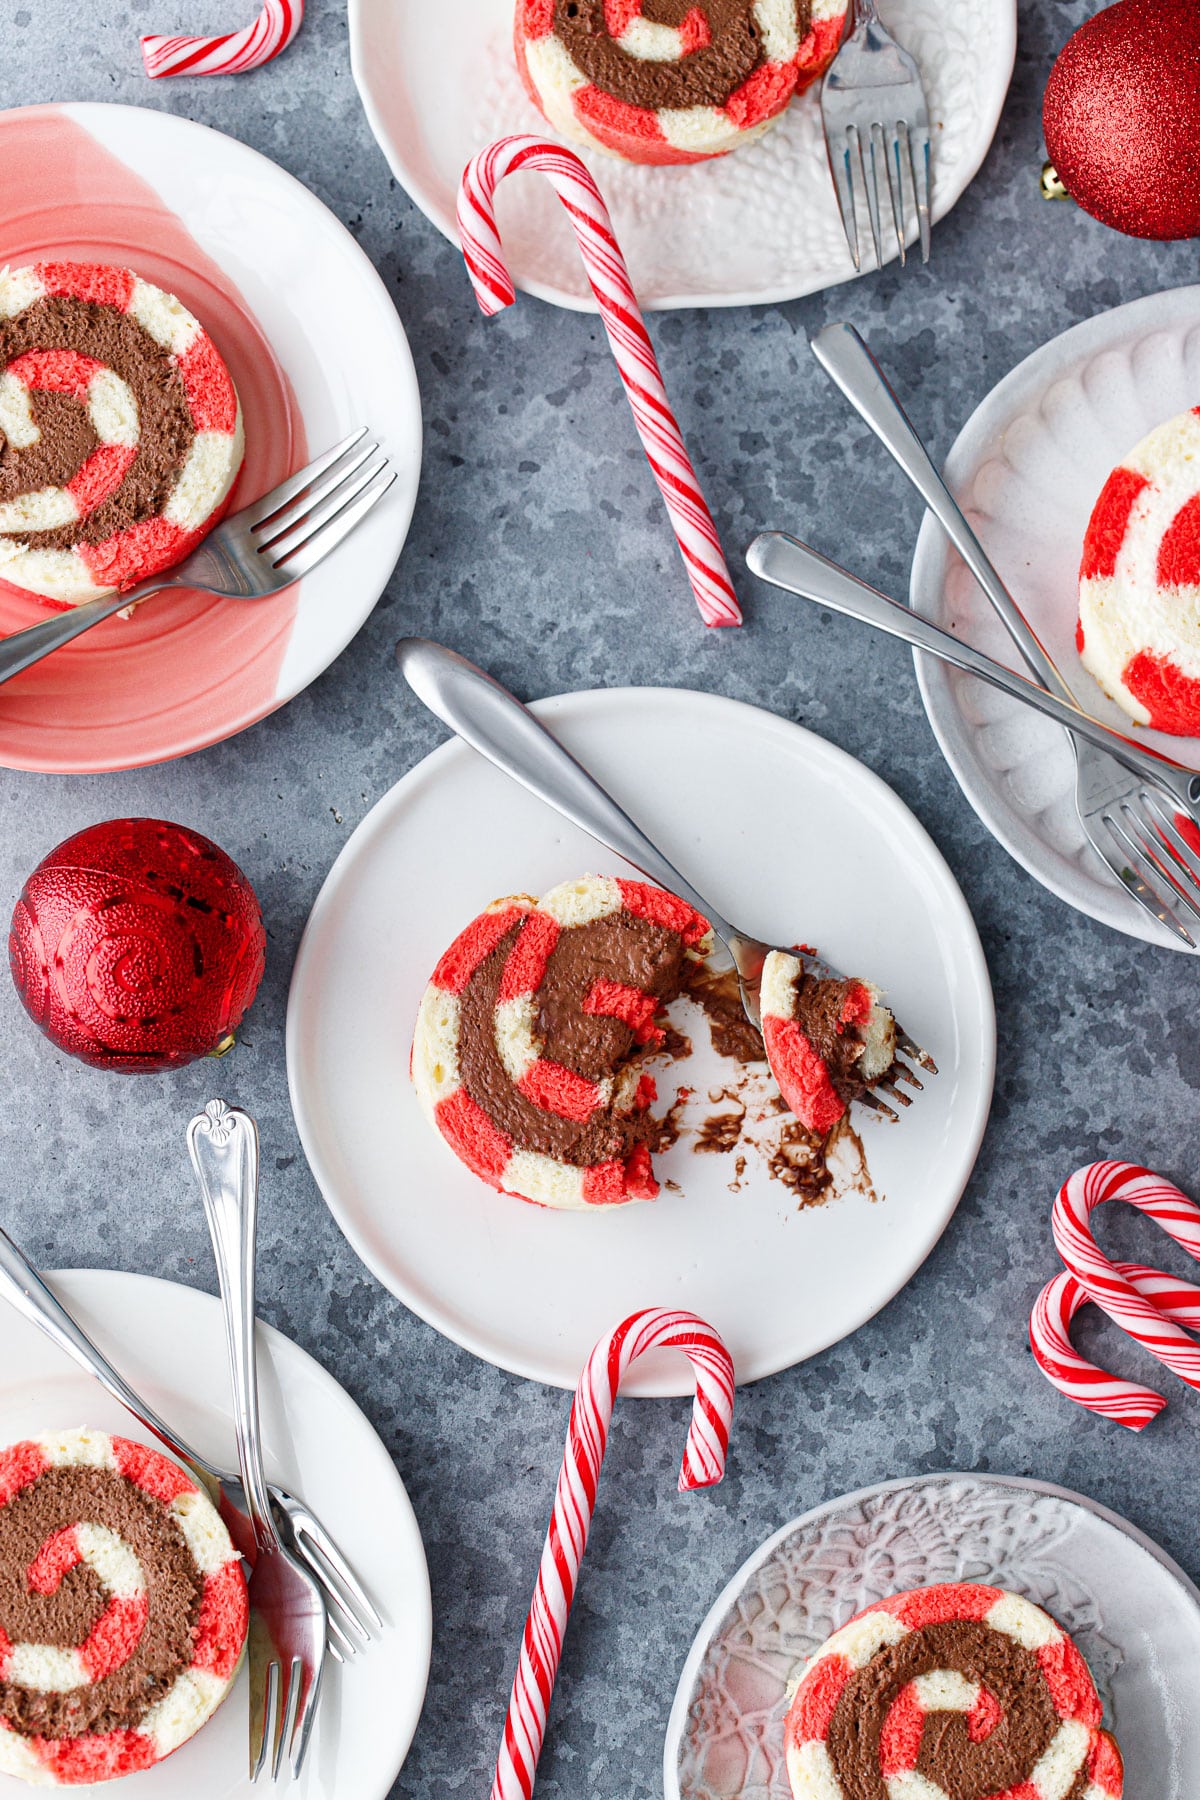
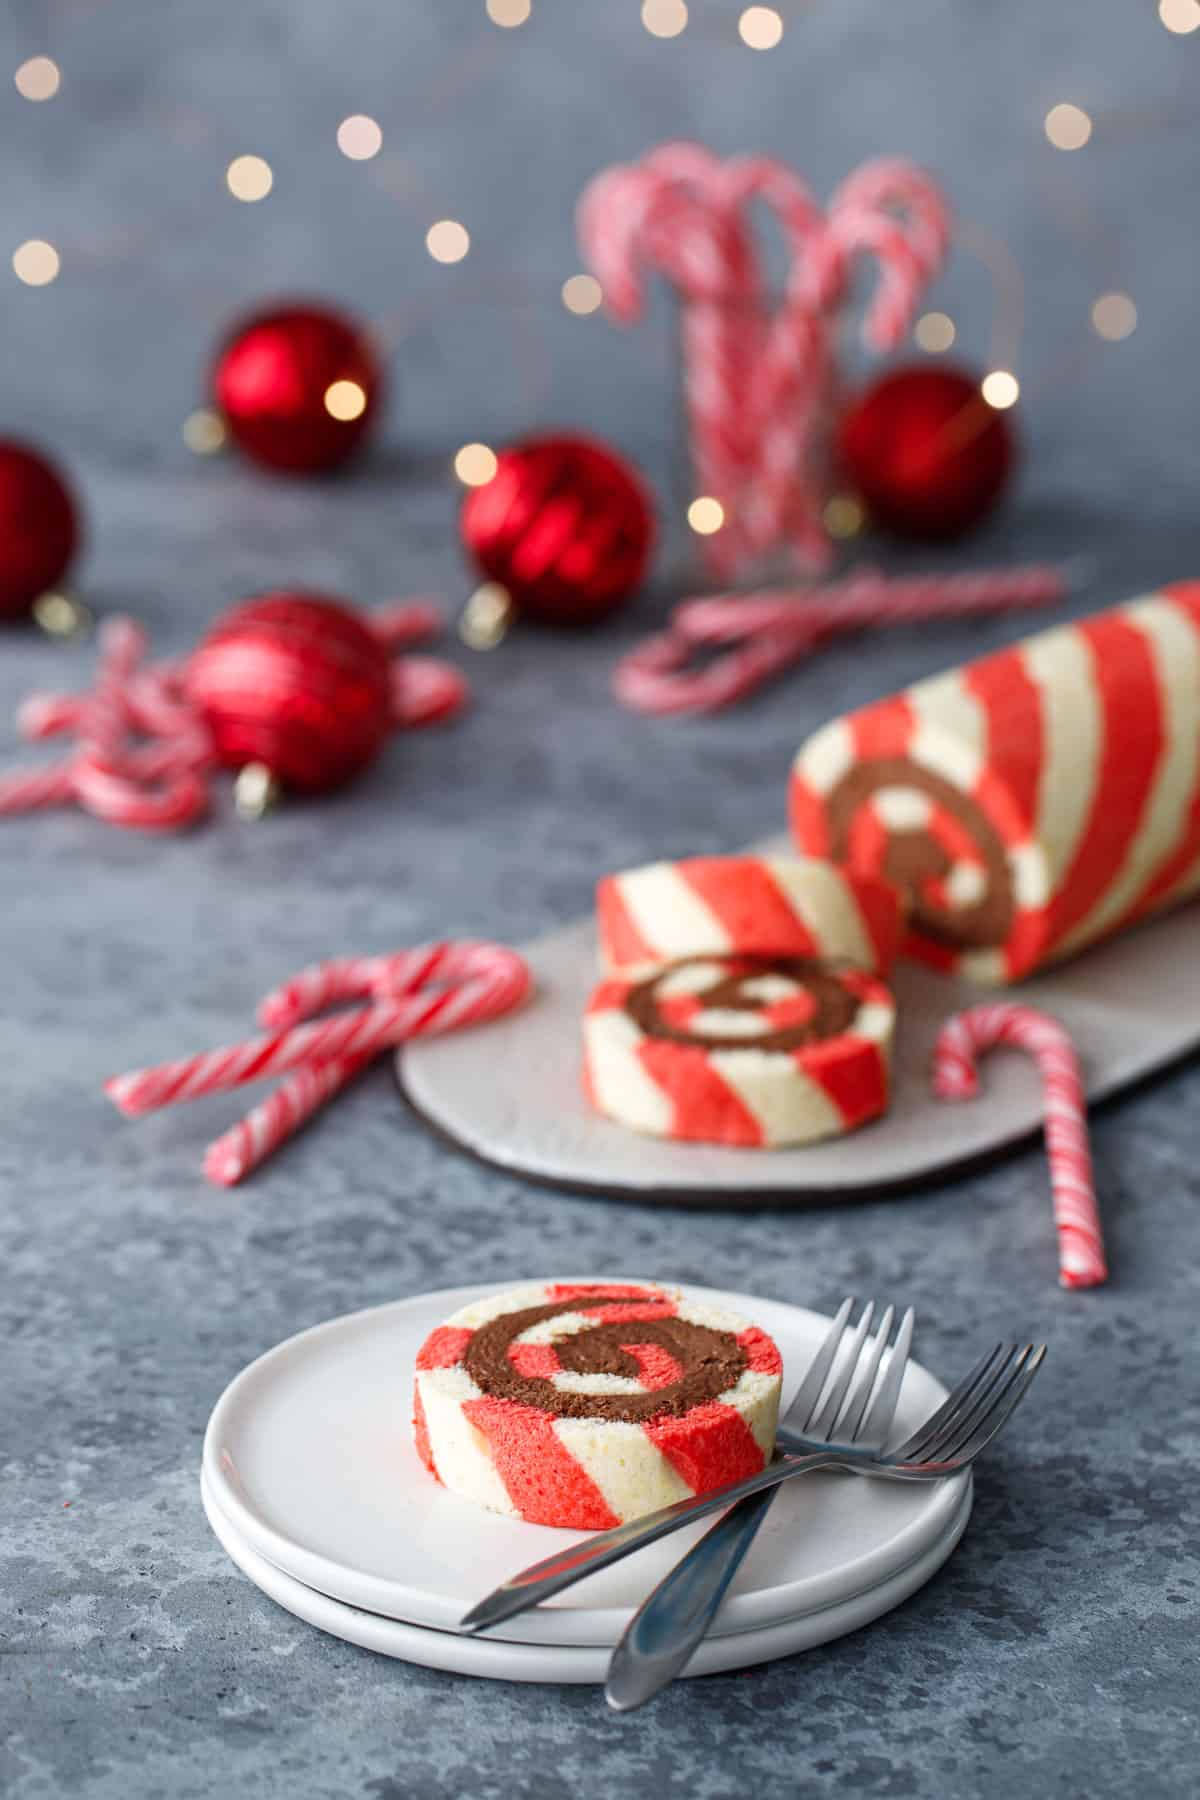
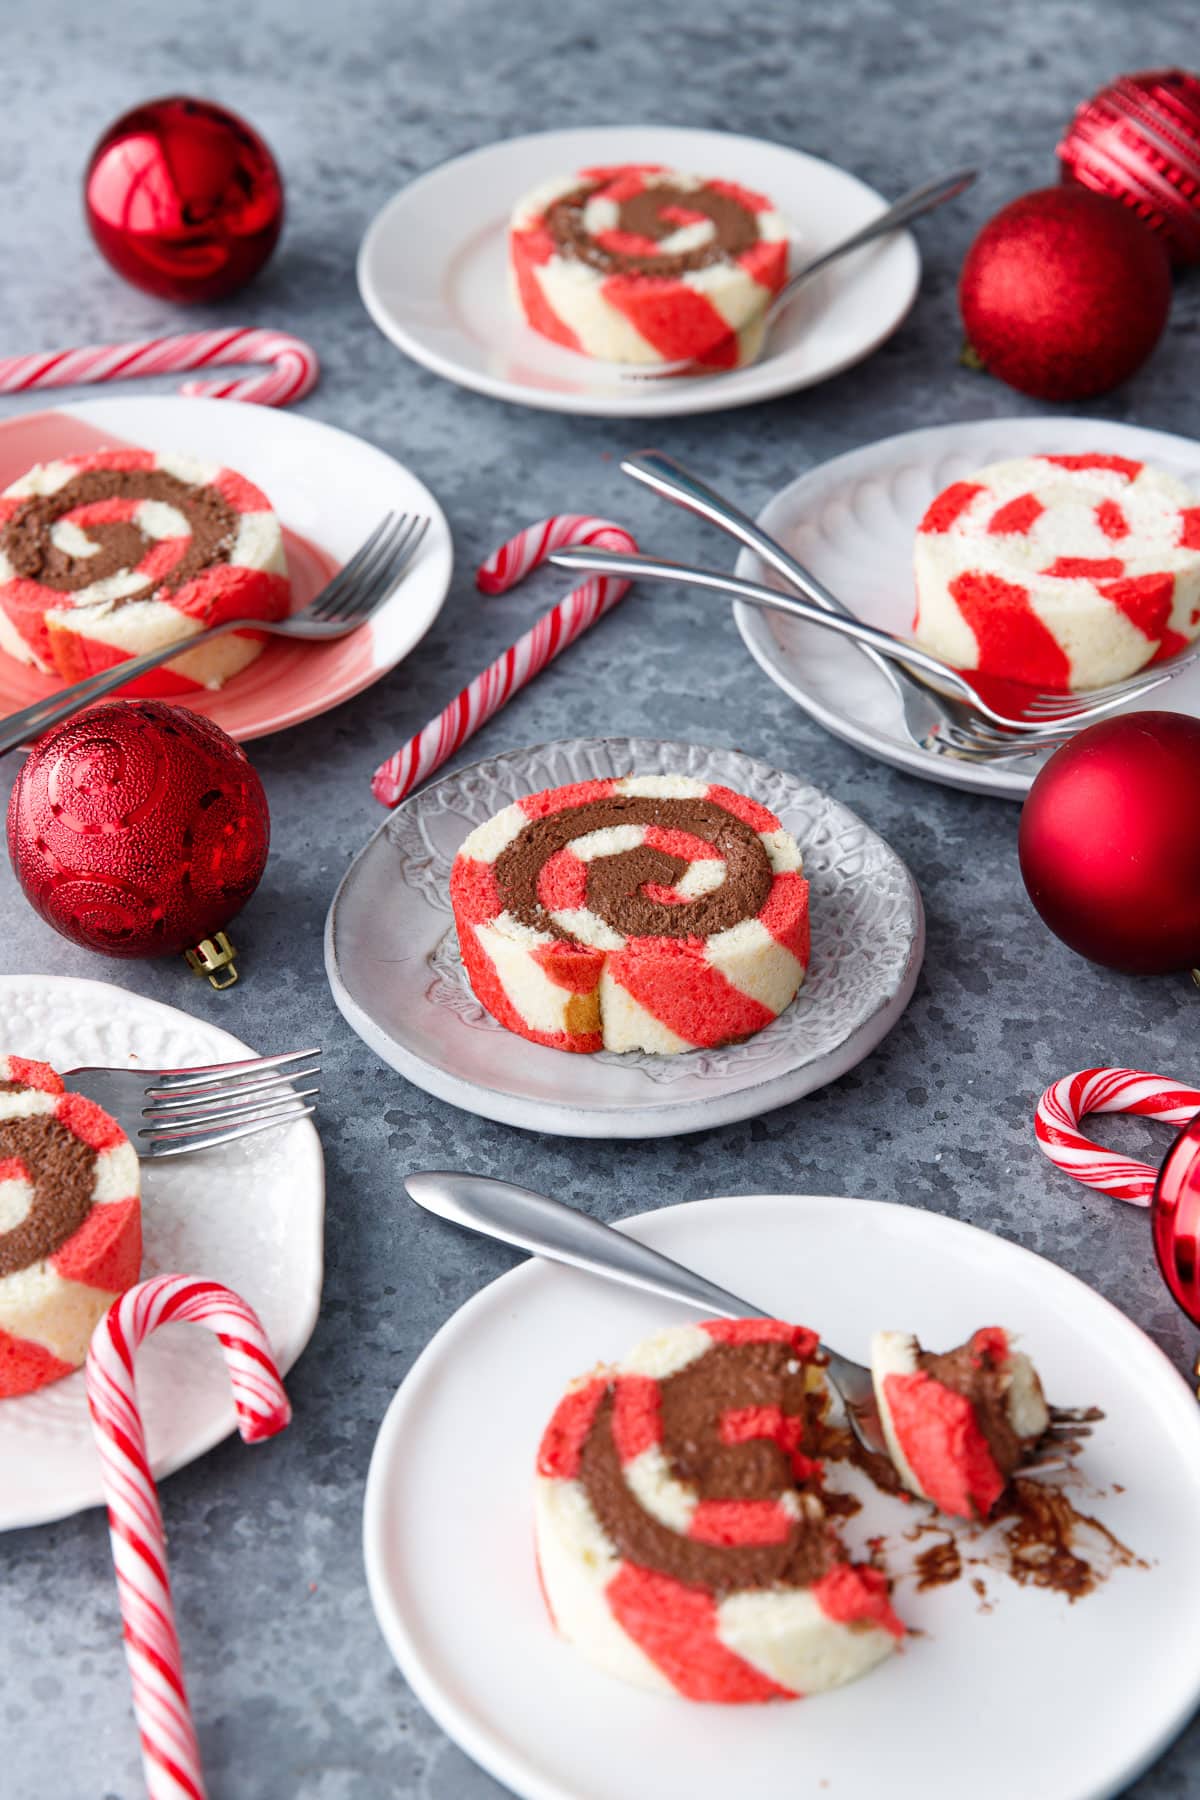
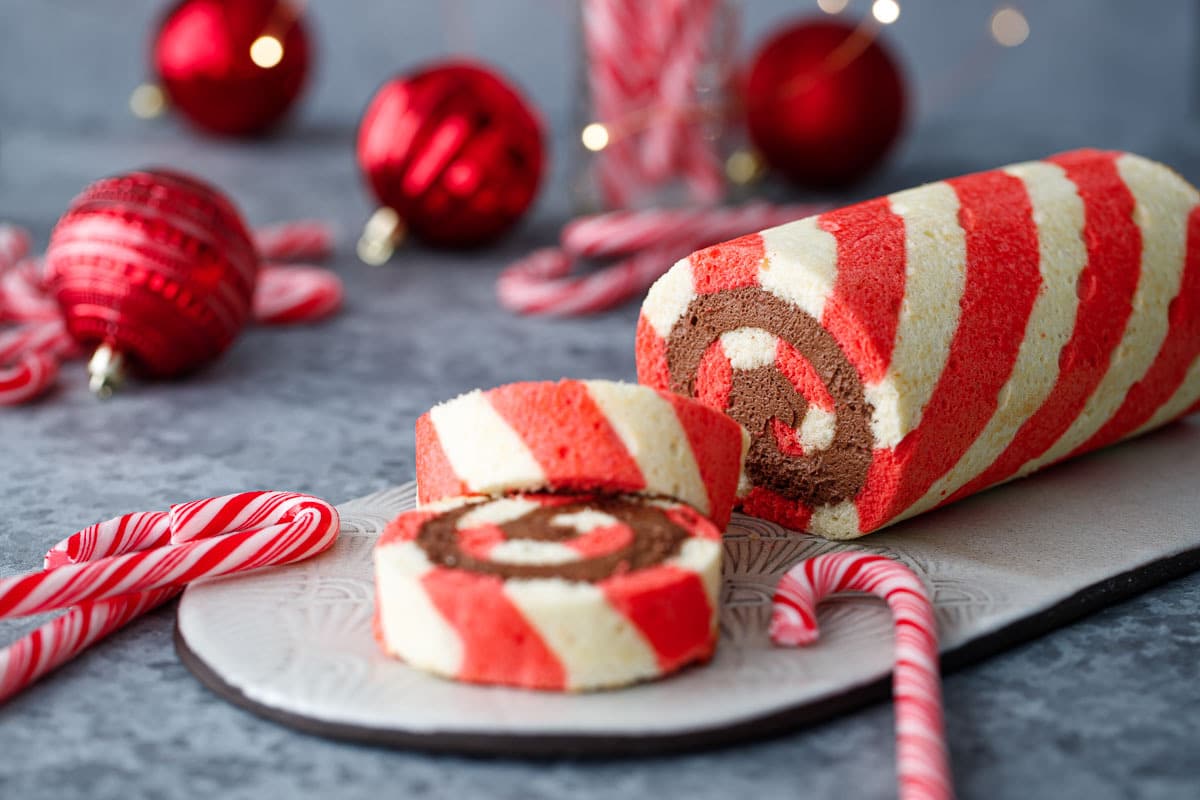
Here’s a perfect addition to your Christmas table: a light and fluffy chiffon cake roll made with red and white striped batter, and filled with a spiral of chocolate peppermint whipped cream for a festive cake that’s dressed to impress.
This peppermint roll cake looks and tastes like a giant candy cane (if candy canes were soft and fluffy and filled with chocolate peppermint whipped cream). While patterned cake rolls can be challenging to bake, the work can be split up into a few days (making them a perfect make-ahead dessert!)
Plus, I’ve included lots of tips and tricks and how-to photos in this post to help you succeed in making this impressive looking dessert for your holiday celebration!
Save this recipe for later!
This recipe was created in partnership with Amoretti (use coupon code LOVEANDOLIVEOILFREESHIP for free shipping on your order!) All opinions expressed here are my own.
A festive holiday cake roll is quickly becoming a household tradition around here. My own version of the yule log, if you will (this one not quite as obviously log-like as my chocolate chestnut cake roll which has a literal wood grain design baked right in).
I love Japanese-style cake rolls like this because they aren’t overly sweet (not to mention they’re just gosh darn cute). If you are the kind of person who finds most buttercream-frosted cakes far too sweet, chances are you’ll love this style of cake!
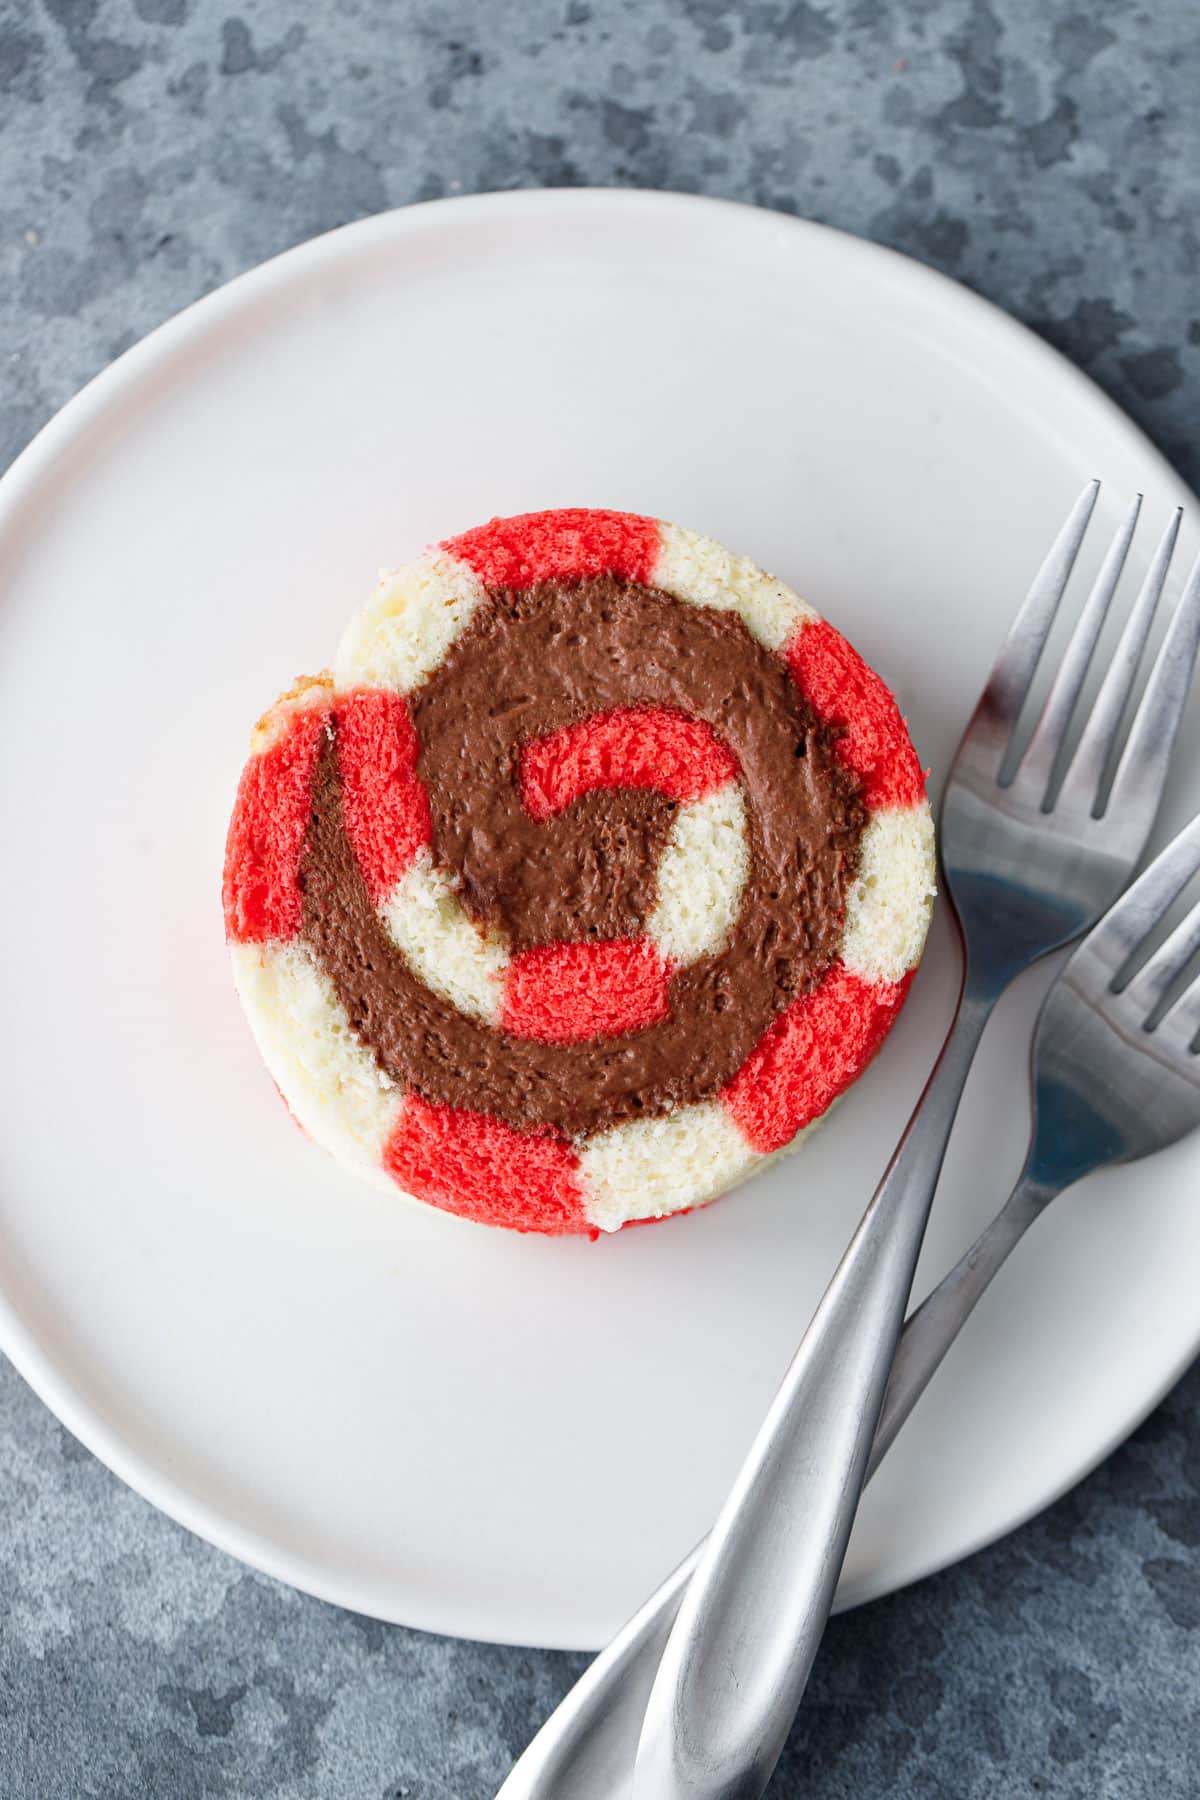
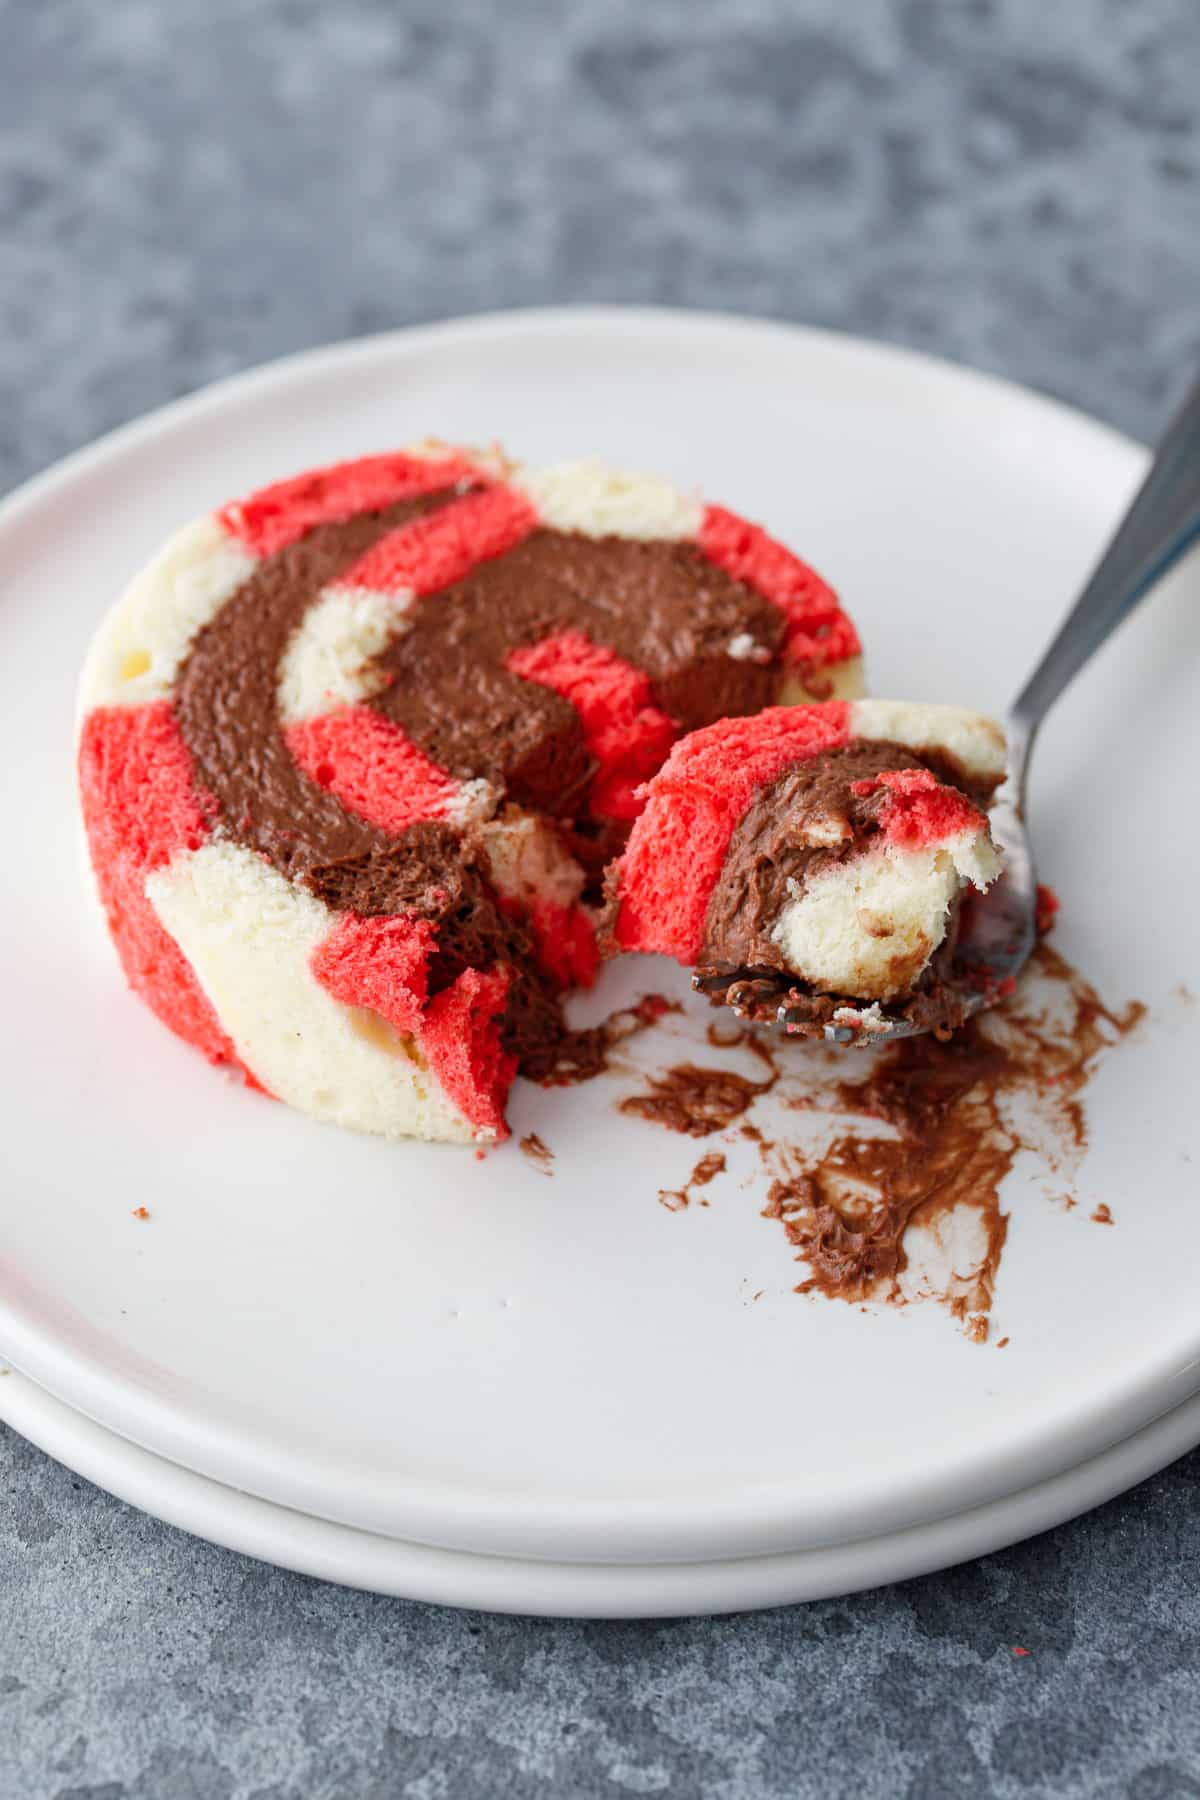
The cake itself is lightly sweetened and pillowy soft, with a hint of vanilla and peppermint in the cake itself, and then filled with a chocolate peppermint whipped cream filling with an ultra rich chocolate flavor while still remaining incredibly light (I think it tastes like a decadent peppermint hot chocolate that’s been whipped to a cloud-like fluff).
Let’s talk about our feelings for a second. Excuse me, I meant fillings, not feelings, because let’s face it, that spiral of whipped chocolate goodness is really the star of the flavor train here, packed with chocolate and a lovely peppermint flavor courtesy of Amoretti’s Peppermint Extract.
For chocolate lovers, you’ll be chuffed to know that it’s not just a whipped cream with some cocoa powder added. No, I’ve used dark chocolate in addition to Dutch process cocoa powder, for a rich and chocolately cream filling that falls somewhere between a whipped ganache and a whipped cream in terms of texture (it’s denser and silkier than plain whipped cream, but lighter and airier than a mousse or whipped ganache).
Like all my cake roll recipes, the whipped cream filling is stabilized with gelatin so it can support the weight of the cake and set just enough to achieve crisp, clean slices. I used leaf gelatin in mine (which I find to have a cleaner flavor), but powdered works just fine too.
The gelatin stabilizes the cream so it’s thicker and more stable than regular whipped cream, making it easier to fill and roll up in the cake. But that stability also makes it incredibly versatile.
Honestly you could use the chocolate peppermint whipped cream on its own, maybe spooned on top of a slice of chocolate cream pie or a warm brownie, piped onto cakes or cupcakes (it’s sturdy enough to hold up to piping), or even dolloped on top of a steaming cup of homemade hot chocolate (may as well add a bit of peppermint extract to that as well).
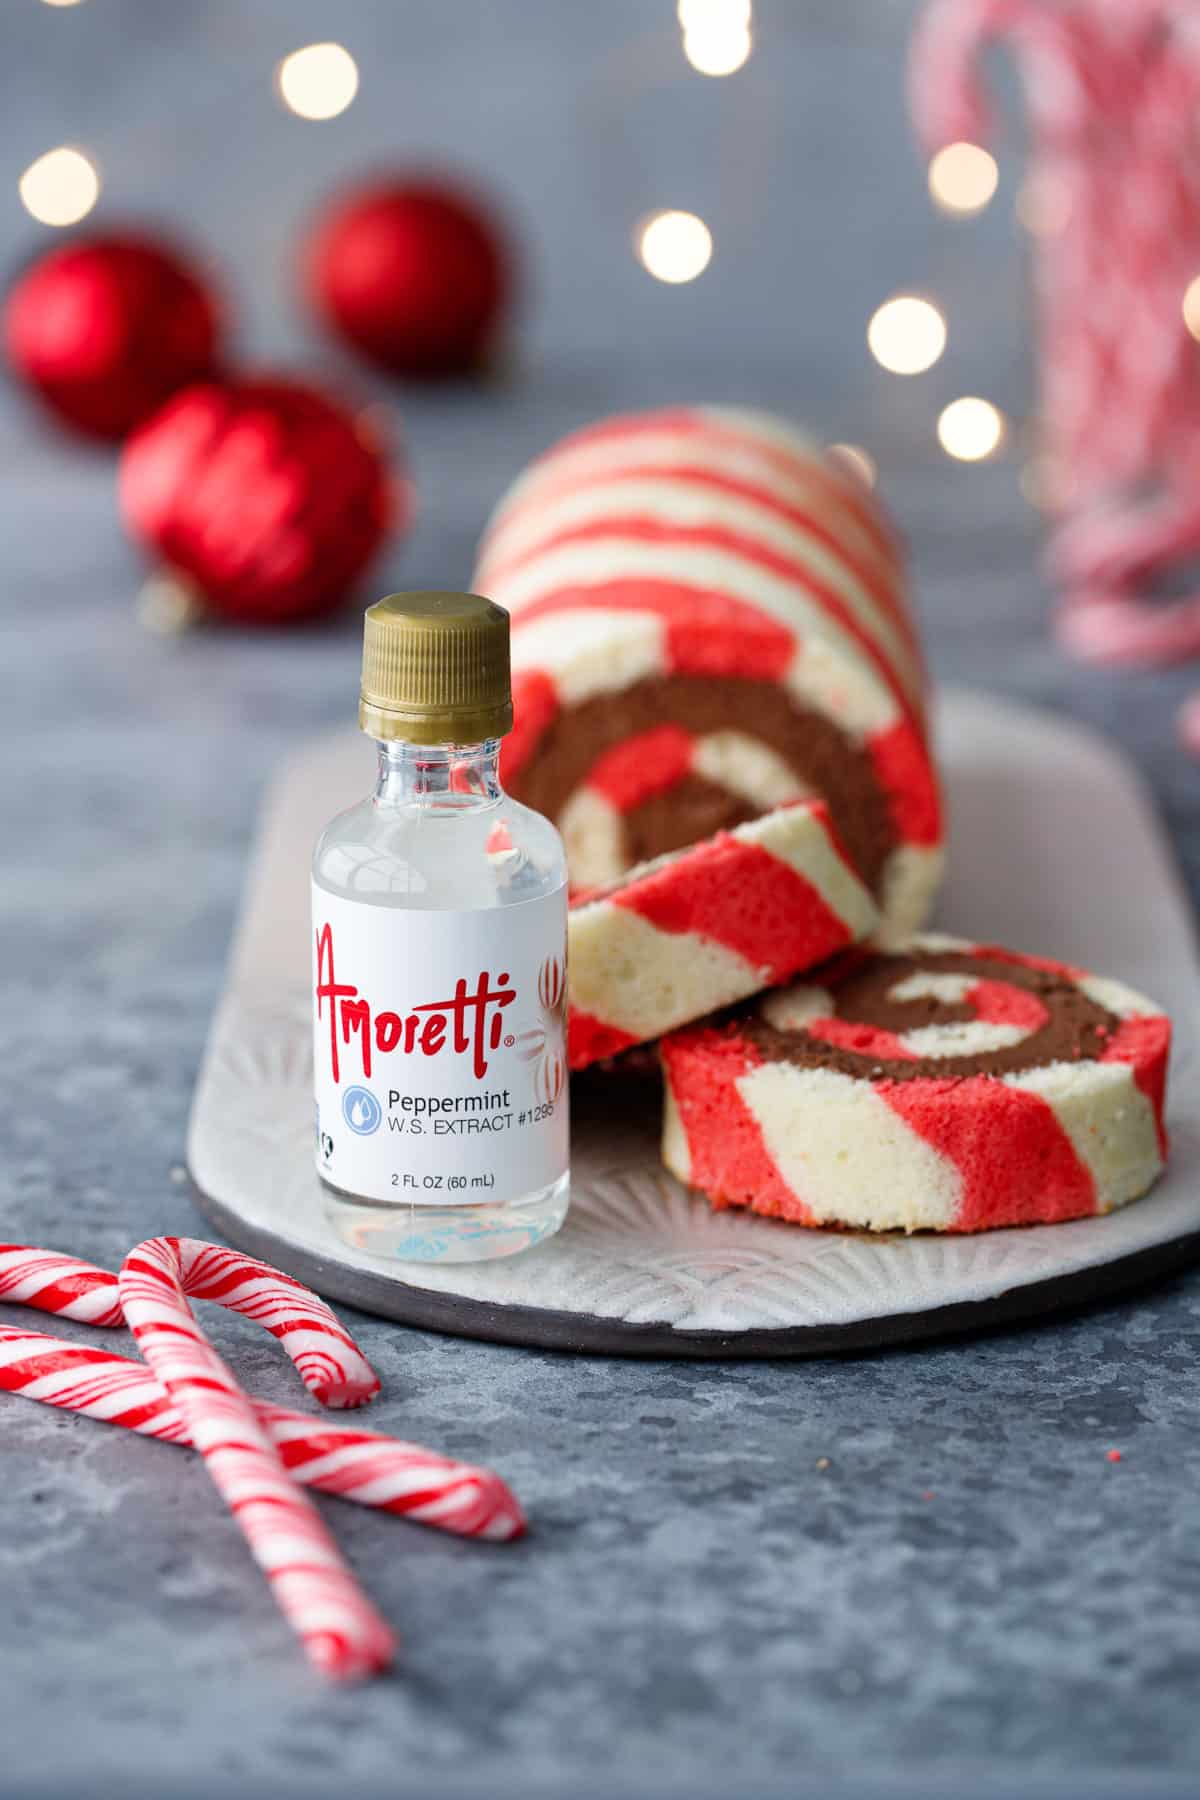
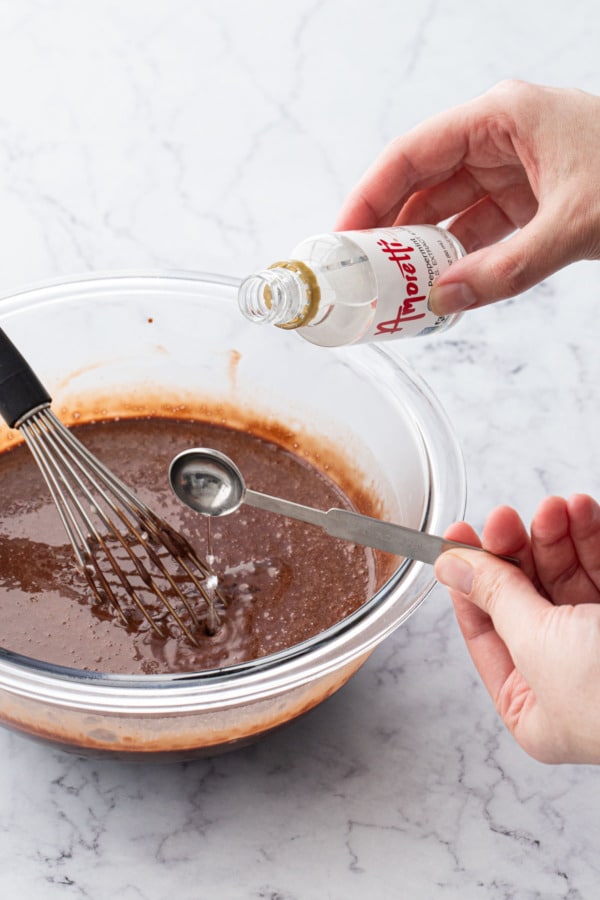
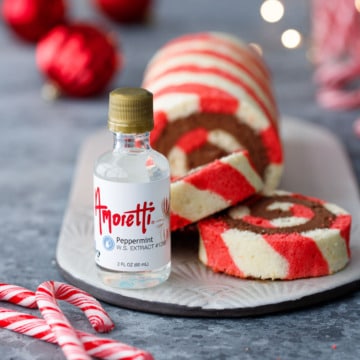
The festive peppermint flavor comes from Amoretti’s Water Soluble Peppermint Extract. It’s your classic peppermint flavor (think candy cane), with a fresh, minty brightness and no harsh aftertaste. Peppermint can be a very tricky flavor for this reason, and the Amoretti extract strikes just the right balance.
This is a highly concentrated extract so a little goes a long way, so unless you’re baking peppermint cake rolls on the regular, one 2oz bottle will likely last years.
Use coupon code LOVEANDOLIVEOILFREESHIP at Amoretti.com for free shipping on your order!
I used the Amoretti Peppermint Extract in the chocolate whipped cream filling, but also a little bit in the cake itself, along with some Amoretti Natural Vanilla Bean Artisan Flavor to help round out and add an almost marshmallow-like undertone to the prominently peppermint flavor. Vanilla and peppermint just work together like that, like some sort of sugary super-duo or something.
This style of cake roll utilizes a basic chiffon cake base, which is leavened with egg whites and made with oil instead of butter, which helps the roll stay soft and flexible so it doesn’t crack. I personally don’t like all egg-white chiffon cakes, so I make use of the yolks as well (though only 2 in this one so the color stays brighter white).
If you’re looking for uses for the extra egg yolks, might I recommend a double batch of my Caramel Pumpkin Cookies or M&M Sugar Cookies?
While many people have made and loved my other roll cakes (the Strawberry Cake Roll is especially popular), it’s also one of my trickier recipes, as the cake flour called for in the recipe simply can’t be swapped with AP. It doesn’t just change the texture of the cake roll, it deflates the batter, resulting in a too-thin layer of cake that’s not as light and fluffy as it can be. No one wants a dense and gummy cake roll!
With this in mind, I set out to make this year’s cake roll with all-purpose flour from the get-go, ultimately landing on a mix of AP and cornstarch to help lower the protein. This year’s version just about did me in, but seven rolls of cake later (yes, I said seven), the final version is not only adorable and delicious, but also totally doable with AP flour.
In the end, the other main ingredients of the recipe remain unchanged (it’s basically a chiffon cake made with oil and leavened with egg whites), though the proportions are slightly different, including more liquid and an extra egg white to give some the coarser AP flour some extra lift.
I also used more egg whites than yolks this time, since I wanted the white batter to be more distinctly white rather than off-white or yellow (this is one situation where I recommend using cheap grocery store eggs, since the lighter colored yolks won’t tint the batter like the deep orange color of organic, grass-fed egg yolks tend to do).
I’m confident this new and improved cake roll recipe will prove to be much more manageable for home bakers, without the need to go out and buy a specific kind of flour.

As for the striped design, I’d already decided on peppermint for my flavor, and thus wanted red and white stripes on the cake roll to make it look like a giant candy cane.
I first tried the same striping technique as my pumpkin cake roll, piping different sizes of stripes in red batter, freezing them, then pouring the white batter over the top. But even with a solid 15 minute freeze, the stripes still got mushed around when spreading the white batter on top, and the results were just not very neat or nice looking in the least.
Then I tried making a stiffer design paste like the one I used for my strawberry and monstera cake roll designs, this time using various widths of painters tape as a template to get really crisp stripes of varying widths for a true candy cane effect. And while I loved how crisp the stripes were, because the design paste bakes to a thicker, firmer consistency, the larger stripes especially were prone to cracking when rolled.
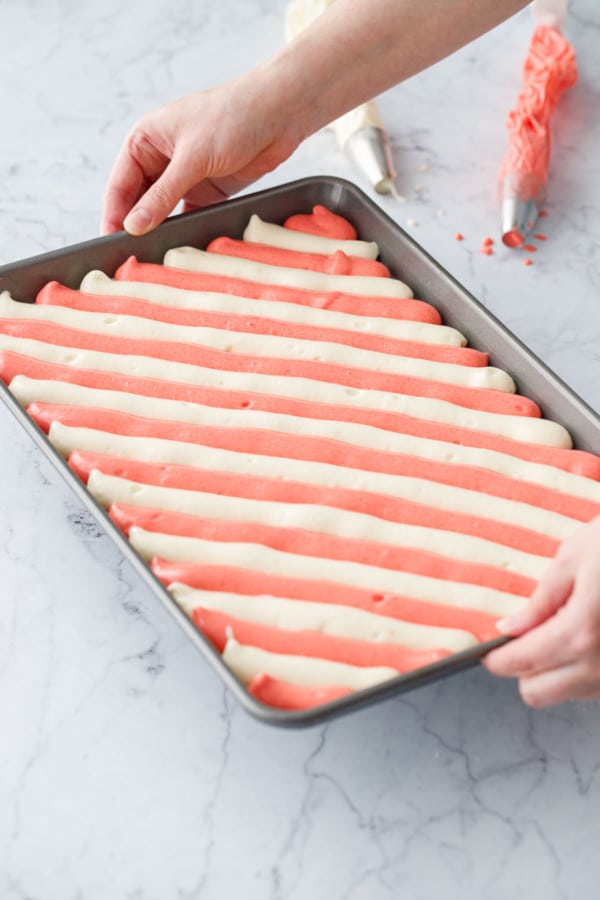
Ultimately, I ended up piping alternate stripes of red and white batter across the whole pan (and honestly, considering this is probably the easiest method of all, I really should have tried it first. Hindsight I guess.)
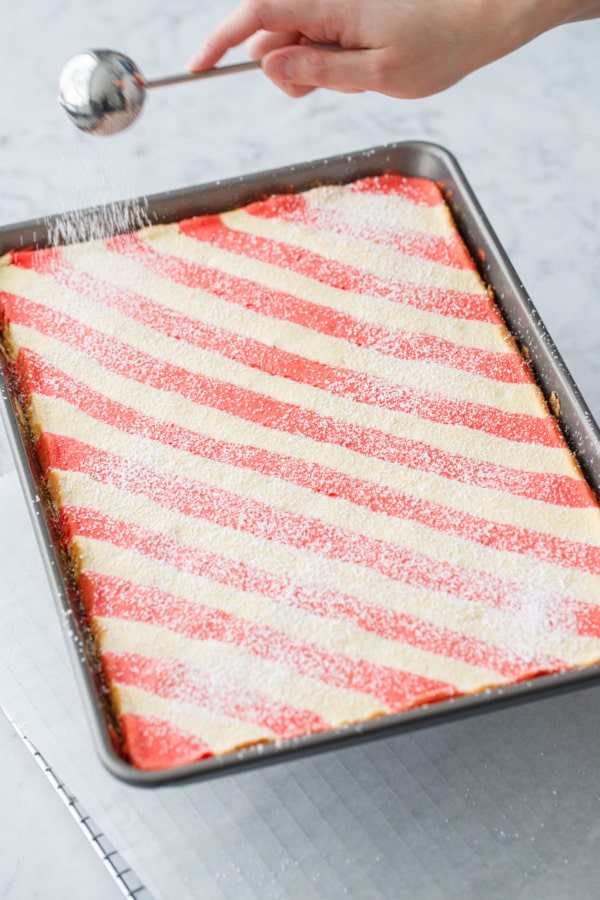
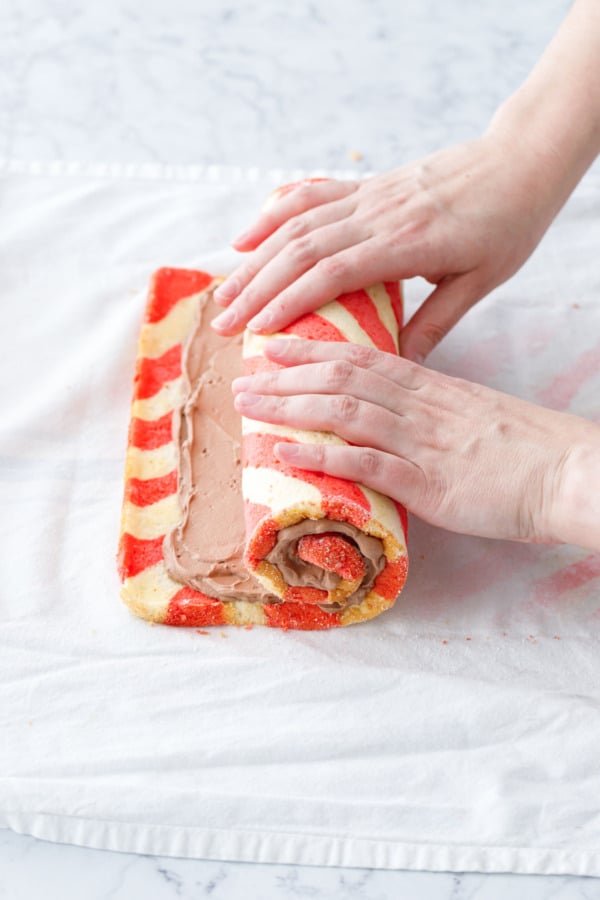
My favorite part about this striping method is that the red and white aren’t just on the surface, but rather go all the way through the roll, making for a really fun peppermint candy-like effect on the cut slices.
See what I mean?
The end result was well worth the seven test rolls it took me to get here.
(This is what I do best… I make all the mistakes first, so you don’t have to!)
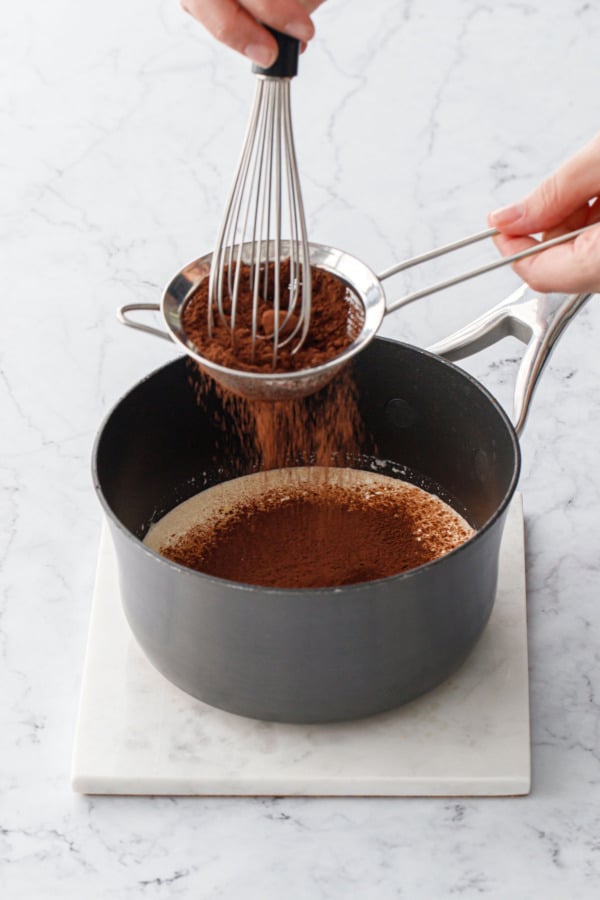
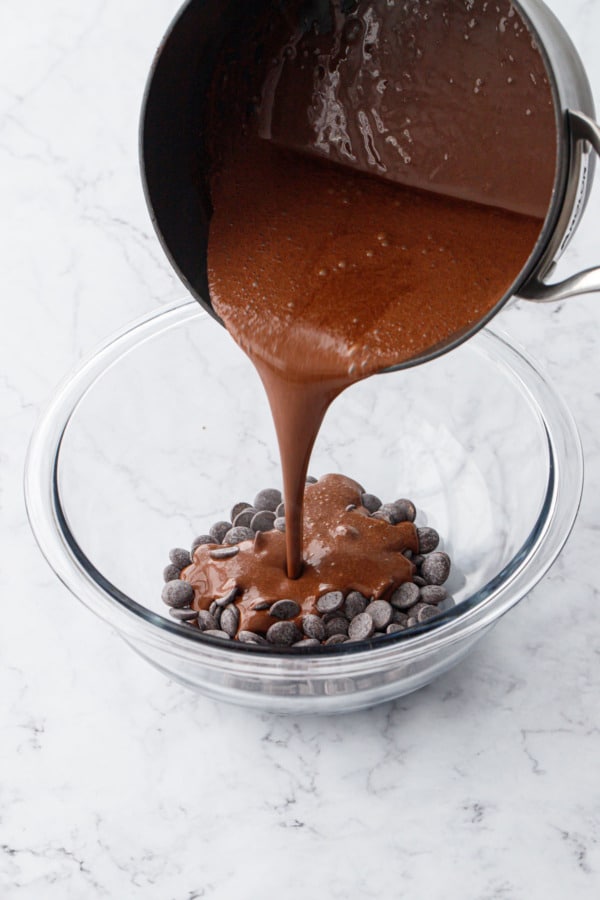
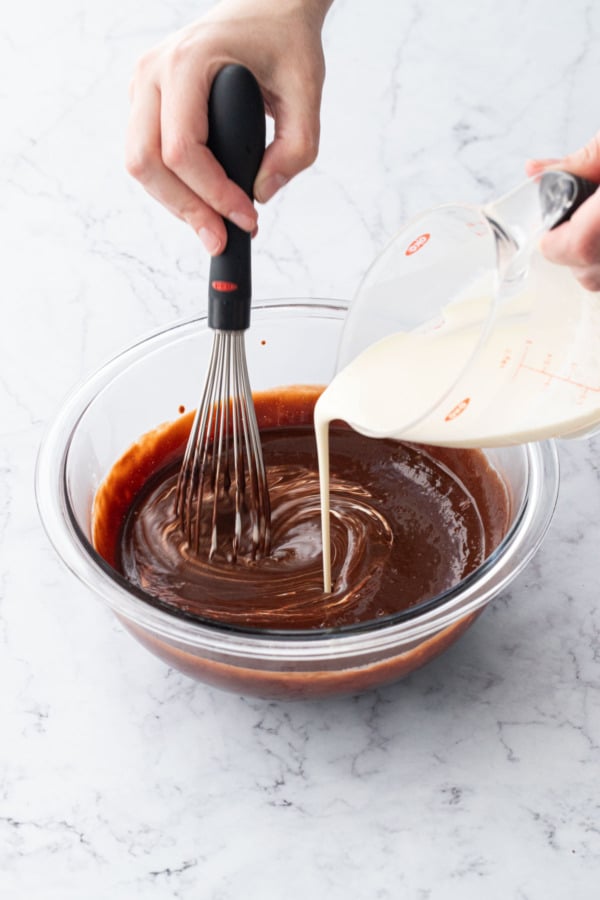
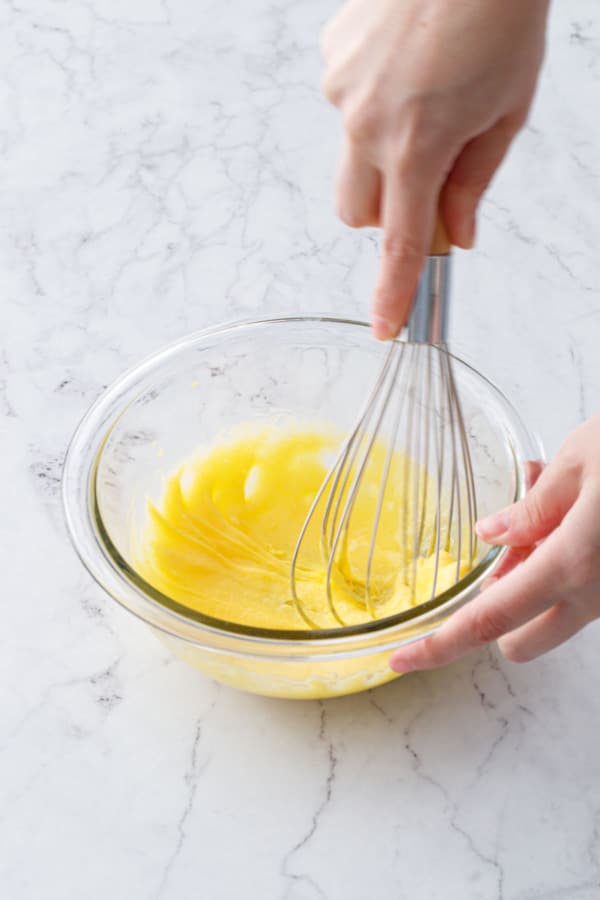
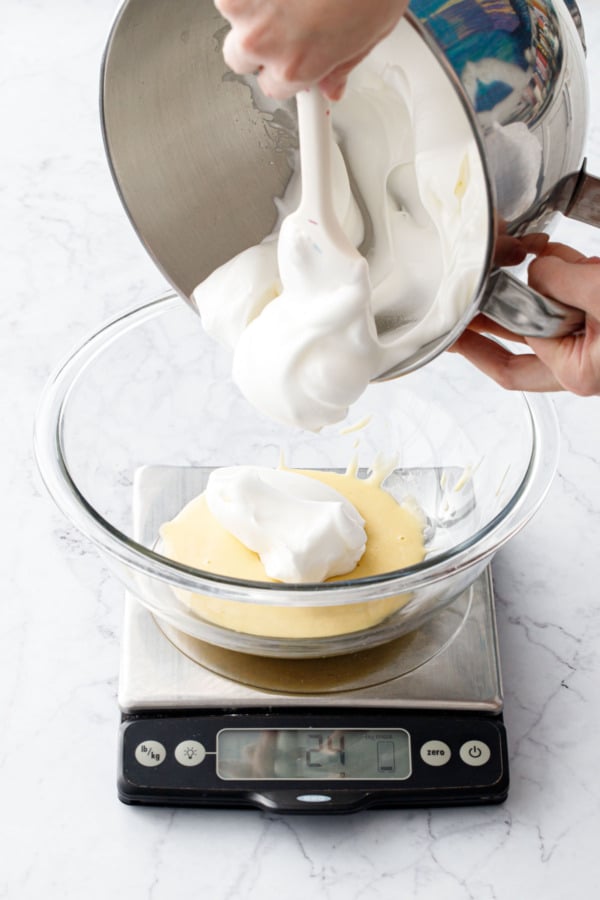
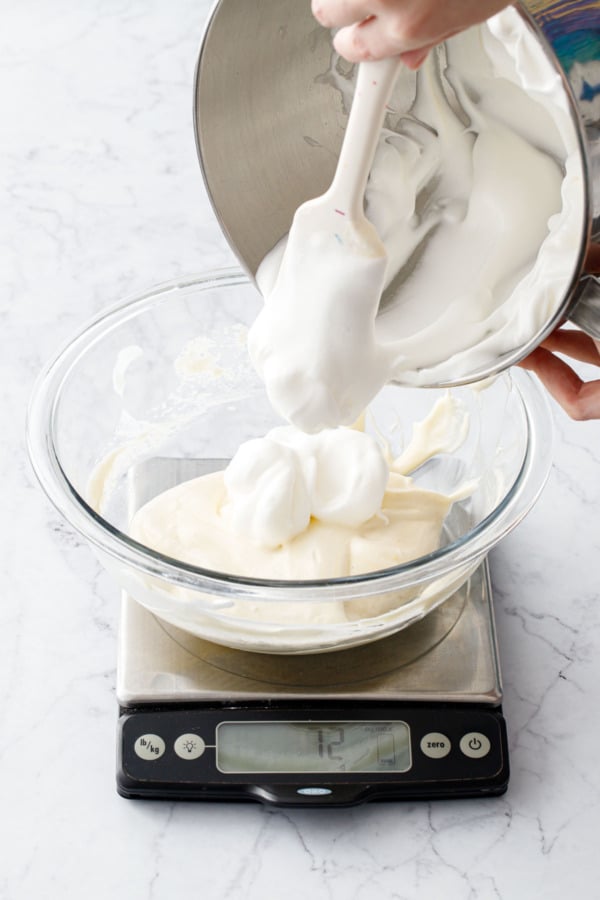
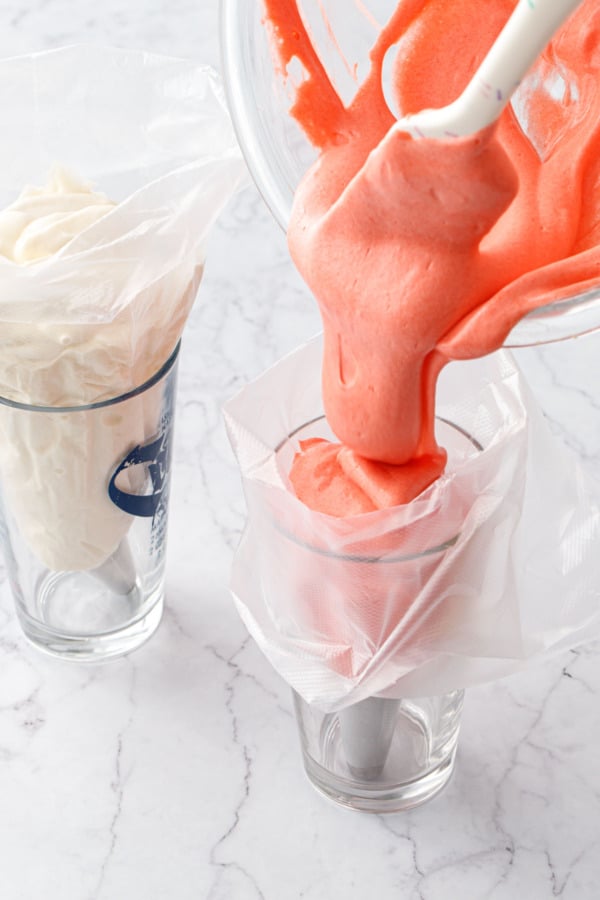
To make the chocolate peppermint whipped cream, combine heavy whipping cream, cocoa powder, and a bit of sugar and warm it on the stovetop, then add softened/bloomed gelatin, and pour it over some dark chocolate to melt it.
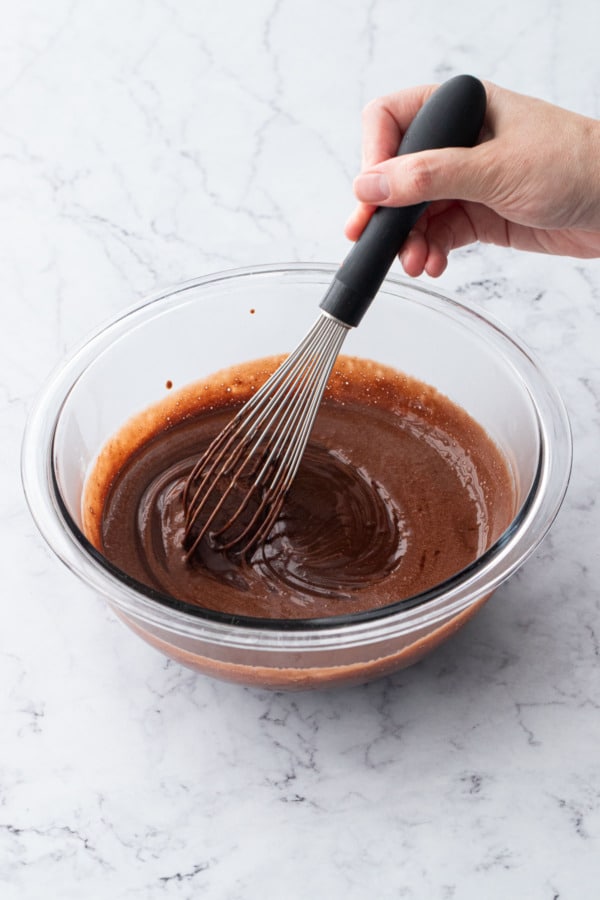
It’ll look and taste like a really rich, peppermint hot chocolate at this point, but resist the urge to drink it by the spoonful!
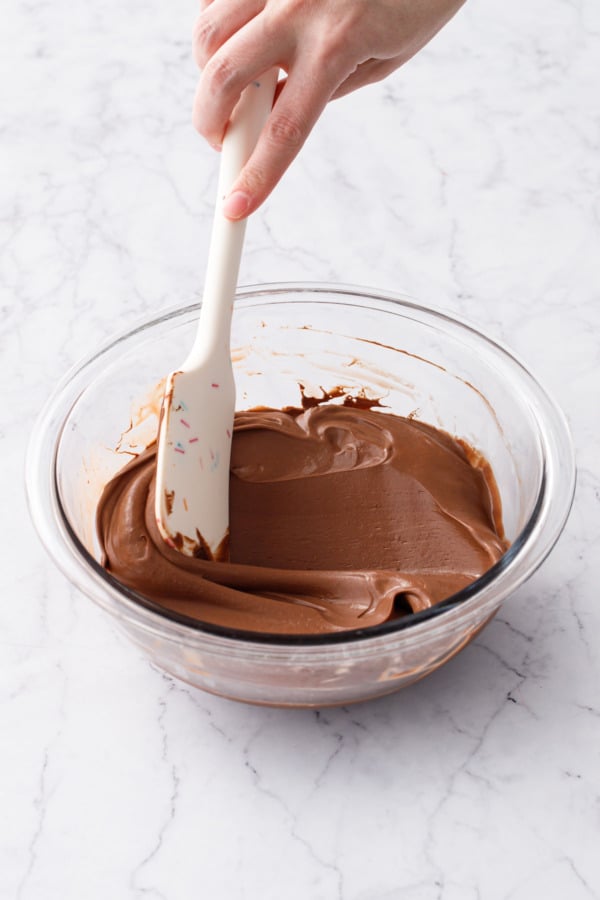
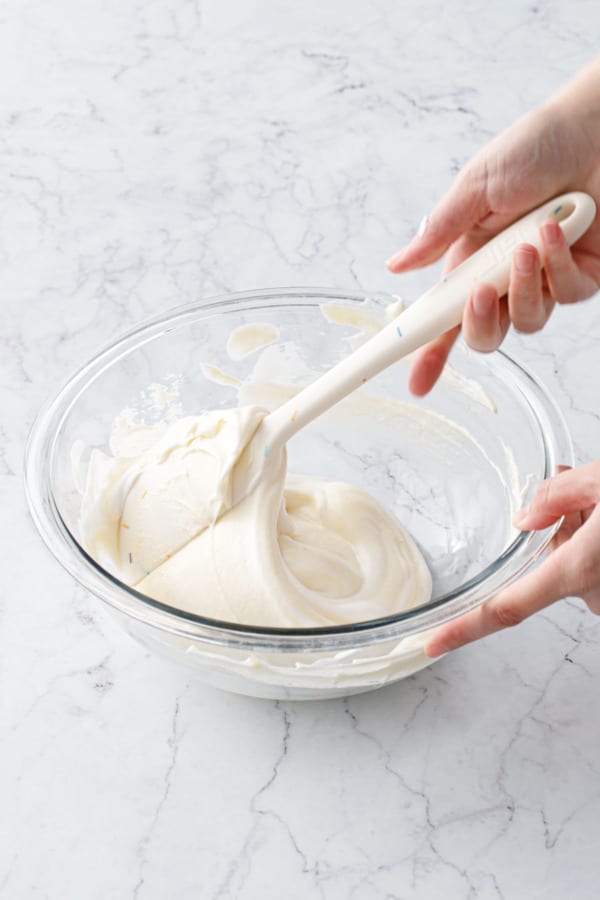
After an overnight chill (or a few hours at the very least), the filling is then whipped with an electric mixer fitted with the whisk attachment until thick and fluffy and holds stiff peaks (know that it’ll whip up much faster than normal whipped cream because of all the chocolate solids in there).
What you ultimately end up with is a hybrid whipped ganache/chocolate whipped cream of sorts that manages to be both light and rich at the same time, with a pronounced, multi-faceted chocolate flavor (since there’s both chocolate and cocoa powder in there) that pairs beautifully with the peppermint.
For a white chocolate variation, simply replace the dark chocolate with 100g of white chocolate, and omit the sugar and cocoa powder. The cream will be thinner and whip up lighter than the dark chocolate version, and with a milder white chocolate flavor, but will still whip up into a beautifully smooth and fluffy whipped cream.
Do be aware that the filling needs to be completely chilled, so plan to make it a day or two ahead of time if you can, but at the very least you need a solid 2-3 hours to chill it down fully. You can also treat it like an ice cream base and use an ice water bath if you need to cool it even quicker; you’re ideally looking for under 40 degrees, but the colder the better.

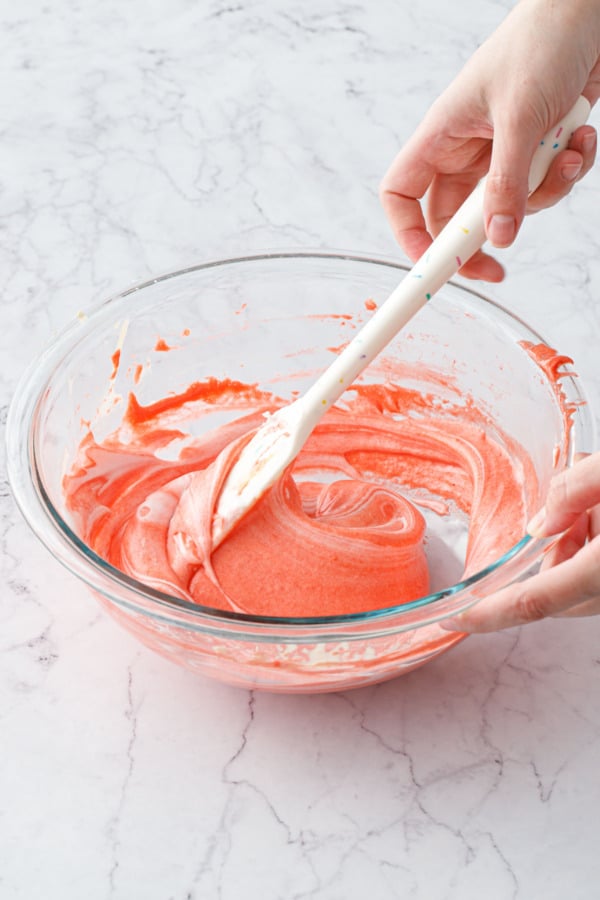
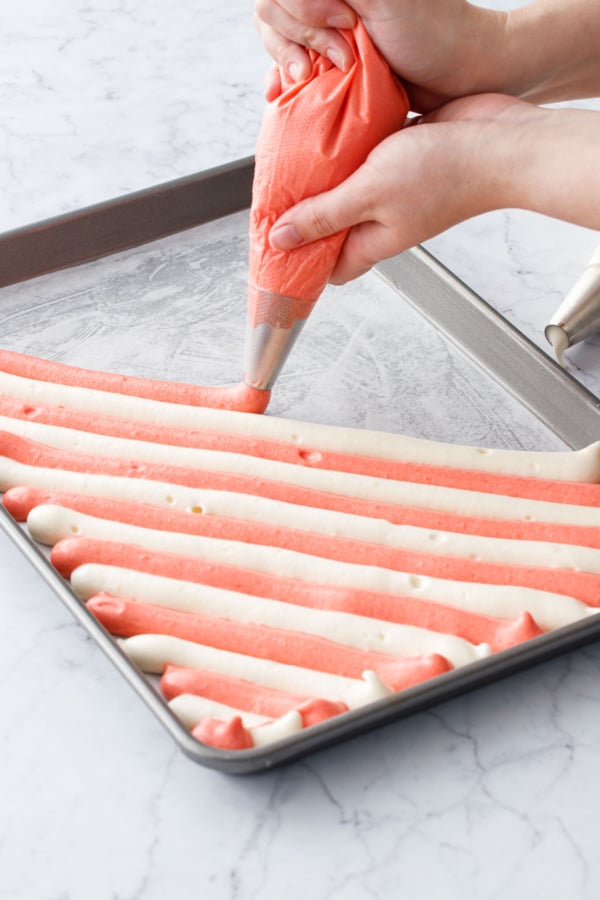
The stripes are achieved by piping alternating lines of red and white batter. You’ll need to split the batter in half before adding the egg whites (which helps prevent over-mixing), and then add red food coloring to one of the halves.
Transfer the colored batters to two piping bags fitted with large round piping tips (I used Wilton 1A/Ateco #806 piping tips which are about 14mm or 9/16″ in diameter). You’ll need 2 of them for this recipe (since you need to be able to pipe both colors simultaneously).
When piping, alternate rows of red and white batter diagonally across the pan. Try to pace yourself so you have just enough batter to fill the pan (but if you end up with a little leftover, that’s ok, your cake will just be slightly thinner; it’s better than running out of batter too soon!)
After piping the stripes, drop the pan once or twice from a few inches up. This firm drop will help the batter settle into the edges as well as pop larger air bubbles (I still had some air bubbles in mine, but not enough to ruin the effect).
During the testing process, I did make one roll with the egg whites beaten to medium instead of stiff peaks, and while this reduced the large air bubbles in the final cake quite a bit, it made the batter quite a bit thinner and harder to pipe (I couldn’t set the piping bag down or the batter just oozed right out). The final cake was also a bit thinner, as the softer egg whites didn’t retain as much air. So, up to you if you’re ok with a few bigger air bubbles in the final cake or not, but I found using stiffer egg whites made the piping process much easier.

Tips & Tricks
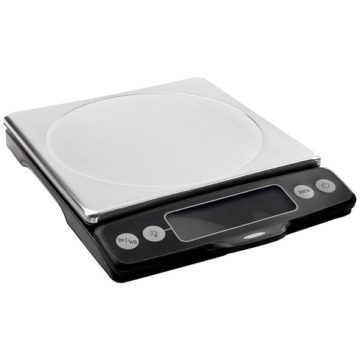
Make note of the tare weight of all your mixing bowls before you start baking! You can even write the weights on the bottom of the bowls in sharpie so you always have it handy. This way you can easily know exactly how much batter you have so you can split it perfectly down the middle. Same for the egg whites, if you know exactly how much you have, you can divide the beaten whites evenly among the red and white batters.
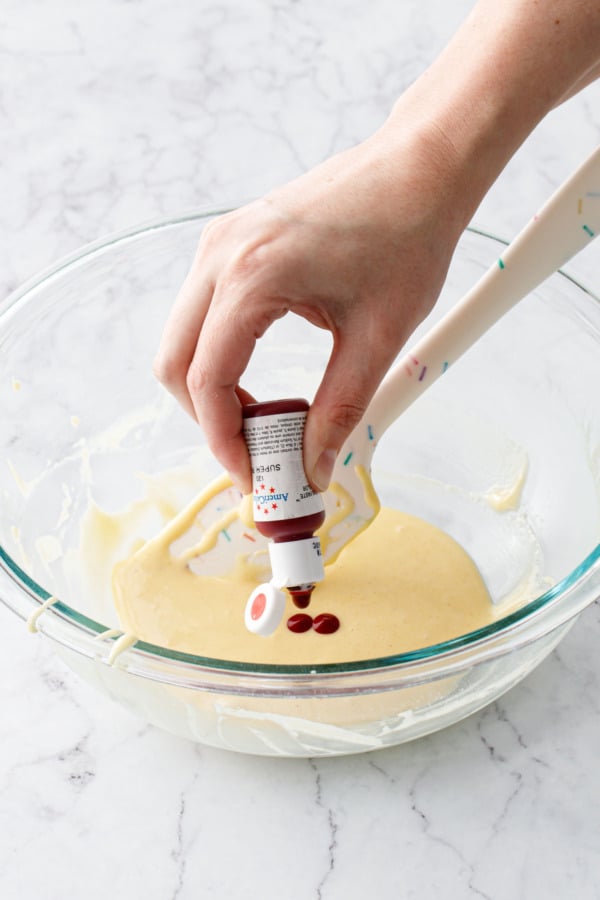
Add more red food coloring than you think you need, as the color will lighten significantly once you fold in the egg whites. I used 4 drops of Americolor Super Red gel food coloring.
If your egg yolks are particularly orange, you can add some white food coloring to the white batter to make it brighter in color and not quite so yellow.
Use a pencil and a ruler to draw a few diagonal lines on the underside of the parchment paper before you start piping your stripes; this will help you keep your lines straight and even across the entire pan.
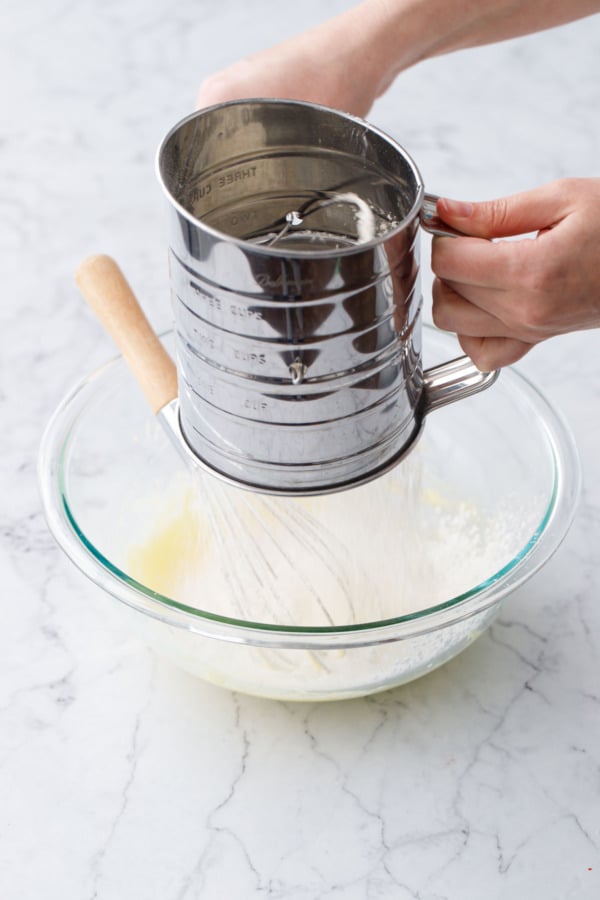
Don’t skip the sift! I sifted my dry ingredients twice, once to mix all the dry ingredients together, and then again into the bowl with the wet ingredients. Skip this step and you’ll most definitely have clumps of flour in your batter.
A Cut Above
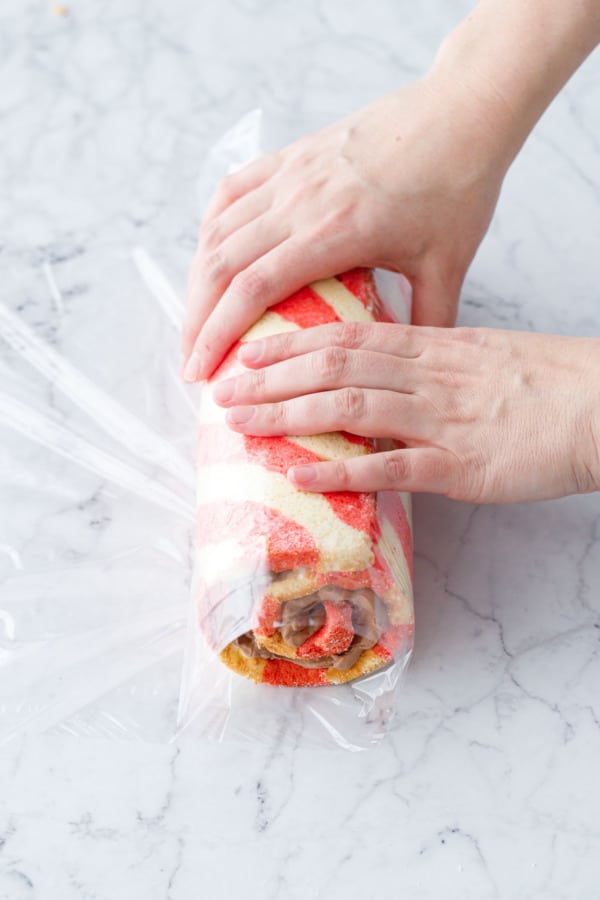
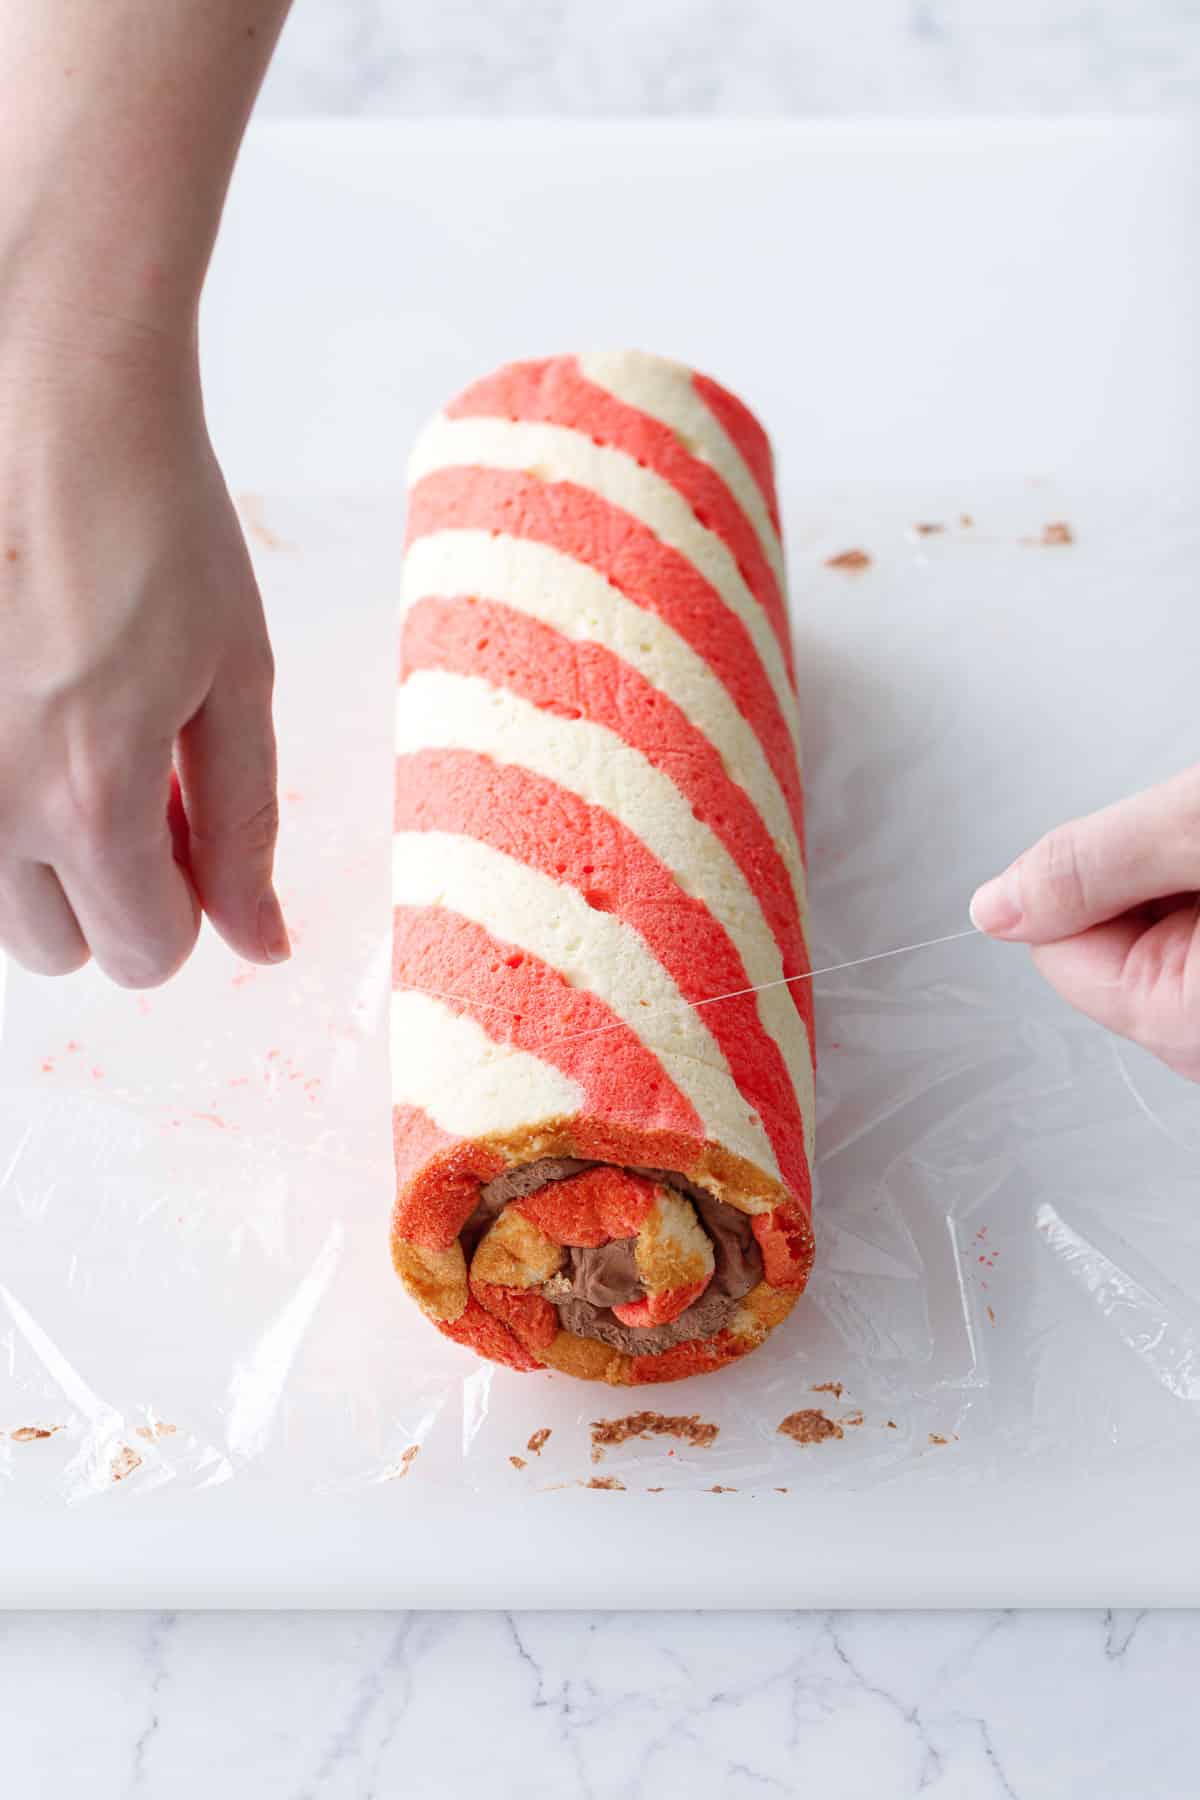
I found that the easiest way to get clean cuts from your cake roll is to use a piece of fishing line or dental floss (mint flavored is fine here because it’s already minty). Place a loop of floss under the cake roll, then cross over the top to make a loop. Pull ends firmly apart and you’ll end up with a neat, even cut that doesn’t squish the round shape of your cake roll.
I’ve used this trick before to make cinnamon rolls, but this was the first time I’d thought to try it on a cake roll and I was completely blown away.
For the cleanest cuts, also be sure you let your roll set fully before slicing, preferably overnight. The test rolls that I let sit overnight cut far cleaner than the rolls I tried to cut into after a few hours.
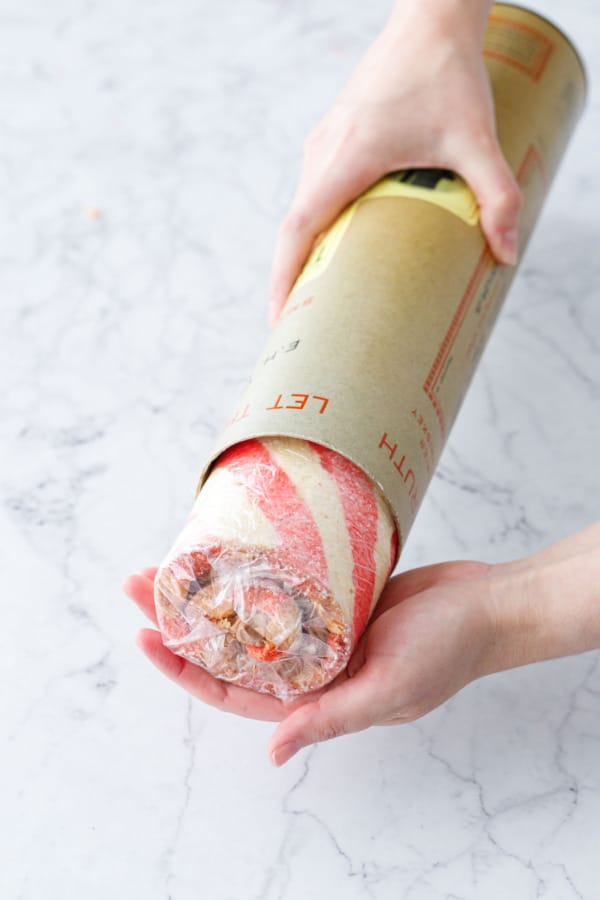
To preserve the perfectly round shape, store your cake roll in a cardboard tube. Otherwise the cake will naturally slump a little bit and you’ll end up with more of an oval shape than a perfect circle.
Make Ahead
Whatever you do, start the filling first and well ahead of time. The cream needs to be heated to incorporate the gelatin and melt the chocolate, but then it needs to be cooled completely in order for it to whip up properly. For that reason I highly recommend making the base for the filling a day ahead of time.
I also recommend making the cake itself a day before you plan to serve it, so it’ll have time to fully set overnight (this will allow you to get much cleaner slices). If you have to rush it you can cut into the cake after a few hours, but it won’t hold it’s shape quite as well.
Because it’s pretty much essential that everything be made ahead of time to allow for chilling/setting, it makes this recipe a perfect make-ahead option when you need a dessert but don’t want to deal with making it the day of. Score!
Ingredient Notes & Substitutions
- Amoretti makes our favorite Peppermint Extract, with a clean, crisp peppermint flavor and no harsh undertones. Other brands of peppermint extract may be more or less strong, so adjust the quantity as needed to taste. (Don’t forget to use coupon code LOVEANDOLIVEOILFREESHIP at Amoretti.com for free shipping on your order!)
- This recipe calls for all-purpose flour, cut with cornstarch to approximate the protein content of cake flour. If you don’t want to use cornstarch or if you’d prefer to use cake flour, replace the AP flour and cornstarch with 75g of cake flour (both sifted).
- The whipped cream is stabilized with gelatin, and while you can use either leaf/sheet gelatin or powdered (I prefer the cleaner flavor and set of leaf gelatin) I do not recommend leaving it out or the cream may not be sturdy enough to support the weight of the cake. I have seen vegetarian versions of stabilized whipped creams that use agar agar powder, but I have not tested this myself to know if it will work in this instance.
- For the cocoa powder in the filling, I used Valrhona Dutch processed cocoa (but Cacao Barry Extra Brute is a great option for a more reasonable price). Natural cocoa will work, but will result in a lighter color and more astringent flavor. You can also leave it out entirely but the filling won’t be nearly as chocolatey.
- I used a semisweet 56% chocolate in the filling (Callebaut brand specifically, which comes in callets so no chopping is needed), but you can use whatever brand or percentage of chocolate you like best. Chop finely so it’ll melt quickly and evenly in the hot cream.
- The chocolate peppermint whipped cream can also be made with white chocolate! Simply omit the sugar and cocoa powder, and replace the dark chocolate with a slightly higher quantity of white chocolate, about 3.5oz/100g. Cream and gelatin amounts stay the same. The white chocolate cream won’t set up quite as firmly as the dark chocolate version because it doesn’t have the same cocoa solids that dark chocolate does, but it’ll still whip up into a lightly sweetened, delicately flavored, peppermint-scented whipped cream.
Peppermint Cake Roll with Chocolate Peppermint Whipped Cream
Ingredients
For Cake:
- 2 large egg yolks
- 4 tablespoons / 50 g granulated sugar
- 2 tablespoons / 28 g vegetable oil
- 3 tablespoons / 45 g whole milk
- ½ teaspoon vanilla extract
- ¼ teaspoon Amoretti Peppermint Extract
- ½ cup / 62 g all-purpose flour
- 2 tablespoons / 16 g cornstarch
- ½ teaspoon kosher salt
- ¼ teaspoon baking powder
- 4 / 136 g large egg whites
- ⅛ teaspoon cream of tartar
- 3 tablespoons / 36 g granulated sugar
- red gel food coloring
For Filling:
- 1 ½ cups / 240 g heavy whipping cream, divided
- ¾ sheet leaf gelatin or 3/4 teaspoon powdered gelatin
- 2 ounces / 60 g dark chocolate, finely chopped
- 1 tablespoon / 15 g granulated sugar
- 3 tablespoons / 25 g Dutch-processed cocoa powder, sifted
- ¾ teaspoon Amoretti Peppermint Extract, or to taste
Instructions
For Filling:
- Cut leaf gelatin into 1-inch strips and place in a bowl of cool water to soften. If using powdered gelatin, sprinkle over 1 tablespoon heavy cream and set aside to soften for 5 minutes.
- Place chopped chocolate in a heat-proof bowl.
- Heat 1 cup of heavy cream in a small saucepan. Add sugar, and sift in cocoa powder to remove any lumps. Whisk until smooth and cream starts to steam and bubble around the edges (don't let it fully boil).
- Add gelatin to hot cream, either wrining out the soaked sheet gelatin and adding that, or adding the softened powdered gelatin. Stir until gelatin has completely melted.
- Pour hot cream over chopped chocolate in bowl, then gently whisk until chocolate is completely melted and evenly incorporated into the cream.
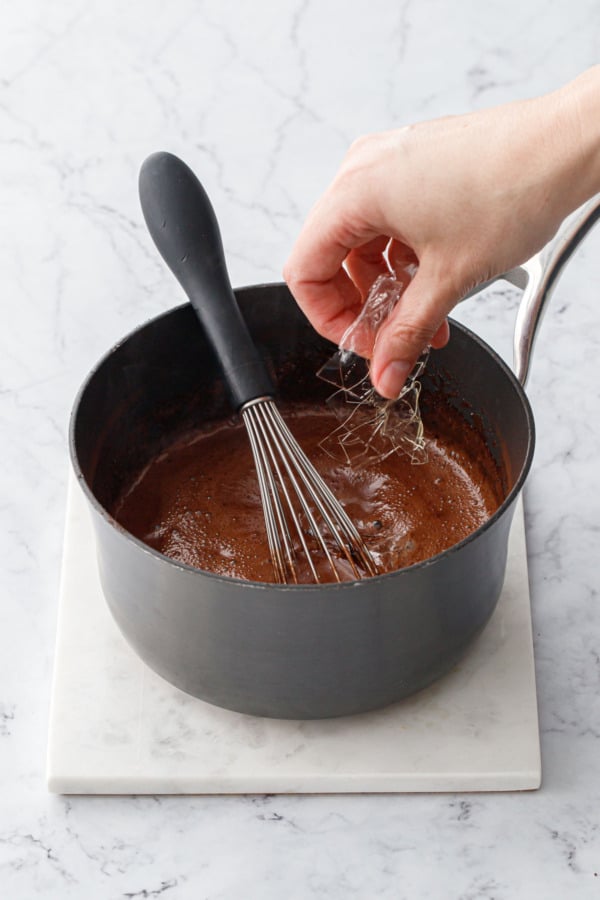
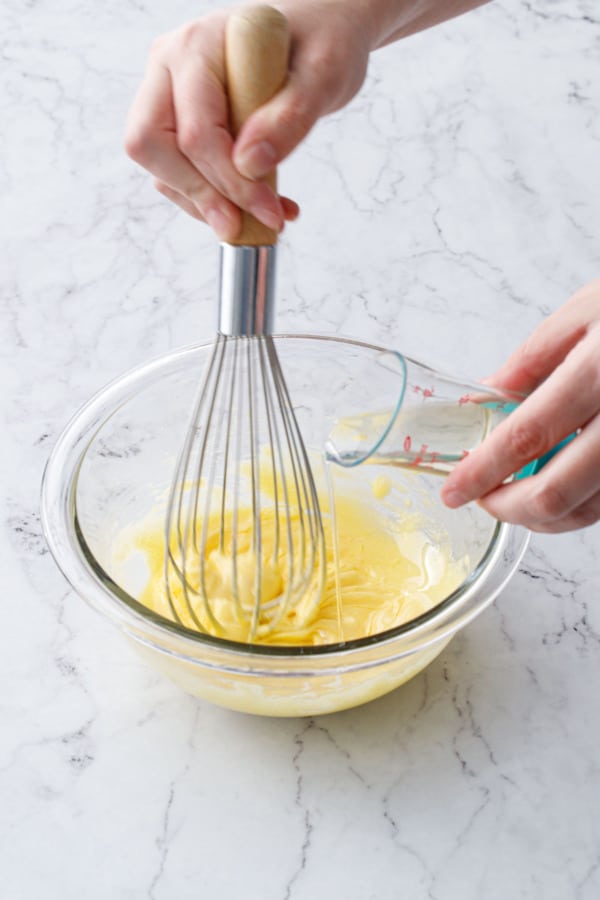
- Add remaining 1/2 cup cold cream (this will help bring the temperature down more quickly). Stir in peppermint extract.
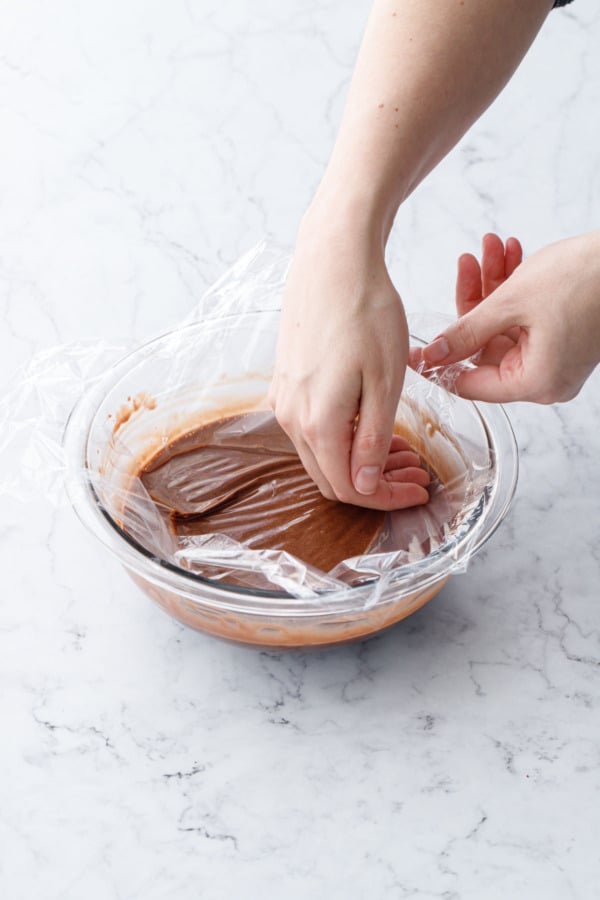
- Cover with plastic wrap, pressing down so the plastic is touching the surface of the cream. Place in the refrigerator until completely chilled, at least 3 hours or overnight (since this needs to chill completely in order to whip up properly, definitely make this ahead of time well before you start your cake).
For Cake:
- Preheat oven to 350 degrees F. Lightly butter or grease the bottom and sides of a 15-by-10-inch jelly roll pan; line with parchment paper (optionally, use a straight edge to draw a few diagonal lines in pencil on the bottom of the parchment paper to use as guides).
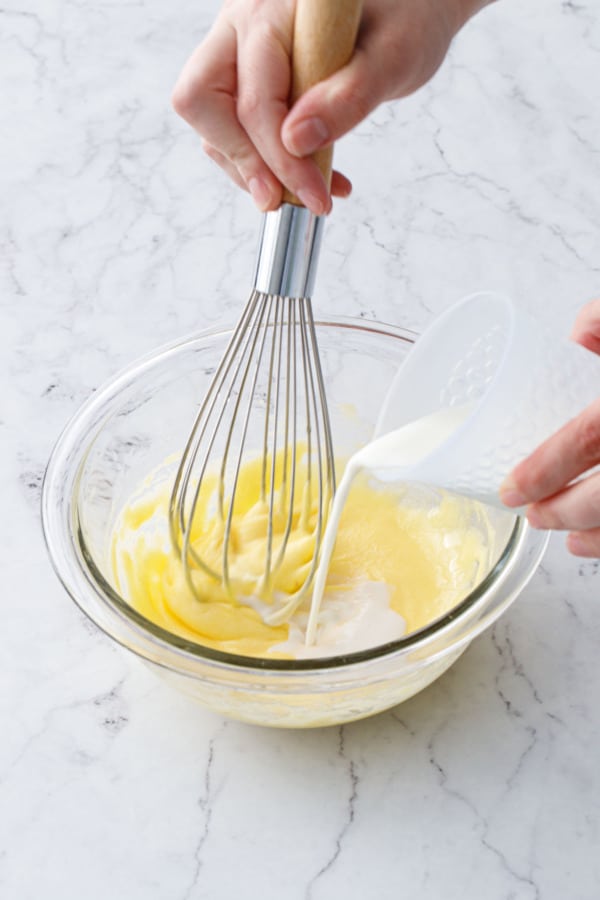
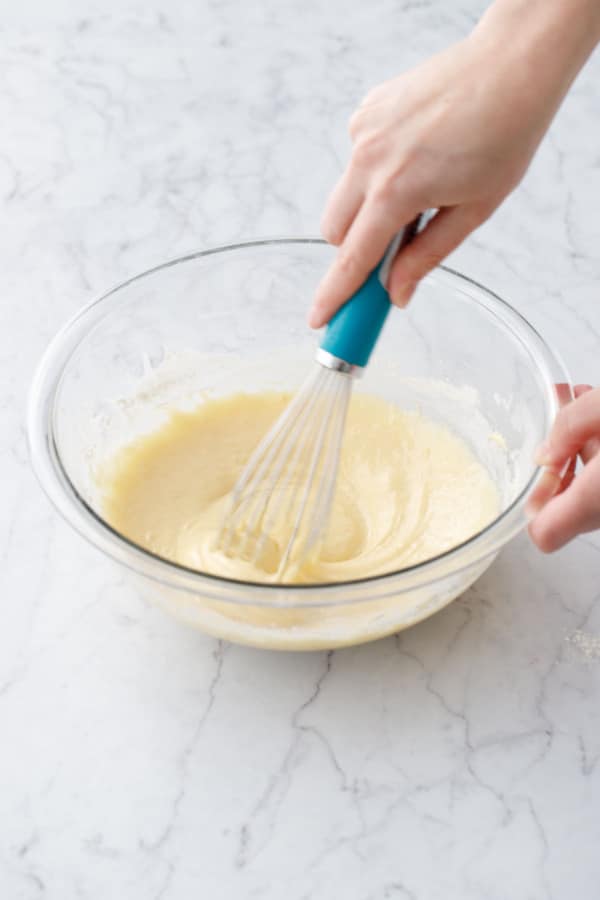
- Place egg yolks in a mixing bowl. Add 1/4 cup sugar and whisk until sugar is dissolved and yolks are lightened in color. Drizzle in vegetable oil, whisking constantly, until incorporated. Whisk in milk, vanilla and peppermint extracts.
- In a separate small bowl, whisk together flour, cornstarch, salt and baking powder, then sift dry ingredients into bowl with wet ingredients; whisk until combined.
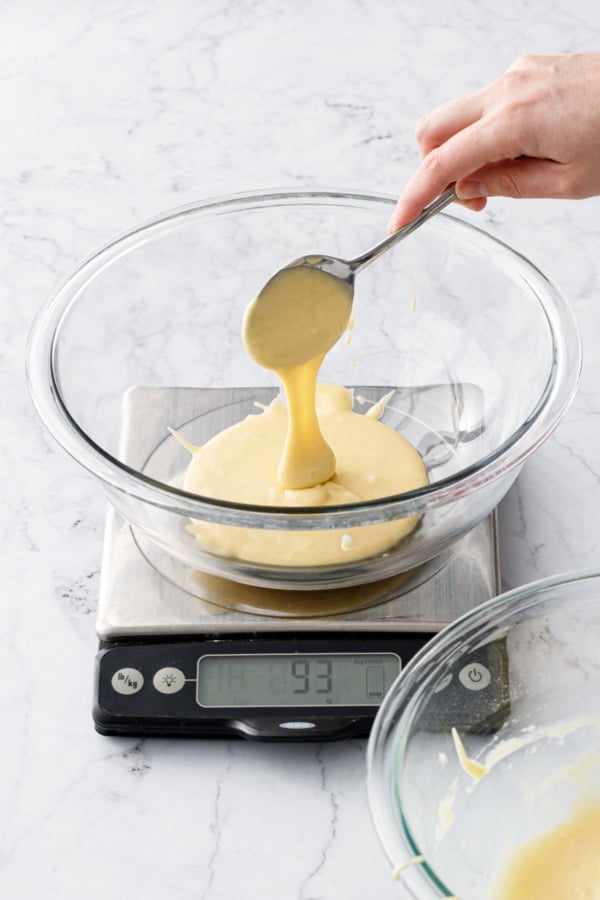
- Transfer half of batter to another mixing bowl (tip: if you get the tare weight of your first mixing bowl before you start, it'll be very easy to know the exact weight of your batter and split it perfectly in half).
- Add a few drops of red food coloring to one bowl of batter (make it darker than you think you need as the egg whites wiil lighten it up quite a bit; I used 4 big drops of red gel coloring).
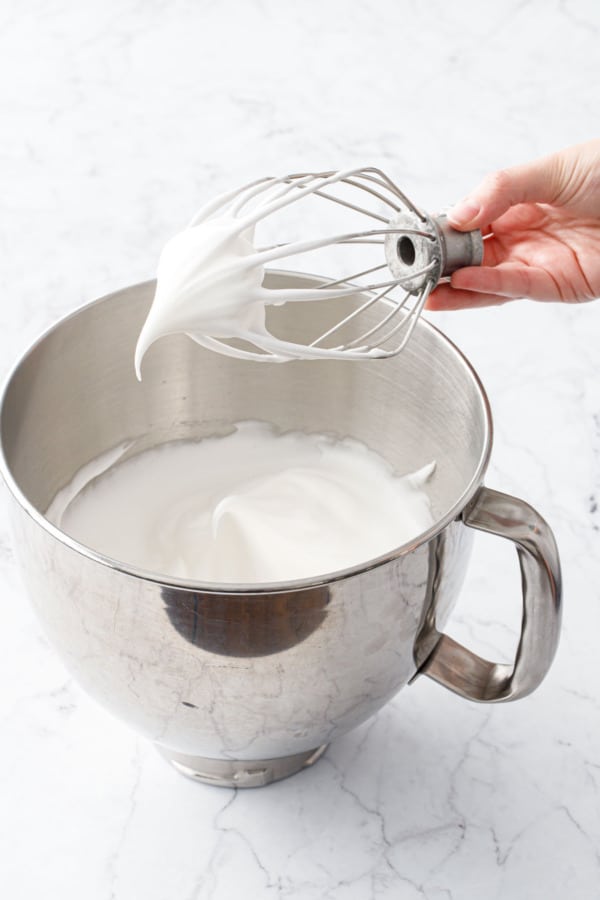
- In a clean mixing bowl or the bowl of a stand mixer fitted with the whisk attachment, beat egg whites on medium speed until frothy. Add cream of tartar, and continue to beat until the mixer stars to leave tracks. Slowly add 3 tablespoons of sugar, 1 tablespoon at a time, beating for a minute or so between each addition. Once all the sugar has been added, increase speed to medium-high speed and beat until whites hold just barely stiff peaks.
- Divide egg whites equally between white and red batters. I used my scale here, adding about 85g of egg white total to each bowl in two additions. I like to stir a scoop or two of egg whites first to lighten the batter, then I add the remaining egg whites and fold until just incorporated, taking care not to overmix and deflate the batter. Give the bowls one good rap on the countertop to pop the larger air bubbles.
- Transfer batter two two large piping bags fitted with 9/16" (14mm) piping tips (1A is the tip I used, one size up from my 1/2" tip). Twist and secure the ends of the piping bags with rubber bands or bread clips to keep the batter from leaking out. You can also use zip-top bags (wait to cut off the corner until you're ready to pipe).
- Pipe diagonal stripes, alternating between red and white batters, over the entire parchment-lined pan. Try to move the piping bag at a consistent speed, squeezing with even pressure as you go, with the intention of rationing out the batter so the stripes fill the entire pan with not much left over (some is ok, if you have a lot leftover your roll may end up too thin). Don't worry about the spaces around the very edges, the batter will soften to fill in those gaps.
- Once the pan is covered, lift and drop the baking pan from a few inches off the countertop once or twice to settle the batter into the edges and hopefully deflate some of the larger bubbles.
- Bake for 11-13 minutes or until top is springy and edges are just barely starting to brown. Remove from oven, run a knife around the edge to release the cake from the sides of the pan.
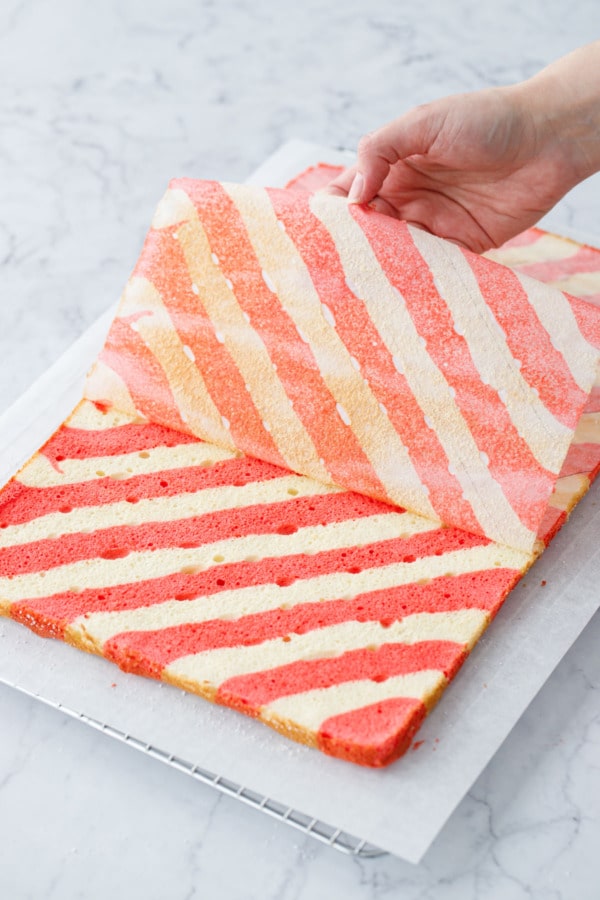
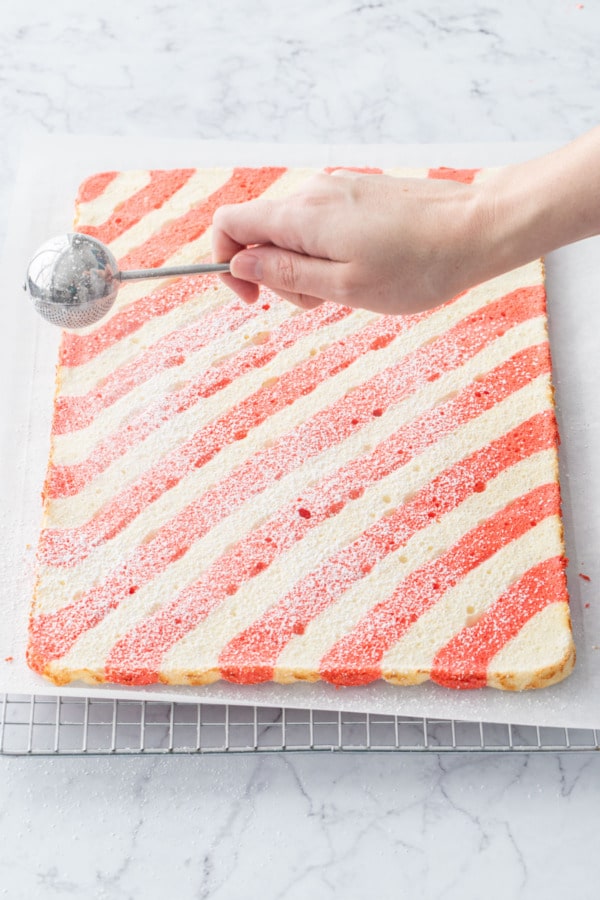
- Carefully invert the warm cake onto a piece of powdered sugar-dusted parchment paper sitting on top of a solid surface like a cooling rack, cutting board, or upside-down sheet pan. Peel of parchment paper from the bottom of the cake, revealing the stripes underneath.
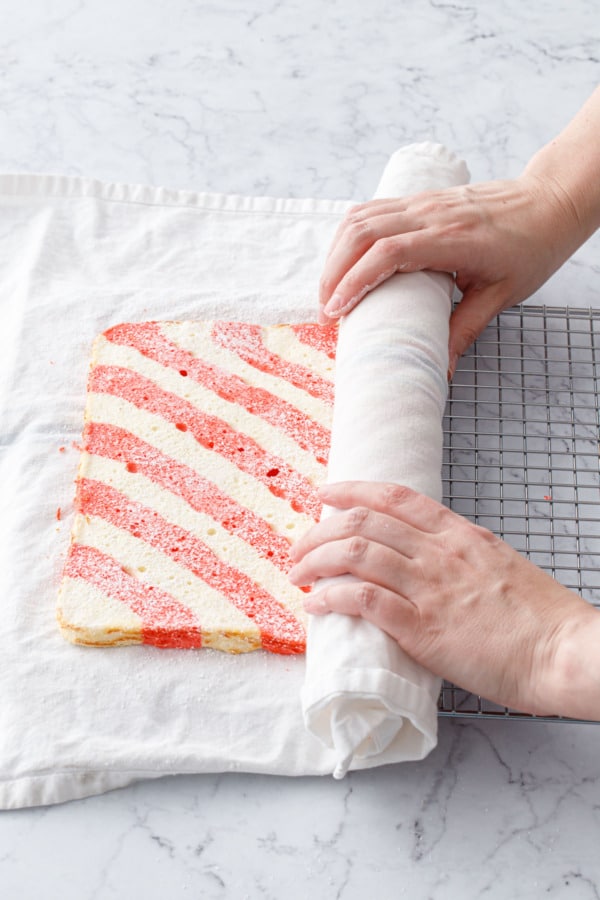
- Liberally dust a clean tea towel with powdered sugar and lay on top of cake, leaving about 1-inch of overhang on one of the short sides. Flip cake over once more (use a second cooling rack or cutting board on the back to support it) so what was the top of the baked cake is facing up once again (this will ultimately become the interior of the cake roll).
- Fold the tea towel over the edge of the short side with the 1-inch overhang, then carefully roll up the warm cake, smoothing out any large creases in the fabric if necessary. Rolling up the cake while it is still warm will give it a 'muscle memory' and prevent it from cracking later.
- Let rolled cake cool, still wrapped in the tea towel, for about 30 minutes or until completely cool to the touch.
Final Assembly:
- While cake is cooling, transfer chilled filling mixture to the bowl of a stand mixer fitted with the whisk attachment. Beat on medium-high speed until the cream holds very stiff peaks (although be careful not to overbeat).
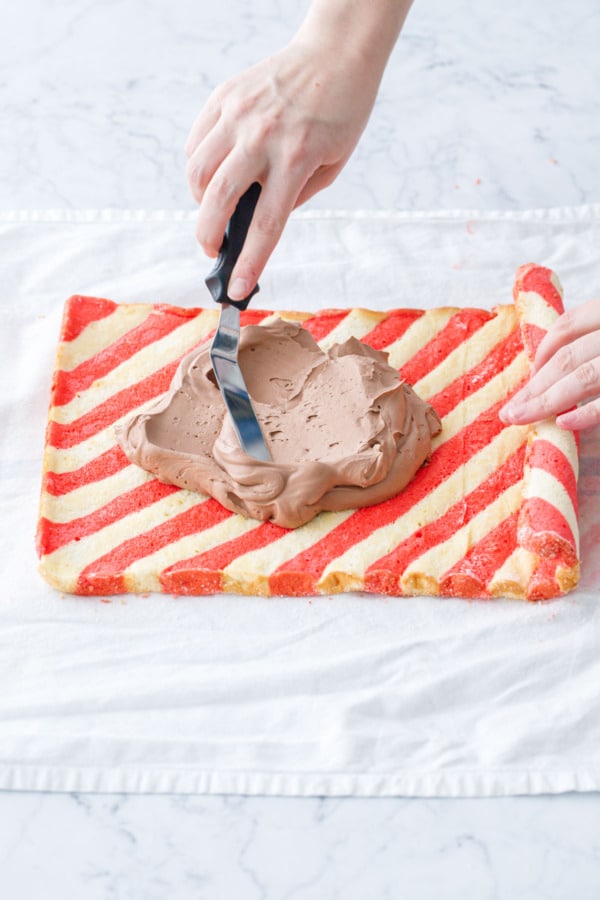
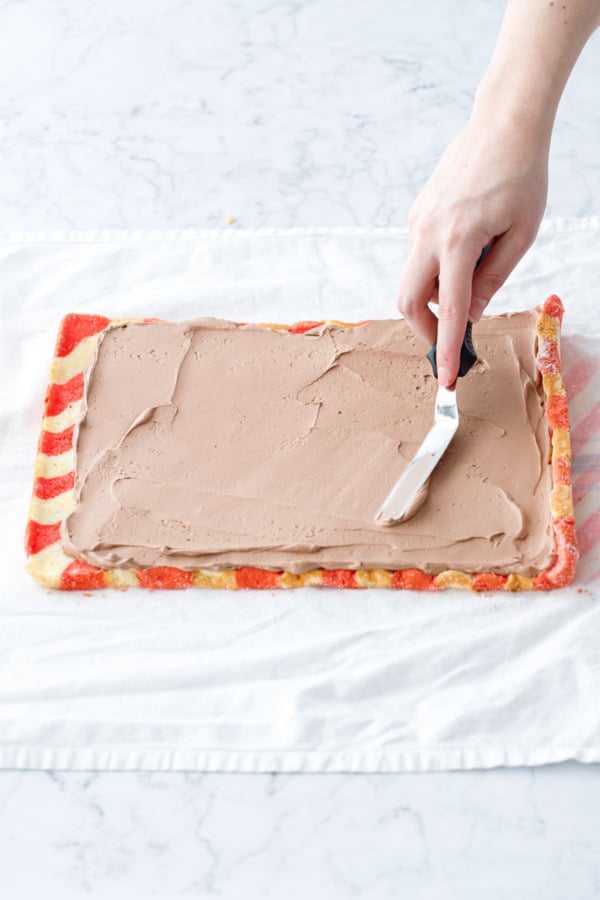
- Carefully unroll cooled cake. Spread filling into a thin even layer over the whole cake, leaving about 1/2 inch bare at the far end. You may not need all of the filling, depending on how thick a layer you want.
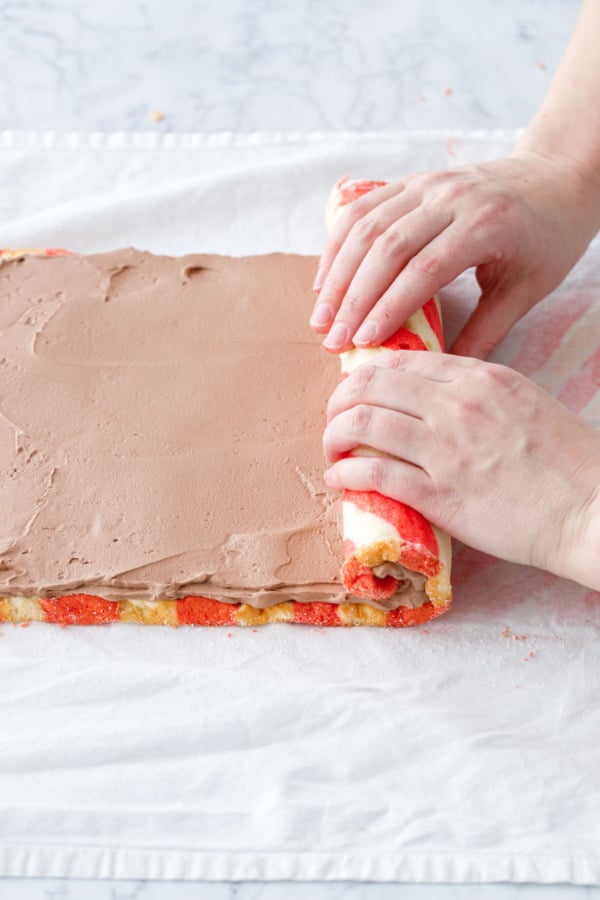
- Gently roll up the cake, firmly but not so tight that the filling squeezes out the sides. Wrap entire roll tightly in plastic wrap and refrigerate for at least 2 hours or ideally overnight, until completely set. If you happen to have a cardboard tube lying around, place your cake roll in the tube to keep the bottom from flattening out as it chills (I have a 3 1/2-inch-diameter tube from a bourbon bottle and it is the perfect size for cake rolls).
- Once cake is throughly chilled, I find the easiest way to get clean cuts is to use a piece of fishing line or dental floss (mint flavored is fine here because it's already minty). Place a loop of floss under the cake roll, then cross over the top to make a loop. Pull ends firmly apart and you'll end up with a neat, even cut that doesn't squish the round shape of your cake roll.
- Leftover cake roll will keep, tightly wrapped and refrigerated, for up to 3 days.
Did you make this recipe?
Let us know what you think! Leave a Review below or share a photo and tag me on Instagram with the hashtag #loveandoliveoil.Disclosure: This post was created in partnership with Amoretti. As always, all opinions written are purely our own. We’re incredibly grateful for opportunities like these that allow us to continue sharing delicious recipes with you, so thank you for supporting us and the brands we love.


Tasted delicious. Wasn’t as perfect as your roll, but it looked pretty good. It was a fun and festive dessert for Christmas.
👎🏽👎🏽👎🏽Epic baking fail disaster. I wish I had gotten the white food coloring because my cake turned out purple and yellow. I thought this was optional. It is literally impossible to get this cake red and white without the white food coloring when egg yolks are part of the batter. Also, I didn’t have enough batter for my pan so I had to make 2 batches. And of course, the purples didn’t match, and that batter rose differently…[sigh] I spent all afternoon on a cake only to have it look like it was made by a child. Good thing I started on this 2 days before Christmas. At least I can use the filling for a Buche de Noel with a way less fiddly chocolate sponge tomorrow.
Sorry you had trouble with this recipe! Colorwise, darker yellow egg yolks will definitely affect the color of the cake, but I don’t see how you ended up with purple? If anything dark yellow yolks would have made orange and yellow. Maybe it was your food coloring. In general cheaper grocery store eggs usually have lighter yellow yolks which will give you a cleaner white cake.
As for the quantity of batter, assuming you used the right sized pan (jelly roll size, 10×15, NOT half sheet) – usually if you feel like there isn’t enough batter, that means it was overmixed, too much air was knocked out of it, so you don’t have enough volume to cover the pan. Either stirring too much/too roughly, over/under whipping the egg whites or an unstable meringue, also using too much flour (overmeasuring by not using a scale usually), can all result in a thin batter.
Cake rolls like this are definitely some of the more complex recipes I’ve written (in this case, it took me 7 tries to get it right), so it takes some practice and experience to really know the right consistency of the batter and such.
My batter was so runny it could not form red and white lines. It was a messy mixture of red and white. What did i do wrong?
I followed the recipe and the exact measurements closely.
So a thin batter means it was overmixed; too much air was lost resulting in a thin batter. Even a few extra strokes can make a difference between perfect and overmixed. Also be sure to measure the flour by weight (too much flour makes a thicker paste that needs more strokes to incorporate the egg whites, leading to over-mixing). While the recipe should work with AP flour, using cake flour which has lower protein and results in a much fluffier cake (it’s my preference). Other things to keep an eye on are underwhipping or overwhipped the egg whites, also letting the whipped egg whites sit for too long before incorporating into the batter can result in an unstable meringue.
Hope that helps!
Hello! Can’t wait to make this.
How many days can I make the filling in advance? How many days can it be kept in the fridge? Can the filling be frozen?
The filling base (pre-whipping) should be made a day or two before you bake the cake so it has time to completely chill. I don’t recommend freezing it though. Once it is whipped it needs to be rolled in the cake right away, then the cake should chill overnight for the cleanest slices.
Lioks amazing! I saw this recently and am making it right now. In the recipe instructions, it says to whip up the filling mixture with powdered sugar. How much powdered sugar do I add? I can’t seem to find it on the recipe list.
Sorry, no powdered sugar in the filling! Just whip up the chilled mixture by itself. :)
Thanks for the reply. Thats the first roll cake I’ve made that hasn’t cracked on me. Great recipe! Can’t wait to try it at our potluck this afternoon.
This looks beautiful! What did you use for the inside of the vanilla version? I’m not a chocolate fan. Can’t wait to try this!
Yup, you can use white chocolate instead of dark in the filling. See the Ingredient Notes & Substitutions sections for specific instructions (the quantities are a bit different).