
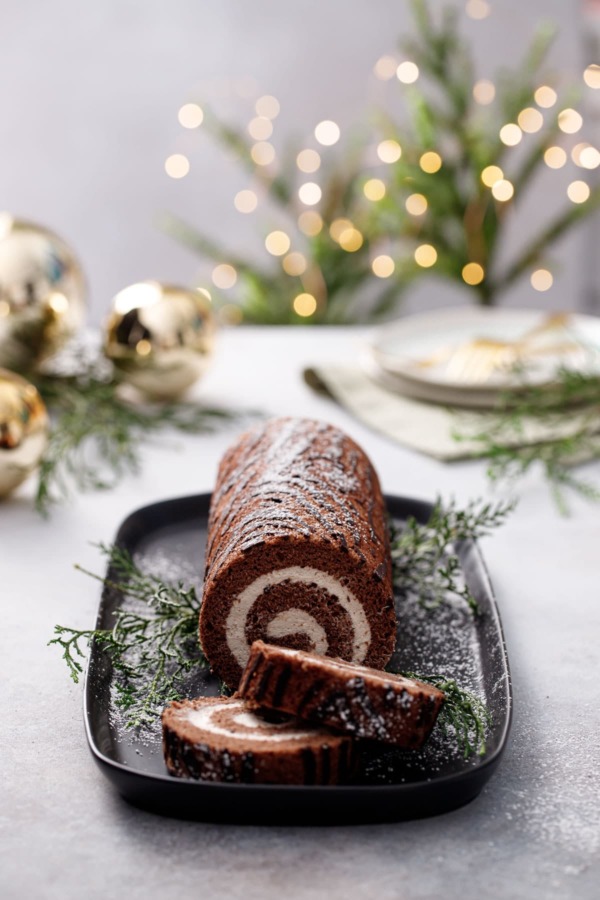
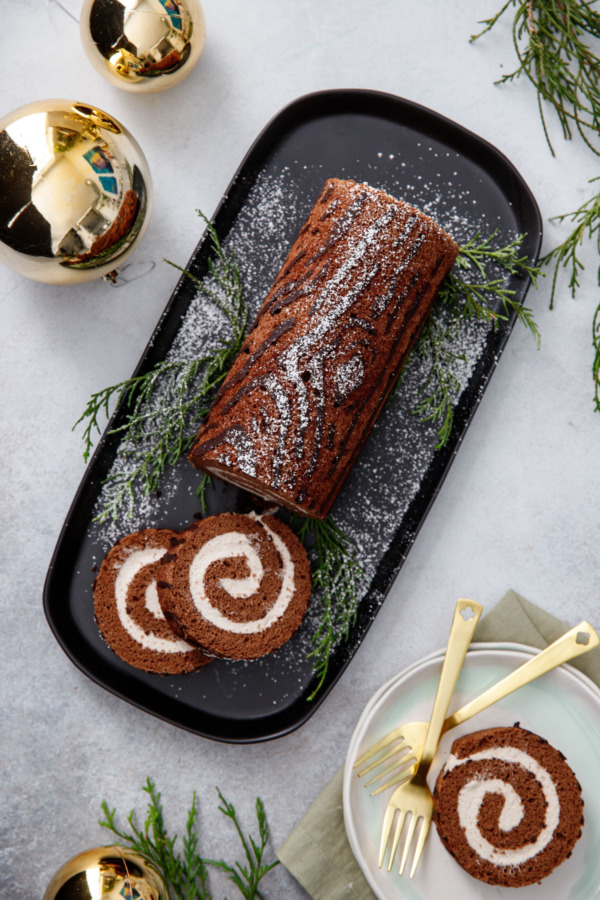
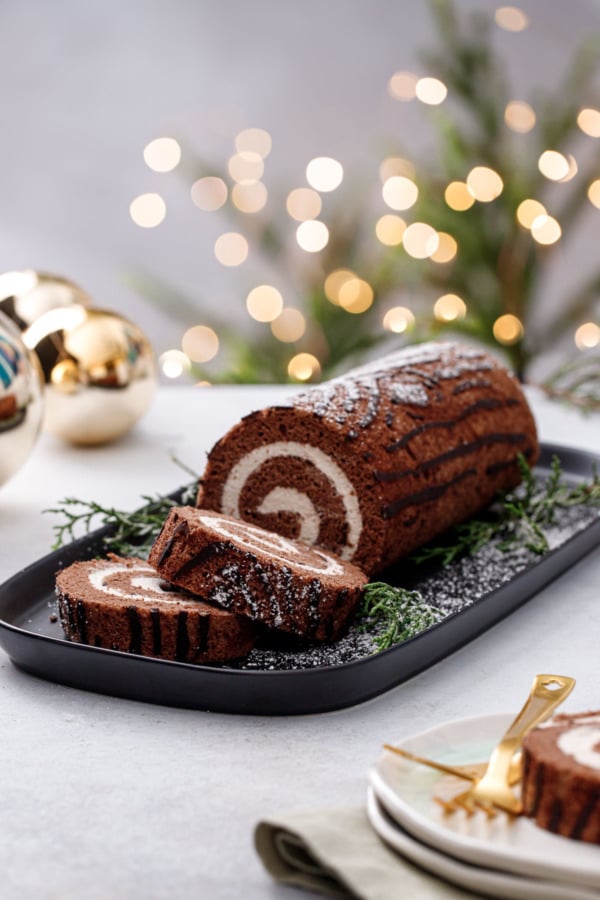
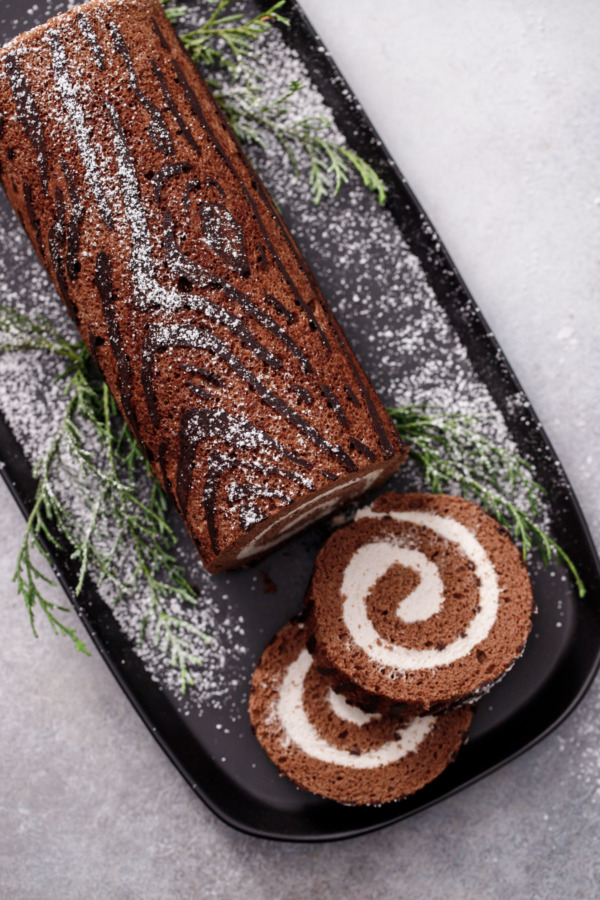
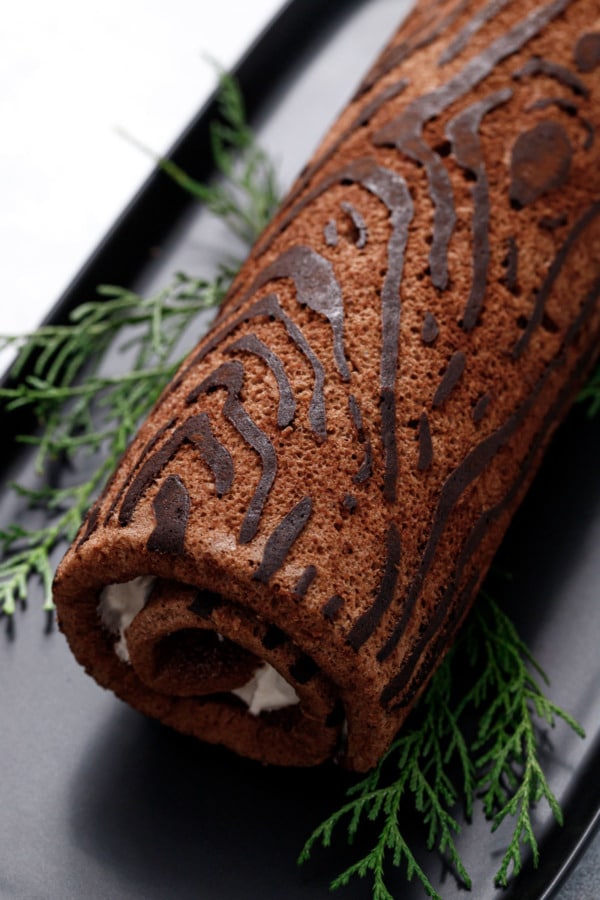
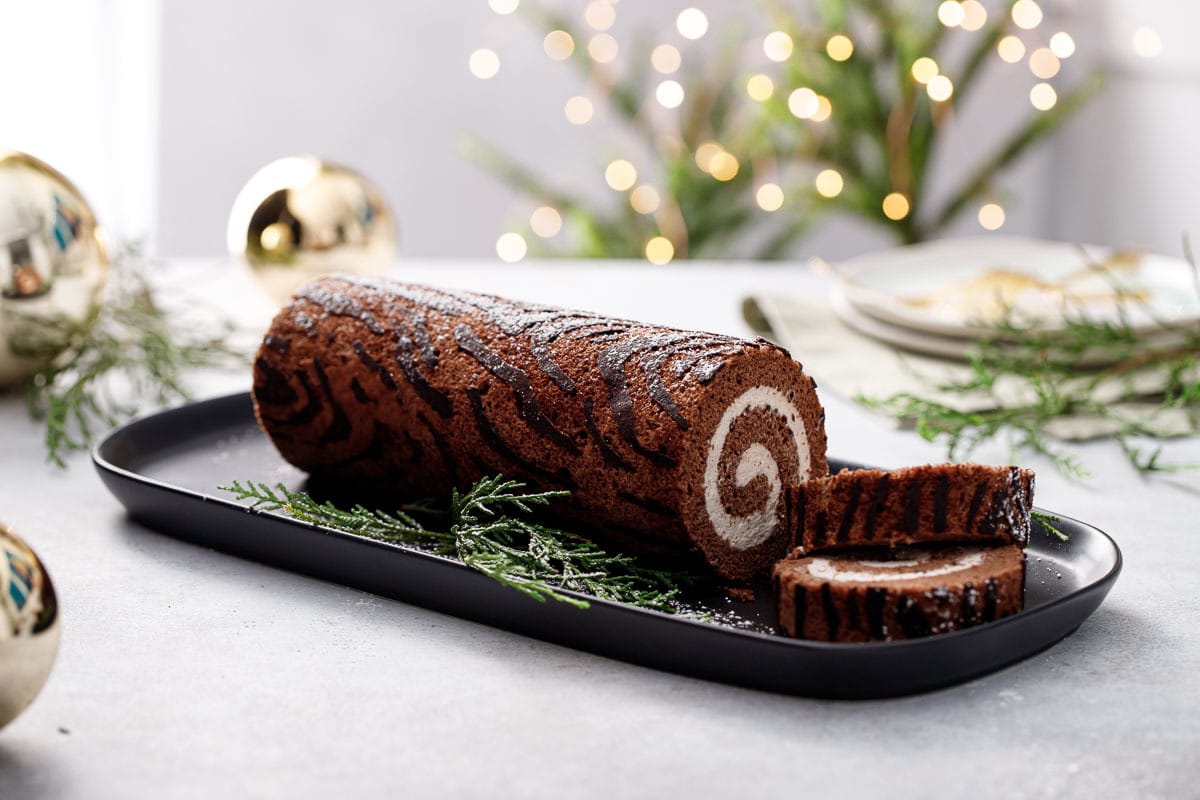
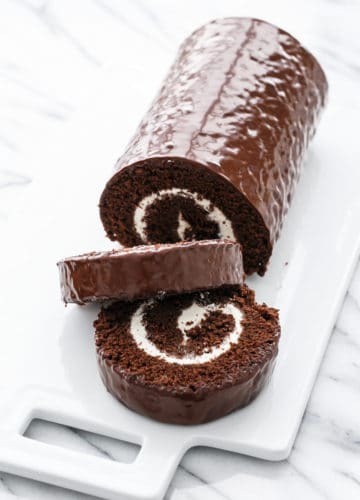
This minimalist yule log roll cake is simple and sophisticated, with a faux wood-grain effect baked right into the light chocolate sponge cake, and a cloud-like chestnut whipped cream filling.
We’ve given the traditional European yule log cake a far-East twist, using a Japanese cake design technique to give the cake a unique wood-grain look, no fussy frosting required.
Save this recipe for later!
Yule Log cakes in general can be rather fussy, with fancy layers of frosting and meringue mushrooms and sugared cranberries and other decor that take hours to create. On the opposite end of the spectrum, we’ll call this Japanese-style roll cake the minimalist’s yule log: with a wood-grain design baked right into the cake itself, and a simple dusting of powdered sugar as the finishing touch.
It’s a perfect option for lazy bakers and frosting haters, and for those who like their desserts a little less sweet.
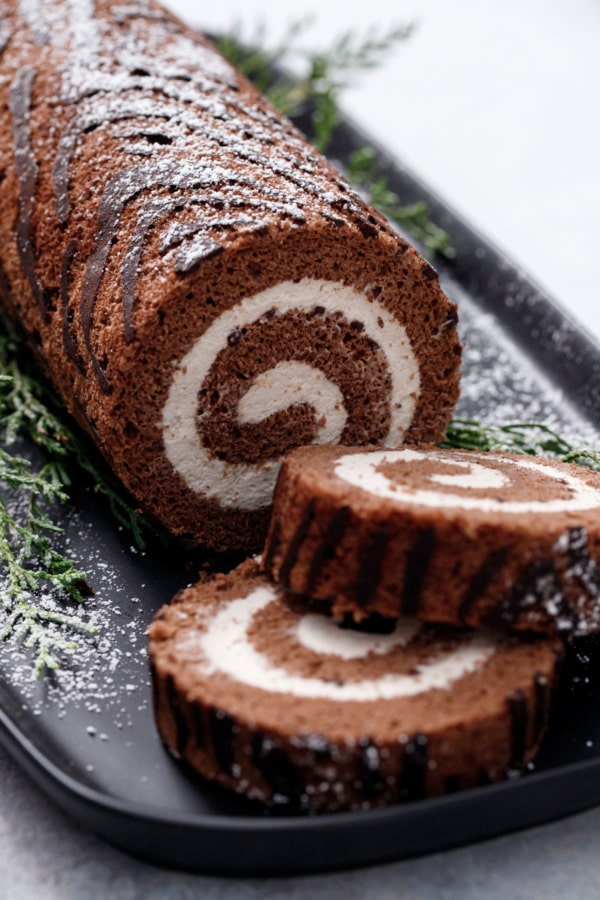
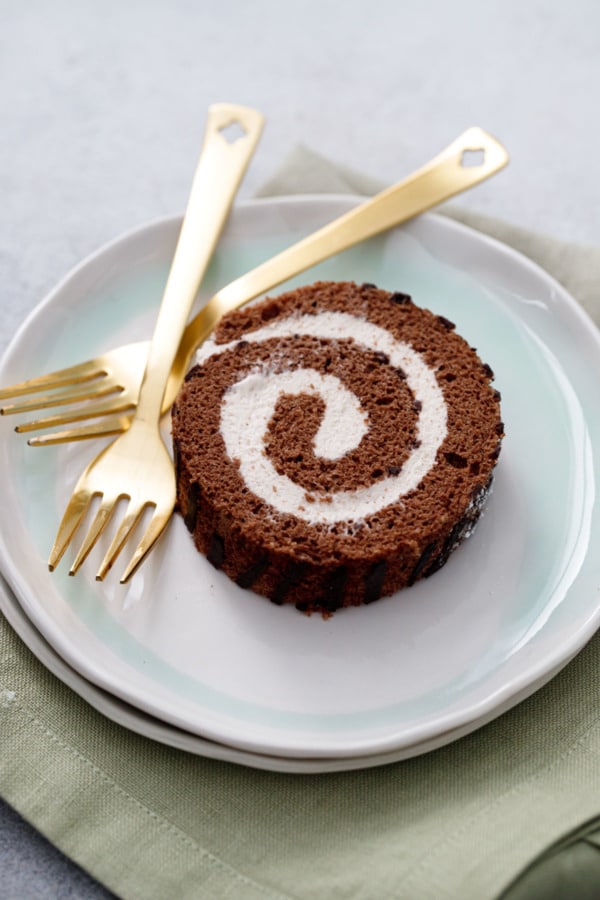
The cake itself is a light cocoa sponge cake baked with a darker chocolate wood grain pattern (the color contrast necessary here, which is why I didn’t make the cake too dark). The filling is a lightly sweetened whipped cream infused with chestnut creme and a splash of amaretto liqueur. It’s a delicious and festive flavor combination that tastes like the holidays without being so in your face about it (like, ahem, peppermint or gingerbread flavors).
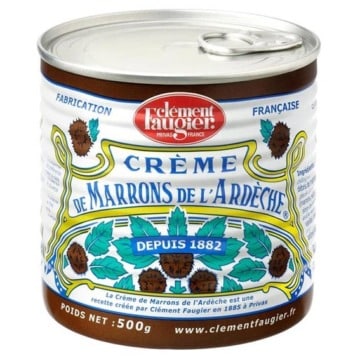
Chestnut spread, also called chestnut creme or creme de marron, is made from pureed candied chestnuts. We first tried this nutty spread in France (it’s amazing on crepes), and promptly found a few cans at a local market to bring home with us. I’m not sure why chestnut creme hasn’t made its way to the US, since chestnut trees grow so abundantly here. Luckily, you can get it online pretty readily or make it yourself from fresh chestnuts.
Chestnut creme is most often used in the classic French dessert called a Mont Blanc, and, actually, this cake could probably also be called a Mont Blanc bûche de Noël because of the similarity in flavor profiles (namely, chestnut cream and whipped cream).
Did you know that the tradition of making log shaped cakes started with… actual logs?
Indeed, Yule Logs date back to medieval times in Norway, where, during the traditional winter solstice celebration known as Yule, families would burn giant logs, often decorated, in their hearths over the course of 12 nights to celebrate the return of the sun each year. Wishes written down on paper were often burned along with the log, and the ashes were saved for luck and protection.
The earliest yule log cake recipe appeared in print in 1615, though the tradition wasn’t widely popularized until the Parisian bakers got ahold of it in the 19th century (and some of the most stunning modern bûches de Noël still come out of France today).
My original idea for this faux-bois cake roll was to use one of those faux finishing tools to make the wood grain. Which was a cool idea in theory, but unfortunately the paint tool didn’t translate too well into cake batter (the design itself actually looked pretty cool, but since it basically made a paper thin layer of batter over the entire surface of the cake, it ended up cracking and flaking off when I rolled up the cake).
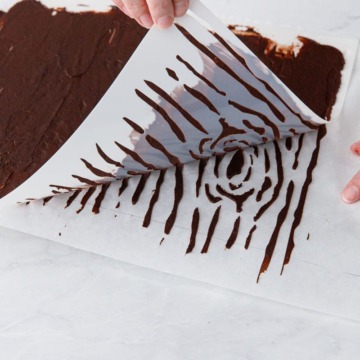
On to plan B: stencils. I found a wood grain stencil and used that to almost ‘screen’ the design onto the parchment. The sponge batter is then poured over top, baking the design right into the surface of the cake.
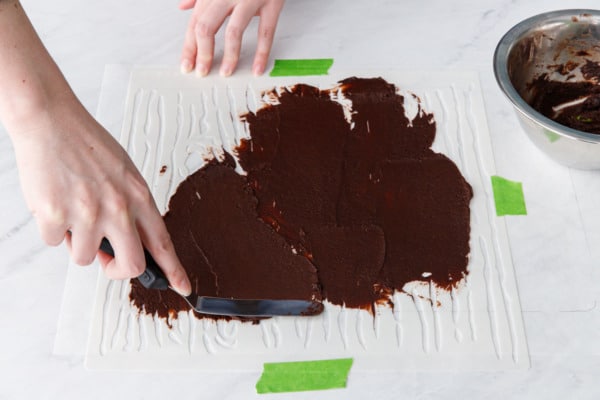
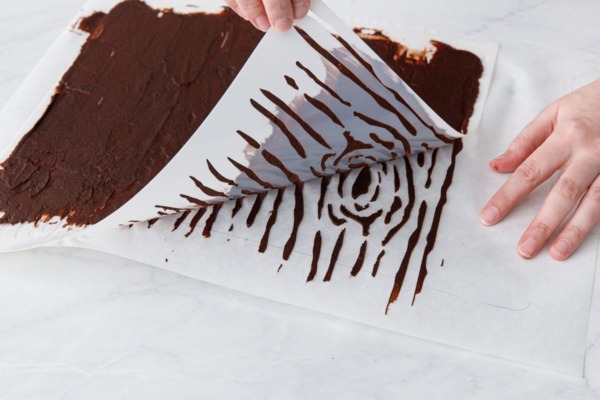
Tip: for stencil-based designs, it’s helpful to have a stencil that is larger than the pan itself. Trace the outline of your jelly roll pan onto the bottom of a piece of parchment. Rub a thin, even layer of butter over the top of the parchment, then tape your stencil in place. For wood grain, remember that the design should go perpendicular to the way the cake will get rolled, so the wood grain goes parallel to the short side. The design only needs to cover half of the cake surface, since the rest will get rolled up inside and won’t be visible.
In my numerous tests, I did find that a thicker layer of design paste gave the wood grain better roots into the cake; if it’s too thin, the design tends to peel off with the parchment. Giving the parchment a light coating of butter before baking helps as well.
In lieu of a stencil, you could also transfer the chocolate paste into a piping bag and pipe on a wood-grain design, similar to the strawberry cake roll technique. Although I found the stencil much easier and quicker than piping (easier on the hands too!)
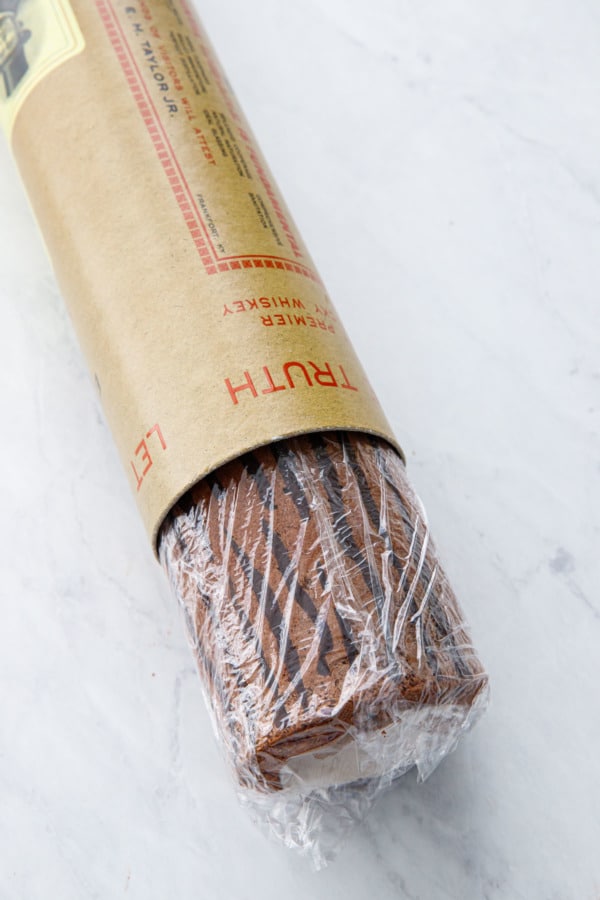
Cake rolls in general tend to droop, forming more of an oblong roll shape than a perfect cylinder. To keep the roll nice and round, I like to store it in a cardboard tube while it sets in the fridge. This particular tube happens to be from a bottle of whiskey, but something like a wine gifting tube works well too (you want approximately 3½ to 4″ in diameter.)
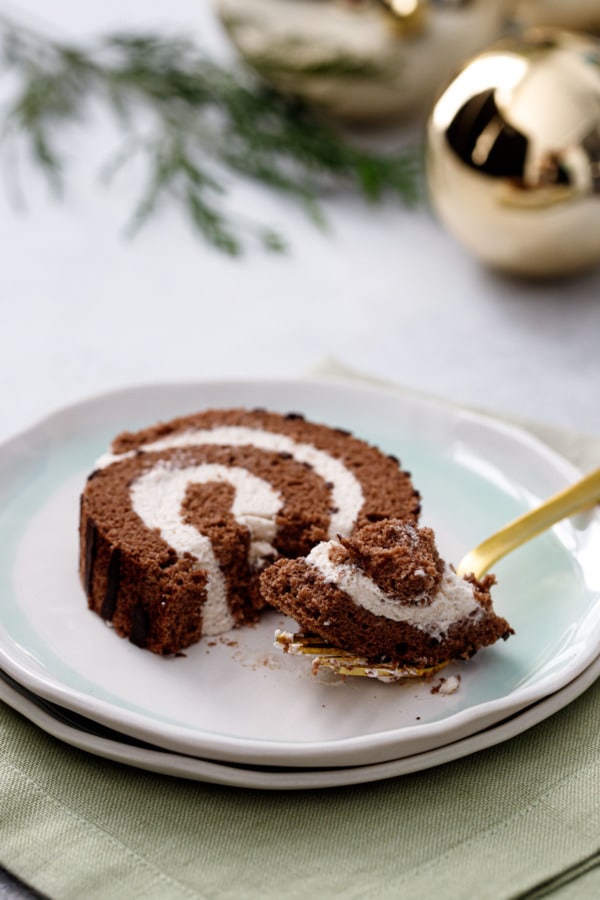
The filling of the cake is a lightly sweetened whipped cream, infused with sweetened chestnut paste and a splash of amaretto (you could also use a chestnut or walnut liqueur or even something like Kahlúa).
This cake, in true Japanese style, is very lightly sweetened. If you’re used to super sweet, overly frosted cakes you might find it bland. Personally I like the delicate sweetness of this cake, with the lovely holiday flavors of the chestnut, light cocoa, and amaretto coming through.
That said, if you want it sweeter, you can always add a bit more powdered sugar to the cream filling. You could also serve the cake with a sweetened sauce, something like a raspberry coulis, hot fudge sauce, or a crème anglaise.
Chocolate Cake Roll with Chestnut Whipped Cream Filling
Ingredients
For Design Paste:
- 2 tablespoons / 30 g unsalted butter, softened (softer than room temp, but not melted)
- 2½ tablespoons / 30 g granulated sugar
- ¼ cup / 30 g cake flour, sifted
- 3 tablespoons / 20 g Dutch-processed cocoa powder, sifted
- 1 / 34 g large egg white, 34g
For Chocolate Cake:
- 3 / 150 g large eggs, separated
- 6 tablespoons / 75 g granulated sugar, divided
- 1 tablespoon / 14 g vegetable oil
- 1½ tablespoons / 23 g whole milk
- 1 teaspoon vanilla extract
- ½ teaspoon kosher salt
- ½ cup / 52 g cake flour, sifted
- 2 tablespoons / 10 g cocoa powder, sifted
- pinch cream of tartar
- powdered sugar and cocoa powder, for dusting
For Chestnut Cream Filling:
- ¾ cup / 180 g heavy whipping cream, cold
- 1 tablespoon / 8 g powdered sugar
- ½ teaspoon unflavored powdered gelatin
- 3 tablespoons / 45 g sweetened chestnut paste
- 1½ teaspoons amaretto liqueur, optional
Equipment
- Cardboard tube
Instructions
- Preheat oven to 350 degrees F. Lightly butter or grease the bottom and sides of a 15 by 10-inch jelly roll pan. Trace the outline of the jelly roll pan on the bottom of a piece of heavy duty parchment paper. Lightly butter the top of the parchment with a thin, even layer.
- To make design paste, with a spatula or wooden spoon, mix butter and sugar together until you get a smooth paste. Add flour and cocoa and mix until partially incorporated, then add egg white and mix until smooth. Paste should have a buttercream-like consistency.
- Place wood grain stencil on the parchment, with the grain going parallel to the short side of the pan. Tape into place to keep it from moving.
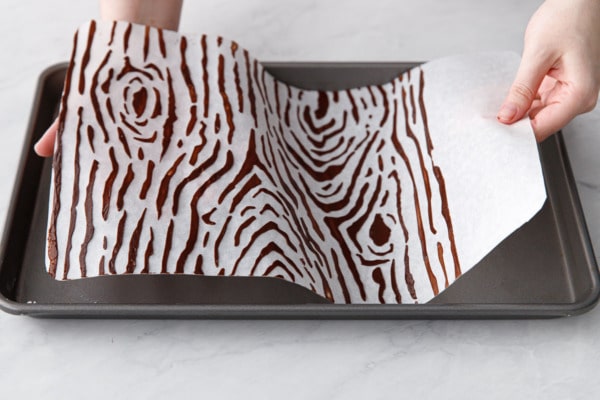
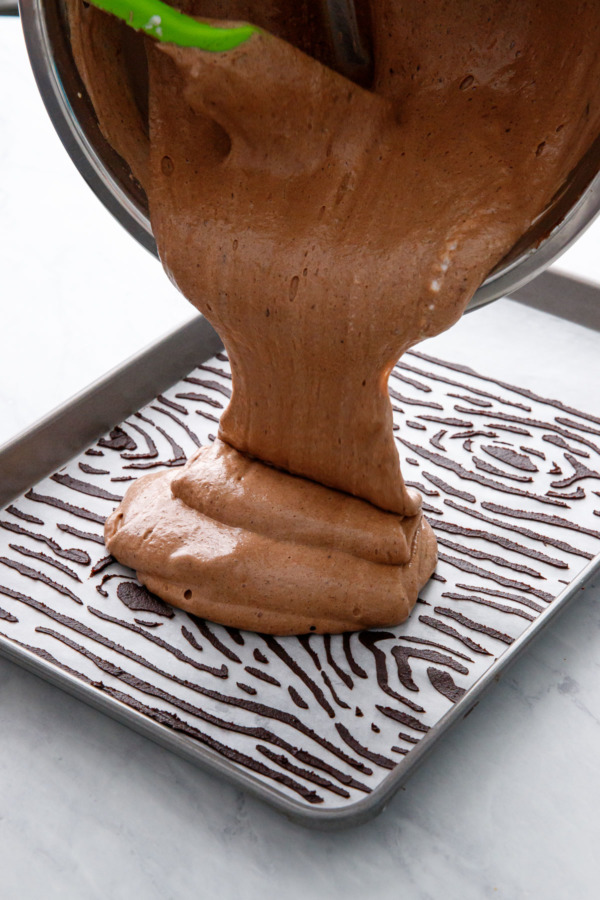
- Using an offsest spatula, spread a thick layer of chocolate paste mixture over stencil. You want a layer that's thicker than the stencil itself, so don't scrape it off too much. You may not need all the paste for this. Once entire stencil is covered, gently peel off the stencil. Cut around outline and place parchment into buttered jelly roll pan. Set aside while you prepare the cake batter.
- To make cake batter, place egg yolks in a mixing bowl. Add 1/4 cup sugar and whisk until sugar is dissolved and yolks are lightened in color. Drizzle in vegetable oil, whisking constantly, until incorporated. Whisk in milk, vanilla extract and salt.
- Sprinkle sifted cake flour and cocoa powder over batter and fold until completely incorporated.
- In a clean mixing bowl or the bowl of a stand mixer fitted with the whisk attachment, beat egg whites and cream of tartar until frothy. Add remaining 2 tablespoons of sugar and beat on high speed until whites hold medium-stiff peaks.
- Fold a third of egg whites into batter to lighten it, then add the remaining egg whites and fold until just incorporated and no streaks of white remain.
- Pour batter over top of stenciled design, spreading the batter into an even layer using a large offset spatula. Bang the pan once or twice on the countertop to remove any air bubbles and level out the top.
- Bake for about 10 minutes or until top is springy and edges are just barely starting to brown.
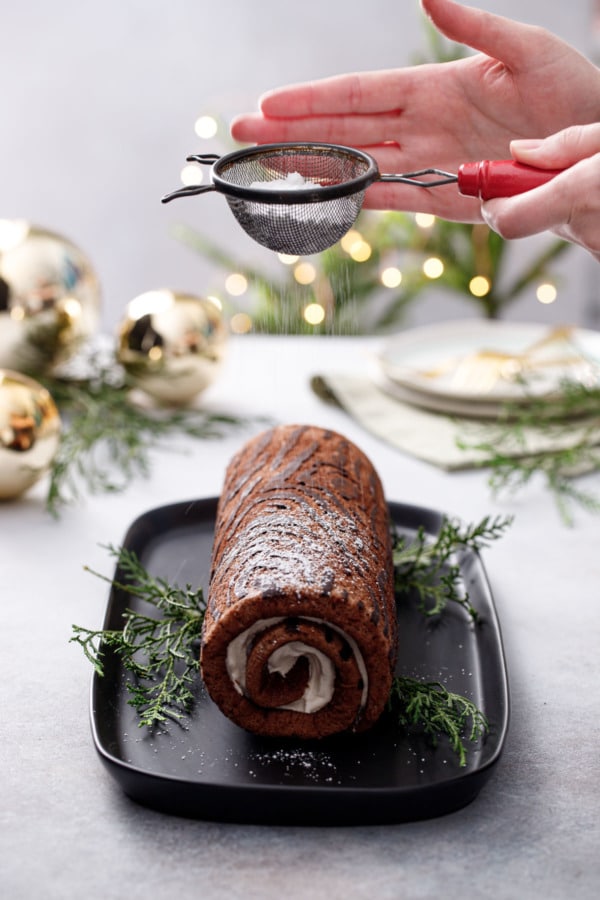
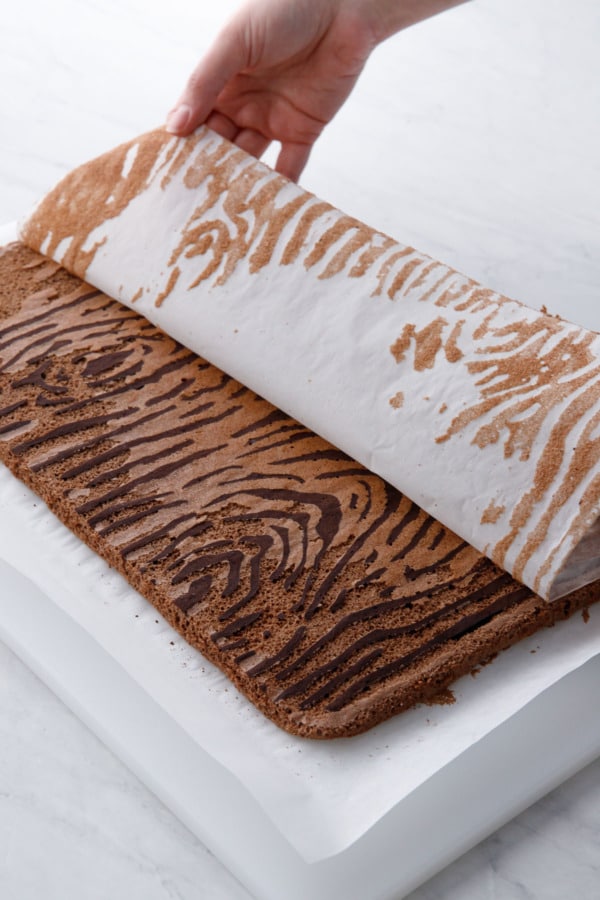
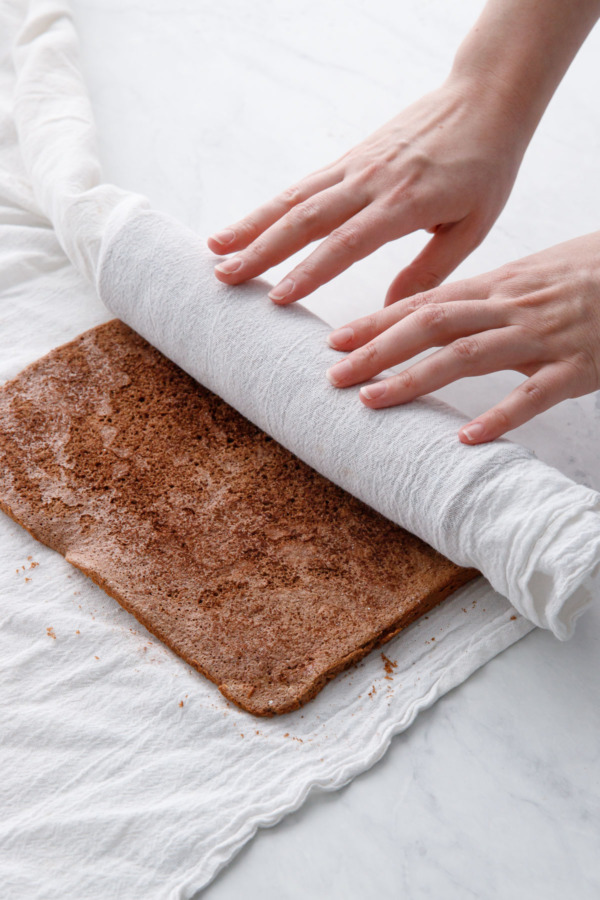
- Remove from oven. Dust top of cake with a bit of powdered sugar mixed with cocoa powder, then carefully invert warm cake onto a piece of parchment backed by a solid surface like a large cutting board. Peel off parchment paper backing, revealing the design. Liberally dust a clean tea towel with more powdered sugar/cocoa and lay on top of cake. Flip cake over so the design is facing down. Also, if your stencil design doesn't cover the full surface, make a note of which surface is the empty side: you'll want to start rolling from this side.
- Starting with the side of the cake without the design, carefully roll up the warm cake in the towel. Doing this while the cake is still warm will give the cake a 'muscle memory' and allow you to roll it up later with the filling without it cracking.
- Let rolled cake cool for about 1 hour or until completely cool to the touch.
- Meanwhile, to make filling, in a small bowl, sprinkle gelatin over 1 tablespoon cool water and let soften for 5 minutes. Microwave the mixture for 5-8 seconds until the gelatin is completely dissolved and liquefied. Let cool slightly (but don't let it firm up, if it does, microwave it again).
- Place cold whipping cream in the bowl of a stand mixer fitted with the whisk attachment. Beat on medium speed until frothy, then add powdered sugar, increase to medium high and beat until the paddle starts to leave trails in the cream.
- Mix a spoonful of the partially-whipped cream into the bowl with the melted and cooled gelatin until completely incorporated, then, with the mixer running on low, add this back to the bowl with the rest of the cream. Increase speed to medium high, beating until cream holds medium-stiff peaks (take care not to overbeat). Mix in chestnut cream and amaretto until incorporated. Set aside or chill for 5 to 10 minutes to let the gelatin set up a bit (a slightly firmer filling makes the cake easier to roll).
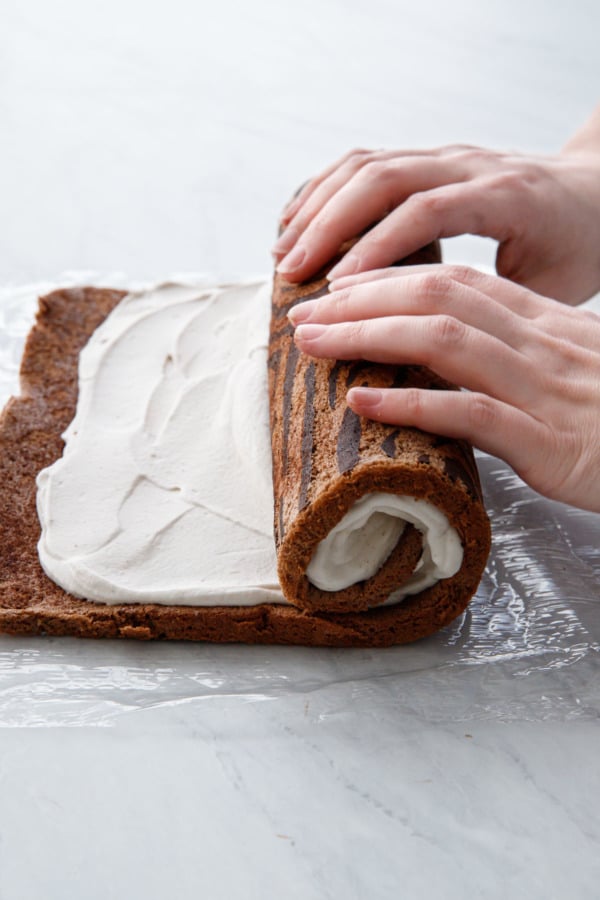
- Carefully unroll cake and remove towel. Spread filling into a thin even layer over the whole cake, leaving about 1/2 inch bare at both ends. You may not use all of the filling (save the rest to dollop on top!)
- Gently roll up the cake, firmly, but taking care not to use too much pressure lest the filling squeeze out the sides. Wrap tightly in plastic wrap and refrigerate for at least 2 hours or overnight, until filling is set. If you happen to have a cardboard tube lying around, place your cake roll in the tube to keep the bottom from flattening out as it chills (I used a 3½-inch-diameter tube for a whiskey bottle and it was the perfect size).
- Dust cake liberally with powdered sugar. Cut into slices with a sharp serrated knife and serve. Cake roll will keep, tightly wrapped and refrigerated, for up to 3 days.


I have a baking pan that’s about 9 x 11 inch, but I’ve tried a recipe also with 3 eggs that had a bit too much left over. I wanted to try a chocolate version one, but should I reduce the recipe slightly?
I tried it and the taste came out beautifully! Do you happen to have the recipe for a two-layer cake? I’d love to make one for my kid’s birthday.
So glad you enjoyed!
I have lots of cake recipes:
https://www.loveandoliveoil.com/category/recipes/desserts/cake
this looks lovely. chocolate and chestnut is a great combo. happy festive season.
really neat idea using the wood grain pattern! love this, thank you!
Such a wonderful recipe and a very beautiful photo! I will definitely try to cook. I love your blog! I look forward to updates.
Sounds and looks delicious! Can this be made with hazelnuts instead? If yes, how? What alcohol will go well with it- I mean in the cake.
The chestnut paste is really unique in terms of flavor/texture. That said, you can flavor the cream filling with anything as long as it doesn’t affect the consistency of the whipped cream. A few spoonfuls of hazelnut praline paste would be lovely here, for example!