
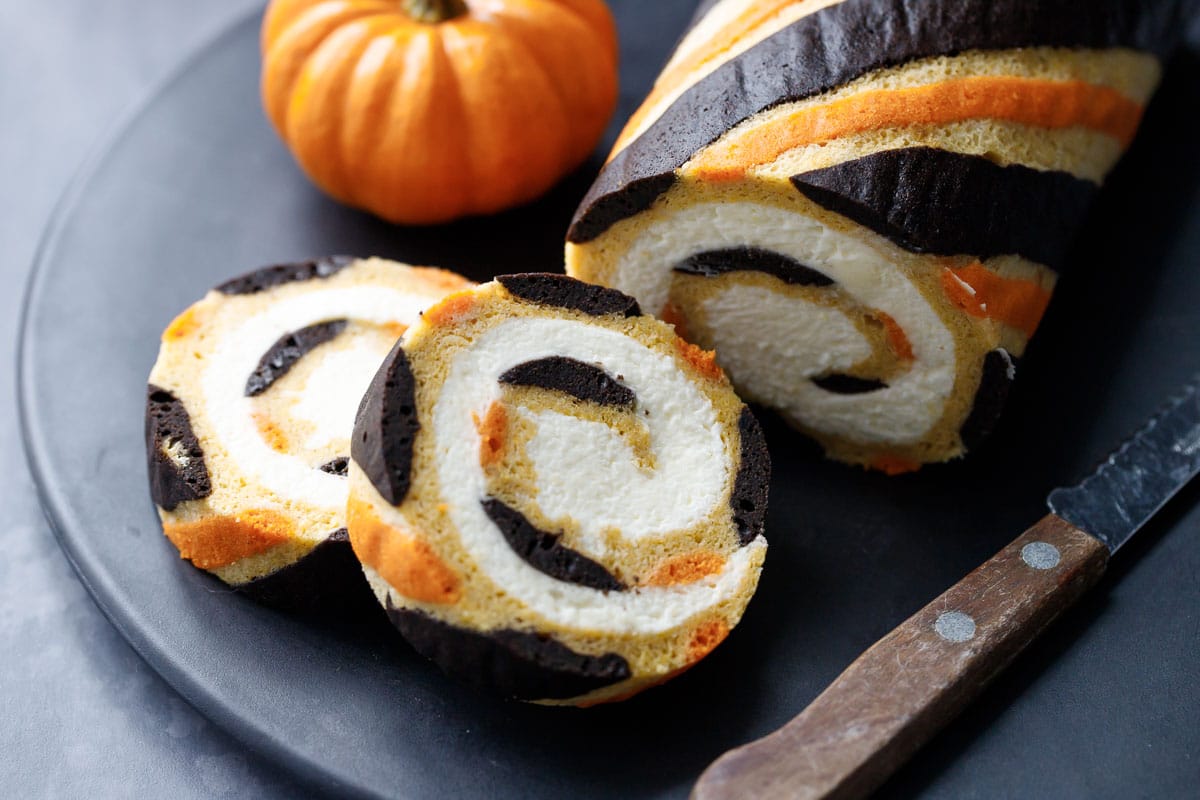
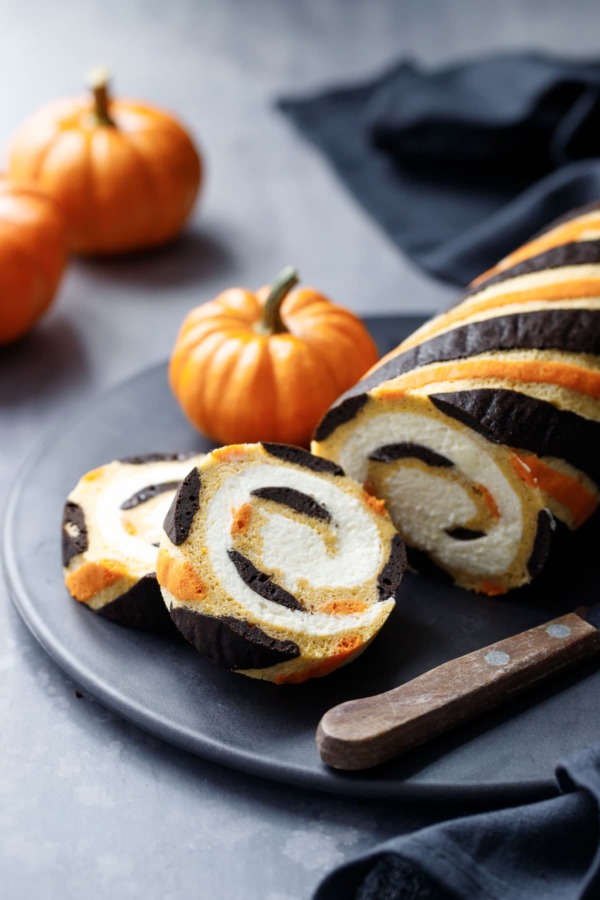
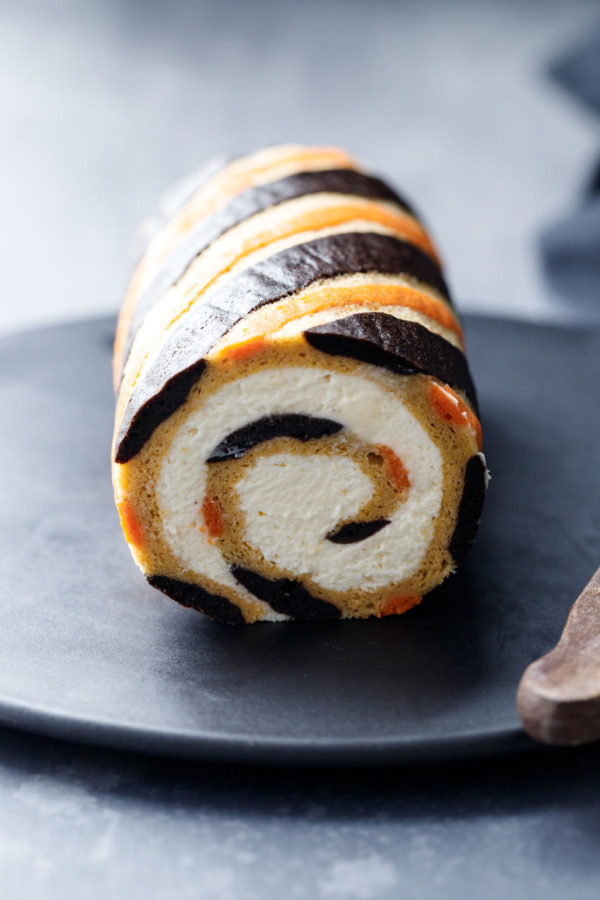
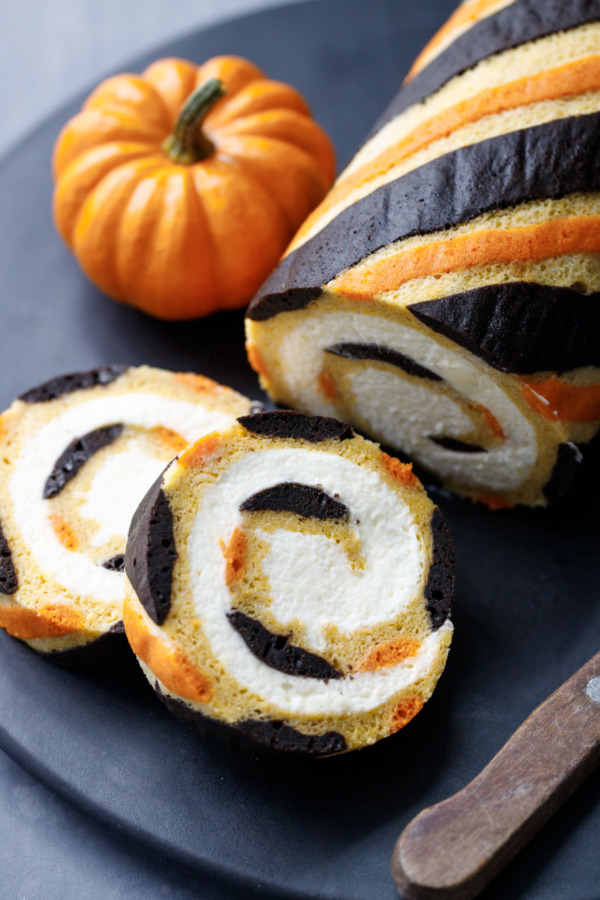
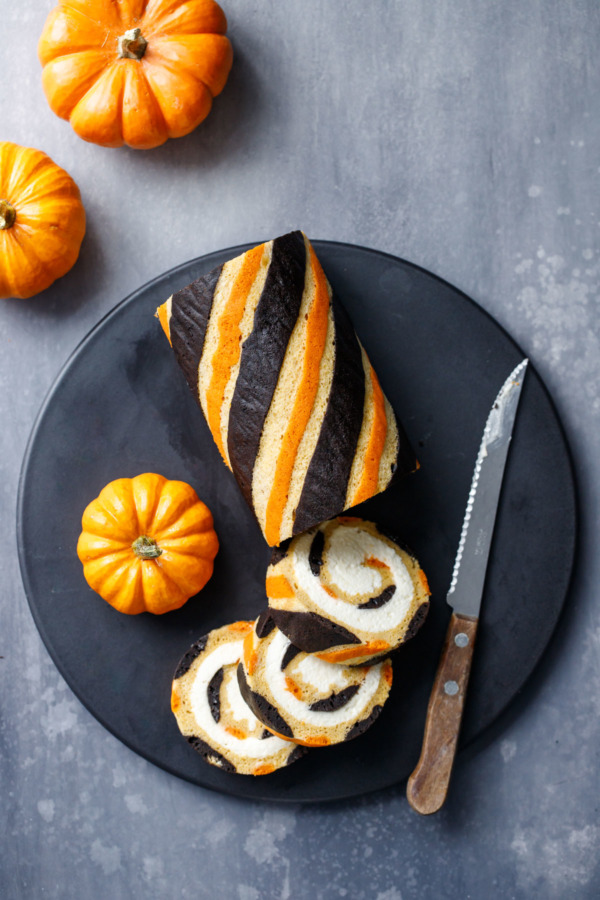
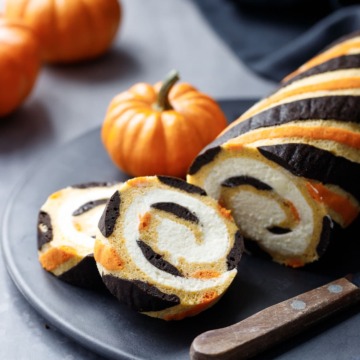
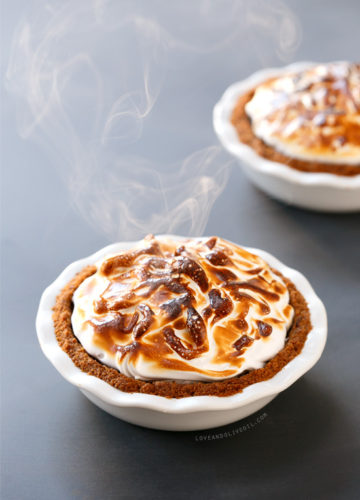
Perfect for fall, this stunning take on a classic pumpkin cake roll features a lightly spiced pumpkin sponge cake and a creamy mascarpone whipped cream filling.
The striking orange and black diagonal stripe pattern is made by coloring some of the batter and piping it onto the baking pan before the cake is baked (see step by step photos below – it’s easier than it looks!)
Save this recipe for later!
I had a hankering to make a cake roll. But pumpkin cake rolls have been done. Overdone in fact. I wanted to do something just a little bit different.
In typical indecisive fashion, I wavered back and forth, unable to decide whether to make a chocolate cake roll with a pumpkin filling or a pumpkin cake roll with a chocolate filling. Because, surprisingly, chocolate and pumpkin are a remarkably good combination.
But then I started looking online at pictures of ornate Japanese cake rolls and decided that was what I wanted to make, with orange and black Halloween-themed stripes.
My design is fairly simple and far from perfect. But the two tone stripes are pretty darn cool looking, and I also love the pop of chocolate flavor (the dark stripes are naturally colored with dark cocoa powder.)
The filling is simple: a fluffy whipped cream folded into mascarpone cheese. The mascarpone has a delicate flavor, but more importantly, gives the whipped cream a structure and stability that allows it to hold its own when rolled up in the cake. This is not a buttercream. It’s light and airy and not overly sweet or greasy, like a lightly sweetened cloud.
Could you use cream cheese instead? Of course. (Personally, I strongly dislike cream cheese frostings and tend to avoid them). But if you’ve never tried mascarpone you don’t know what you’re missing!
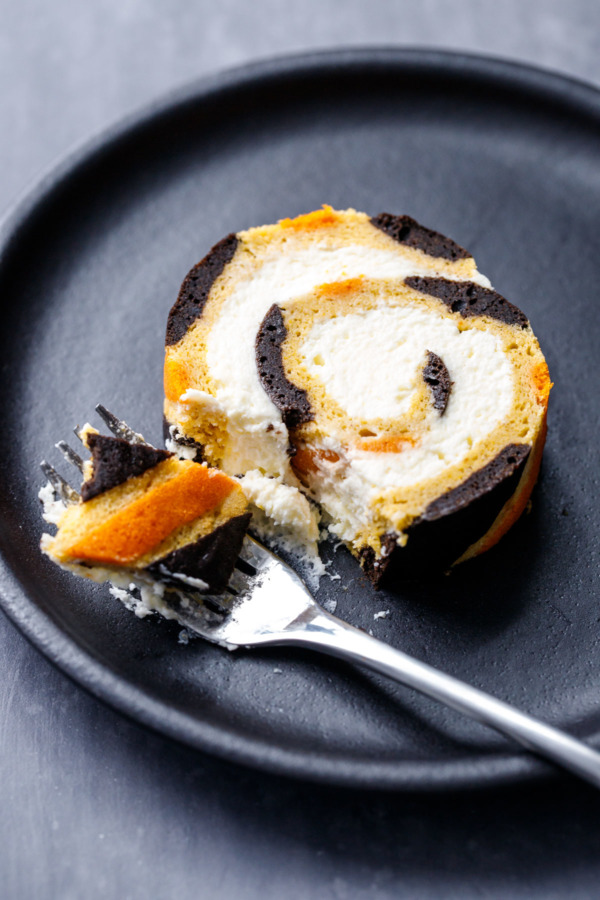
You might be surprised to hear this dessert isn’t overly sweet. In fact the first time I made it Taylor said it actually needed more sugar. I upped it a bit in the second version, but it’s still far less sweet than what you might expect.
The sponge cake is moist and bouncy, lightly flavored with pumpkin and spices (this isn’t one of those punch-you-in-the-face pumpkin spice desserts—rather, more of a love tap of pumpkin and a whisper of spice). And the filling is beautifully simple, fluffy and cloud-like, with little more than cream, sugar, mascarpone and a pinch of salt.
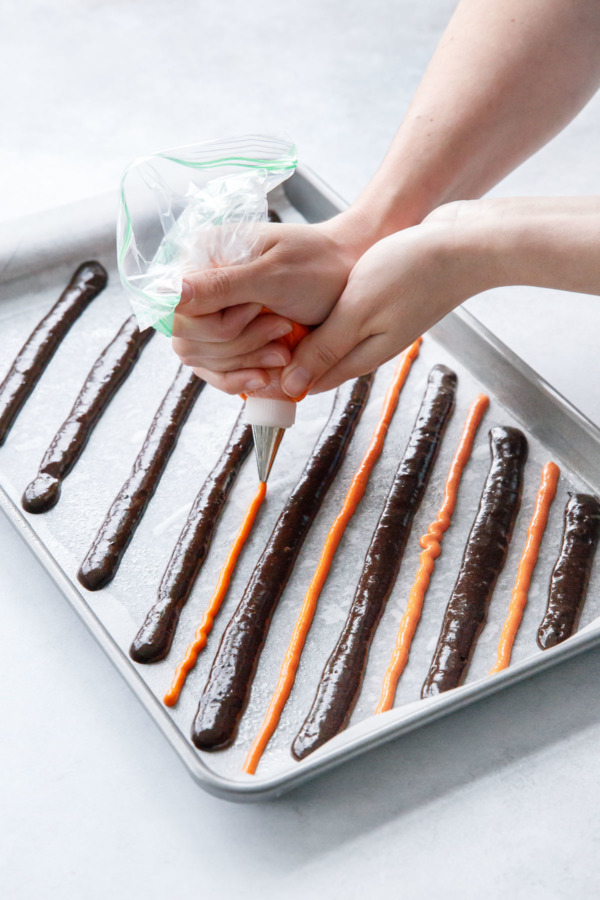

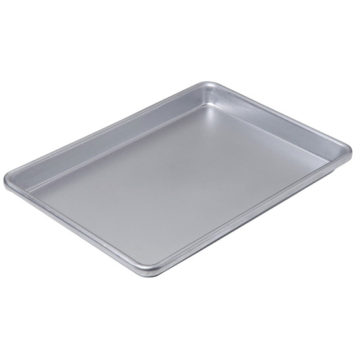
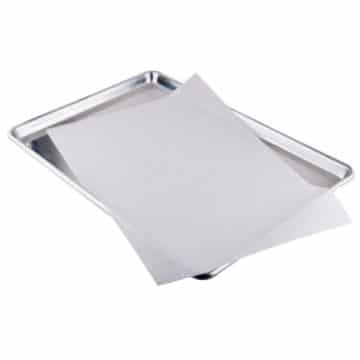
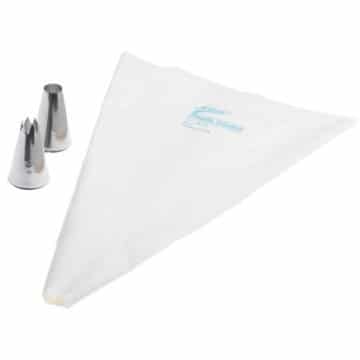
The pattern is made by dividing the batter into three bowls (PSA: this recipe uses a lot of bowls. Just accept it and make room in the dishwasher). The main bulk of the batter is naturally pumpkin colored, a light orange. One third of the batter is then colored with cocoa powder, for both a flavor and color contrast. For the thin stripes I added some orange food coloring (Americolor Orange, for reference) for a bit more contrast from the natural pumpkin. The two accent batters are then spooned into piping bags and piped into diagonal stripes on a parchment-lined jelly roll pan (a jelly roll pan is in between the size of a quarter sheet pan and a half sheet pan. It’s uniquely sized just for this kind of cake).
Baking Tip: Draw your design on the back of the parchment in heavy pencil. Do this before greasing and lining the pan. This guide will help immensely when actually piping out your design.
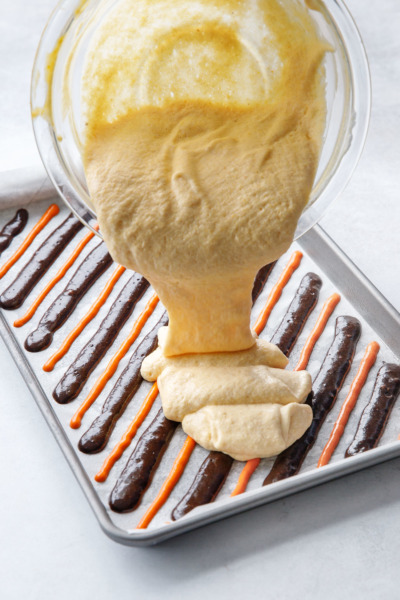
Once you’ve piped your design, freeze the whole pan for about 10 minutes to set the design, then pour the remaining natural batter over the top. This batter doesn’t really level out on its own, so you want to smooth the top out as much as possible (a large offset spatula is the best tool for this!)
If you prefer to keep things simple, skip the stripes and just pour the plain batter right into the pan. Your cake roll will taste just as good without the stripes. :)
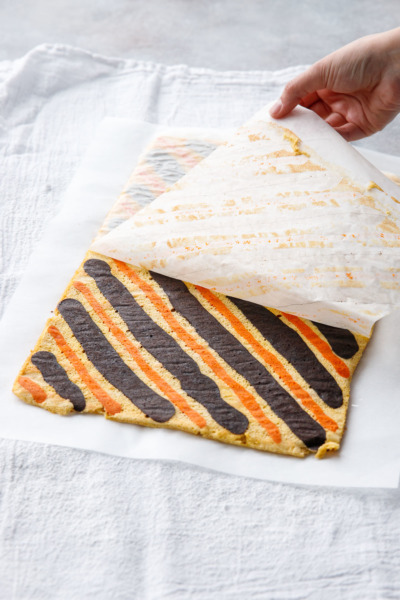


Once the cake has baked, almost immediately lift it out of the pan. Flip it onto a clean piece of parchment, and peel off the other piece of parchment from the back. Then lay a clean tea towel (dusted with powdered sugar) on top, and flip it again. Remove the other piece of parchment and tightly roll up the cake in the tea towel.
Be sure the pretty side of the cake is facing DOWN, that way it will appear on the outside of the final roll (the first test cake I made I rolled up inside out and it the stripe effect was lost entirely).
Let the rolled cake cool completely, about an hour or so.
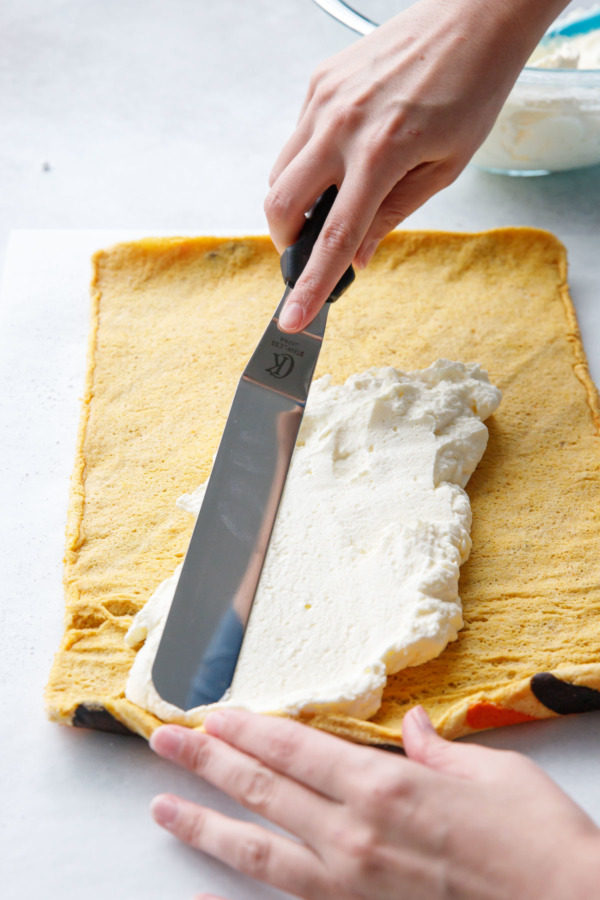
Then, when it’s completely cool, gently unroll it from the towel and spread the filling into a thin even layer over the whole cake (leaving about 1/2 of empty space at the far end – the filling will squeeze out a bit as you roll it up).
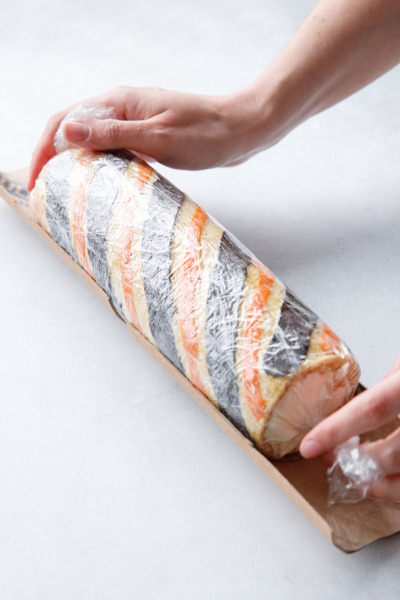
Since it cooled in a roll, it should have somewhat of a ‘muscle memory’ and should roll up pretty easily here without cracking. Roll it fairly tight, but try not to squeeze out too much of the filling.
Wrap the cake in plastic wrap and chill it for at least 2 hours.
Baking Tip: If you want a perfectly round roll, cut a mailing tube about the diameter of your roll in half lengthwise. Gently rest your rolled and plastic wrapped cake in the semicircle of the tube; this will keep the roll from settling to a flat bottom.
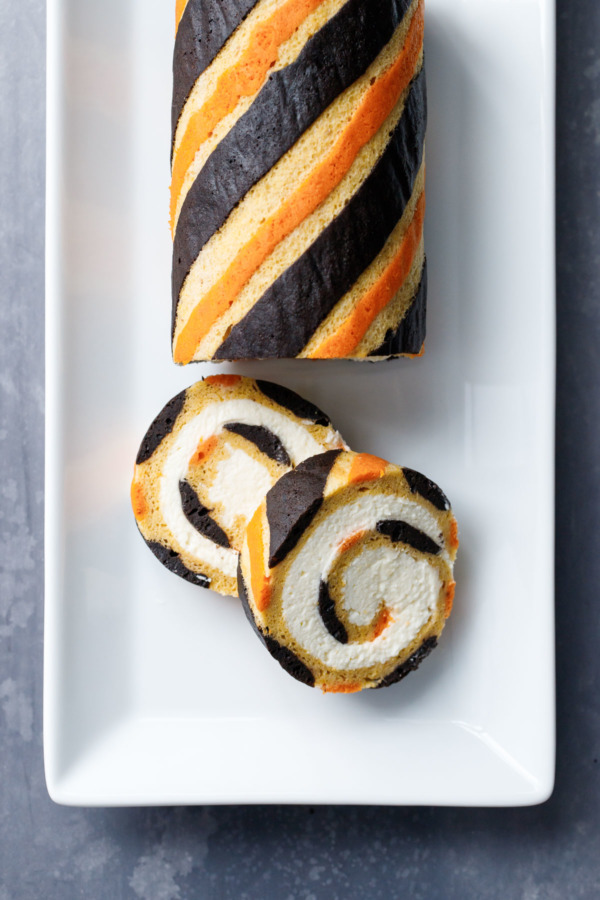
Once chilled, remove the plastic wrap and slice it with a clean, sharp knife while it’s still cold (it will soften as it sits at room temperature and will be harder to slice cleanly without squishing out the filling). Wipe off the knife blade between each cut for perfectly clean slices.
Happy fall, y’all!

Pumpkin Cake Roll with Mascarpone Whipped Cream
A patterned twist on a classic pumpkin roll cake, with a lightly spiced pumpkin sponge cake and a cloud-like mascarpone whipped cream filling. Perfect for fall!
Ingredients:
For Cake:
- 3 large eggs, separated
- 6 tablespoons plus 2 tablespoons granulated sugar, divided
- 1 tablespoon vegetable oil
- 1/2 cup canned pumpkin puree
- 1 teaspoon vanilla extract
- 1/2 cup (60g) plus 3 tablespoons (22g) cake flour, sifted and divided
- 1/2 teaspoon kosher salt
- 1/2 teaspoon ground cinnamon
- 1/8 teaspoon ground nutmeg
- 1/8 teaspoon ground cloves
- 2 tablespoons whole milk
- 1 tablespoon dark or black cocoa powder, sifted
- orange food coloring, optional
For Filling:
- 3/4 cup heavy whipping cream, plus an additional 1 to 2 tablespoons as needed
- 3/4 cup powdered sugar, sifted
- 4 ounces (1/2 cup) mascarpone or cream cheese, at room temperature
- pinch salt
Directions:
- Preheat oven to 350 degrees F. Lightly spray a 15 by 10-inch jelly roll pan with cooking spray, then line bottom with parchment paper (if you want to trace a design template, do so with thick pencil lines on the back of the parchment paper before placing it in the pan). I also recommend leaving a bit of an overhang on opposite edges of the pan: this will make it easier to lift the cake out later.
- Separate eggs and set egg whites aside. Place yolks in a mixing bowl. Add 6 tablespoons sugar and whisk until sugar is dissolved and yolks are lightened in color. Drizzle in vegetable oil, whisking constantly, until incorporated. Whisk in pumpkin and vanilla.
- In a bowl, whisk together 1/2 cup of cake flour, salt, and spices. Sprinkle over batter and fold until incorporated. (At this point you should have about 12 ounces, or just over 1 1/3 cups of batter). From here we will split up the batter to create the multi-colored stripes (if you don’t want stripes, skip steps 4, 5, 8, and 10-14.).
- Measure out 4 1/2 ounces of batter (a generous 1/2 cup) into a clean bowl. Add 2 tablespoons of sifted cake flour and 1 tablespoon of sifted cocoa powder and stir to combine.
- Spoon out another 1 1/2 ounces (about 3 tablespoons worth) into another small bowl. Add 1 tablespoon of flour and a few drops of orange food coloring and mix well.
- Add 2 tablespoons of whole milk to main bowl of batter and whisk until just incorporated.
- In a clean mixing bowl or the bowl of a stand mixer fitted with the whisk attachment, beat egg whites until frothy. Add remaining 2 tablespoons of sugar and beat on high speed until whites hold medium peaks.
- Fold a heaping tablespoonful of egg whites into bowl with orange colored batter; fold until incorporated. Fold about 3 tablespoonfuls of egg whites into bowl with chocolate batter, again folding until no streaks of white remain.
- Fold half of remaining egg whites into main bowl of batter to lighten it, then add the remaining egg whites and fold until just incorporated.
- Transfer orange batter to a small piping bag fitted with a #5 round tip (you can also use a zippered sandwich bag). Transfer the chocolate batter to a piping bag fitted with a 1/4 round tip (#2A).
- Using the chocolate batter, pipe diagonal stripes of batter on prepared jelly roll pan. Keep your piping bag moving fairly briskly for straighter lines. I piped about 9 diagonal stripes about 1 1/2 inches apart.
- Using the smaller bag of orange batter, pipe thin stripes between each chocolate stripe.
- Place jelly roll pan in the freezer for 10 minutes to let the stripes set.
- Pour remaining batter over top of stripes, spreading the batter into an even layer using a large offset spatula.
- Bake for 12 to 14 minutes or until top is springy and edges are just barely starting to brown.
- Remove from oven. Carefully lift out warm cake and invert it onto another piece of parchment paper. Peel off parchment paper backing, revealing the striped design. Liberally dust a clean tea towel with powdered sugar, then flip the cake layer onto the towel, striped side down (the outside of the cake roll should showcase the pretty stripes, just be sure that side is facing down).
- Carefully roll up the warm cake in the towel. You want to roll it up fairly tightly; doing so will give the cake a ‘muscle memory’ and allow you to roll it up later with the filling without it cracking.
- Let rolled cake cool for about 1 hour or until completely cooled. Meanwhile, get your mascarpone out and let it fully come to room temperature.
- To make filling, place 3/4 cup of cold whipping cream in the bowl of a stand mixer fitted with the whisk attachment. Beat on high speed until cream falls in soft folds. Add sifted powdered sugar, then continue to beat until cream holds medium-stiff peaks (take care not to overbeat).
- In another bowl, combine mascarpone with salt and a splash of cream to loosen. Add a few spoonfuls of whipped cream and mix until combined, then fold in remaining whipped cream until smooth.
- Carefully unroll cake. You may need to hold it with your hand as it will try to roll back up (see, muscle memory!) Spread filling into a thin even layer over the whole cake, leaving about 1/2 inch bare at the far end. You may not need all of the filling, depending on how thick you want it.
- Gently roll up the whole cake, taking care to create a tight roll but not so tight that it squeezes out the filling. Wrap tightly in plastic wrap and refrigerate for at least 2 hours or overnight, until filling is set (this will make for cleaner slices). If you happen to have a spare mailing tube handy, cut it in half lengthwise to form a half circle. Place your cake roll in the tube to keep the bottom from flattening out as it chills.
- Cut into slices with a sharp knife (use one clean motion to cut, try not to ‘saw’ it) and serve. Cake roll will keep, tightly wrapped and refrigerated, for up to 3 days.
Did you make this recipe?
Let us know what you think!
Leave a Comment below or share a photo and tag me on Instagram with the hashtag #loveandoliveoil.


Great flavor, but fell short on having enough batter, so my cake portion was super thin.
In my experience if you don’t have enough batter, it’s a matter of too much air being lost in the mixing process. This is caused either by overmixing or using AP flour (this is one recipe where cake flour makes a huge difference). You could try adding an extra egg white if you only have AP flour, or if you did use cake flour, be sure to fold in the egg whites very gently to ensure as much air is preserved as possible! (Also double check your pan size, the recipe is for a jelly roll pan which is much smaller than a half sheet).
Ok, so I went back and remade this recipe. I realized my mistakes (one being, I was using a 1/2 sheet pan and not a jelly roll pan), and this time I made it without the stripes and made 1 & 1/2 times the recipe. Despite it cracking (also, my mistake because I rolled it in the parchment to save time), this cake is absolutely delicious! Light & fluffy and the filling is to die for. I used cream cheese because that’s what I had & it was fantastic. Excellent pumpkin roll cake! I’ll be making this again.
Thanks for the update and I’m glad you were able to make it work and loved the results! The size of the pan definitely makes a difference, I’ll be sure to clarify that in the recipe. <333
So I tried this today and followed the recipe exactly, even weighing ingredients and it’s all off. Didn’t have enough of either the chocolate or orange stripes to cover the pan or the remaining batter. The directions are overly complicated too. I’d like to try again without the stripe effect though because the batter is delicious.
Did you use cake flour? I’ve found that using AP flour deflates the batter too much, resulting in a flatter cake with not enough volume for the design. Cake flour has a much finer/lighter texture which allows it to be incorporated without as much volume loss.
I have another cake roll recipe that uses a stencil with a separate paste mixture for the design – I’m thinking something could be done similar for a striped design with the pumpkin flavored batter: https://www.loveandoliveoil.com/2021/03/monstera-cake-roll.html
Yes, I used cake flour. I’ll take a look at the other recipe.
Absolutely the worst directions for recipe ever
You’re directions are completely wrong. I was so embarrassed today. It’s unreal and I’m a private chef and I know my shit.!! And your recipe is way off
Sorry you had trouble with this recipe. Can you let me know a bit more about what happened? I’m positive we can troubleshoot and figure out the issue.
Love this cake —does it freeze well?
I haven’t personally tried freezing this one. Sometimes things with gelatin do odd things when frozen/thawed, the filling might not hold up very well. if you try it definitely let me know!
Something is askew with this recipe. I followed the measurements EXACTLY! There is not enough batter to cover the stripes – very different from the posted photo. Also, the density of the chocolate is too much for the batter that covers it. The marscapone filling was spot on. I think you need to remake this recipe because the quantities and process given do not yield the same results as shown. It’s a shame to throw out food especially when ingredients are so expensive. I would be reluctant to try anything else off this website.
Sorry this didn’t work out for you! In my experience (and I’ve made dozens of cake rolls and had this happen to me as well), when the cake comes out too thin or there seems like there’s not enough batter, it’s actually that there’s not enough air in the batter. Either it was over-mixed, the meringue was too weak, or, and this is probably the most likely reason, there was too much flour or it was all-purpose flour (cake flour is much lighter cup for cup). So you probably had the correct amount of batter by weight, but not nearly enough volume, which is why it seemed like there was so little. I wrote a lot more about troubleshooting cake rolls in this recipe here: https://www.loveandoliveoil.com/2021/03/monstera-cake-roll.html (near the bottom). Hope that’s helpful!
Could this be frozen? I’m wondering how macaroons and whipped cream would thaw.
Recipe is not correct. I followed to the tee and did not have enough batter left to cover the stripes. It was short by quite a bit and yes, I even measured my jelly roll to ensure it was the correct size. After spending so much time on the recipe and making the stripes I then had to make additional batter to cover. I would suggest if you plan to make this one skip the stripes. :(
The quantities are exactly what I used. Depending on your piping tips and techniques your stripes might use more or less batter, it’s just a matter of eyeballing it to ensure you space it out evenly. Luckily, with cake rolls you really only need the design on half of the cake since that’s all that shows on the outside anyway, so it’s somewhat forgiving.
I think the cake batter needs more flour. I made this the light collored batter browned but he cake never set up firm , it was to wet. . I had to throw it away. The ororang and chocolate set up perfectly. Too bad it was absolutely a beautiful design and great idea.
I had the exact same problem…the cake was too thin and didn’t hold it together. There wasn’t enough batter. I followed the recipe exactly. That being said, the design was striking and the marscapone filing was delicious.
I baked this beauty today! It doesn’t look so perfect like yours but still – it’s amazing. I have an experience with pumpkin roll but this one, with stripes and all, was a challenge:). Love it! Planning it for Thanksgiving, why not, right? The colors are matching:) . Thank you for a great explanation and direction. I’m a fan:)
This is super cute. It literally made me smile when I saw the post.
I made this roll yesterday. I closely followed all of the steps. My pan was larger than the jelly roll pan you recommended so I increased the recipe for 1.5 x the original recipe. To me, the regular batter was less than I would have liked in order to make the overall cake a little bit thicker. I struggled to cover the stripes. I am familiar with tedious recipes like empanadas and baklava, so I enjoyed this challenge. My take away is that I will not make it again because the stripes were harder than the cake batter, the whole cake start to finish too too long and the taste didn’t reward me for the effort expended, even though I added extra spices. I made a cream cheese filling with cream cheese, butter, vanilla and powdered sugar. The filling overshadowed the taste of the cake. It was a fun project but way too time consuming for a repeat.
One of the reasons I didn’t use a cream cheese frosting, it’s far too strong a flavor! The mascarpone whipped cream is much lighter and a better match for the sponge cake. ;)
wow, this is really gorgeous, it doesn’t even have to be a Halloween, October or even fall themed cake roll, regardless very subtly beautiful with really nice flavors like mascarpone that are less sweet and creamy than tasty, thank you for this wonderful recipe!
Just got halfway through the recipe, to the part where it gets divided in three (stripes & main batter).
Measured out 3/4 C for the chocolate stripes per the recipe. Measures out 1/4 C for the orange stripes. Annnnd now I have 1/8th teaspoon of “main” batter left.
I think your numbers might be a little off…?
Try using the weight measurements? I weighed it out as I spooned the batter using a 1/4 cup. A liquid measuring cup might be more generous? But the weights should be accurate.
I gave up on the stripes and just baked the sponge whole. It’s a light brown, closer to a molasses cookie in color than the beautiful golden of yours. Did you start with a European recipe and try to convert it to volume instead of weights? There’s only maybe half as much sponge batter as there should have been — once it was baked off and rolled there was easily 3x as much filling as was needed…? Unless I misread something somewhere, next time I’d go 1.5x on the sponge and maybe 3/4 on the filling…?
So after your comment last night I was prompted to retest the recipe again this morning, just to confirm the measurements once more, and have updated the recipe here for clarity. My original weight measurements are accurate, but the volume equivalents may have been a bit generous (‘scant’ 1/4 cup might have been more appropriate). Long story short, the recipe makes about 12 ounces of batter; half of this (about 6 ounces or ~3/4 cup) is split for the stripes, and the other half should remain uncolored.
As for the color differences, I’ve found canned pumpkin can vary quite a bit in this regard. I used Trader Joe’s Organic Pumpkin Puree; Libby’s, for example, is generally much deeper in color.
Anyways, glad you persevered and hopefully you enjoy the final product despite these issues!
This is way out my league to make esp with a toddler around but absolutely stunning photography! That is a gorgeous cake roll! I’d buy one!
The I love reading even the posts of things no one would eat in my house, i really enjoy the photos and your writing style. Someday I’m gonna jump in and learn canning from you though
Leave a Reply
FANTABULOUS! Very impressive looking. I am drooling! lol
Lindsay this is too fun! I love it!!!
LINDSAY!!!
How WILD is this cake roll, it’s BEAUTIFUL!!
If you don’t mind, just mail me 3 of them please….LOL!!
It does look complicated, but reading your instructions on assembling it, not so hard.
I’ve made many a cake roll, but not like this!
You, my dear, have gold stars for this one.
Cute indeed, thanks for sharing.
Have a nice day!
Pinned!
AMAZING!!!