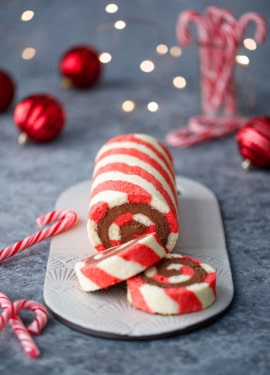
Peppermint Cake Roll with Chocolate Peppermint Whipped Cream
A light and fluffy chiffon cake with red and whites, rolled up with a chocolate peppermint whipped cream filling for a festive holiday cake that’s dressed to impress.
Yield: 10 servings
Ingredients
For Cake:
- 2 large egg yolks
- 4 tablespoons / 50 g granulated sugar
- 2 tablespoons / 28 g vegetable oil
- 3 tablespoons / 45 g whole milk
- ½ teaspoon vanilla extract
- ¼ teaspoon Amoretti Peppermint Extract
- ½ cup / 62 g all-purpose flour
- 2 tablespoons / 16 g cornstarch
- ½ teaspoon kosher salt
- ¼ teaspoon baking powder
- 4 / 136 g large egg whites
- ⅛ teaspoon cream of tartar
- 3 tablespoons / 36 g granulated sugar
- red gel food coloring
For Filling:
- 1 ½ cups / 240 g heavy whipping cream, divided
- ¾ sheet leaf gelatin or 3/4 teaspoon powdered gelatin
- 2 ounces / 60 g dark chocolate, finely chopped
- 1 tablespoon / 15 g granulated sugar
- 3 tablespoons / 25 g Dutch-processed cocoa powder, sifted
- ¾ teaspoon Amoretti Peppermint Extract, or to taste
Instructions
For Filling:
- Cut leaf gelatin into 1-inch strips and place in a bowl of cool water to soften. If using powdered gelatin, sprinkle over 1 tablespoon heavy cream and set aside to soften for 5 minutes.
- Place chopped chocolate in a heat-proof bowl.
- Heat 1 cup of heavy cream in a small saucepan. Add sugar, and sift in cocoa powder to remove any lumps. Whisk until smooth and cream starts to steam and bubble around the edges (don't let it fully boil).
- Add gelatin to hot cream, either wrining out the soaked sheet gelatin and adding that, or adding the softened powdered gelatin. Stir until gelatin has completely melted.
- Pour hot cream over chopped chocolate in bowl, then gently whisk until chocolate is completely melted and evenly incorporated into the cream.
- Add remaining 1/2 cup cold cream (this will help bring the temperature down more quickly). Stir in peppermint extract.
- Cover with plastic wrap, pressing down so the plastic is touching the surface of the cream. Place in the refrigerator until completely chilled, at least 3 hours or overnight (since this needs to chill completely in order to whip up properly, definitely make this ahead of time well before you start your cake).
For Cake:
- Preheat oven to 350 degrees F. Lightly butter or grease the bottom and sides of a 15-by-10-inch jelly roll pan; line with parchment paper (optionally, use a straight edge to draw a few diagonal lines in pencil on the bottom of the parchment paper to use as guides).
- Place egg yolks in a mixing bowl. Add 1/4 cup sugar and whisk until sugar is dissolved and yolks are lightened in color. Drizzle in vegetable oil, whisking constantly, until incorporated. Whisk in milk, vanilla and peppermint extracts.
- In a separate small bowl, whisk together flour, cornstarch, salt and baking powder, then sift dry ingredients into bowl with wet ingredients; whisk until combined.
- Transfer half of batter to another mixing bowl (tip: if you get the tare weight of your first mixing bowl before you start, it'll be very easy to know the exact weight of your batter and split it perfectly in half).
- Add a few drops of red food coloring to one bowl of batter (make it darker than you think you need as the egg whites wiil lighten it up quite a bit; I used 4 big drops of red gel coloring).
- In a clean mixing bowl or the bowl of a stand mixer fitted with the whisk attachment, beat egg whites on medium speed until frothy. Add cream of tartar, and continue to beat until the mixer stars to leave tracks. Slowly add 3 tablespoons of sugar, 1 tablespoon at a time, beating for a minute or so between each addition. Once all the sugar has been added, increase speed to medium-high speed and beat until whites hold just barely stiff peaks.
- Divide egg whites equally between white and red batters. I used my scale here, adding about 85g of egg white total to each bowl in two additions. I like to stir a scoop or two of egg whites first to lighten the batter, then I add the remaining egg whites and fold until just incorporated, taking care not to overmix and deflate the batter. Give the bowls one good rap on the countertop to pop the larger air bubbles.
- Transfer batter two two large piping bags fitted with 9/16" (14mm) piping tips (1A is the tip I used, one size up from my 1/2" tip). Twist and secure the ends of the piping bags with rubber bands or bread clips to keep the batter from leaking out. You can also use zip-top bags (wait to cut off the corner until you're ready to pipe).
- Pipe diagonal stripes, alternating between red and white batters, over the entire parchment-lined pan. Try to move the piping bag at a consistent speed, squeezing with even pressure as you go, with the intention of rationing out the batter so the stripes fill the entire pan with not much left over (some is ok, if you have a lot leftover your roll may end up too thin). Don't worry about the spaces around the very edges, the batter will soften to fill in those gaps.
- Once the pan is covered, lift and drop the baking pan from a few inches off the countertop once or twice to settle the batter into the edges and hopefully deflate some of the larger bubbles.
- Bake for 11-13 minutes or until top is springy and edges are just barely starting to brown. Remove from oven, run a knife around the edge to release the cake from the sides of the pan.
- Carefully invert the warm cake onto a piece of powdered sugar-dusted parchment paper sitting on top of a solid surface like a cooling rack, cutting board, or upside-down sheet pan. Peel of parchment paper from the bottom of the cake, revealing the stripes underneath.
- Liberally dust a clean tea towel with powdered sugar and lay on top of cake, leaving about 1-inch of overhang on one of the short sides. Flip cake over once more (use a second cooling rack or cutting board on the back to support it) so what was the top of the baked cake is facing up once again (this will ultimately become the interior of the cake roll).
- Fold the tea towel over the edge of the short side with the 1-inch overhang, then carefully roll up the warm cake, smoothing out any large creases in the fabric if necessary. Rolling up the cake while it is still warm will give it a 'muscle memory' and prevent it from cracking later.
- Let rolled cake cool, still wrapped in the tea towel, for about 30 minutes or until completely cool to the touch.
Final Assembly:
- While cake is cooling, transfer chilled filling mixture to the bowl of a stand mixer fitted with the whisk attachment. Beat on medium-high speed until the cream holds very stiff peaks (although be careful not to overbeat).
- Carefully unroll cooled cake. Spread filling into a thin even layer over the whole cake, leaving about 1/2 inch bare at the far end. You may not need all of the filling, depending on how thick a layer you want.
- Gently roll up the cake, firmly but not so tight that the filling squeezes out the sides. Wrap entire roll tightly in plastic wrap and refrigerate for at least 2 hours or ideally overnight, until completely set. If you happen to have a cardboard tube lying around, place your cake roll in the tube to keep the bottom from flattening out as it chills (I have a 3 1/2-inch-diameter tube from a bourbon bottle and it is the perfect size for cake rolls).
- Once cake is throughly chilled, I find the easiest way to get clean cuts is to use a piece of fishing line or dental floss (mint flavored is fine here because it's already minty). Place a loop of floss under the cake roll, then cross over the top to make a loop. Pull ends firmly apart and you'll end up with a neat, even cut that doesn't squish the round shape of your cake roll.
- Leftover cake roll will keep, tightly wrapped and refrigerated, for up to 3 days.