
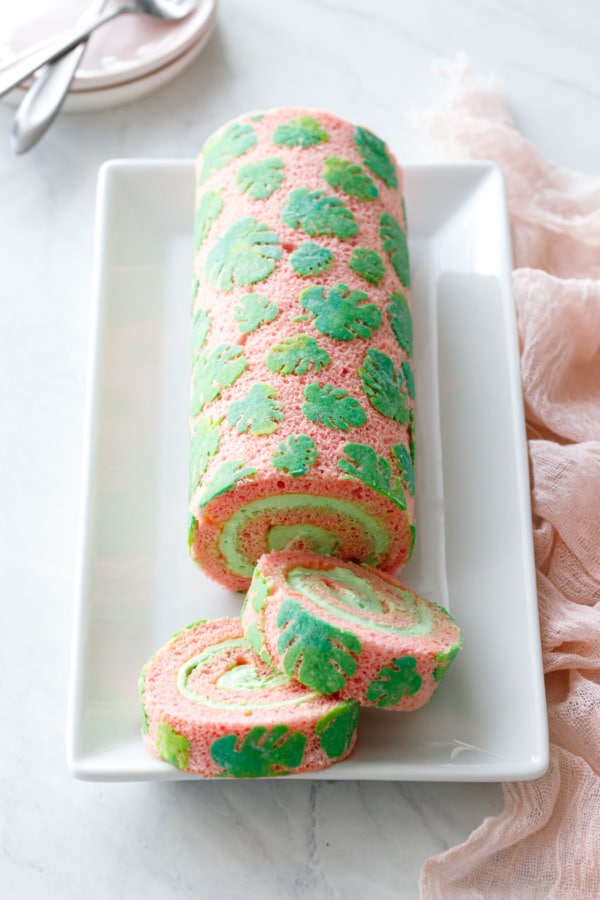
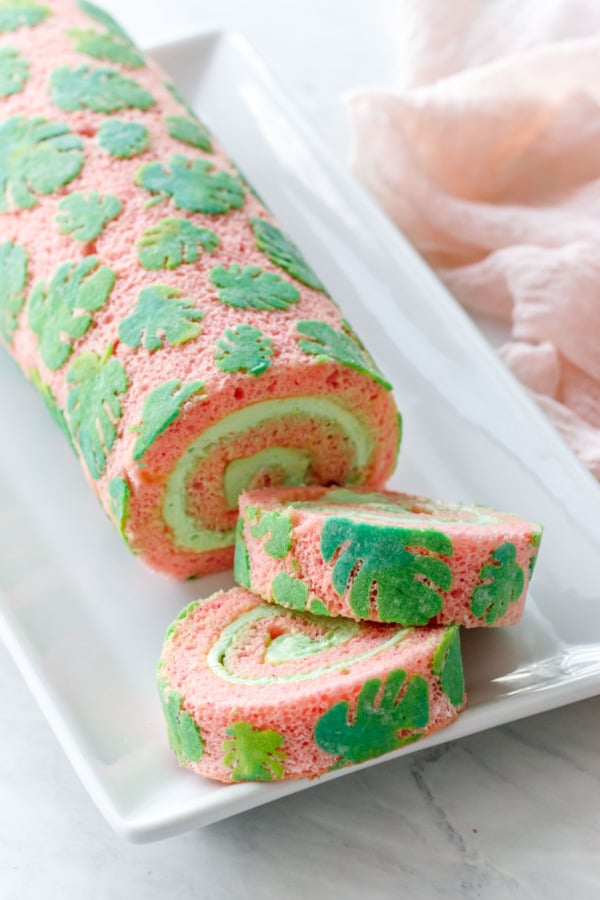
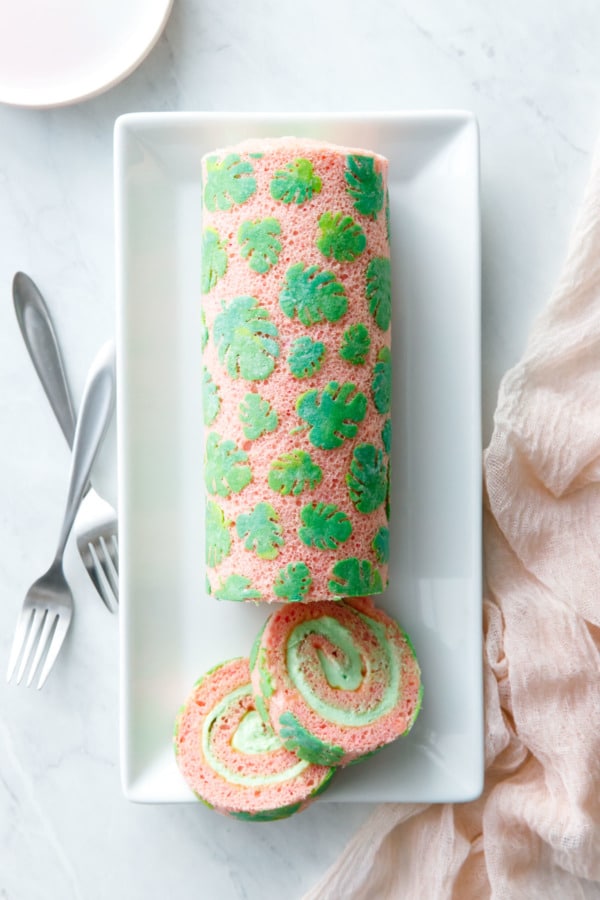
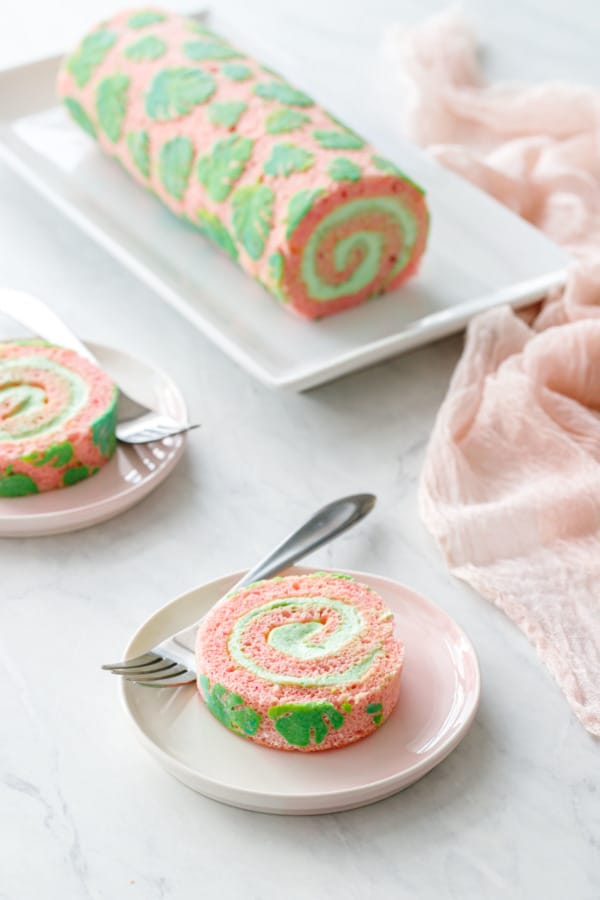
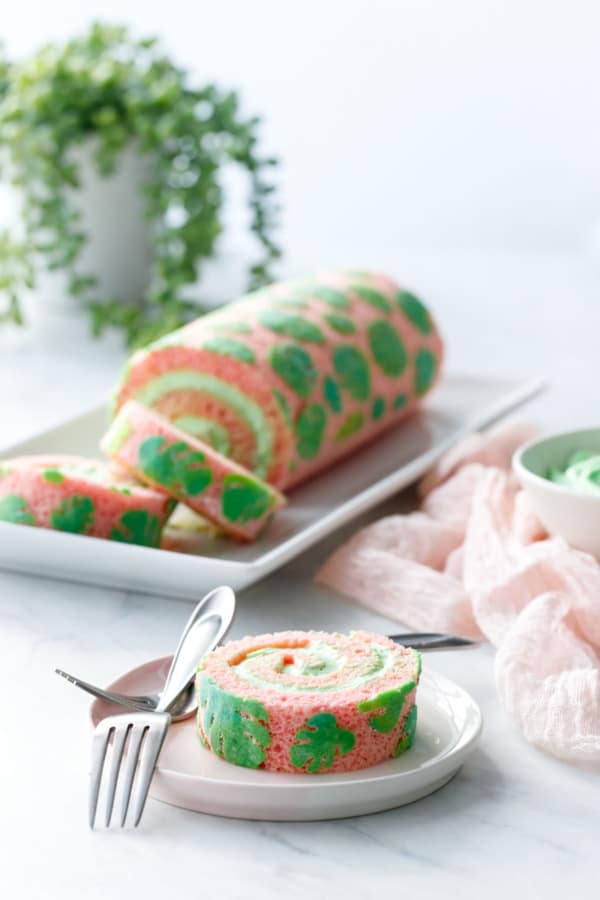
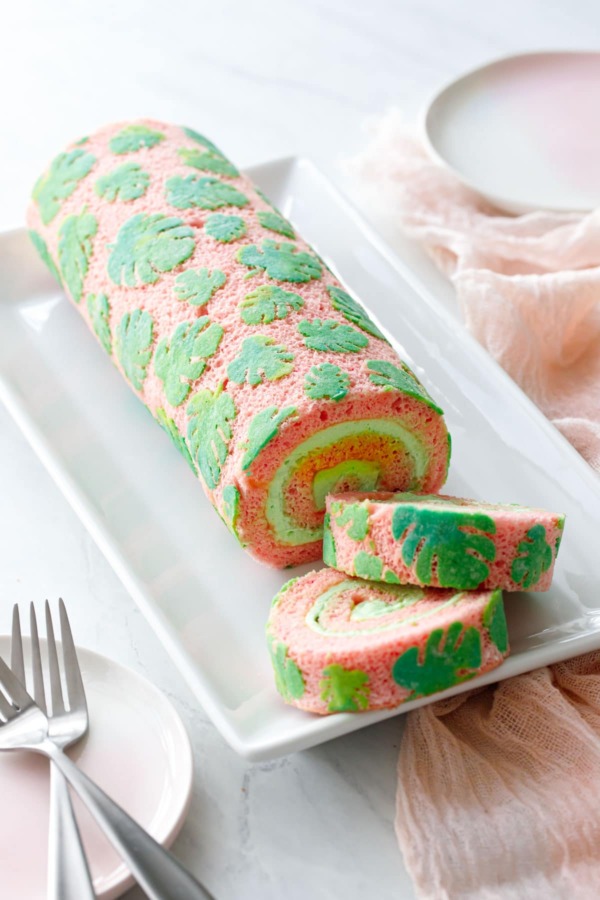
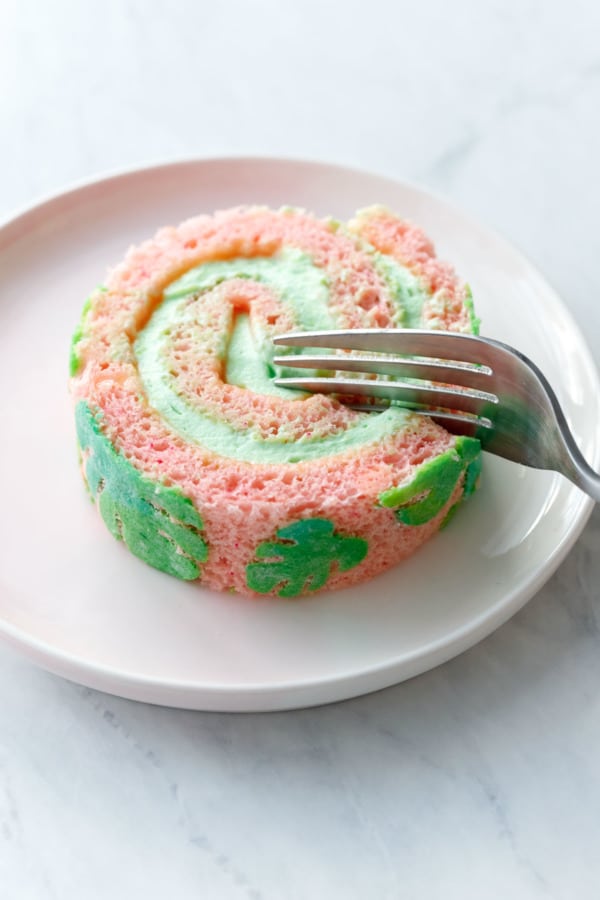
Hello, springtime! This springy, spongy, stenciled cake roll is filled with a layer of rich kaya (coconut jam) and fluffy pandan whipped cream.
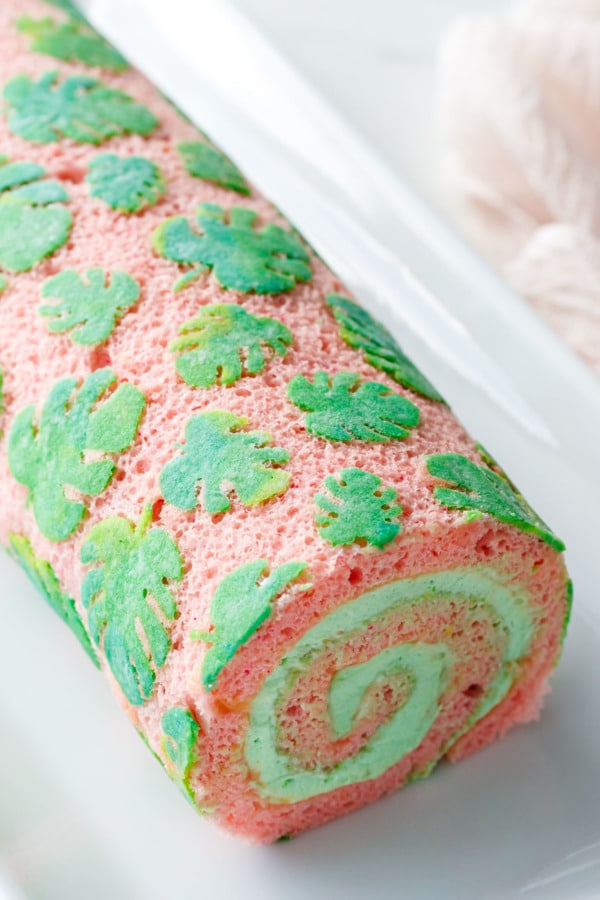
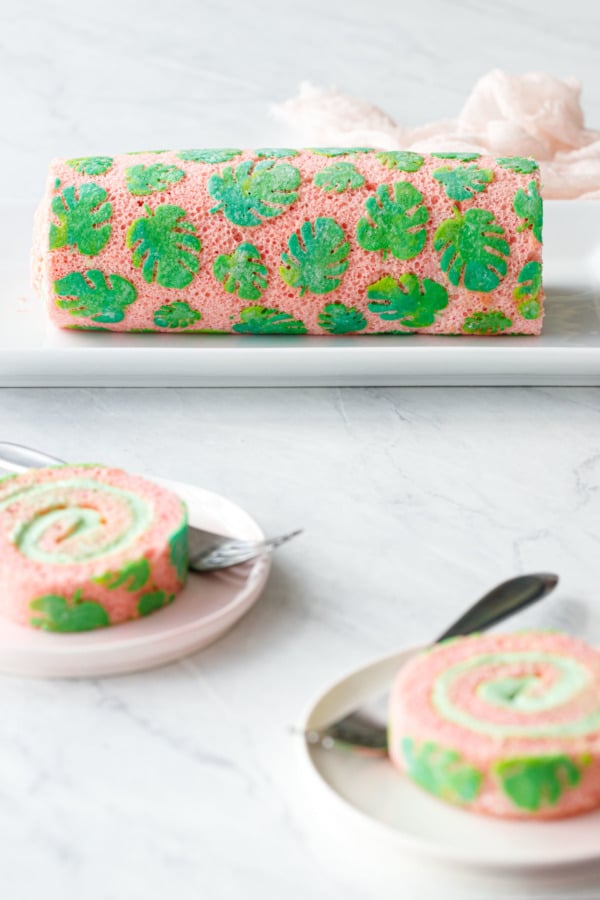
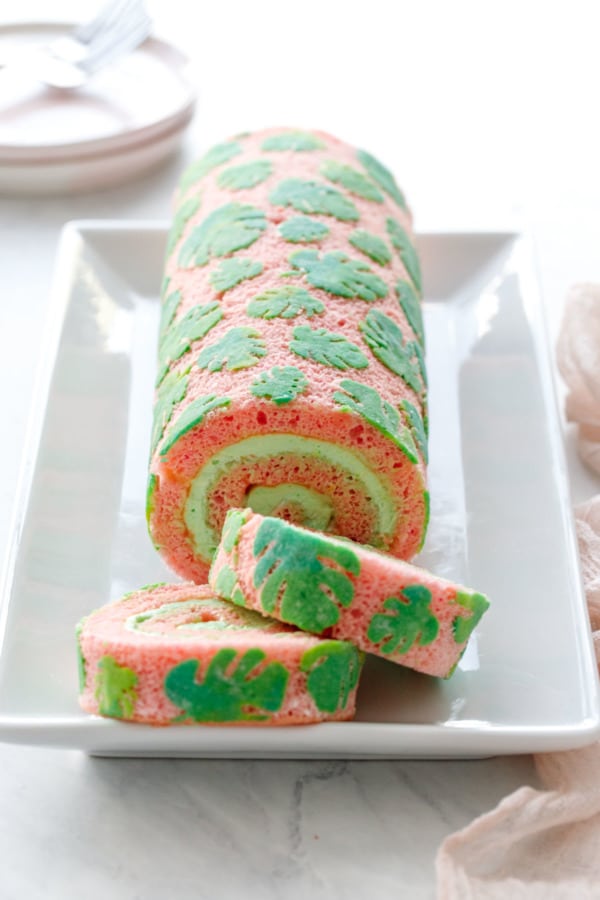
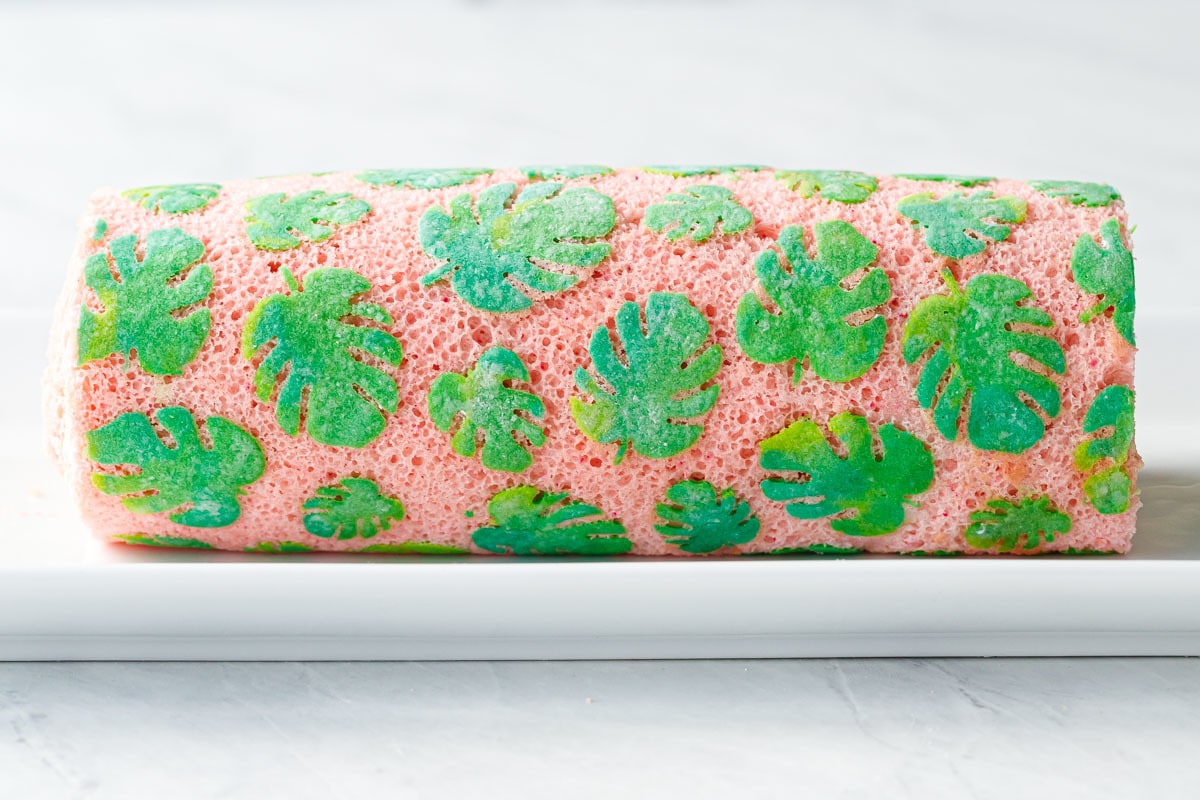
If your piping skills aren’t up to snuff, stencils make for gorgeous prints and patterns with minimal effort… like screen printing, but with cake batter. This monstera leaf design is achieved with 3 different colors of green batter for a water-color like effect, on a pale pink background that’s perfectly on trend.
Save this recipe for later!
This recipe is the product of months of dreaming and weeks of testing. It’s something I’ve been planning for quite a long time (I actually bought the monstera stencil before the wood-grain stencil from my holiday cake roll), but ended up waiting until spring when the design would better match the weather.
The idea for the design popped into my brain and has remained pretty much unchanged (and the fact that the final result matches my vision so closely… well, I’m pleased as punch).
But that still left me with the question of… what do I fill it with?
I knew I wanted something green, to match the monstera leaf design. And I also wanted something a bit different than my usual green-go-to’s (aka matcha and pistachio). The perfect solution came in the form of Pandan: a grass-like leaf native to Southeast Asia which is often used in flavoring sweets and desserts.
I also added a thin layer of Kaya, a coconut-egg jam popular in Southeast Asia (especially Malaysia and Singapore), to give it an extra kick of flavor and sweetness and again, to make it a little bit different from my previous cake roll recipes. The punch of coconut is a perfect pairing for the subtle vanilla notes of the pandan. I simply adore this combination and couldn’t be more delighted with how the final product turned out (although, I’d maybe be slightly more delighted if it didn’t take me 5 rolls to get it just right…)
As is the case with this recipe, I am often inspired by Asian ingredients, flavors, and techniques, and I try my best to show my appreciation for the origins and cultural histories of these amazing and diverse foods. I truly believe we can all enjoy these unique recipes and ingredients, while still appreciating the cultures from which they hail and without laying claim to them as our own (there is a fine line between appropriation and appreciation, and I try very much to fall under the later with my recipes).
I simply didn’t feel comfortable posting a recipe like this one, inspired by Japanese techniques and Southeast Asian flavors, without addressing the increasing violence and hateful rhetoric directed towards Asian Americans in this country. Sadly, it is nothing new: Asian-Americans have been discriminated against in this country since before it was a country, even. This Twitter thread is rather eye-opening; did you learn about any of this in history class? Because I sure didn’t.
Talk is good and all (the more we can create awareness about what’s happening, the better), but I’m committed to putting my money where my mouth is, as they say. So I’ve committed to donating 100% of the Q2 ad revenue from this post to the AAPI Community Fund, which aims to address the urgent issues that face the AAPI community as well as broader, systemic problems through grants issued to trusted AAPI organizations working to rectify the racial inequalities in our society.
Please join me in donating to support organizations doing good in this country and in your community. Talk to your friends, family, and neighbors (and call out those who say hateful or derogatory things). Support Asian-run businesses in your neighborhood. Follow AAPI creators and food bloggers and, when you’re searching for a recipe, seek out those creators that have an authentic voice in whatever cuisine you are searching for (you may have to go to page 3 or 4 of the search results, such is the machine that is Google, but they’re there, I promise!)
You can also register for a free Bystander Intervention Training (I’m signed up for the April 20th date) to help become more informed and learn how to react and intervene in hateful and potentially harmful situations.
Not sure how to transition from such a serious subject to… cake… but if cake is ultimately what it takes to get us all talking about these issues and, more importantly, taking action, then cake it is.
This is a Japanese-style cake roll, distinguished by its fluffy, chiffon-like texture and often intricate (and usually adorable) designs. This style of cake is much less sweet than most American cakes, which is a nice change of pace when you’re craving a sweet treat but not THAT sweet.
Chiffon-style cakes are ubiquitous throughout Asia, and are traditionally filled/frosted with whipped cream. While I did make a test cake using a pandan and kaya-infused buttercream, I ultimately decided to go with the more traditional whipped cream based filling, infused with Pandan extract (and many thanks to my lovely friend, and self-proclaimed Kaya-eating expert Tabitha for her valuable insight and tasting feedback).
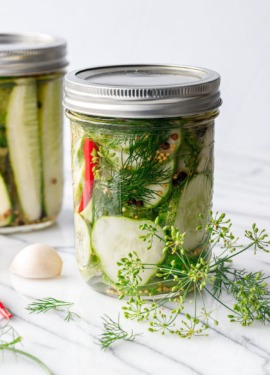
In addition to the pandan whipped cream, I added a thin layer of kaya, which is a coconut jam from Southeast Asia. There are a few different varieties, I used this sunny yellow srikaya in the final roll, but there is also a darker, greenish yellow variety made with pandan called nanyang kaya. I would have loved to use this style for even more pandan flavor, but both of the jars I ordered (in two separate orders, mind you) arrived with damaged unsealed lids and popped safety buttons. Luckily the third jar, ordered from a different brand/seller, arrived safe and sound… about 5 hours after I finished the final shots for this post. Oh well. It will certainly be enjoyed though, I have no doubt of that.
You can also make your own kaya too, with little more than coconut milk, egg and sugar. If you can’t track down fresh pandan, you can easily use pandan extract or pandan powder for flavor and color. I used the same pandan extract in the whipped cream filling as well.
How to Make a Stenciled Cake Roll
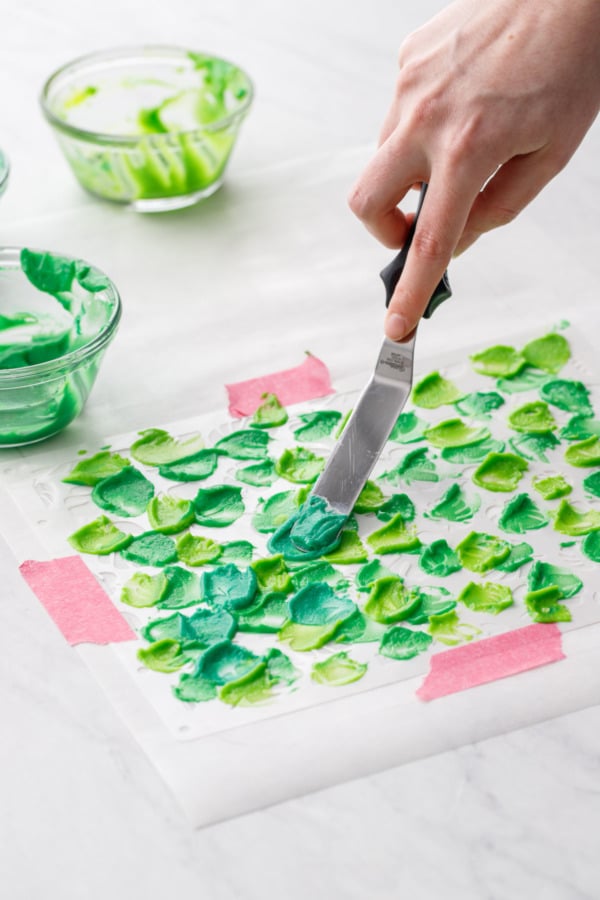
While it might seem more complicated, I’d argue the stencil design is easier than a piped design, as all you really have to do is smear the batter across the stencil and peel it off. No piping skills necessary.
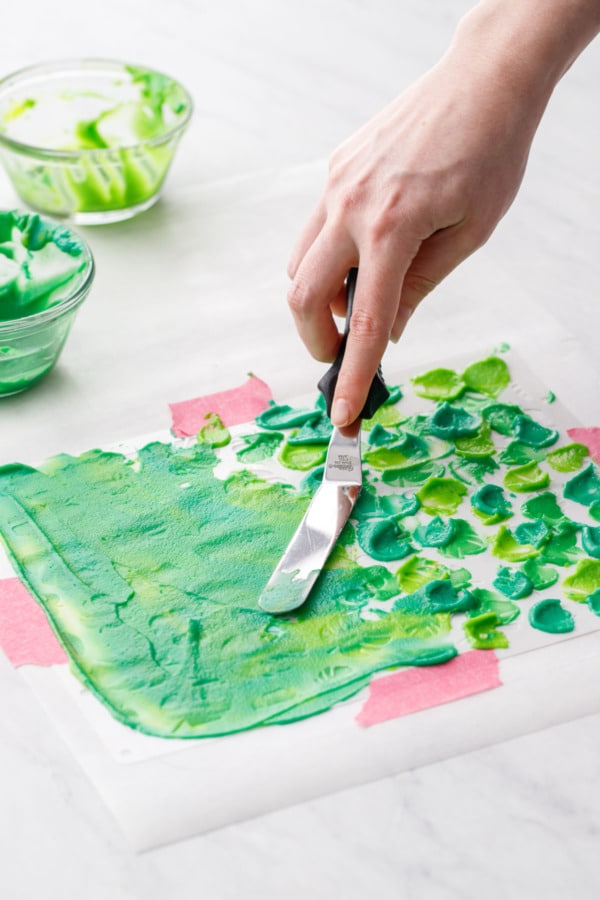
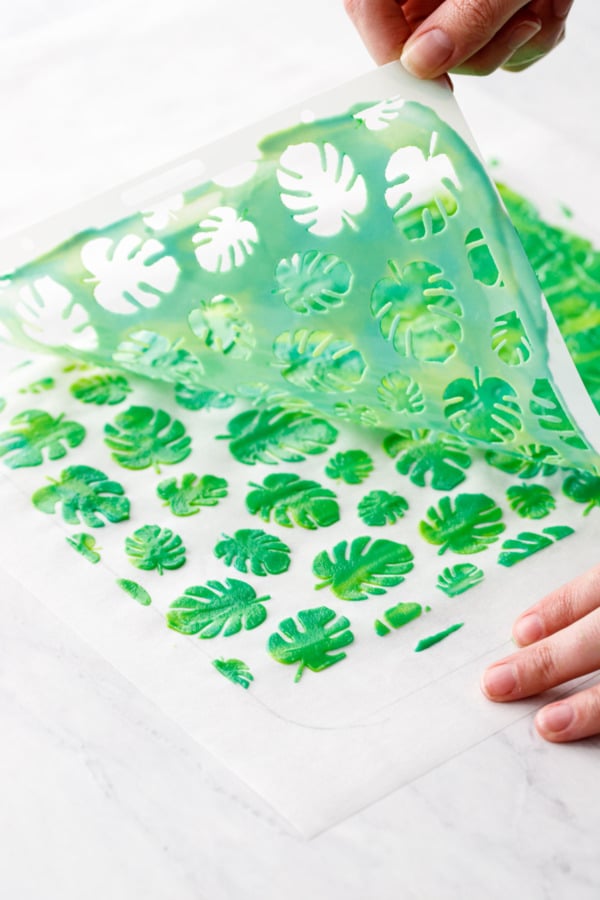
You’ll first want to make up your design paste, which is thicker and pastier than the bulk of the cake batter. I added a bit of green pandan extract to my paste as a ‘base color’, then split it into three small bowls to which I added a bit more food coloring. The result was three different shades of green, which I applied to the stencil like a painter with a palette knife. Then scrape the excess off with an offset spatula or a straight-edged bench scraper, leaving a thin (but not too thin) layer behind.
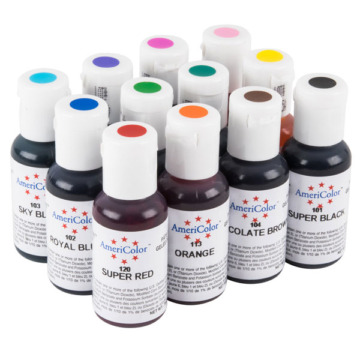
If you want to match the same colors I used here, you’ll want to get yourself the following colors of Americolor gel food coloring: Electric Pink (for the cake base), Teal, Leaf Green, Mint Green, and Electric Green (for the leaves).
If you’d prefer to pipe a design (which you can totally do!) depending on the complexity of your design, you may want to double the paste recipe just to ensure you have enough to finish the full pattern.
You can find the same monstera leaf stencil I used for this recipe on Etsy (the 7.5-by-10-inch size).
I wish the stencil had been an inch or two wider (there’s an inch or so of bare space that I positioned so it was on the bottom of the roll), 9 or 10 inches wide would be the ideal size for a cake roll stencil. The seller has mentioned she may be able to do a slightly larger size – worth messaging her about it if you’re interested!
Any stencil will work here, although stencils will super fine details may have issues with air bubbles (the inner loops of the leaves, for example, are very small spaces that the airy batter of the cake doesn’t fully settle into. You can see in the ‘pour’ shot below I tried to remedy this by hand-piping a tiny bit of pink batter into the small spaces, which helped a bit but was rather tedious). For that reason larger, slightly less complex designs are preferable.

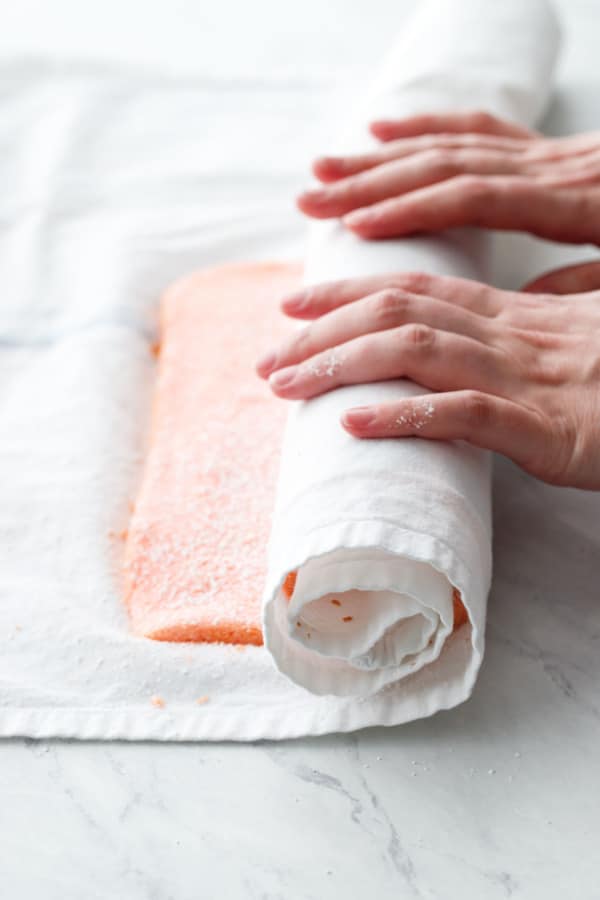
The key to preventing a cake roll from cracking is to roll it up in a tea towel while it is still warm. This creates a muscle memory of sorts, so once cooled and filled, it’ll roll right back into shape without cracking.
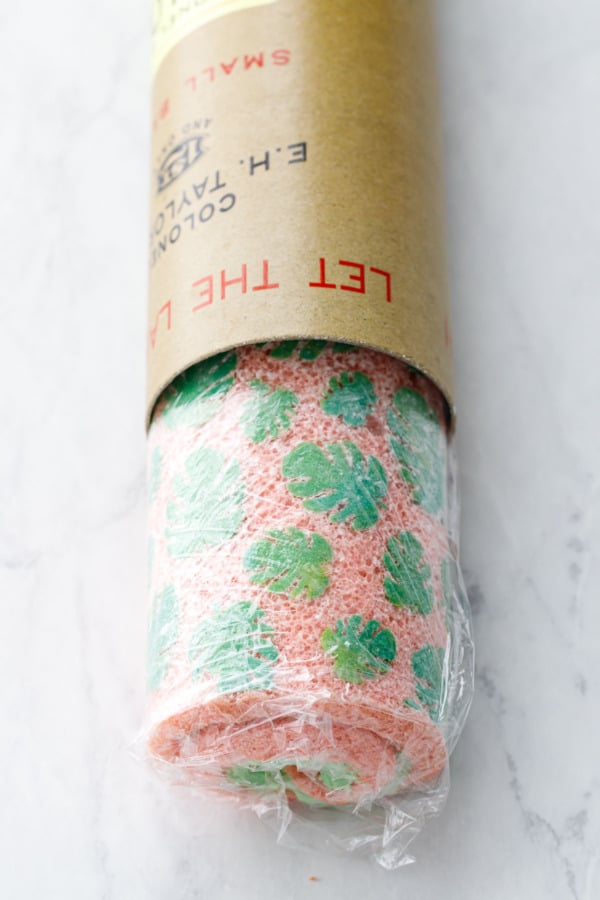
Cake roll tip: to preserve the perfectly round shape, chill/store your cake roll in a cardboard tube about 3.5 to 4-inches in diameter. I use a tube that came with one of Taylor’s whiskey bottles (interestingly enough called E.H. Taylor brand, probably why he bought it in the first place!) that happens to be the perfect size. Something like this would also work, though you’ll need to cut it down so it fits in your fridge.
The cake will be set enough to cut in about 2 hours, though if you have time to chill it longer it’ll hold its shape even better.
Cake Roll Troubleshooting
If you’re having issues with your cake roll coming out too flat/thin, or if your design wrinkles, cracks or sticks, there are a few reasons why that might be happening.
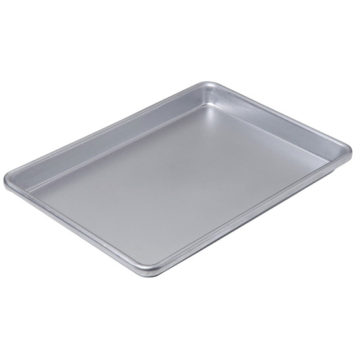
– Wrong size pan. This recipe is written for a standard jelly-roll pan, which falls in between a half and quarter sheet at 10-by-15-inches in size. A 13-by-9-inch pan would be the closest alternative, though you’ll end up with a slightly thicker cake layer and a shorter, squattier roll overall. If you only have a half sheet pan (13-by-18-inch), you’ll want to 1.5x the recipe (sort of tricky to do with 3 eggs, which is why I recommend getting your hands on a true jelly roll pan if you can).
– Unstable meringue. 100% of the lift in this cake recipe is from the meringue: from the air beaten into egg whites. If your meringue is underbeaten, overbeaten, or just plain unstable, it won’t give the cake the lift it needs. Weather can sometimes affect meringues, as can the freshness of your eggs (fresh, cold eggs are best here). Also, use the egg whites immediately after they are beaten; if you let them sit they tend to deflate.
– Overmixed batter. When you add the egg whites to your base batter, you want to gently fold the egg whites in until they are just incorporated, no more. Check YouTube for proper folding techniques if you’ve never done it before (don’t be like David and Moira).
– Too much flour. In my testing, using too much flour resulted in a base batter that was much thicker, and much harder to incorporate the egg whites into. This ultimately resulted in a batter that was overmixed and lacking the air it needed to properly rise.
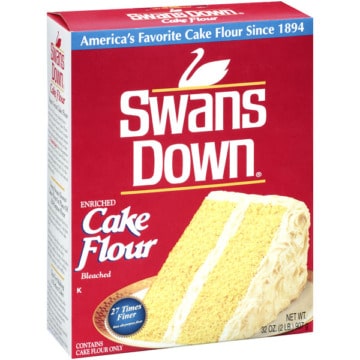
You’ll notice this recipe calls for cake flour, which is more finely-milled and lower-protein than cake flour. If you substitute All Purpose flour here, which weighs more per cup than cake flour, you’ll want to use an equal weight, not volume, which is most definitely a problem.
I have a feeling 75% of the issues people have with this style of cake is a result of over-measuring the flour. If you’re buying Pandan extract and Kaya on Amazon already, go ahead and add a kitchen scale to your cart if you don’t already have one. Trust me, it’s a game changer.
– Cracks. An overbaked cake, because it is drier and slightly browned/crispy around the edges, is much more likely to crack when you try to roll it up. Pull the cake out of the oven when the top is spongy and the edges are just barely (I mean barely!) starting to brown. Then, keep your potholders on and flip the cake out right away. Dust with sugar and roll it up in a tea towel while the cake is still warm, as this will give it a ‘muscle memory’ that will also keep it from cracking.
– Wrinkles. Not all parchment paper is created equal, and this is one recipe where you want to use something good and thick. Thin parchment tends to wrinkle when it comes in contact with moisture (like, say, a moist cake batter), and those wrinkles will show up in your final cake roll. I use King Arthur’s parchment paper sheets, which are nice and thick and doesn’t easily wrinkle.
– Sticking. Additionally, if you find your stenciled design is sticking to the parchment when you try to peel it off, try a different brand of parchment paper or even a silicone baking mat. You can also coat the surface with a very thin layer of butter before adding your design.
With the King Arthur parchment I did not need butter; when peeling the parchment just do it slow and carefully so you can catch and peel off any bits of the design that are sticking before they come off the surface of the roll. Ideally, the design will stay put, but the thin surface of the cake base will peel off with the parchment, revealing a slightly raised design and bubbly surface texture around it. It doesn’t always work exactly this way (did I mention it took me 5 tries to get this right?) but the design still looks lovely even when it’s imperfect.
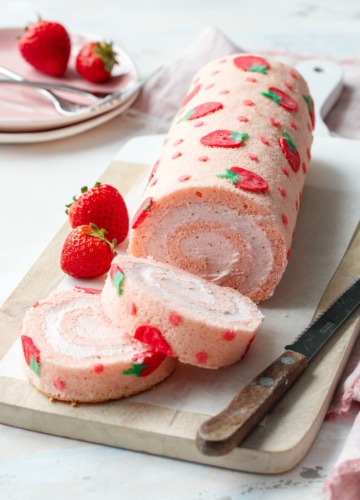
The base cake roll recipe is virtually unchanged from my strawberry version, which shows you just how flexible this recipe can be. Different designs, colors, and fillings galore; really, the sky’s the limit!
Monstera Cake Roll with Pandan Whipped Cream & Kaya
Ingredients
For Paste:
- 2 tablespoons / 30 g unsalted butter, softened (softer than room temp, but not melted)
- 2 ½ tablespoons / 30 g granulated sugar
- ⅓ cup / 40 g cake flour, sifted
- 1 large / 30 g egg white
- food coloring
For Cake:
- 3 large / 150 g eggs, separated
- ⅜ cup / 75 g granulated sugar, divided
- 1 tablespoon vegetable oil
- 1 ½ tablespoons / 23 g whole milk
- 1 teaspoon vanilla extract
- ½ teaspoon kosher salt
- ⅔ cup / 67 g cake flour, sifted
- food coloring
- powdered sugar, for dusting
For Filling:
- ⅓ cup / 75 g kaya coconut jam
- ¾ cup / 180 g heavy whipping cream
- ¼ teaspoon unflavored powdered gelatin
- 3 tablespoons / 24 g powdered sugar
- ½ teaspoon pandan extract
Instructions
- Preheat oven to 350 degrees F. Lightly butter or grease the bottom and sides of a 15-by-10-inch jelly roll pan. Trace the outline of the pan onto a slightly larger piece of parchment paper; flip so the pencil side is down. Tape your stencil in place on the parchment.
- To make design paste, mix butter and sugar together until you get a smooth paste. Add sifted flour and mix until mostly incorporated, then add egg white and mix until smooth. Paste should have a buttercream-like consistency. Mix in a scant 1/4 teaspoon of pandan extract; your paste should be the color of mint chip ice cream.
- Divide paste into 3 bowls and add additional food coloring as desired. (I used 1 drop Leaf Green and 1 drop Mint Green in one bowl; 1 drop Teal in the second; and 1 drop Electric Green with a toothpick or so of Mint Green in the third).
- Using an offset spatula, smear bits of colored paste onto your stencil area, alternating between the three colors. You will probably only need about half of the paste here. Once most of the surface of the stencil is covered, spread out paste into a thin, even layer, scraping off any excess. Carefully peel off stencil to reveal design. Cut out along the traced border, then gently transfer to your buttered jellyroll pan. Place pan in freezer to allow the design to set while you prepare the rest of the batter.
- To make cake batter, place egg yolks in a mixing bowl. Add 1/4 cup sugar and whisk until sugar is dissolved and yolks are lightened in color. Drizzle in vegetable oil, whisking constantly, until incorporated. Whisk in milk, vanilla and salt. Add food coloring as desired (I used 1 large drop of Electric Pink gel coloring.)
- Sprinkle sifted cake flour over batter and fold until incorporated.
- In a clean mixing bowl or the bowl of a stand mixer fitted with the whisk attachment, beat egg whites until frothy. Reduce speed, slowly add remaining 2 tablespoons of sugar, then beat on high speed until whites hold medium-stiff peaks.
- Fold a third of egg whites into batter to lighten it, then add the remaining egg whites and fold until just incorporated.
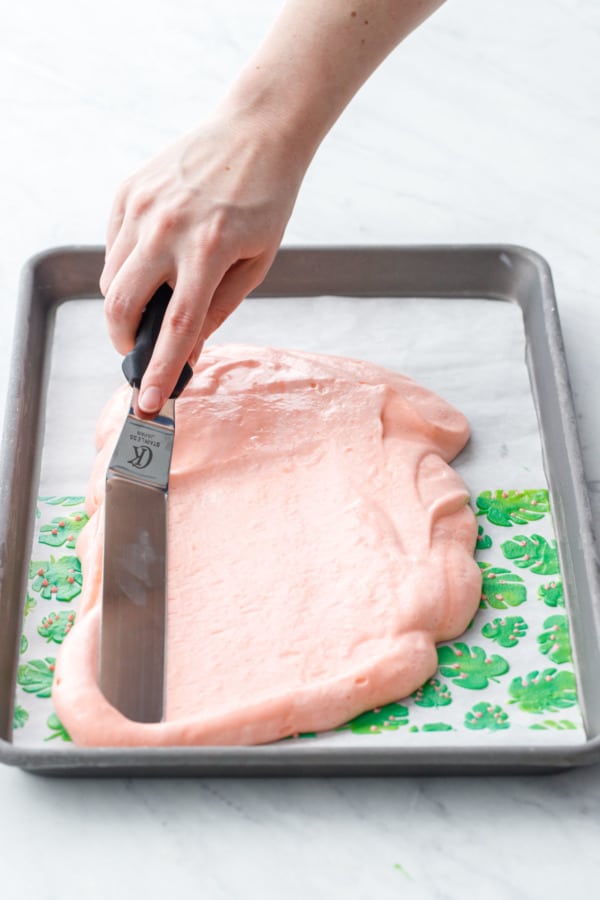
- Pour batter over top of frozen design, spreading the batter into an even layer using a large offset spatula. Bang the pan a few times on the countertop to remove any air bubbles and level out the top.
- Bake for about 10 to 11 minutes or until top is springy and edges are just barely starting to brown.
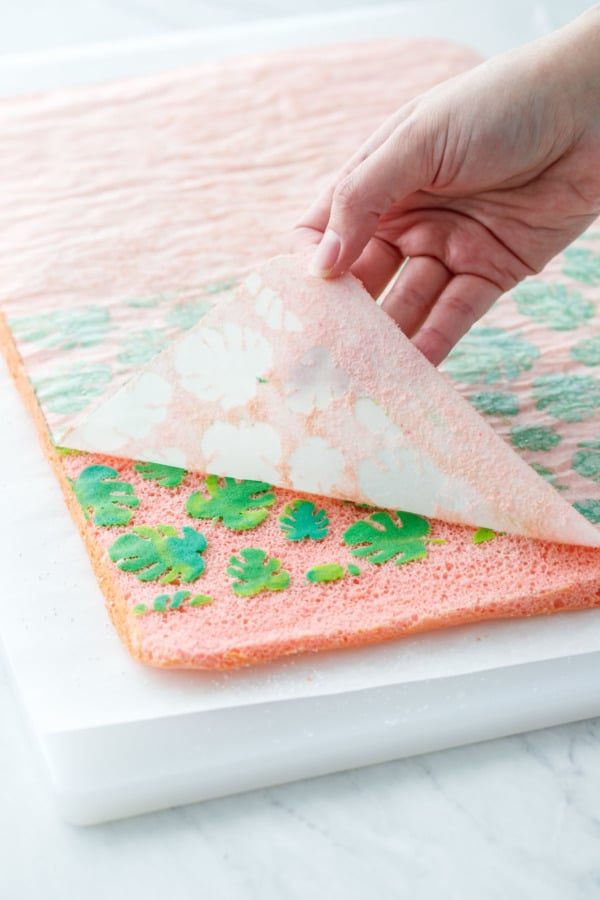
- Remove from oven. Dust evenly with powdered sugar, then carefully invert warm cake onto a piece of parchment backed by a solid surface like a large cutting board. Peel off parchment paper backing, revealing the design. Dust the top of the cake with a thin layer of powdered sugar and lay a clean tea towel on top. Flip cake over again so the design is facing down.
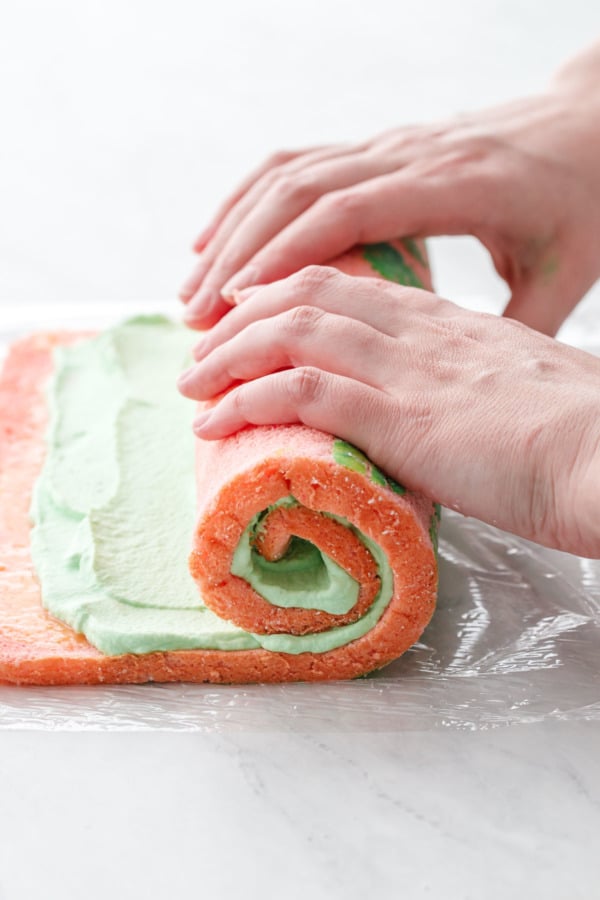
- Starting with the side of the cake without the design, carefully roll up the warm cake in the towel. Doing this while the cake is still warm will give the cake a 'muscle memory' and allow you to roll it up later with the filling without it cracking.
- Let rolled cake cool for about 1 hour or until completely cool to the touch.
- Meanwhile, to make filling, in a small bowl, sprinkle gelatin over 1 tablespoon cool water and let soften for 5 minutes. Microwave the mixture in short, 5 second increments until the gelatin is completely dissolved and liquefied. Let cool slightly (but don't let it firm up, if it does, microwave it again).
- Place whipping cream in the bowl of a stand mixer fitted with the whisk attachment. Beat on medium speed until frothy, then add powdered sugar, increase to medium high and beat until the paddle starts to leave trails in the cream.
- Mix a spoonful of the partially-whipped cream into the bowl with the melted gelatin until completely incorporated, then, with the mixer running on low, add this back to the bowl with the rest of the cream. Add pandan extract and increase speed to medium high, beating until cream holds medium-stiff peaks (take care not to overbeat).
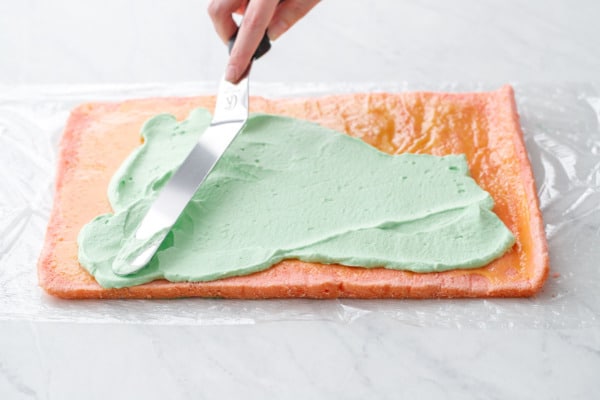
- Carefully unroll cake and remove towel. You may need to hold it with your hand as it will try to roll back up (see, muscle memory!) Spread a very thin layer of kaya over the entire surface of the cake, followed by a thin even layer of whipped cream, leaving about 1/2 inch bare at the end. You may not need all of the filling, depending on how thick a layer you want.
- Gently roll up the cake, taking care not to use too much pressure lest the filling squeeze out the sides. Wrap tightly in plastic wrap and refrigerate for at least 2 hours or overnight, until filling is set. If you happen to have a 3.5 to 4-inch diameter cardboard tube lying around, place your cake roll in the tube to keep the bottom from flattening out as it chills.
- To serve, cut into slices with a sharp serrated knife (the design bits are harder than the cake itself. The slices will look best if you cut using a sharp serrated knife, pulling the knife gently towards you, letting the weight of the knife do the cutting; it may take a few strokes to get through the firmer design parts. Try not to saw back and forth or press down or the design will compress into the cake).
- Cake roll will keep, tightly wrapped and refrigerated, for up to 3 days.


What a beautiful cake!! I will do this in my sons birthday. Thanks a lot for sharing this!
Your cake is beautiful!! Also – I did the Hollaback Bystander Training a few months ago and found it to be really useful. Keep up (all) of your good work!!
wow, this is so impressive on so many levels (I’ll go with the stencils) didn’t even realize that there was such a thing as coconut jam!
Wow this is beautiful! I grew up eating kaya on toast and pandan desserts (I’m from Malaysia). This looks amazing!
Thank you for doing your part and using your platform to speak out. It is nice to see.
All your projects are very impressive. Looking forward to see what is next.