
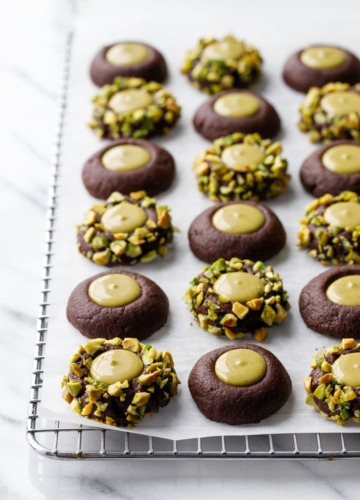
Wouldn’t you know, my always popular soft amaretti cookies work surprisingly well in thumbprint form, filled with amaretto-spiked jam or chocolate ganache.
Amaretti cookies are a reader favorite for a reason: these soft and chewy almond cookies are incredibly easy and ever-so versatile, not to mention naturally gluten free! This fun thumbprint version can be filled with just about anything, and makes for a perfect addition to your holiday cookie plate.
Save this recipe for later!
You all can’t get enough of my amaretti morbidi, or soft amaretti cookies. I mean, I wouldn’t have 11 variations in the archives if you didn’t.
I mean, talk about a versatile recipe… so far we’ve tried all sorts of flavors from chocolate to ube, swapped the almond flour for pistachio and hazelnut, mixed in sprinkles, vegan-ified them, and even stuffed them.
But the question today is… will they thumbprint?
I was optimistic they would, considering they usually hold their shape quite well when baking.
The only potential issue I could foresee was the cracking, which I usually encourage in the regular versions (the cracks being what make these cookies so stunning to begin with!) But I worried the cracks would be too big and the filling would ooze out.
I was, however, pleasantly surprised at just how well they transformed into thumbprints (not all cookie recipes can claim such versatility you know).
The cracking is still a concern, but is manageable with a slightly different technique than you may be used to for other thumbprint cookie recipes. Basically, you just need to be very gentle when you’re shaping the thumbprints not to let the cracks get too big, especially if you opt for a looser filling.
The thumbprint version bakes more quickly than the original cookies (give them a few more minutes if you want a bit of crunch on the bottoms), and I still recommend using two stacked cookie sheets to keep the bottoms from browning too quickly.
I also added a splash of amaretto liqueur to the cookies in place of the typical almond extract (because, amaretto amaretti just sounds gosh darn fun). Since amaretto is a very sweet liqueur, I reduced the sugar slightly to compensate (though I don’t recommend reducing it any more, as the sugar is what makes the cookie so delightfully soft and chewy).
Shaping Thumbprints
I’ve made lots of thumbprint cookies over the years, but these ones are a little bit different.
While I typically use the bottom of a circular (as opposed to oval) half-teaspoon measuring spoon to shape my thumbprints, in this case I found it produced too many large cracks in the sides of the cookies.
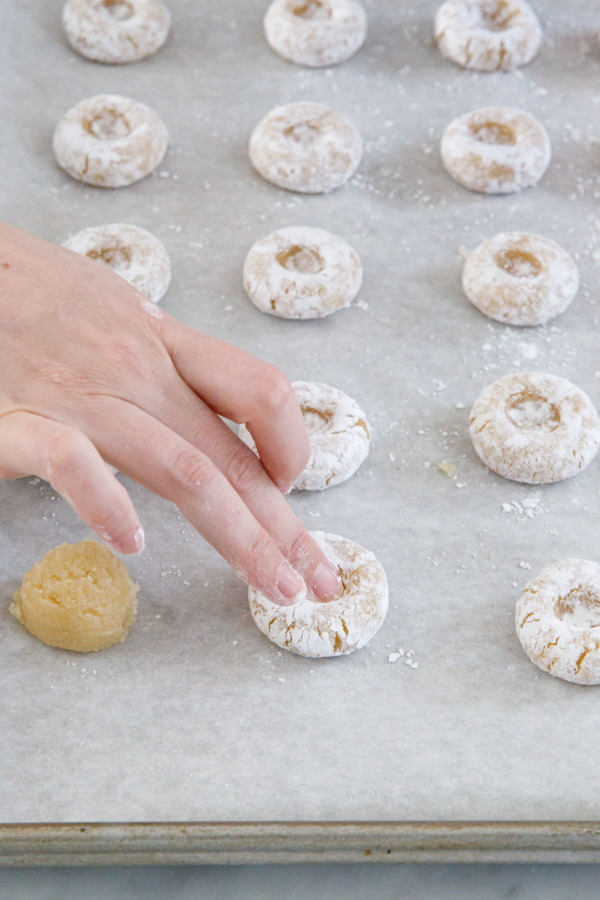
So instead, after rolling the dough ball in sugar, I slightly flattened the ball between my palms. Then, I used the tip of my finger to make a smaller, more defined indentation in the middle (so I guess these are technically fingerprint cookies instead of thumbprints?) The rounded bottom of a wooden spoon would work here too. Whatever tool you use, go slow and be gentle! What you’re ideally looking for are lots of little thin cracks around the edges of the cookie, as opposed to a few larger ones.
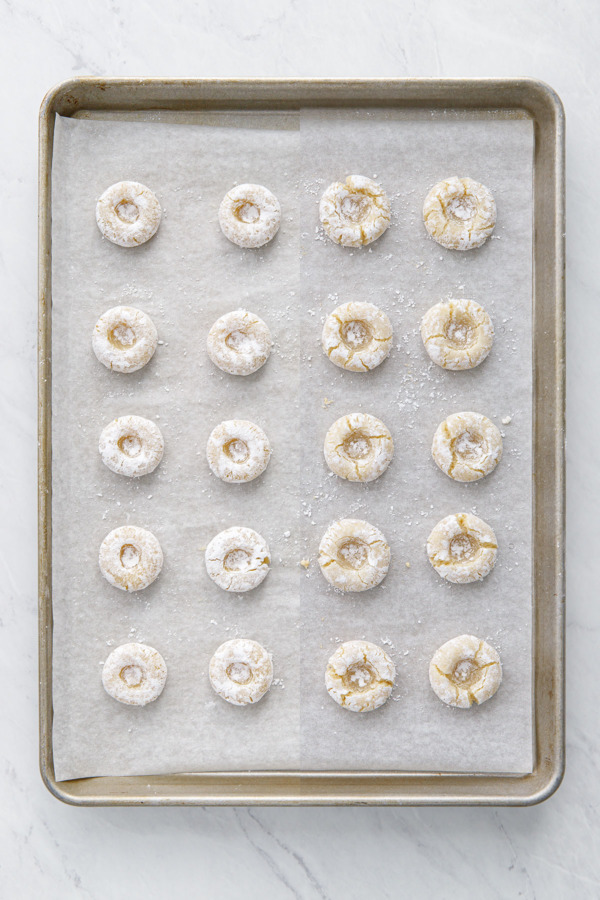
You don’t have to worry too much about the shape of the indentation going into the oven, as you’ll further define the crater once the cookies come out of the oven.
When the cookie comes out of the oven, you’ll then want to grab your round measuring spoon and gently press into the indentation while the cookies are still warm (you can’t use your fingers here because cookies right out of the oven are hot hot. A melon baller, or even something like a mid-sized marble would work here too). Since the cookies puff a bit as they cook, this step helps re-define the thumbprint shape so you have room for more filling.
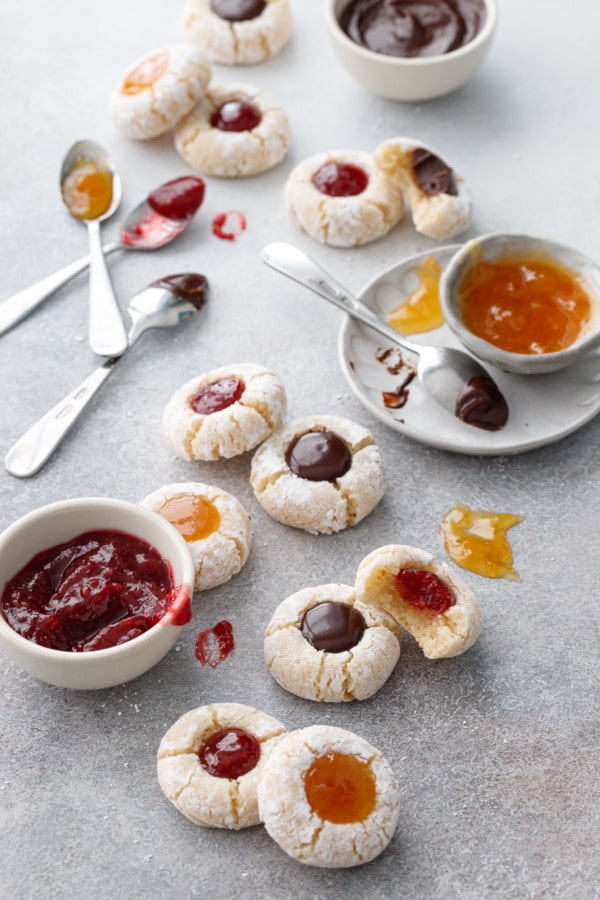
The Filling is Mutual
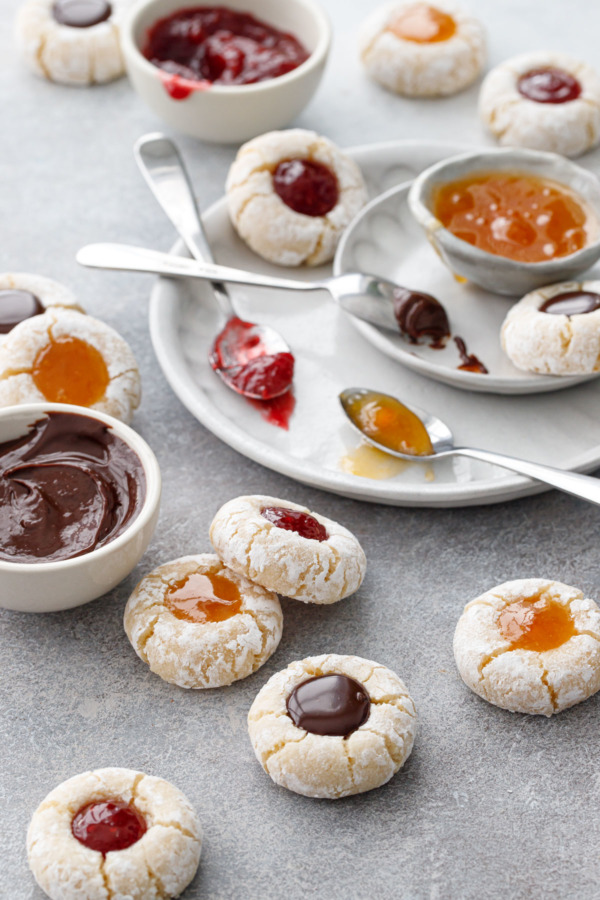
I like to think of these as a Choose Your Own Adventure cookie… start with the base recipe, then fill it with whatever your heart desires.
I originally tried to do some sort of amaretto cream filling (think like a cream liqueur truffle sort of filling), but the result was entirely too sweet. Maybe it would have worked with a shortbread-type cookie, but the amaretti cookies are pretty sweet to begin with so the powdered sugar-based filling was entirely overwhelming.
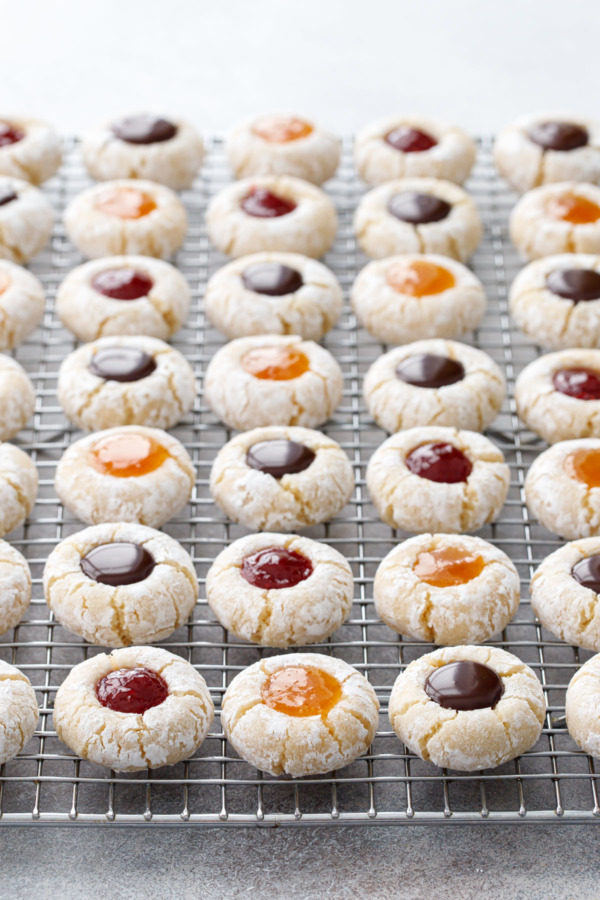
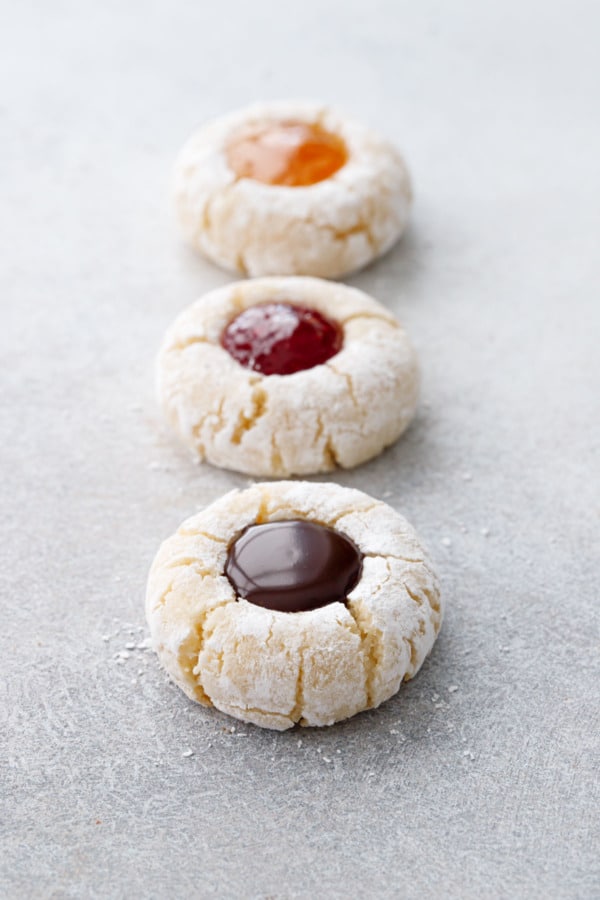
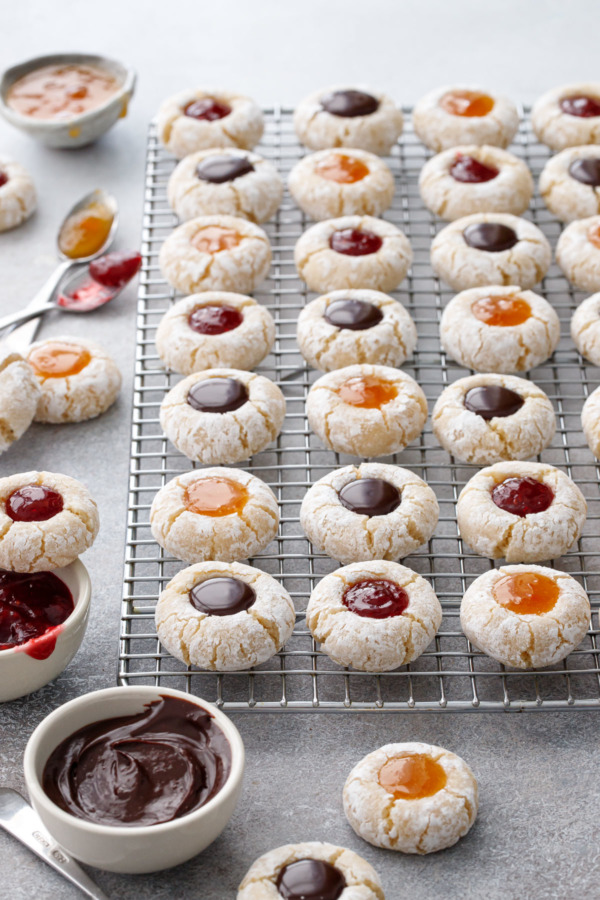
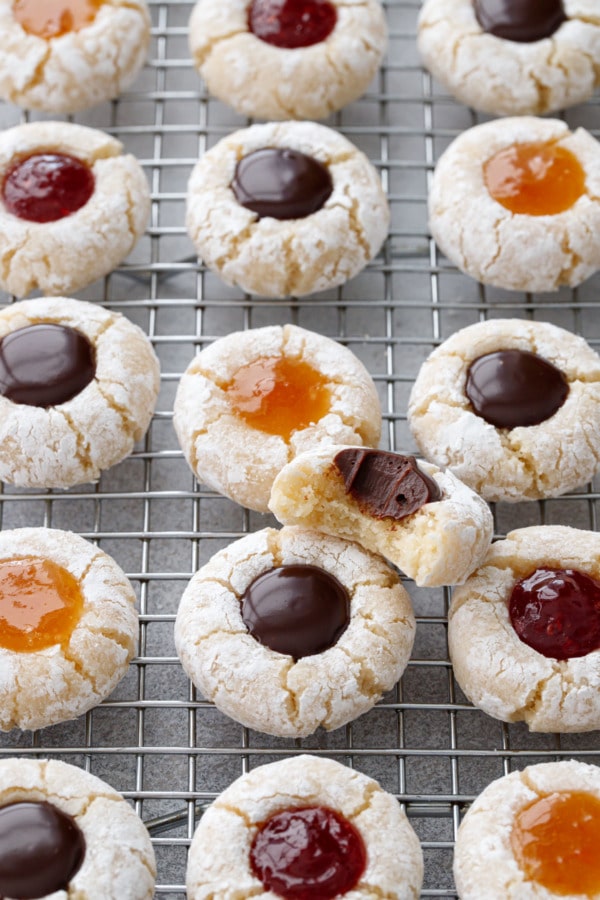
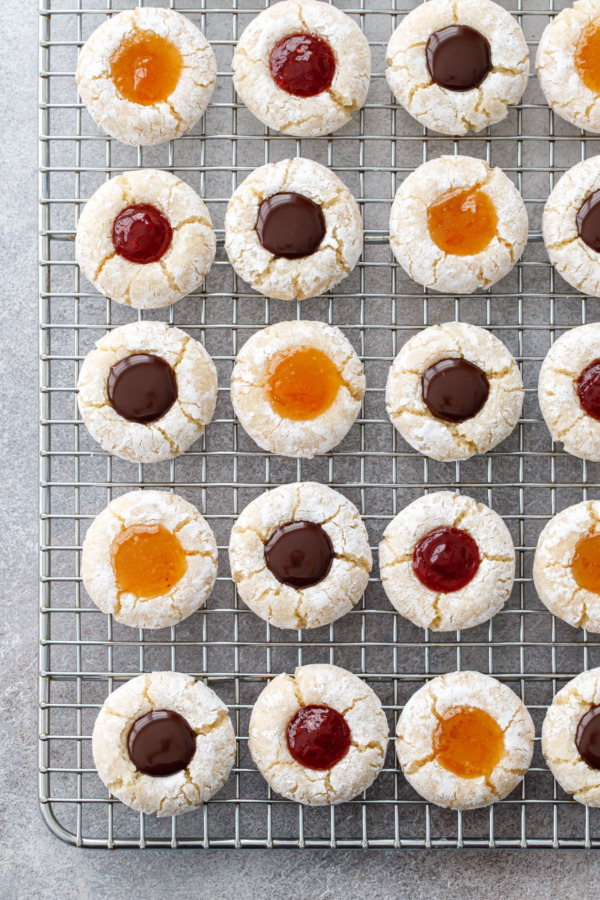
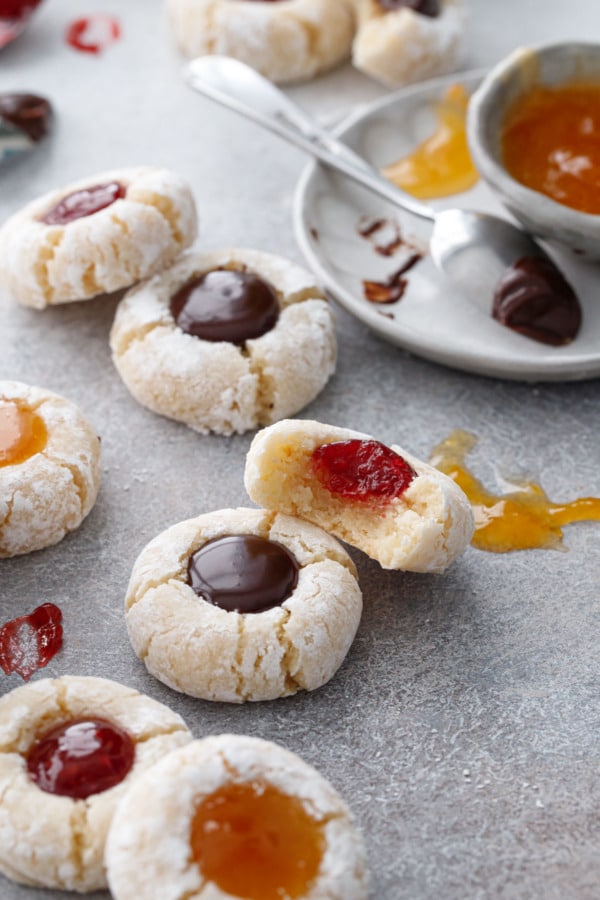
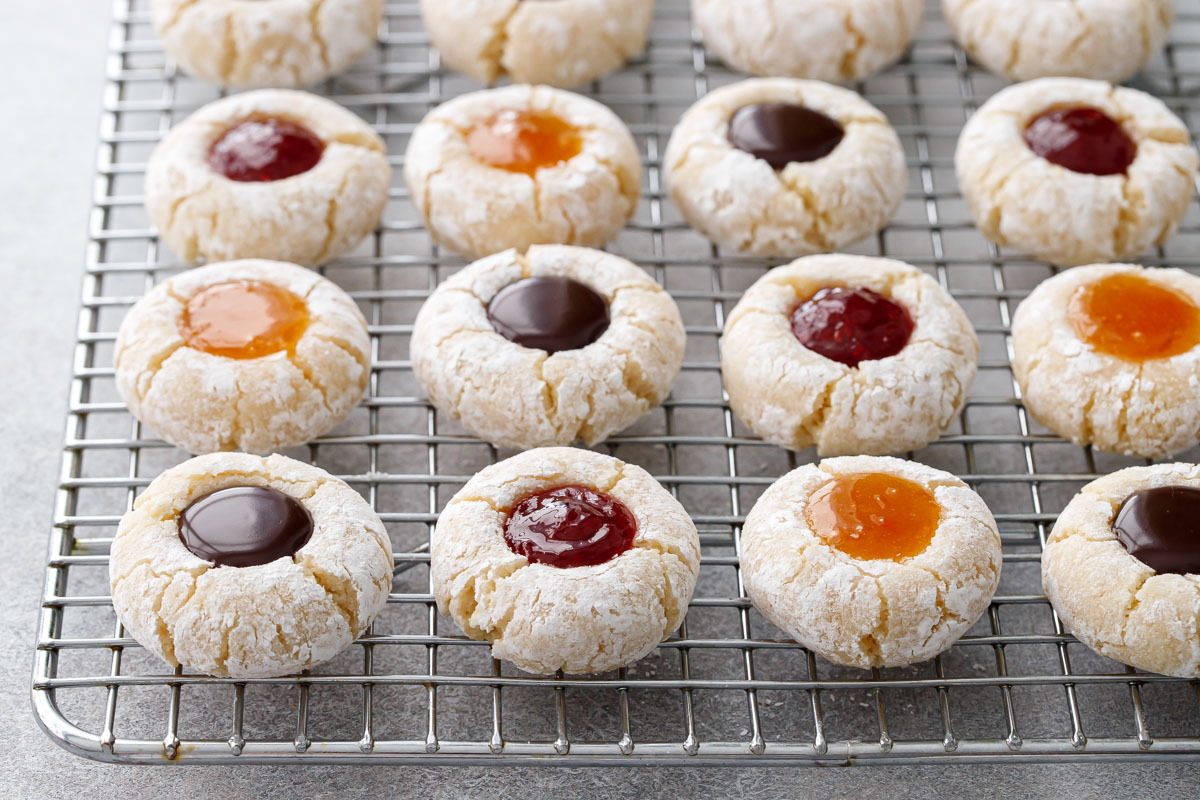
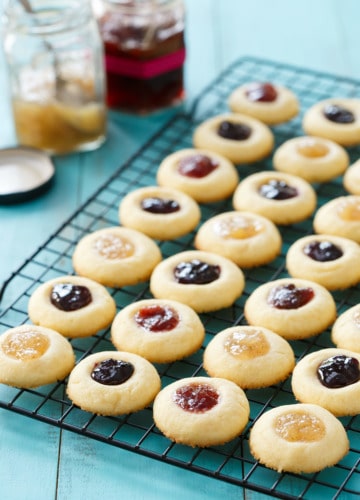
Instead, I opted for a variety of amaretto-infused fillings, including raspberry and apricot jam and chocolate ganache. The amaretto ganache is probably my favorite, the extra dark chocolate is a perfect counterpoint to the sweet almond cookie. Then again, the jams are both pretty darn good too (raspberry+almond and apricot+almond are classic pairings for a reason).
For the jam-filled cookies, I mixed a teaspoon or two of amaretto liqueur into the jam to enhance the flavor. My raspberry jam was noticeably thicker than the apricot, and even with the added liqueur it was plenty thick to hold its shape within the thumbprint.
The apricot, on the other hand, was much runnier, even after thickening it a bit with some cornstarch. You can see the difference in the photos, the thinner apricot isn’t quite as perky, in fact I was a bit worried the warm apricot jam would start oozing out the cracks. Luckily it held on just enough, but I still prefer the look of the thicker raspberry.
I know it’s often hard to tell the consistency of a jam until you open it, but if you have choices, seek out a low-sugar or naturally-sweetened jam, since that kind of jam is often thicker due to the added pectin, compared to more traditional-style jams and preserves which typically have a looser texture overall.
Any of my homemade jam recipes that use Pomona’s pectin (since they are lower-sugar recipes and the texture is typically on the thicker side) would work beautifully in these cookies!
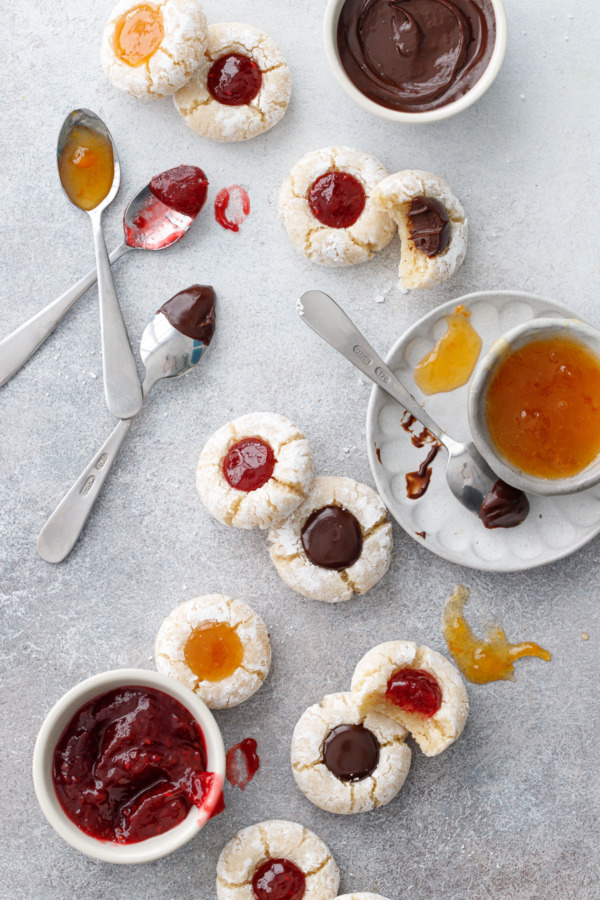
The only difference in the jam-filled thumbprints as opposed to the ganache-filled is the jam needs to bake with the cookies for a few minutes (this helps the jam ‘set’ and better meld with the cookie). Ganache is added after the cookies have baked and cooled slightly.
For jam-filled thumbprints: take the cookies out about 5 minutes before they’re fully done. While they’re still hot, use the round bottom of a 1/2 teaspoon measuring spoon (something like a melon baller or even a marble would work too). Then drop small dollops of jam into the center of each cookie. Return to the oven for 4 to 5 minutes, then remove from oven and let cool on a wire rack.
For ganache-filled thumbprints: bake the cookies all the way through. Remove from the oven and use your measuring spoon/marble/etc to re-define the indentation. Cool slightly, then you can fill the lukewarm cookies with your ganache.
If you find yourself with extra large cracks in your cookies or your cookies spread more than expected, don’t despair! Instead, I recommend using a thicker filling, maybe letting your ganache sit a bit longer and then pipe little kisses of ganache into the centers of the cookies (the thicker filling is not at risk of leaking out the sides). Something like a buttercream would work similarly here too.
Freezing & Storage
These cookies are a bit harder to store and transport than the traditional amaretti, as the fillings are not completely solid and therefore the cookies shouldn’t be stacked. I recommend storing them in a single layer in an airtight container, at cool room temperature or refrigerated if you’d rather.
While the original amaretti cookies are great frozen (freeze the rolled and sugar-coated balls of dough, then you can bake them as needed straight from the freezer!) these thumbprints require a bit more planning: you’ll want to roll and shape the initial thumbprints first, then freeze. When you’re ready to bake, that’s when you’ll deal with the fillings. I don’t recommend freezing the fully baked and filled cookies.
Amaretto Amaretti Thumbprints
Ingredients
- 2 ¼ cups / 200 g almond flour or very finely ground almonds, sifted
- ¾ cup / 150 g granulated sugar
- pinch fine sea salt
- 2 large egg whites, about 65 grams
- ¼ teaspoon lemon juice
- 2 teaspoons amaretto liqueur, optional (if you omit, replace with ¼ teaspoon almond extract)
- confectioners’ sugar, as needed
Jam Filling:
- ⅓ cup / 85 g jam of your choice, ideally on the thicker side
- 2 teaspoons amaretto liqueur
Ganache Filling:
- 2 oz / 57 g dark or bittersweet chocolate, very finely chopped
- ¼ cup / 60 g heavy cream
- 1 teaspoon amaretto liqueur
Instructions
- Preheat oven to 300 degrees F. Stack two matching, heavyweight, light to medium colored cookie sheets one inside the other (stacking two cookie sheets together keeps the bottoms of the cookies from getting too brown). Line with parchment paper.
- In a large bowl, whisk together almond flour, sugar and salt until evenly incorporated.
- In a mixing bowl or the bowl of a stand mixer fitted with the whisk attachment, whisk egg whites and lemon juice until they hold soft peaks.
- Add beaten egg whites and amaretto liqueur to dry ingredients and stir until mixture forms a soft, sticky dough, kneading with your hands if necessary. No need to be gentle here, we're not making macarons.
- Lightly dust your hands with powdered sugar. Use a small cookie scoop to portion dough into 1-inch balls. Roll into a smooth ball, then roll in powdered sugar. Slightly flatten the ball between your palms, then place on prepared cookie sheet. Using your finger tip or the bottom end of a wooden spoon, gently press an indentation into the center of the cookie. Ideally, you're looking for a bunch of small, thin cracks around the edges of the cookies as opposed to a few larger cracks. Repeat with remaining dough, leaving 1 inch of space between cookies.
- Bake for 25 to 28 minutes until bottoms are just barely golden (if you are NOT using doubled cookie sheets your cookies will brown much quicker, and will likely need less time, so watch them closely).
- While cookies are baking, prepare your filling. For jam filling, whisk together jam and amaretto in a small dish. For ganache, place chopped chocolate in a small, heat-proof bowl. Warm cream in a small saucepan until it just begins to bubble around the edges (do not let it boil). Pour over chopped chocolate and let sit for 30 seconds. Staring the center, slowly whisk, working in concentric circles, until chocolate is melted and ganache is smooth. Add amaretto and whisk until combined. Let cool until slightly thickened, but still fluid.
- For jam-filled thumbprints: take the cookies out about 5 minutes before they're fully done. While they're still hot, use the round bottom of a 1/2 teaspoon measuring spoon (something like a melon baller or even a marble would work too). Then drop small dollops of jam into the center of each cookie. Return to the oven for 4 to 5 minutes, then remove from oven and let cool on a wire rack.
- For ganache-filled thumbprints: bake the cookies all the way through. Remove from the oven and use your measuring spoon/marble/etc to re-define the indentation. Cool slightly, then you can fill the lukewarm cookies with your ganache.
- Cookies will keep at room temperature in a single layer in an airtight container for up to 5 days.


Hi, I can’t wait to make these! When you tested them did you measure the almond flour by weight or volume? I find that the conversion can range quite a bit (but personally always use weight), so like to double check! Thank you :)
I always include both in my recipes (recent ones at least, I wasn’t always so diligent lol). I always recommend using the weight measurements if you can!
Doesn’t it need to be refrigerated if it has ganache with cream? Will it mess it up to refrigerate if I’m making a few days ahead?
Ganache should be refrigerated for longer term storage or if it’s particularly warm. But a few hours at cool room temperature is just fine.
I made these! They turned out great. Used triple berry jam for half of them and the other half I used chocolate ganache! Thank you 😊
Have a great day and God bless you!
Can I swap 1/4 cup Aquafaber for the eggs?
It’s not a direct replacement, the proportions are a bit different and they tend to spread a bit more. See here for the vegan version of the regular amaretti cookies (but you could probably turn them into thumbprints in a similar way): https://www.loveandoliveoil.com/2020/06/vegan-aquafaba-amaretti-cookies.html
Love all your Amaretti cookies I’ve tried so far! I made half this recipe with Cherry jam & half with a “cherry/nutella jam”. They are super yummy!
Have made this cookie many many times and love it to bits – hot favourite with my family !! The ganache ones are preferred ♥️
Just what I was looking for. I love the flavour of almonds and amaretto amaretti sounds like bliss!
Made these twice now and they were a hit! The Amaretto flavor in the jam is a game changer. Glad that they are naturally gluten free too. Was a little unsure about baking cookies for 25+ minutes, but I found out that when baking with almond flour, the bake time is much longer. Cookies look pretty displayed on a plate with the different jam colors.
Hi there….First batch in the oven right now. Quick question for you. Why is it necessary to whisk the egg whites before mixing into the dry ingredients? After all, the air is then beaten out of the mix. Would it not work with unbeaten whites? Thanks, Mel 🌲😊
I know it seems counterintuitive, but beating the egg whites actually changes the structure of the proteins, which affects the final texture of the cookie. The cookies will be denser and won’t crack much at all without that extra step.
Love this recipe but are you sure there’s no butter in this cookie ?
Correct, the base is an amaretti cookie recipe which is just egg white, sugar and almond flour. It’s not a traditional thumbprint cookie you might be used to, if that’s what you’re looking for, check out this recipe instead: https://www.loveandoliveoil.com/2013/09/jam-filled-thumbprint-cookies.html
The chocolate ganache looks sinfully good! Thank you for all the tips. You cleared up the probable reason behind a minor disaster we had with some thumbprint cookies last year.
fun and gorgeous, love all of the colors with the different jams, great this time of year too of course, thank you