
No matter the toppings, homemade pizza is sure to be a crowd pleaser. And the foundation of good homemade pizza is, of course, the crust. Once you find a reliable, go-to pizza crust recipe, you’ll be set for life.
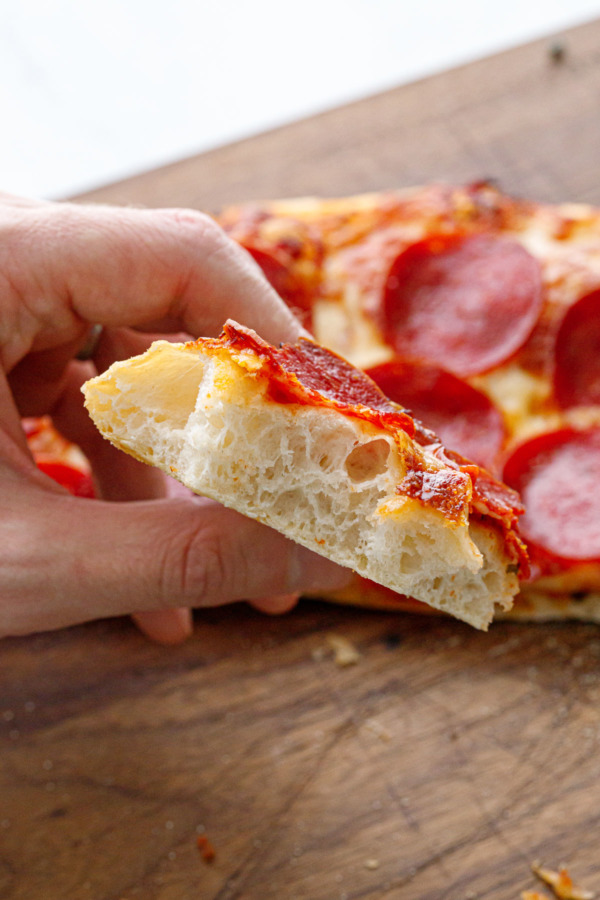
We’ve made dozens of different crust recipes over the years, and this one is our all-time favorite: an overnight pizza dough recipe that uses what’s called a poolish, or pre-ferment, to develop a lovely depth of flavor without the need for a sourdough starter. It’s thick (but not too thick) and perfectly chewy, with an open, airy crumb and a delightfully crisp bottom.
As much as I love sourdough, I find most sourdough pizza crusts too tangy for my tastebuds. But often times recipes using instant yeast are downright flavorless. This pizza dough, however, strikes the perfect balance of flavor and fermentation, and it does so using what’s called a poolish, or pre-ferment, which gives the dough a lovely depth of flavor without the harsh undertones of sourdough.
This post and recipe is really focused the dough: what you put on top of it is up to your personal taste and limited only by your imagination.
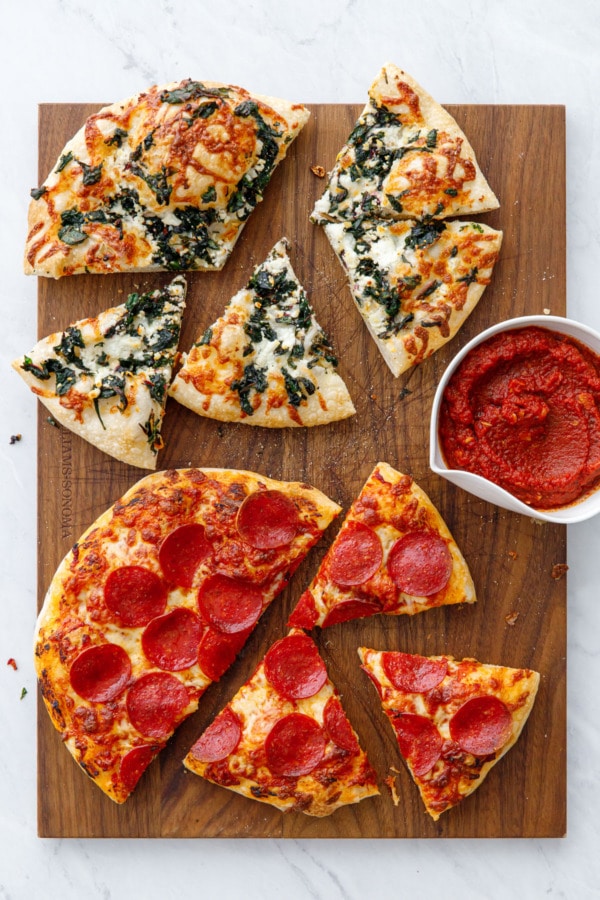
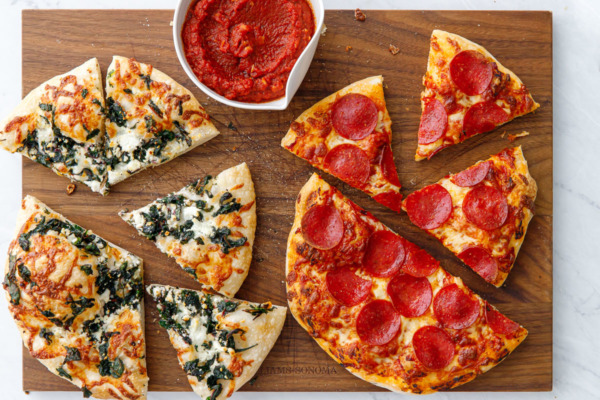
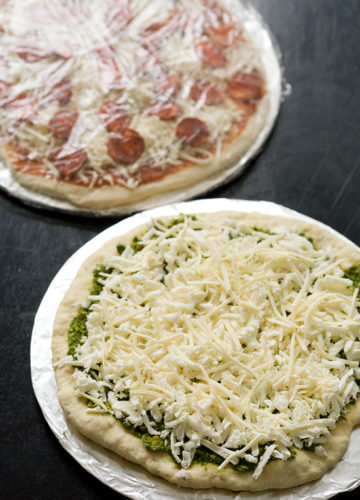
Our favorite go-to pizza assembly includes a thin layer of extra thick pizza sauce (recipe coming in a separate post!) plus slices of creamy mozzarella and lots of pepperoni (I have to say, I never used to be a pepperoni person but lately it’s been growing on me). Sometimes we’ll add a sprinkle of parmesan or some fresh basil leaves to finish it off.
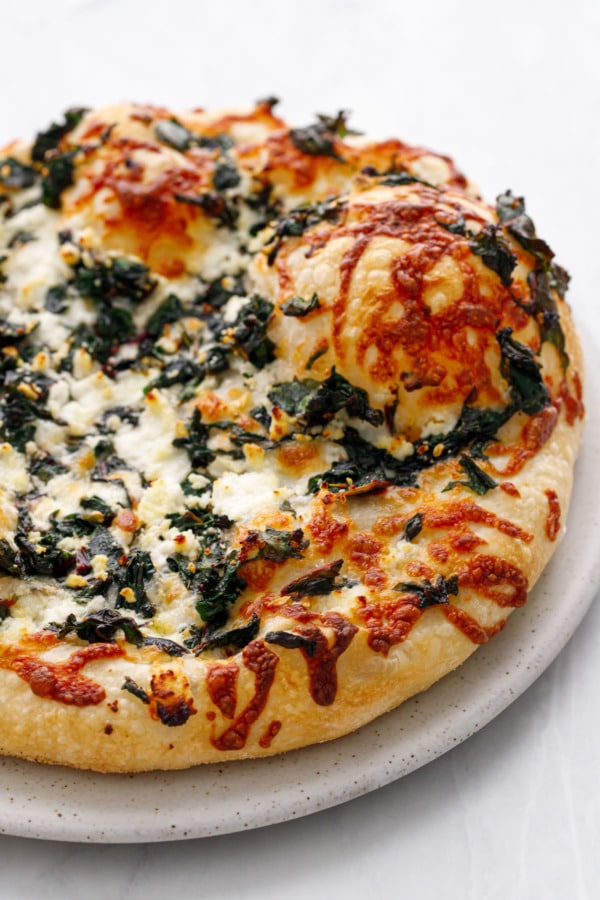
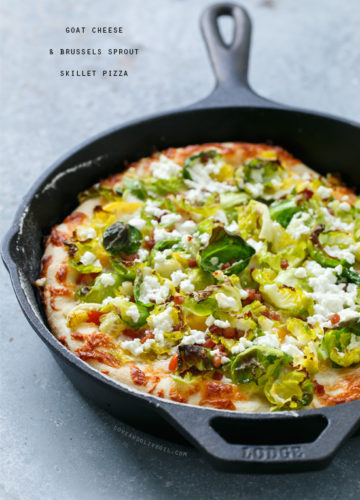
If I happen to have fresh chard on hand, this pizza bianca with goat cheese is quite possibly my favorite pizza of all time (just ignore the old crust recipe in that post, ok? This new one is better).
This recipe is scaled and adapted from one of my favorite bread books, Flour, Water, Salt, Yeast. The book actually has four different pizza dough recipes, including a sourdough pizza dough and a same-day pizza dough. But this one, an overnight dough made with a poolish or pre-ferment, has emerged as our favorite. I’ve scaled it down, as the original makes 6 balls of dough and frankly, I don’t have a container big enough for that much dough.
I find the reduced quantity perfect, it makes four 9-inch pizzas (and one 9-inch is the perfect size for two). We’ll bake up two of the pizzas, eat pizza for dinner one night and reheat the other for lunch, and then freeze the other 2 balls for another week. Because even our pizza-obsessed selves get tired of eating it after 4 meals straight, and the last thing I want is to be sick of pizza).
Baking Schedule
The schedule is somewhat flexible, most steps can be pushed or pulled an hour or so in either direction. Do keep in mind that the schedule will likely be a bit more condensed in the warmer summer months; in the winter the dough will take slightly longer to achieve the same results.
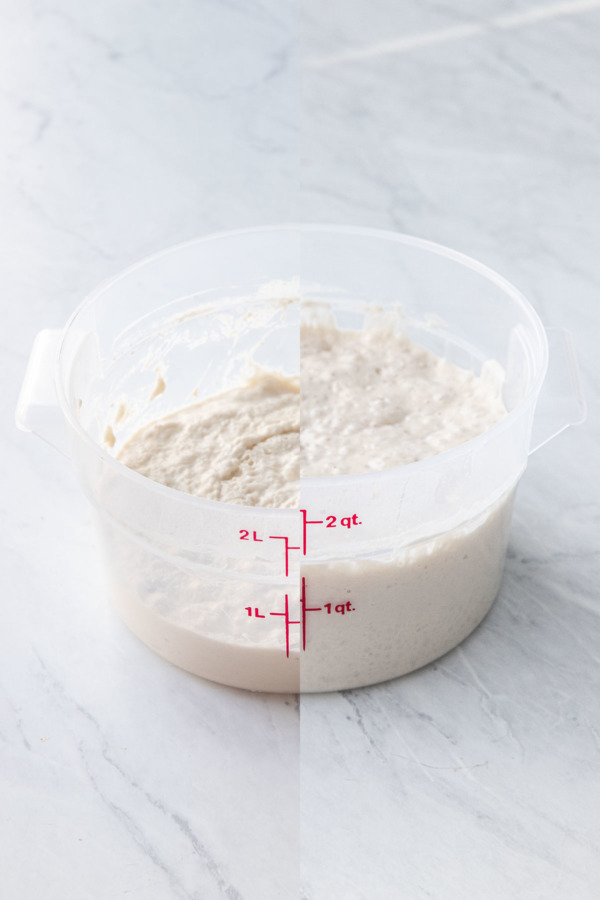
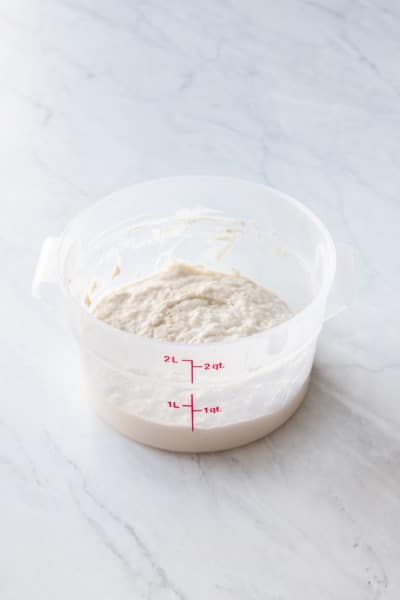
Day One, 6-8pm: Start your poolish.
Day Two, 8-10am: Mix your final dough. Plan to give it two sets of folds within the first hour.
Day Two, 3-4pm: Shape your dough balls. Refrigerate until ready to bake (ok to refrigerate overnight), or wrap loosely in plastic wrap, then seal in a bag and freeze.
Day Two, 5-6pm: Preheat your pizza stone.
Day Two, 6-7pm: Bake and devour!
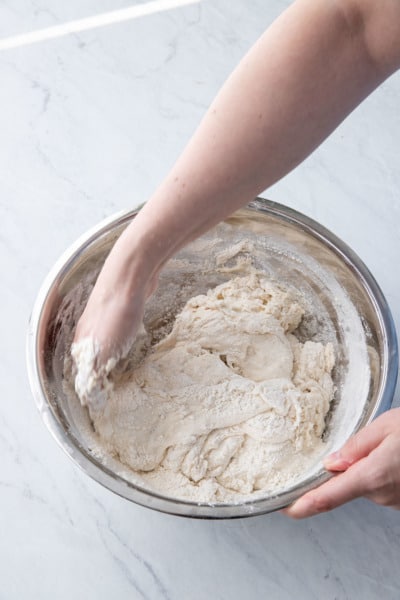
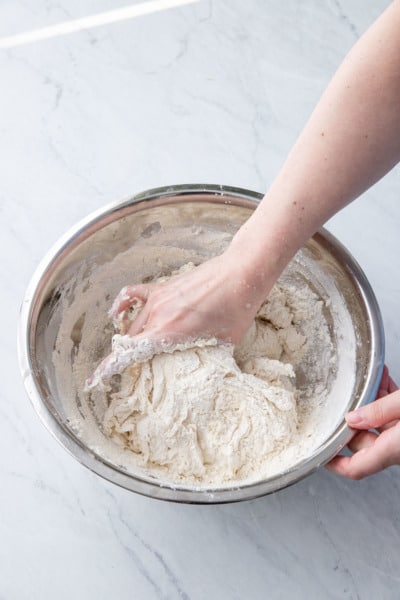
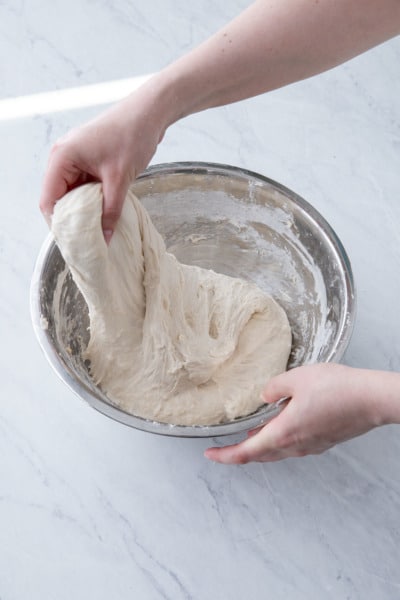
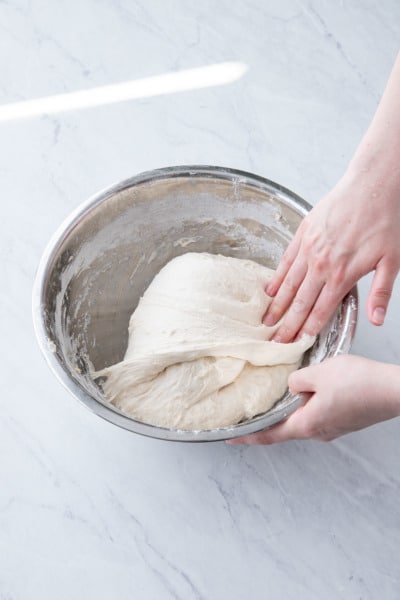
The folding technique here helps develop the gluten in the dough. It requires two sets of folds within the first hour after mixing the final dough. You’ll notice that after each set of folds the previously shaggy dough becomes smoother with each subsequent fold.
Basically, you want to tuck your hand under one side of the dough (we’ll call this 12 o’clock), grab the side of the dough and lift it up, then stretch it up and over the dough, tucking it into the 6 o’clock side.
Rotate the bowl 90 degrees and repeat this same folding action another 3 times, until you’ve made four folds at 12, 3, 6 and 9 o’clock (or North, East, South and West if it’s easier to think about that way).
Let the dough rest for 30 minutes then do another set of folds.
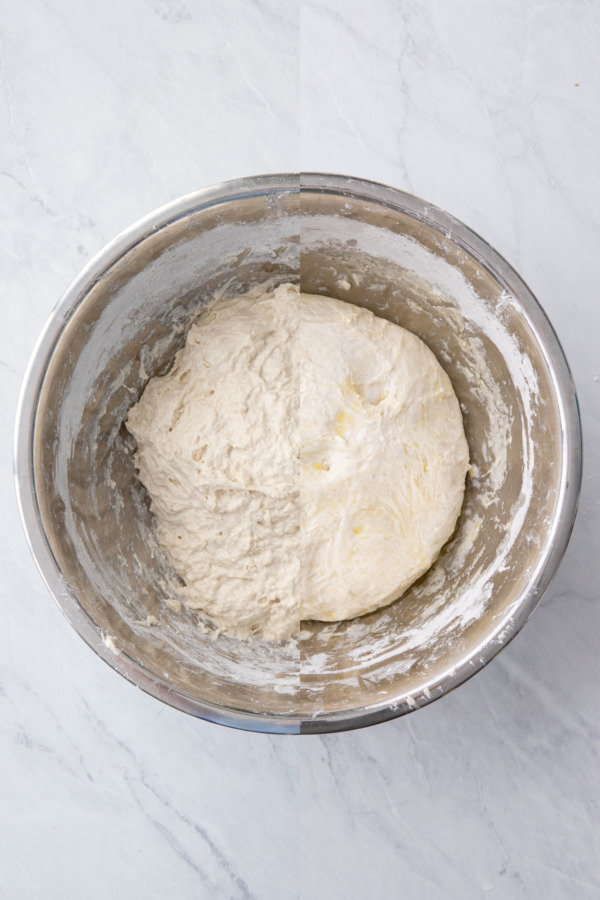
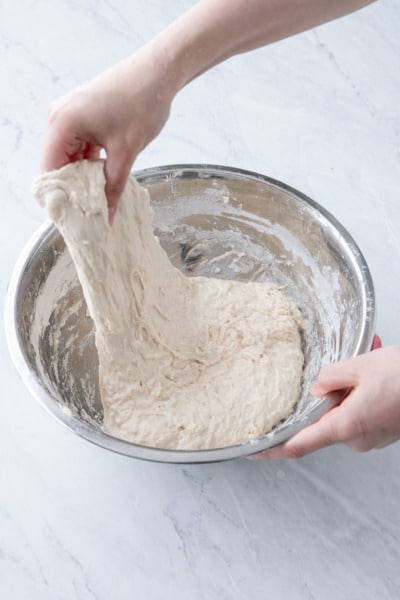
You can see here just how much difference the folding makes in the overall appearance and texture of the dough. On the left is the freshly mixed dough and on the right is the dough after two full sets of folds (and a drizzle of olive oil at the end to prevent sticking).
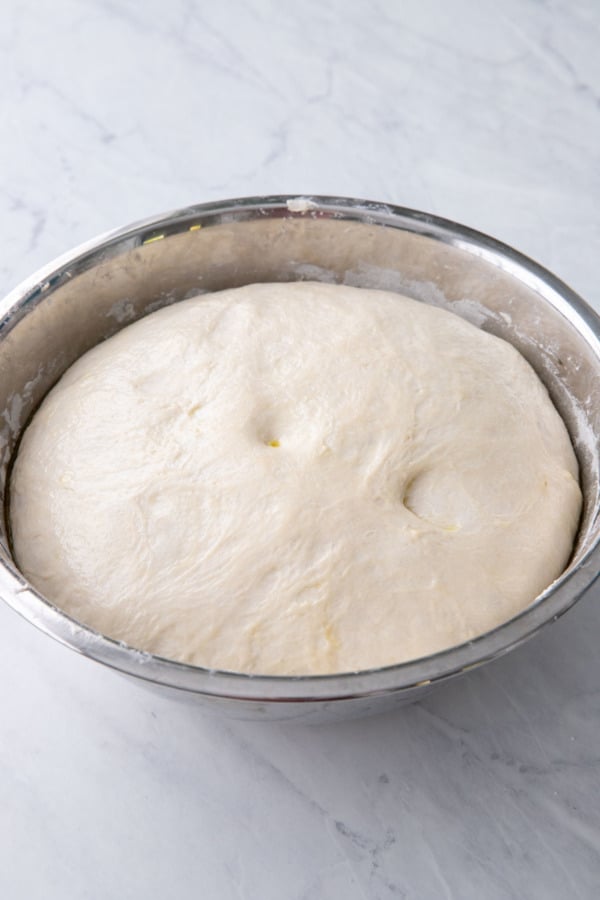
After this you can cover and leave the dough alone for another 4-5 hours or until it has risen to about 2 1/2 times its original size.

Shaping the Dough
I am no expert at this part. My friend Laura should be publishing her (sourdough-based) pizza crust recipe soon, and I bet you her shaping instructions will be vastly superior to mine. Because she’s a rockstar like that.
Basically, the process of shaping the dough is twofold: forming the balls and then flattening/stretching the balls into the pizza shape.
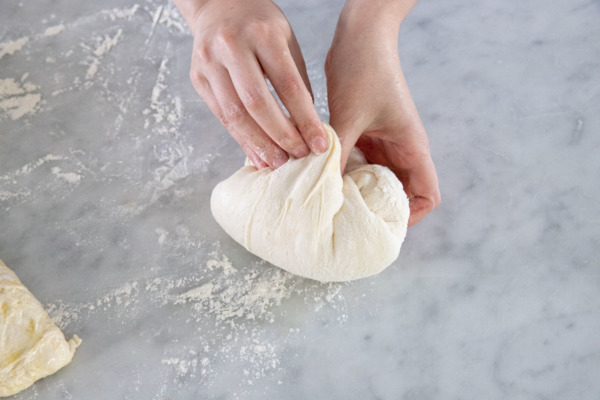
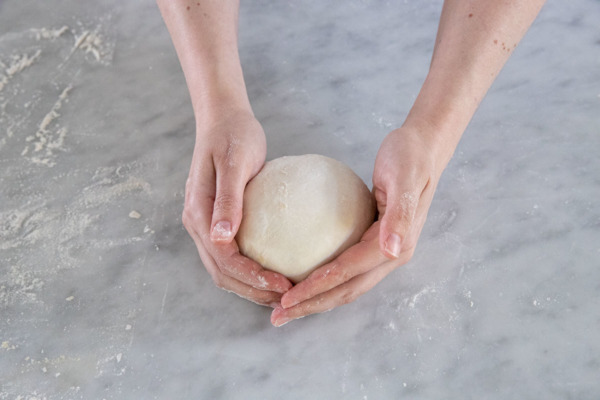
Shaping the dough balls involves taking advantage of the slight tackiness of the dough to create surface tension. You do this by sliding the balls of dough over an un-floured surface. Cup your palms around the ball of dough with your pinkies touching the countertop, then pull the ball of dough towards you. You should feel the tension of the dough sticking to the surface, and pulling the surface of the dough taught. If your counter or work surface is floured, the dough will slide right over and won’t stick; in this case, move the dough to a clean spot of counter and try again (you need the slight stickiness to create that tension). Change directions a few times (either by gently lifting and repositioning the dough ball, or moving yourself around the counter for a different angle) and pull it towards you again. Repeat this process a few times, taking care not to deflate the dough, until the dough forms a nice tight ball.
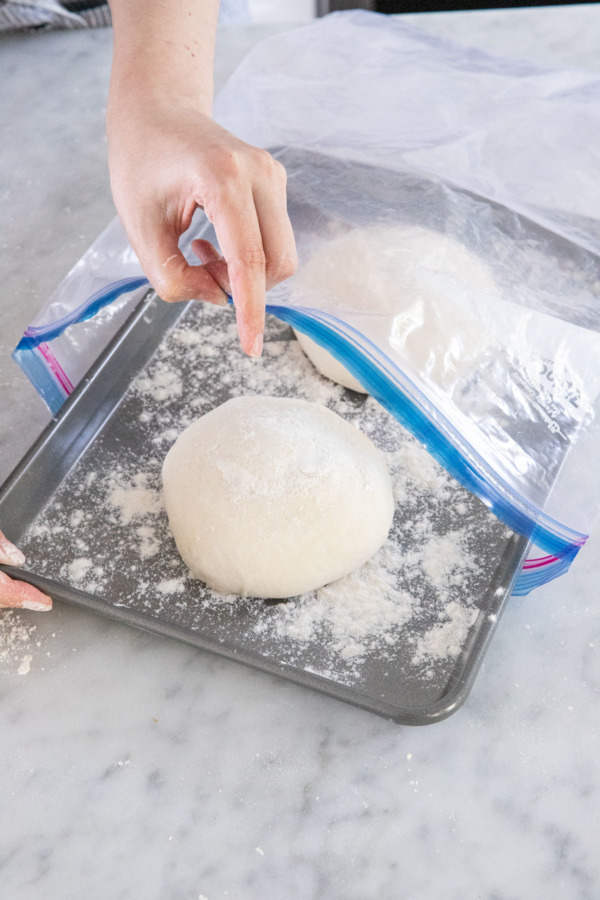
After shaping, you can technically go straight to baking if you want, however I find the dough is much easier to work with after chilling for an hour or two. I’ve timed the baking schedule above to include a few hours of chill time for just this reason. Place your dough balls on a lightly flour a plate or small cookie sheet, cover with plastic (I use a 2 gallon plastic bag for this), and refrigerate until ready to use. 1-2 hours is the minimum, but the dough can be chilled up to 24 hours if necessary. For any longer than that, consider freezing it instead.
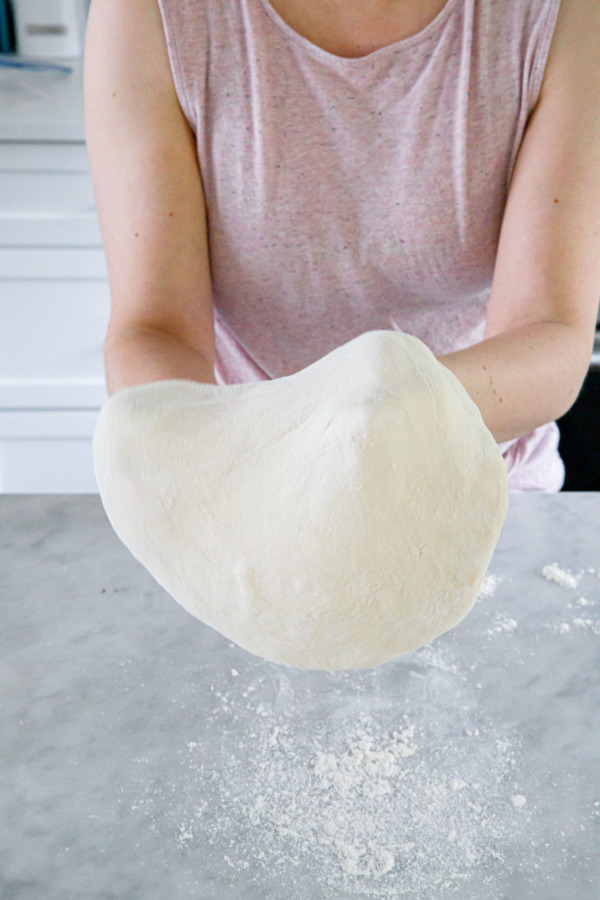
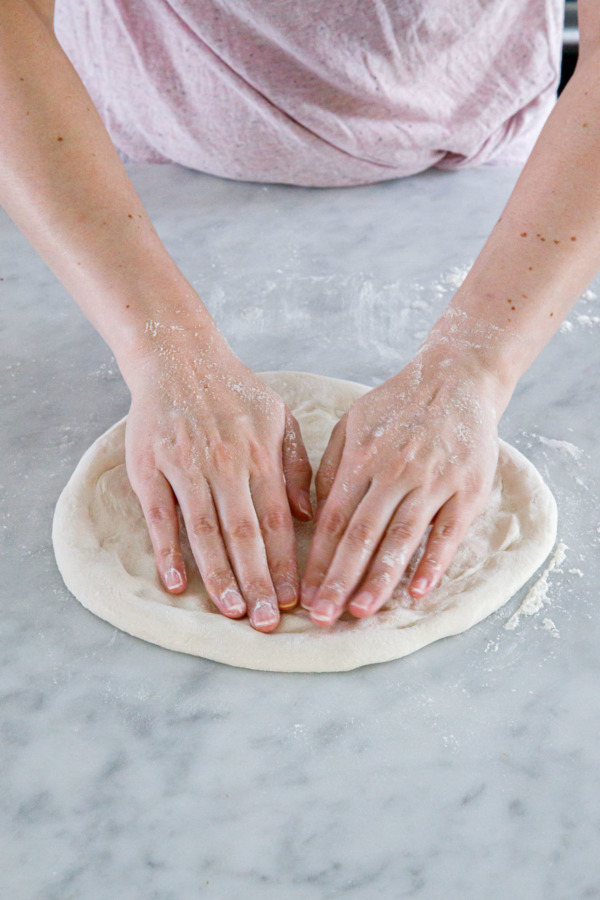
When you’re ready to bake, you’ll need to turn those balls into flat rounds of dough. Rather than rolling the dough into shape, you want to gently stretch it into shape (seriously, step away from the rolling pin). Instead, lightly press the dough out into a thick disc, then gently stretch over your fists, letting the weight of the dough itself do most of the work. This will preserve the air bubbles that have developed in the dough while it was rising.
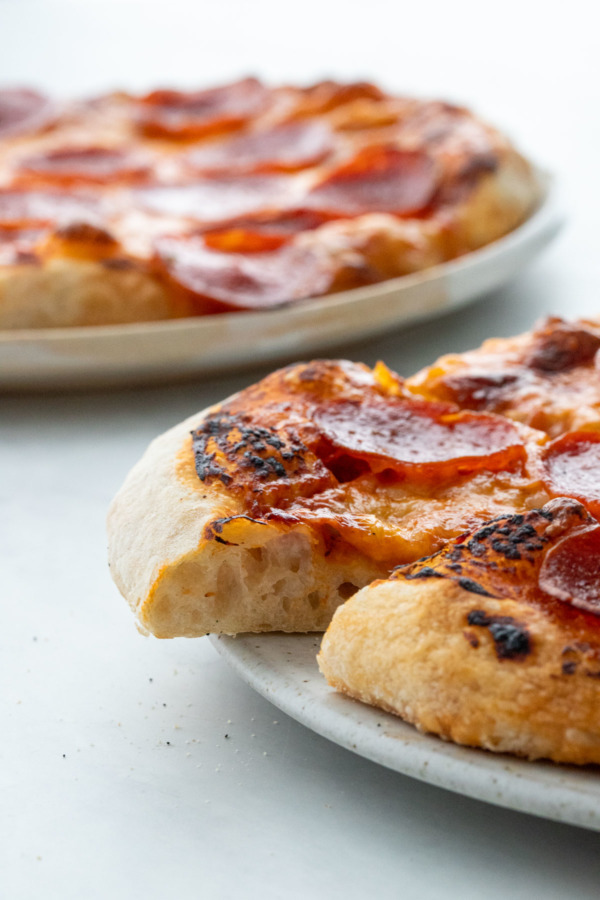
To bake, transfer the dough to a pizza peel liberally dusted with semolina flour. Shimmy it just a bit to be sure it’s not sticking, then add your toppings. Bake on a preheated pizza stone for about 8 to 12 minutes (at 500 degrees F, slightly more/less if you are using a higher or lower temperature) until the crust is golden brown and cheese is bubbly and browned in spots.
Freezing Pizza Dough
This recipe makes 4 balls of pizza dough, which is a lot of pizza for two people unless you enjoy eating pizza for four meals straight. We usually make one the night of, then chill the second ball overnight and have it the next day. The other two balls of dough we wrap up and freeze for another week.
Dough stored in the freezer won’t be quite as bubbly as freshly made dough, but the results will be just as delicious.
Frozen dough should be taken out of the freezer the night before you want to bake your pizza. Let it thaw overnight in the refrigerator, then take it about an hour before you want to bake (same time as you preheat your pizza stone). The room temperature dough will be a bit more fragile than chilled dough, but this gives the dough a chance to warm up and rise a bit before shaping and baking.

Tricks & Tools
For the crispiest pizza, a hot oven is paramount. We crank ours to 500, but if yours goes hotter by all means, do it. Let the stone preheat fully for at least 45 minutes to an hour in the oven (I know the oven will tell you it’s preheated much sooner than that: don’t trust it.)
A pizza stone or baking steel is really non-negotiable here, it’s the only way you’re going to get even close to replicating a wood oven-style pizza at home. This is the pizza stone we have, it was a wedding gift from my cousin all of 12 years ago (eep!) and despite being burnt and blackened and clearly well-used, it still makes beautiful pizza. I swear, these things last forever.
You’ll also want a pizza peel (ours is wood, but a thin steel one could be used as both a peel and a spatula to take the hot pizza out of the oven). Coarse semolina flour helps the pizza not stick to the peel (sprinkle it generously before you put your shaped dough on the peel, then shimmy it a bit to make sure it’s loose).
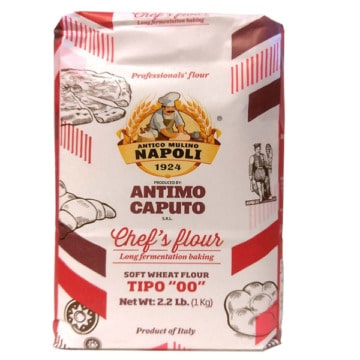
You’ll achieve the best results with 00 flour (Antimo Caputo brand is our favorite), which is a finely milled bread flour that’s slightly higher protein than regular AP flour. It produces a silky smooth dough with a lovely chew and airy crumb that bakes up beautifully crisp and bubbly in the oven.
This is also my favorite flour to use for focaccia bread and homemade pasta, so buy a few bags: it certainly won’t go to waste. You’ll also need some semolina flour for dusting your pizza peel (semolina won’t burn like regular flour or cornmeal will).
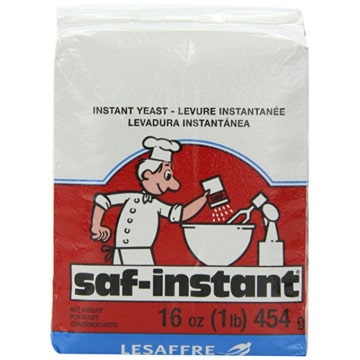
For instant yeast, I buy a vacuum pack of SAF instant yeast every year or two; freeze half and store the other half in a jar in the fridge to preserve freshness. So much more convenient than dealing with those pesky packets.
Overnight Pizza Dough
This recipe makes enough for four 9-inch pizzas. Plan to start the dough the evening before you want to make your pizza.

Ingredients:
For Poolish:
- 2 1/2 cups (333g) 00 flour, or an equal weight of bread or AP flour
- 1 1/3 cups (333g) filtered or spring water, approximately 80ºF/26ºC
- scant 1/8 teaspoon (.35g) instant yeast
For Dough:
- 2 1/2 cups (333g) 00 flour, or an equal weight of bread or AP flour
- 2/3 cup (166g) filtered or spring water, approximately 1050ºF/40ºC
- 12g kosher salt
- olive oil, as needed
Directions:
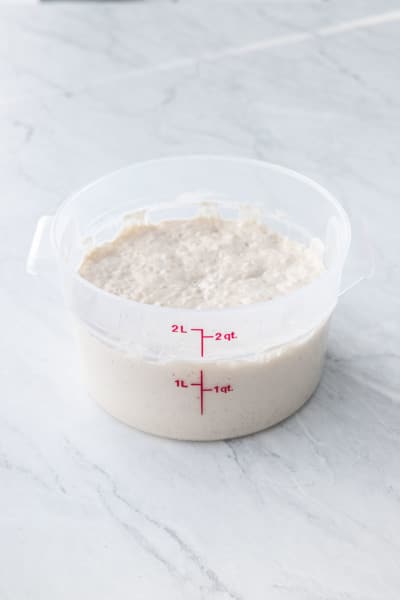
- In a bowl or tub, combine flour, water and yeast. Mix well to form a sticky, shaggy dough. Cover lightly and set in a warm location overnight. The poolish is ready when it hits its peak, about 10-12 hours after mixing. At this point it should be doubled in size and bubbly on top, with bubbles actively popping every few seconds.
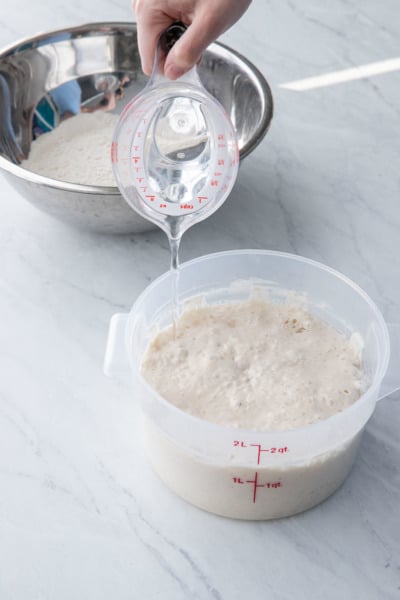
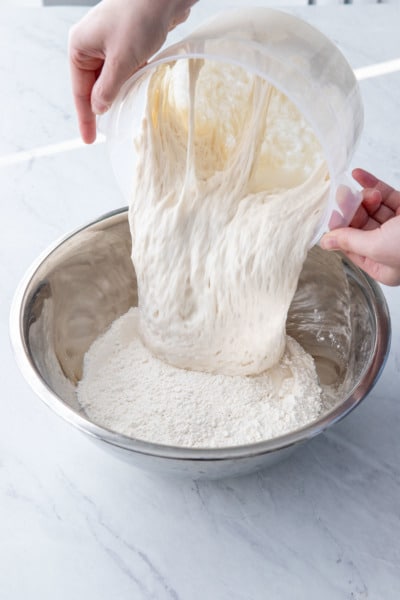
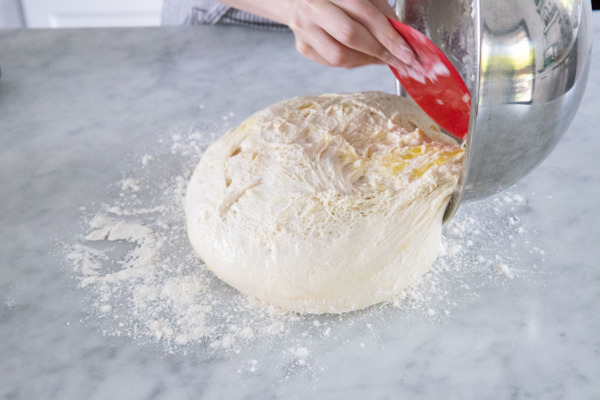
- The next morning, whisk together flour and salt in a large bowl or 4 quart tub. Pour the warm water around the edges of your poolish to release it, then pour into bowl with flour. Incorporate the dough by swiping and folding, alternating with a pinching motion through the middle of the dough. Continue to repeat these motions until the dough comes together and no dry ingredients remain. Cover lightly and set in a warm location for 30 minutes.
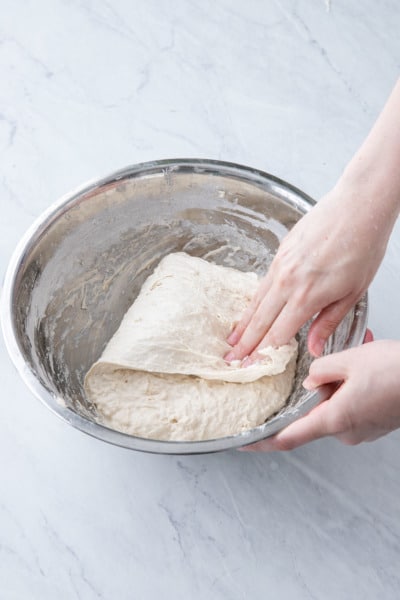
- The dough will need two sets of folds within the first hour after mixing. To fold, cup your hand under the side of the dough, then lift the dough up and over itself to tuck it in on the other side. Rotate the bowl a quarter turn and repeat this fold three more times, until you’ve made 4 folds at 12, 3, 6 and 9 oclock. Cover and set aside for another 30 minutes, then repeat this set of folds again. After each set of folds you’ll notice the dough getting smoother and less shaggy.
- After the second set of folds, lightly drizzle a tablespoon or so of olive oil around the edges of the dough, then gently lift and flip the dough ball a few times until it and the bowl are lightly coated with oil. Cover again and set in a warm spot to rise.
- After about 5 or 6 hours, or when the dough is about 2 1/2 times the original size, it’s ready to shape.
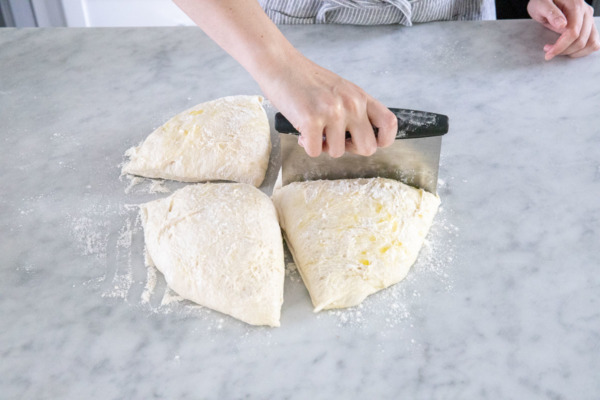
- Lightly flour your work surface and the top of the dough, then turn dough out on the floured surface in one big blob. Use a bench scraper to cut the dough into 4 even pieces (about 275g each).
- To shape, stretch and fold the corners of the dough, tucking into the center. Flip the dough ball onto a clean, unfloured portion of your work surface. Cup your palms around the dough, with your pinkies touching the work surface, and lightly pull it towards you, taking care not to squish or deflate the dough. It should create some tension on the surface. Rotate the ball a quarter turn and pull it again. Repeat until you have a nice tight dough ball.
- At this point the dough can be refrigerated (place on a floured cookie sheet then cover with a large plastic bag or sheet), or frozen for later use (wrap loosely in plastic wrap then seal in a zip top bag).
- To bake, preheat a pizza stone in a 500 degree oven (or as hot as your oven will go). Let it preheat for a solid 45 minutes to be sure it is thoroughly heated before baking. Gently stretch your dough balls into 9-inch rounds (take care not to deflate the dough too much). Transfer to a pizza peel that has been liberally dusted with semolina flour, then add toppings as desired. Transfer to the preheated pizza stone and bake for about 8 to 12 minutes or until crust is golden brown and cheese is bubbly and spotted. Let cool for 5 to 10 minutes before slicing and serving.
Did you make this recipe?
Let us know what you think!
Leave a Comment below or share a photo and tag me on Instagram with the hashtag #loveandoliveoil.


Thank you for this recipe and the photo walkthrough with specific details of sizing etc – I’m not the most confident cook but I got my partner a pizza stone for Christmas so then it fell to me to make dough :D This has increased my confidence hugely and makes a lot of other yeast-related stuff make sense!
I only see 1/8 teaspoon of yeast for the poolish. Is there any additional yeast added to the dough?
Nope, just the 1/8 teaspoon in the poolish! Because of the long rest time that is more than enough yeast to produce a proper rise.
thank you, I want a thicker crust and all of my local pizza places are thin crust, great but tired of it, so happy to see this and also great to be able to make it as crispy as I want!
Where did warm water come from and how much
Can this 1st part be done in bread maker
This is not a breadmaker recipe, it doesn’t actually require any kneading, just a few folds after mixing the final dough.
Water quantities are listed separately for the poolish and the final dough portions.