The first rule of entertaining: always stash some for yourself.
Especially when it comes to dessert.
Because after the crowd of tipsy beer-fanatics have their way with the dessert tray, there won’t be a solitary crumb left.
In hindsight, perhaps this particular dessert wasn’t the best choice for an outdoor gathering that day, considering the humidity had to be at least 327% (in other words, downright sticky). But the fact that the topping was melting all over everyone’s hands didn’t stop them from devouring the whole tray.
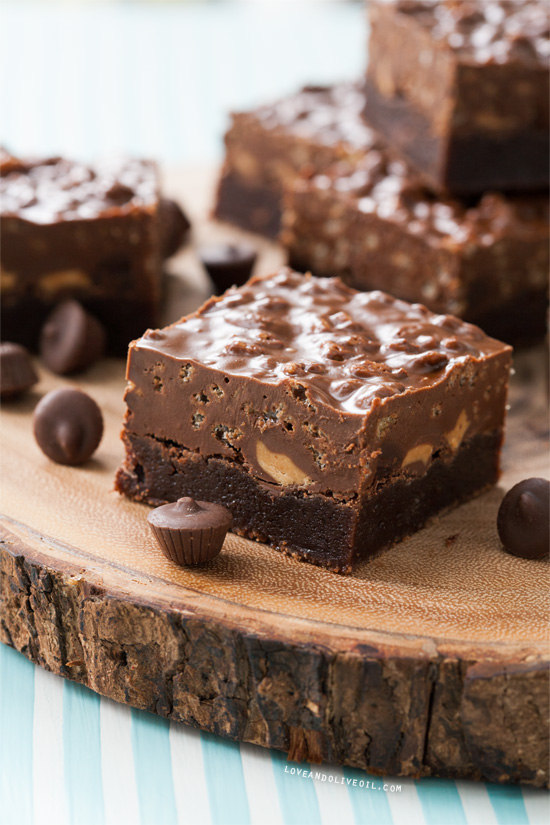
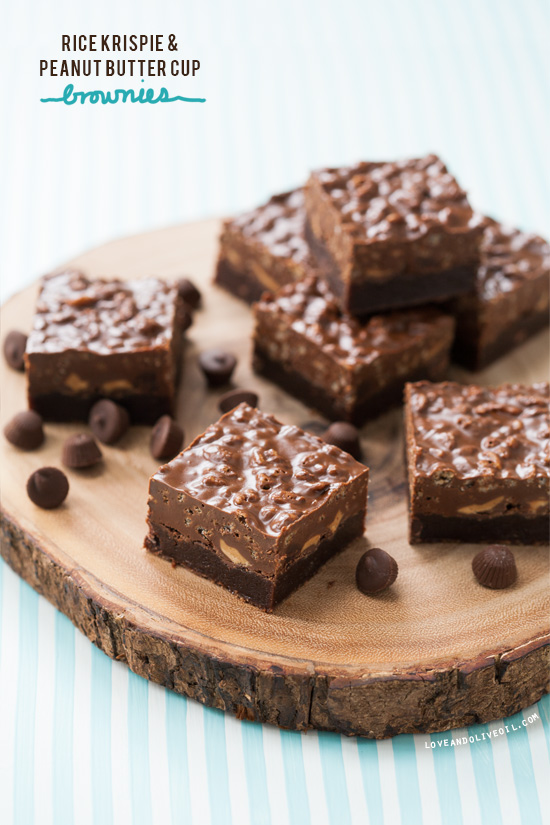
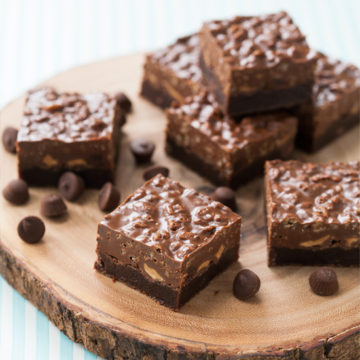
What starts as a seemingly ordinary brownie gets sprinkled with chocolate chips and peanut butter cup candies, baked until they just start to melt and puddle, and then topped with a double thick layer of crispy chocolate and peanut butter paradise. It’s like brownie meets rice krispie treat meets peanut butter cup… meets my mouth.
This recipe comes from my friend Averie’s delightful new cookbook, called Peanut Butter Comfort. An entire book about peanut butter? I’m sold. But of course I flipped right to the peanut butter and chocolate chapter, as that is where my true heart lies. (Also, if the idea of a peanut butter cookbook makes you giddy like a schoolgirl, you don’t want to miss tomorrow’s post!)
And remember, even though it seems like a 13-by-9-inch pan makes more than enough, wrap up a few bars and tuck them in a dark corner of the fridge, maybe behind the broccoli or the who-knows-how-old-it-is jar of whatnot where the other members of your household won’t think to look. Trust me. Your future self will thank me later.
Rice Krispie & Peanut Butter Cup Brownies
Ingredients:
For Brownie Base:
- 3/4 cup (1 1/2 sticks) unsalted butter
- 1 3/4 cups semisweet chocolate chips, divided
- 1 1/2 cups granulated sugar
- 1/2 cup light brown sugar, packed
- 1/2 teaspoon instant espresso powder or 2 tablespoons brewed coffee (optional)
- 1 1/2 teaspoons vanilla extract
- 3 large eggs
- 1 cup all-purpose flour
- 8 full-sized peanut butter cups, chopped, or 1 cup mini peanut butter cups
For Crispie Topping:
- 1 1/2 cups semisweet chocolate chips
- 1 1/2 cups creamy peanut butter
- 1 tablespoon butter
- 1 1/2 cups crisp rice cereal
Directions:
- Preheat oven to 350 degrees F. Line a 9-by-13-inch baking pan with aluminum foil; spray lightly with cooking spray.
- Combine butter and 3/4 cup chocolate chips in a large microwave safe bowl. Heat on high power for 60 to 90 seconds, stirring every 10 to 15 seconds to prevent scorching. When chocolate is melted and mixture is smooth, stir in sugar and brown sugar. Batter may seem grainy, that’s ok.
- Add the coffee or espresso powder and vanilla extract and stir until smooth.
- Whisk in eggs until incorporated. Sprinkle the flour over top and fold until just combined. Stir in 1/2 cup chocolate chips then pour batter into prepared pan.
- Bake for about 25 minutes or until brownies are mostly done. Remove from oven and sprinkle chopped peanut butter cups and remaining 1/2 cup chocolate chips over top, then return to oven and bake for 3 to 4 minutes more. Transfer pan to wire rack to cool.
- Meanwhile, to prepare topping, combine 1 1/2 cups chocolate chips, peanut butter, and butter in a large microwave safe bowl. Heat on high power for 1 minute, stirring every 10 to 15 seconds, until melted and smooth. Add rice cereal and toss to coat. Spread cereal mixture in a smooth layer on top of brownies, then cover and refrigerate for at least 90 minutes or overnight, or until topping is cooled and set before slicing and serving. Brownies will keep, refrigerated in an airtight container, for up to 1 week.
Recipe from Peanut Butter Comfort by Averie Sunshine.
All images and text ©Lindsay Landis / Love & Olive OilDid you make this recipe?
Let us know what you think!
Leave a Comment below or share a photo and tag me on Instagram with the hashtag #loveandoliveoil.


I made these for Thanksgiving and these bars are delicious! My 3 year old great nephew literally screamed when he tasted his, holding it up to his mother with the biggest chocolate smile! And Lindsay, you were spot on when you said save a few! I screwed up and only saved 2. Big mistake. So of course, I’m making them again for Christmas….❤️
So glad you enjoyed!!
This recipe looks so good, I shared the link on my blog today in my list of Fabulous Finds, even before I have made it myself. The ingredients are lined up on the counter now, and I will be mixing these up in just a bit! Pinned as well, and I’m following you on Facebook now. I’m glad I happened upon this recipe!
Holy smokes! Just found today’s dessert! Will keep you posted!
I cooked mine the 25 minutes then 4 minutes more. once they are cooled, they are okay. they look like the ones in the picture and everyone who tastes them says they are good,you just eat them cooled,not warm. so i guess they are supposed to be gooey on the bottom. but to me 25 minutes does seem to be too little time.