
 Well, it ain’t pretty.
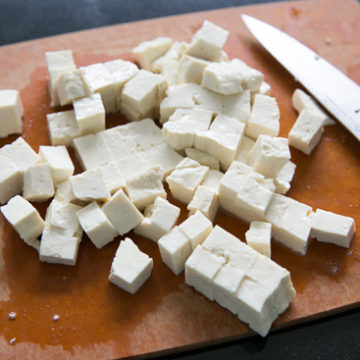
But it’s tofu.
Mission, accomplished?
The whole process was oddly similar to making mozzarella, only a bit more… beany. And you have to make your own milk first before you can start the curdling process.
Was it worth the time? Debatable. While the texture was definitely more delicate, there wasn’t anything that made the homemade version leaps and bounds above what you can buy in a store. Granted I did not try the silken version of the recipe, but for standard block tofu I think I’ll stick to store bought. Although I will say you could save some money making it yourself (not that tofu is expensive or anything). I spent $3 on a quart of soy beans and it is probably enough make 6 good-sized blocks of tofu.
On the other hand, time IS money.

The ingredients are simple enough…

The dried soybeans soak overnight until they are buttery yellow and easily break apart. They are easier to blend this way.

Mmm… soybean milkshake.
It smells like grass, and not necessarily in a good way.

While the recipe I followed (from Asian Tofu by Andrea Nguyen) was very thorough and descriptive, there were a few places where it was missing some critical information. Like here. A temperature would have been extremely helpful. Instead, it just said to cook until a thick foam rose to the top of the milk. Well, that happened literally 20 seconds after I poured it into the pot, not the 3-6 minutes like the recipe said. Foam be damned, I kept cooking it.

It may seem smooth, but there’s more solid stuff in there than you’d think. It needs to be strained. Muslin or unbleached cotton fabric works best here, cheesecloth will let too much of the soy bean remnants through.

Caution: contents may be hot. Even with the gloves on I almost couldn’t bear it.

This stuff is what’s left after all the soymilk is squeezed out. Soybean “lees,” which, according to Ms. Nguyen, can be used in a variety of things. She even has a recipe for doughnuts. Say what?
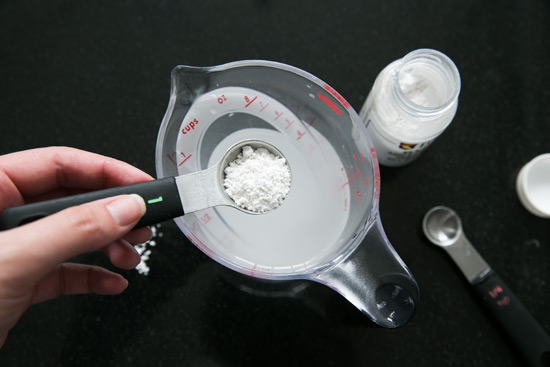
This is gypsum, the coagulant that separates soymilk into the tofu curds and whey. Yes, gypsum. Like drywall. Food grade drywall (I’m really making you want to make tofu here, aren’t I?)

This is not proper coagulation. The 2nd time I made this it didn’t curdle nearly as well as the first time. I followed the troubleshooting steps in the book, adding more gypsum even. Stirring seemed to help, however, as once I started to ladle it into the mold it did separate into more distinctive curds.

Fancy tofu mold? No way, José. Instead I used an old plastic container with a few holes punched in the bottom.

Lined with some damp muslin, it made for a perfectly acceptable tofu mold.

See, curds!

This is what you call MacGyver’ing it.

Ok. Um… who’s hungry?
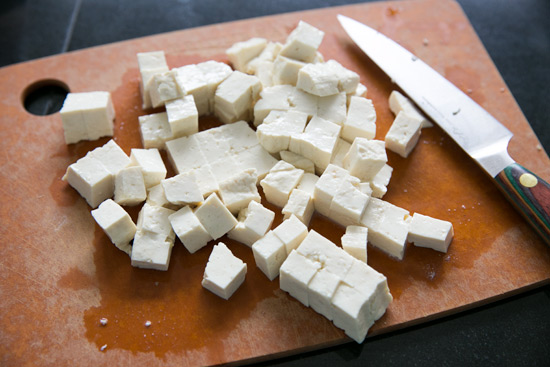
So there you have it. Perfectly acceptable tofu.

We chopped it up and used it along with some leftover pork in a dish called mapo tofu. The key flavor here is the Szechuan peppercorns, which have a woodsy spice and a unique tingly-hot sensation that leaves the tongue feeling anesthetized. In a good way, of course. Apparently it was illegal for many years, and only became readily available here in the states in 2005. Who knew?
Homemade Block Tofu
Ingredients:
- 6 ounces dried soybeans, rinsed
- 8 cups spring or filtered water, plus more for soaking soybeans
- 1 1/2 teaspoons gypsum*
You will also need:
- Large 6 quart non-stick pot
- Medium 5 quart non-stick pot
- Wooden spatula
- Large mesh sieve
- Two pressing cloths (a clean piece of cotton muslin fabric or a flour sack dish towel works well)
- Mold (I used a plastic container with a few holes punched in the bottom)
*Gypsum can often be found at homebrewing supply stores or online.
Directions:
- Place soybeans in a bowl and cover with spring water by at least 2 inches. Cover and let soak for 8 to 12 hours or until beans split apart into two, evenly colored halves that break in half easily. If the insides of the beans are concave or darker in color and the beans are rubbery, allow to soak longer.
- Drain, reserving soaking water for the next steps (if desired). Soaked and drained beans will keep, refrigerated in an airtight container, for up to 5 days.
- Place a colander or fine mesh sieve over the smaller of the two pots. Line sieve with cloth. Place 5 cups of spring water in the larger pot to warm over medium heat. Don’t let it boil just yet.
- Place soaked soybeans and 2 cups of spring water in a blender and liquify on high speed for 1 to 2 minutes or until soybeans form a thick, smooth purée. Add to pot with warm water. Add another 1/2 cup of water to blender and pulse briefly to rinse out any remaining soy solids, then pour that into the larger pot as well.
- Cook the soybean mixture, stirring frequently to avoid scorching, for about 3 to 6 minutes or until a thick, frothy foam begins to rise. Remove from heat and let sit for a few minutes as the foam subsides.
- Pour the milk through the pressing cloth, allowing the liquid to seep through before topping it off. Gather up the pressing cloth and twist, extracting as much liquid as possible (it will be hot, so it may help to wear rubber gloves or wait a few minutes for it to cool down further).
- Open up the pressing cloth and stir in an additional 1/2 cup of spring water, then twist and squeeze out any remaining liquid. At this point the remaining solids (called “lees” can be saved and used for another purpose or discarded).
- Set the smaller pot with strained soymilk over medium-high heat and stir until it comes to a gentle simmer. Continue to stir, adjusting heat as necessary (you want it just gently bubbling) for 5 minutes.
- Meanwhile, combine the gypsum with 1/2 cup spring water, stirring with a spoon to dissolve. Place your mold on a rimmed baking sheet and line with pressing cloth. You will also want to have a sieve and a ladle handy.
- After the soymilk has simmered for 5 minutes, remove from heat and let cool slightly, stirring occasionally, for 2 to 3 minutes.
- While vigorously stirring the milk in a “Z” or “N” pattern across the pot, add 1/3 of the gypsum mixture. Stop stirring, using the spatula to halt the motion of the liquid, then gently lift out the spatula.
- With a spoon, gently sprinkle another third of the gypsum mixture over the surface of the milk, then cover and let sit, undisturbed, for 3 minutes.
- Stir the remaining 1/3 of the gypsum to be sure it is evenly mixed, then sprinkle over the surface of the milk. Gently stir in an “N” or “Z” shaped motion across just the top 1/2-inch of the liquid for about 20 seconds, then cover and let sit for another 6 minutes.
- At this point the mixture should visibly show white curds in a pale yellow whey. If there is still milky liquid, cover the pot again and wait for another minute. You can also add another 1/3 teaspoon of gypsum mixed with 1/3 cup water, gently sprinkled over the surface. Gently stirring the mixture should bring out the curds.
- Press the sieve down into the pot, and use the ladle to spoon out as much liquid whey as you can from the center (the whey can also be saved and reserved for later use). Gently ladle the remaining curd into the prepared mold. Fold in the corners of the pressing cloth and set a second container or similarly-sized surface on top. Weight the tofu with approximately 1 to 2 pounds of weight (more weight will yield firmer tofu), and let sit for about 15 minutes. Carefully remove the tofu from the mold and cloth and submerge in cold water to thoroughly cool.
- At this point the tofu can be enjoyed immediately or stored, covered in water in an airtight container for up to 1 week.
Recipe from Asian Tofu: Discover the Best, Make Your Own, and Cook It at Home.
All images and text ©Lindsay Landis / Love & Olive OilDid you make this recipe?
Let us know what you think!
Leave a Comment below or share a photo and tag me on Instagram with the hashtag #loveandoliveoil.
Serious bonus points to the few brave folks who joined me this month. You guys did awesome, your tofu looks way better than mine!
I’m so ready to move on. Next!


Far out, I am absolutely and positively impressed! Never thought of making tofu at home before. I guess for the time spent, it’s probably worth spending the money on tofu from a store (not that I actually eat tofu, I can’t stand the stuff… though your recipe does look delicious). Thanks for the tutorial!
While I can’t say I will ever make my own tofu, it is really interesting to see what goes into it. I never really thought of it before.
Yeah, I’ve made homemade stuff before (goat cheese most recently) and it is just easier and often more cost effective to get it at the store. But, there is a certain sense of satisfaction in knowing you COULD make it yourself, in a pinch :)
A recipe perfect for me and my family. I just made one small change, I add some hemp seeds, we learned to put it almost in every dish.
The one condition where I can see homemade tofu as beneficial is if I were to have organic (non-GMO) soybeans and sprout them when soaking them. Sprouted, organic tofu is actually a little more difficult to come by in my mid sized town. Apparently it is much easier to digest and the protein is more usable when it has been sprouted. So, actually, this is something I might try!
Hahahaha, I think mine looks the worst! I will be trying it in a recipe today! So glad I took this challenge with you. Thanks for challenging me to :D
wow, thank you soo much!
all the best from austria x
One suggestion – when I make brittles I wear a pair of regular winter gloves under the rubber gloves to pull the super hot candy. That might help you?
Ah, great advice! Will definitely keep this in mind (if) I do this again!
Very cool! I’ll have to give this a try!
Wow. I give you a ton of blog credit for attempting this! I have to say your pork dish with your tofu looks yummy – hope you enjoyed it:-)
I debated joining you in this challege, but I must admit I was scared it would be so good I would feel the need to make tofu from scratch each time! I might have to put this one on the bucket list!
Wow. Totally fascinating. Tofu is definitely one of those ingredients that I know can be made at home, but I couldn’t even begin to imagine how that process takes place. Thank you!
So this is one make from screech item I can cross off my list. I appreciate your honest conclusion about value of making your own tofu. You clearly have to really love tofu and have a ton of free time on your hands.
So facinating! Chalk tofu up to another thing I didn’t ever think to make at home. I love this totally honest review, and this food challenge as well.
I’m so impressed!!
Wow, I’m not sure I’d have the patience for this. I had some friends who made tofu in college, and I’m not sure if they used the same process as you, but it took them all day. A lot of it was just waiting, pressing, and anticipating parts of the process, but it started in the morning in time to use it in a dinner.
Ooh that’s awesome!!! I’m very impressed!
Wow, very impressed by your tofu making skills! I was too scared to attempt this challenge…