

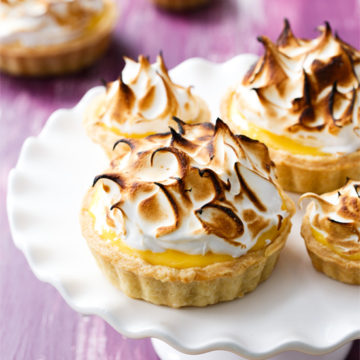
We’ve all heard of lemon meringue pie.
But what about passion fruit meringue pie?
Or, tart, in this case. Pie, tart… whatever you call it, it’s a crust with some filling that belongs in my mouth.
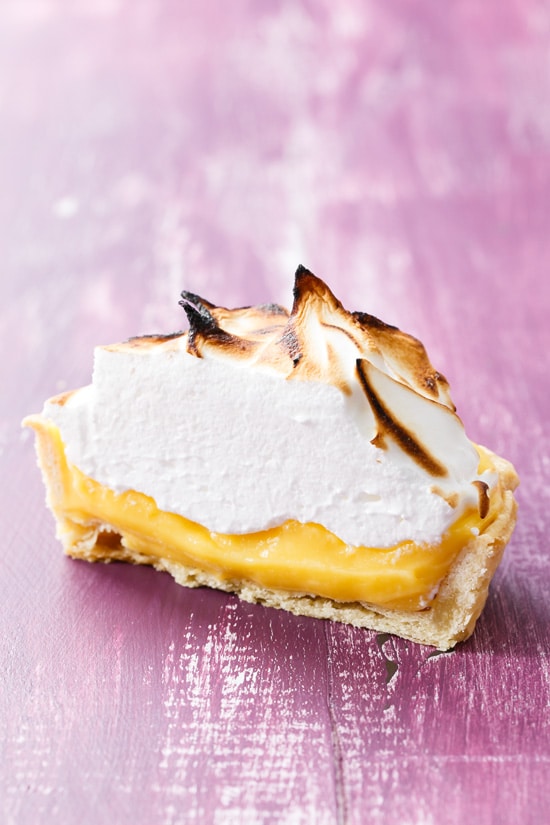
A delightfully tart passion fruit curd makes up the filling of this impressive looking dessert, with a fluffy, marshmallow-like meringue floating, cloud-like, on top of the curd. While the curd on its own is almost too sour to be enjoyable, when paired with the meringue topping and buttery pastry crust it settles into perfection.
Like liquid gold. In a pastry crust.

Being that this was my first time EVER making meringue pie, I think I did pretty darn good. Meringue is a tricky beast, or so I hear. I definitely need to work on my ‘peak’ technique, as mine looks more like monster fur than what I envision meringue pie looking like. I think I may have overbeaten my meringue by a tiny bit, yielding a slightly stiffer meringue that didn’t want to pull up quite as freely. But next time, well, next time I’ve got this.
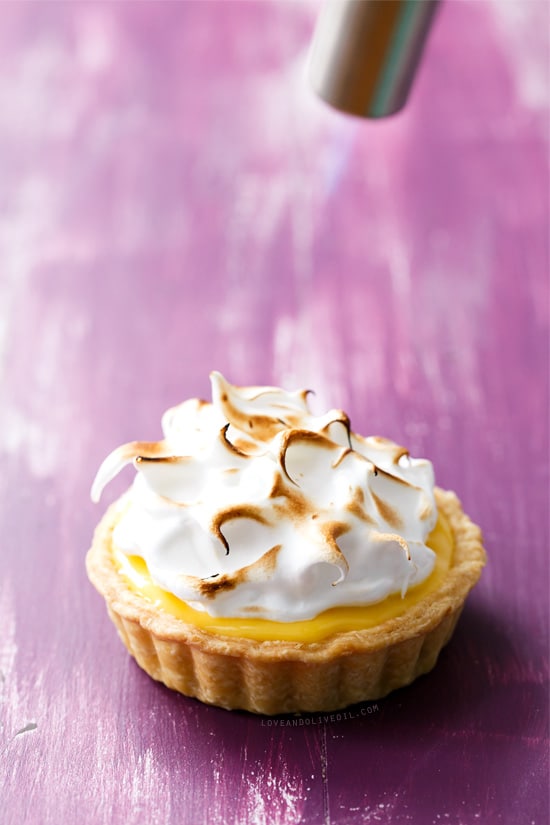
You meringue purists are probably going to scold me for over-toasting my meringue too, but I’ll just say I’m one of those people that likes their marshmallows charred and crispy. And since meringue is basically half-way to being a marshmallow anyway, well, let’s just say you’re lucky I stopped when I did.
Plus, torches are fun.
When they work properly, at least. (Note to self: hold the refill can upside down. Otherwise you might just think your stupid torch is broken and order a new one…)
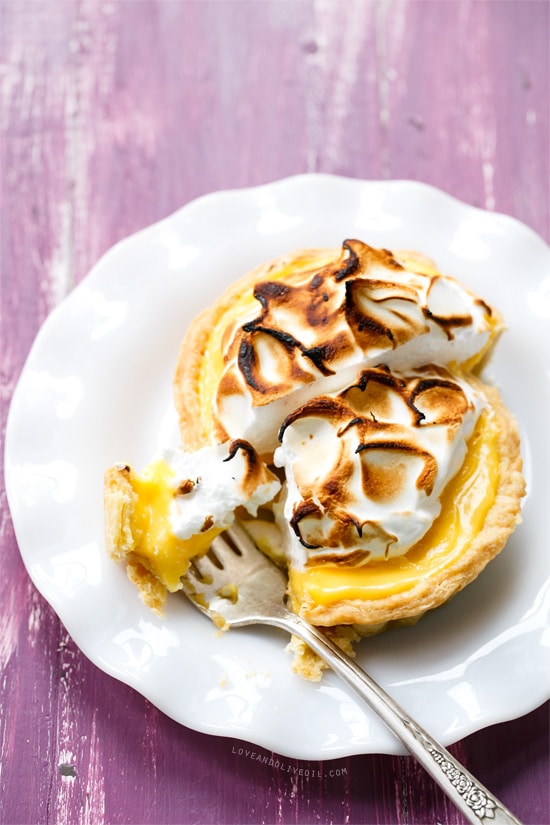
I adapted the recipe slightly to make mini tartlets, halving the curd recipe (also because I didn’t want to waste a good 2/3 of my precious passion fruit on one recipe).
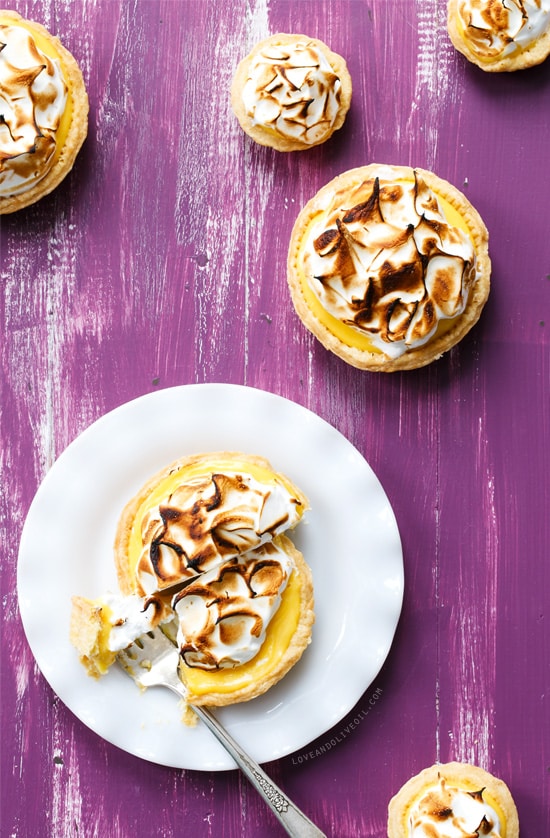
As it stands, I got 3 tartlets (using this pan) and 3 itty bitty mini tarts (in this pan) out of half a batch of curd. A full batch would give you more than enough for a 9 or 10-inch tart, depending on the depth and volume of your tart pan. Heck, I think you’d even be fine making this into a 9-inch pie.
We’re half-way through passion fruit week, and I’m not done yet. In fact, in addition to the third recipe I planned on posting this week, I may or may not have two other little recipes to share as well. I told you I was going to put that $12 bag of passionfruit to good use.
Passion Fruit Meringue Tart
Ingredients:
For Passion Fruit Curd:
- 6 large eggs
- 1 cup sugar
- 1 tablespoon cornstarch
- 1/8 teaspoon salt
- 2/3 cup thawed unsweetened passion fruit puree or juice from fresh passionfruit (from about 12 passionfruit)
- 6 tablespoons (3/4 stick) unsalted butter, cut into chunks
For Pastry Crust:
- 1 1/3 cups all-purpose flour plus additional for dusting
- 2 tablespoons sugar
- 1/4 teaspoon salt
- 1/2 cup (1 stick) cold unsalted butter, cut into 1/2-inch cubes
- 1 large egg yolk
- 1 1/2 tablespoons ice water, plus more as needed
For Meringue:
- 4 large egg whites, room temperature
- 1/8 teaspoon salt
- 3/4 cup sugar
- 1/4 cup water
Directions:
- To prepare curd, in a bowl, whisk together eggs, sugar, cornstarch, and salt until smooth.
- Heat passion fruit in a medium heavy saucepan over moderate heat until it just begins to simmer. Slowly ladle hot juice into egg mixture, 1/4 cup at a time, whisking constantly, until combined and warm to the touch. Return to saucepan over medium heat. Whisk in butter, 1 cube at a time, until mixture is thickened and just comes to a boil, about 6 minutes. Cook, whisking constantly, 2 minutes more. Press curd through a fine-mesh sieve into a bowl, discarding any remaining solids. Cover, pressing plastic wrap or waxed paper onto the surface of the curd, and refrigerate for at least 8 hours.
- While curd is chilling, make the crust. Whisk together flour, sugar, and salt in a large bowl (or pulse in a food processor). Cut in butter with a pastry blender (or pulse) until broken up into pea-size chunks. Lightly whisk together yolk and water and, with a fork, stir into flour mixture (or pulse) until dough just comes together. If necessary, add more water, 1 teaspoon at a time, stirring (or pulsing) until just combined. (Do not overwork, or pastry will be tough.)
- Turn out dough onto a lightly floured surface and divide into 8 portions. With heel of your hand, smear each portion once in a forward motion to help distribute fat. Gather all of dough together with scraper and press into a ball, then flatten into a 5-inch disk. Wrapped tightly in plastic wrap and chill until firm, at least 1 hour.
- Allow dough to sit at room temperature for about 30 minutes prior to rolling out.
- Turn dough out onto a lightly floured surface and roll into a 12-inch round. Gently ease dough into tart pan, pressing with floured fingers onto bottom and up side of pan. Trim overhang to 1/2 inch and fold inside, pressing against rim of pan. Refrigerate for 30 minutes.
- Preheat oven to 350 degrees F.
- Line shell with foil or parchment paper and fill with pie weights or dried beans. Bake until edge is pale golden, about 20 minutes (10 minutes for smaller tartlets). Remove foil and weights and bake until bottom and side are light golden brown, about 20 to 25 minutes more (or 10 to 15 for tartlets). Let cool completely.
- To prepare meringue, combine egg whites and salt in a large metal mixing bowl or the bowl of a stand mixer.
- Combine sugar and water in a small, heavy saucepan set over moderate heat, stirring until sugar is dissolved and syrup begins to bowl. Insert a candy thermometer into the syrup, then continue to boil (without stirring), brushing any sugar crystals down side of pan with pastry brush dipped in water.
- When syrup reaches about 235 degrees F, begin to beat egg whites on medium-high speed until they form soft peaks.
- When syrup reaches 238 to 242 degrees F, immediately remove syrup from heat and pour in a slow, thin stream down side of bowl into whites (to not pour onto beaters to prevent splattering). Increase speed to high and beat until meringue is cool to the touch and holds stiff peaks, about 10 minutes in a stand mixer or 15 with a handheld.
- Transfer shell to a serving plate. Spread curd into the shell. Dollop meringue on top of curd, then spread to edge of crust. Draw meringue up into peaks with a rubber spatula.
- Toast meringue using a small creme brulee or culinary torch, holding flame 1 to 2 inches from meringue and moving evenly back and forth over peaks, until lightly browned in spots. Slice and serve. While the tart and filling will keep in the refrigerator for up to 3 days, the meringue topping is best when served within a few hours.
Adapted from Epicurious.
All images and text ©Lindsay Landis / Love & Olive OilDid you make this recipe?
Let us know what you think!
Leave a Comment below or share a photo and tag me on Instagram with the hashtag #loveandoliveoil.


Can you make a recipe on classic mini lemon meringue tarts though? And what can I do if I don’t have a torch?
You can try broiling the meringue in your oven, just watch it very closely so it doesn’t burn.
The filling looks a tiny bit runny, is there a remedy for this? Any ideas to set it more?
Thanks
I prefer a softer texture curd, though it’s not so soft it oozes out of the shell when cut. That said, if you want something firmer I’d try adding a bit of gelatin.
I’m thinking of using this recipe for a class project, but I only have five hours to do an appetizer, entrée and dessert.
Is it absolutely necessary to chill for 8 hours?
I wouldn’t risk it. You could try freezing vs refrigerating but I’d think it would affect the consistency of the final product. A different recipe might be best.
These are beautiful! And passionfruit is my very favorite fruit! If one doesn’t happen to own a torch, would it be possible to set them under the oven broiler for a number of minutes, or would that ruin the pastry/filling?
I haven’t personally tried but but I would think so! It might not be quite as evenly browned, and just watch it very carefully so it doesn’t burn.
Too sweet for our tastes.
Hi Im just wondering I used your recipe but I used storebought passionfruit juice and ist a little bit sweetened so the taste isnt exactly the same as fresh ones. What do you suggest I do ?
I haven’t tried it personally, but if there is sugar added then I’d suggest reducing the sugar in the recipe slightly. You might also want to use more like 1/2 cup juice since it’s going to be thinner than fruit puree. Let me know how it turns out if you try it!
Everything about this looks amazing. I became obsessed with everything passion fruit as I was traveling through South East Asia and I can’t wait to try this recipe! You’re right who cares what it’s called I just want to taste it!
Hi,
I would like to thank you for sharing your recipe with us
I have one question, in our country it is hard to find passion fruit, what is the alternative for that?
what lovely tarts!
i can never say no to passion-fruit, love the idea of cornstarch.
Did you use fresh or frozen puree passion fruit? This looks insanely delicious. I am a HUGE fan of meringue tarts and this is the first time I’ve seen a passion fruit meringue tart.
The photographs look beautiful. I especially love the toasty touch on the meringue. I now crave this tart and can’t wait to have a bite. Thanks for this recipe.
This looks so delicious! I love the photographs! So,beautiful and yummy :)
You’re on a passion fruit roll! Love this!
These are so pretty and they sound so delicious. It just seems like a natural combo. I like your toasty meringue top too, I am a fellow super roasty marshmallow lover too. ; )
I like your over-torched meringue! (I like my marshmallows on the burnt, crispy side too!) This looks so pretty!
I have never tried passion fruit, but have always wanted to! These tarts/pies are adorable :)
I am so excited to see passion fruit! I grew up in Hawaii and mom still lives there growing passion fruit trees aka “lilikoi” in Hawaiian. She sent me a box a full of them once and I made a few recipes for the blog and then she tried again and Agriculture said no haha. There is something so special about lilikoi!!
These look AMAZING! I’m not sure when you photographed these, but it looks like maybe you used some of the techniques from the WORC workshop?? :) You always produce such beautiful work.
Yuummm!! I had my very first passion fruit tart this past summer, while at a small cafe and it was amazing — I must give this recipe a try!!
Oh wow, these are simply stunning!
I’m up for any dessert that lets me use that kitchen blow torch thing. When I was in high school one of my friend’s mom invited a bunch of the kids to have weekly cooking/etiquette classes. We made creme brûlée one week and all of us were just SHAKING to use the blow torch! lol
Extra toasty meringue ALL THE WAY! Move over lemon—you have some serious competition.
I love, love, love passionfruit! I wish I had a way to get it over here. This looks so good! <3
I’m eager for passionfruit season to arrive in Australia. I’m going to make these tarts.
What is better than playing with a blow torch? I love it!
I love your meringue and the fur reference….LOL. But it looks gorgeous! And love the passionfruit ‘series’ of posts and that purple background is perfect! Pinned!
Funny I was actually considering repainting this backdrop. Glad I didn’t… the purple + yellow combo is perfect for passionfruit!
oh my…these look so delish! wish i could have one for breakfast now :D
x
laura & nora
To have so many passion fruits to use, I am so Jealous! I can wait to see what you have next!