
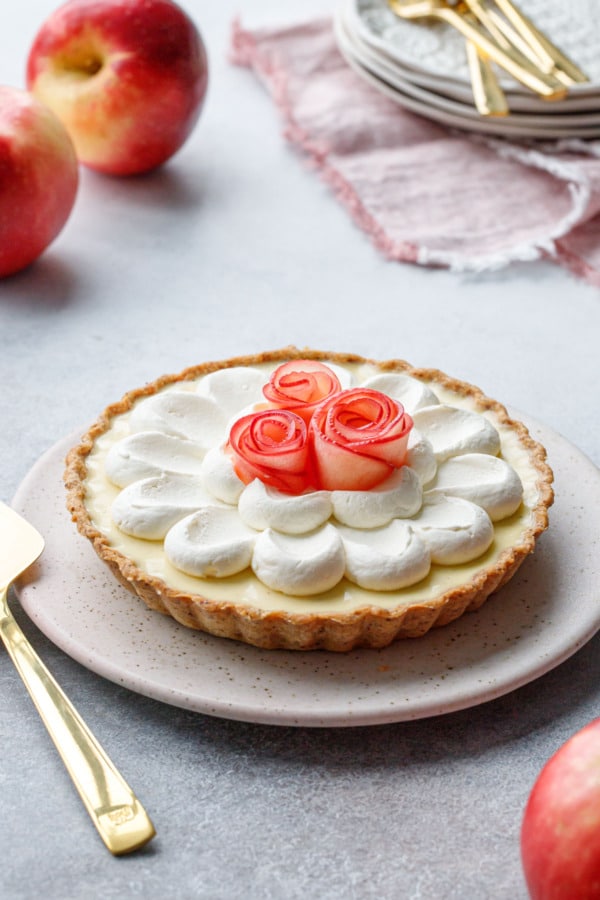
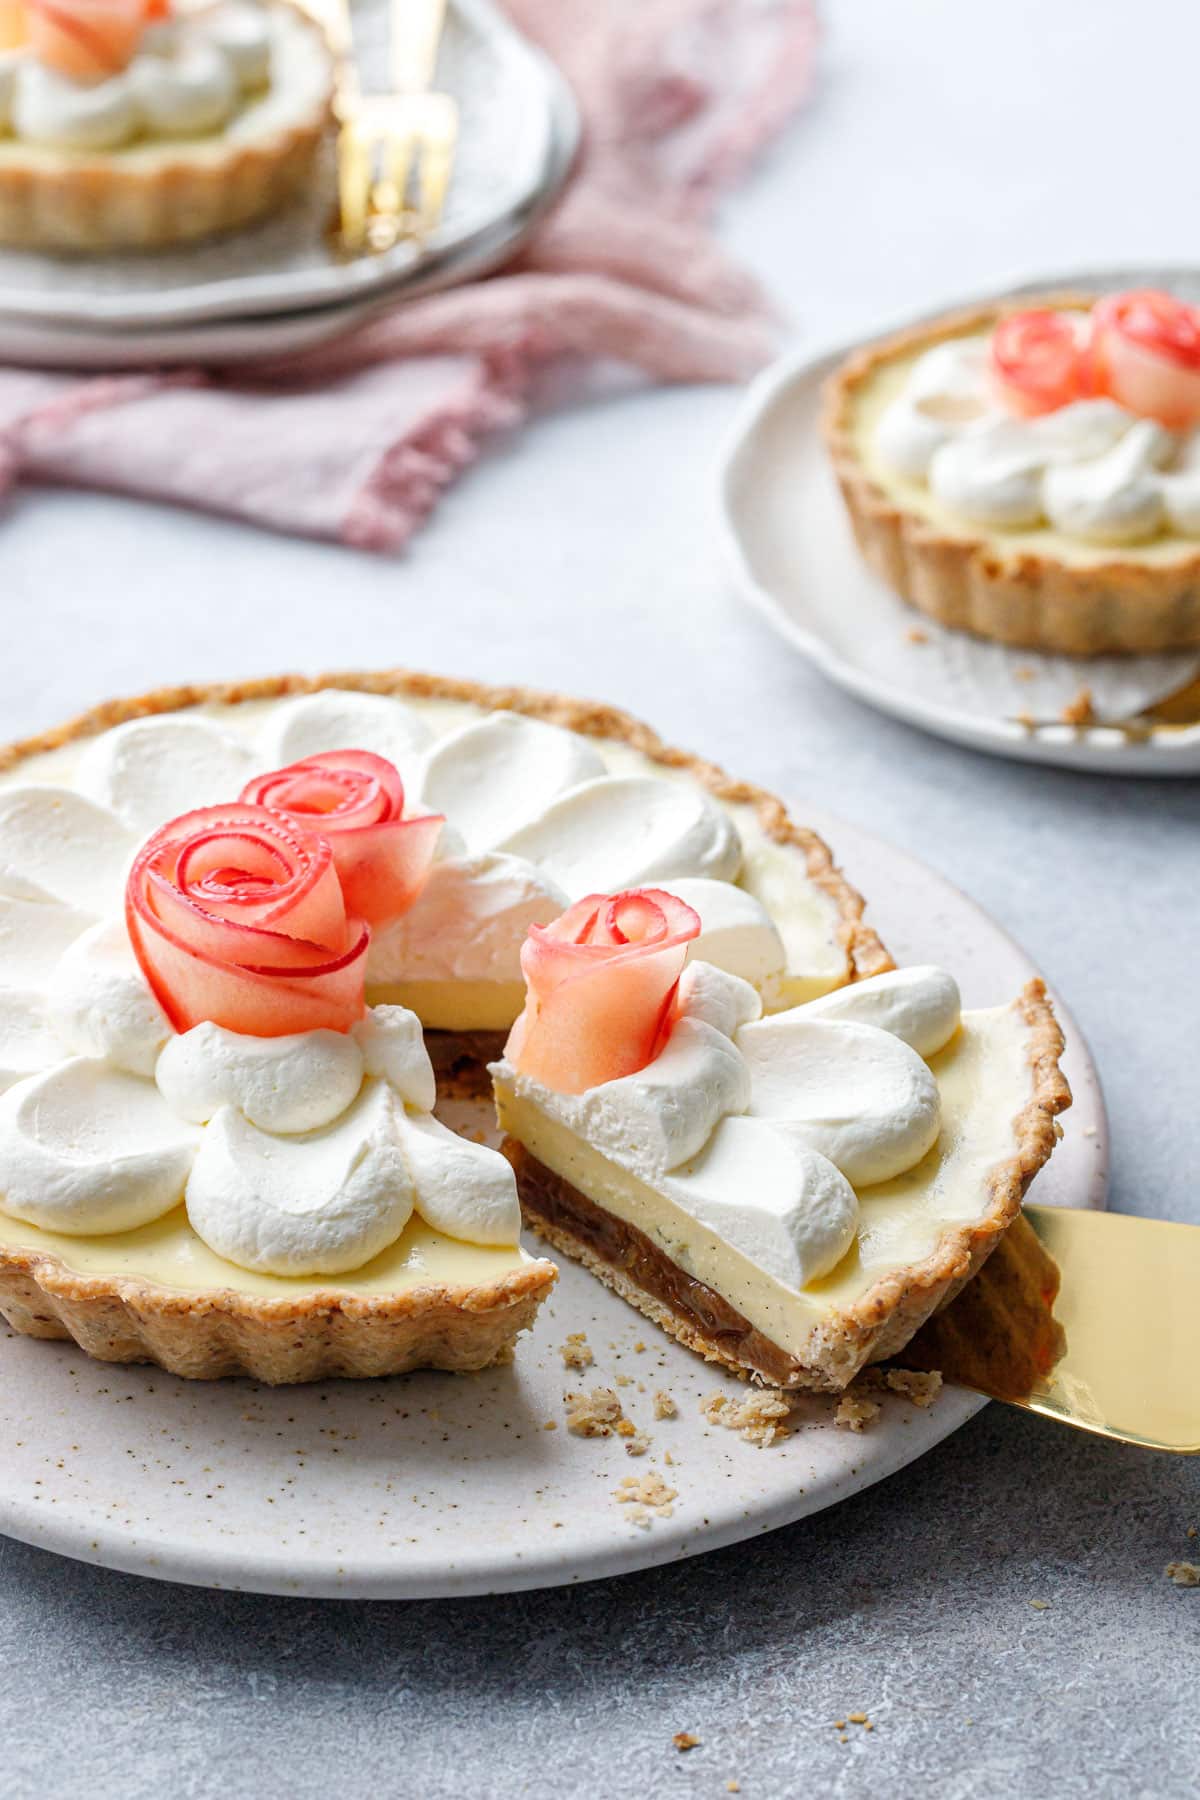
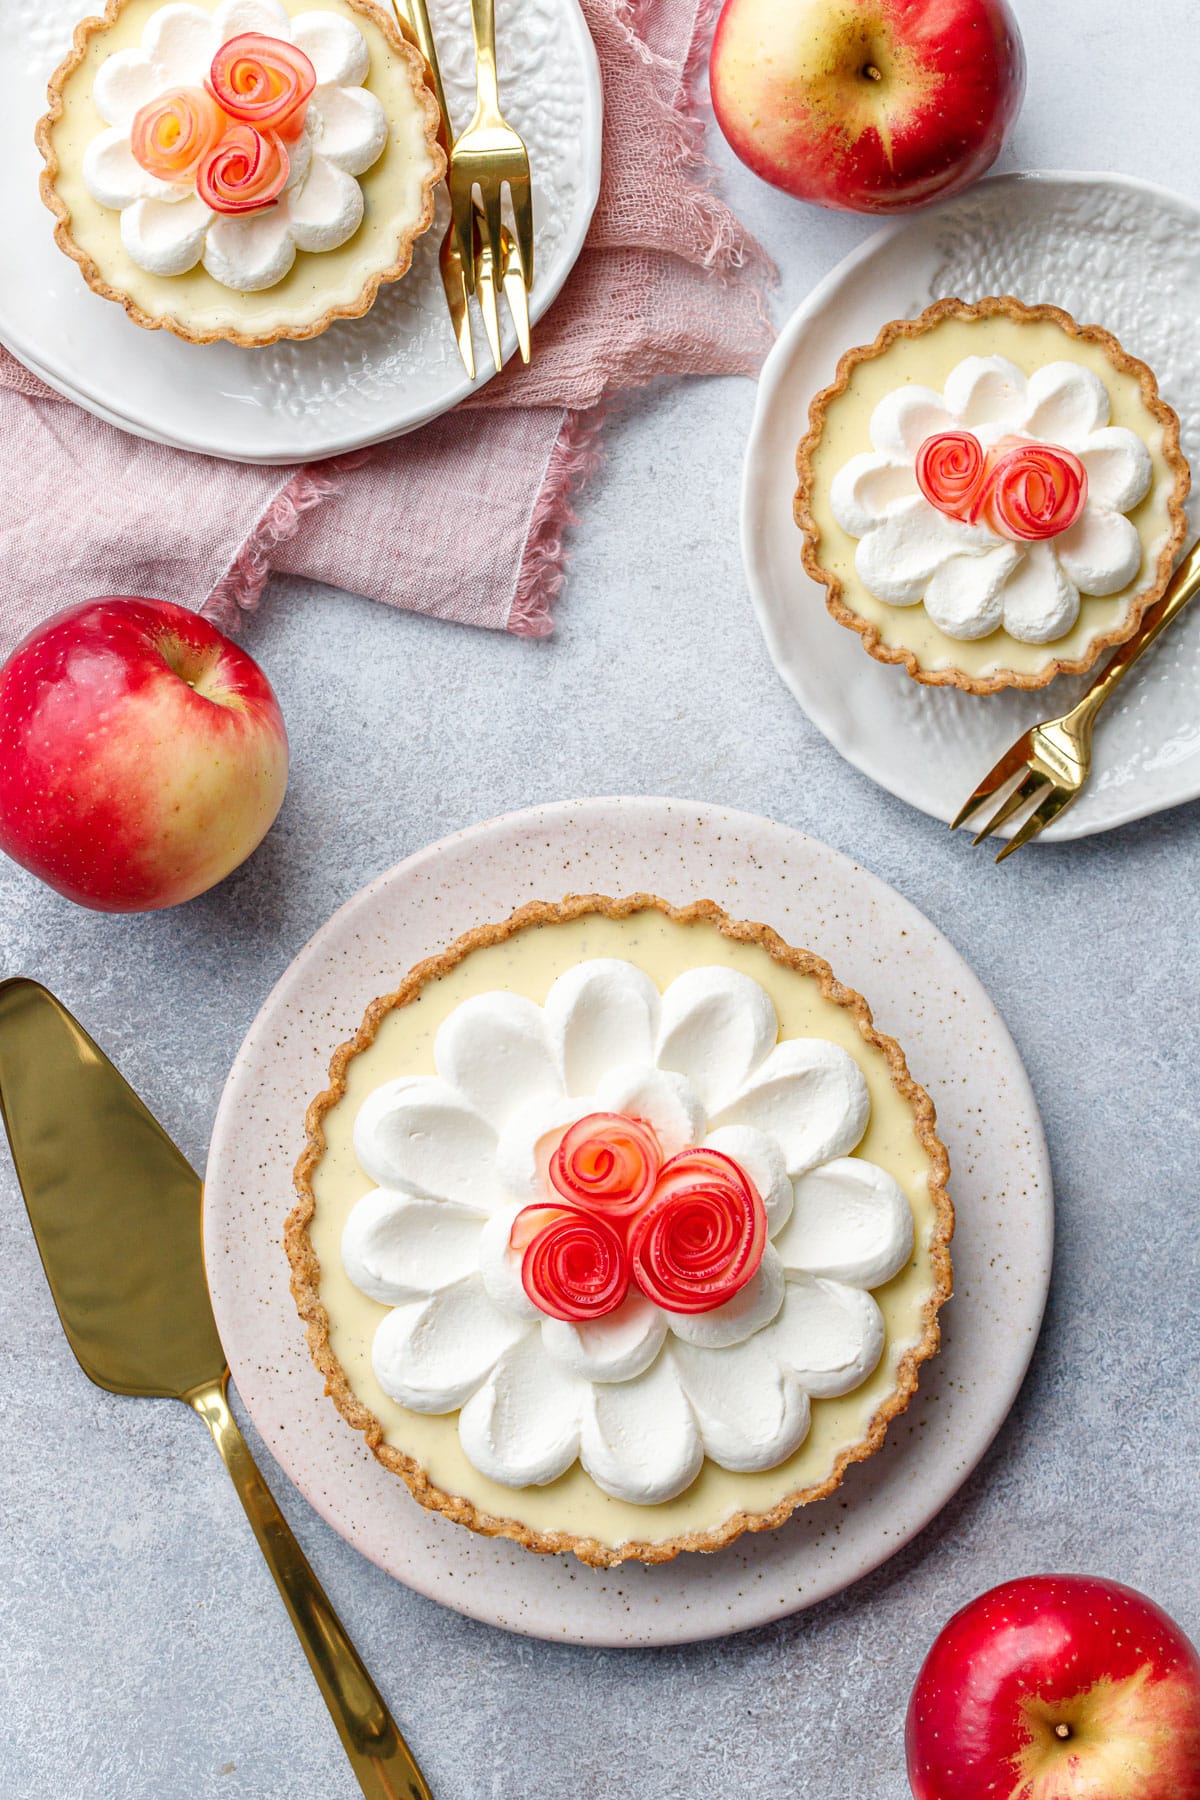
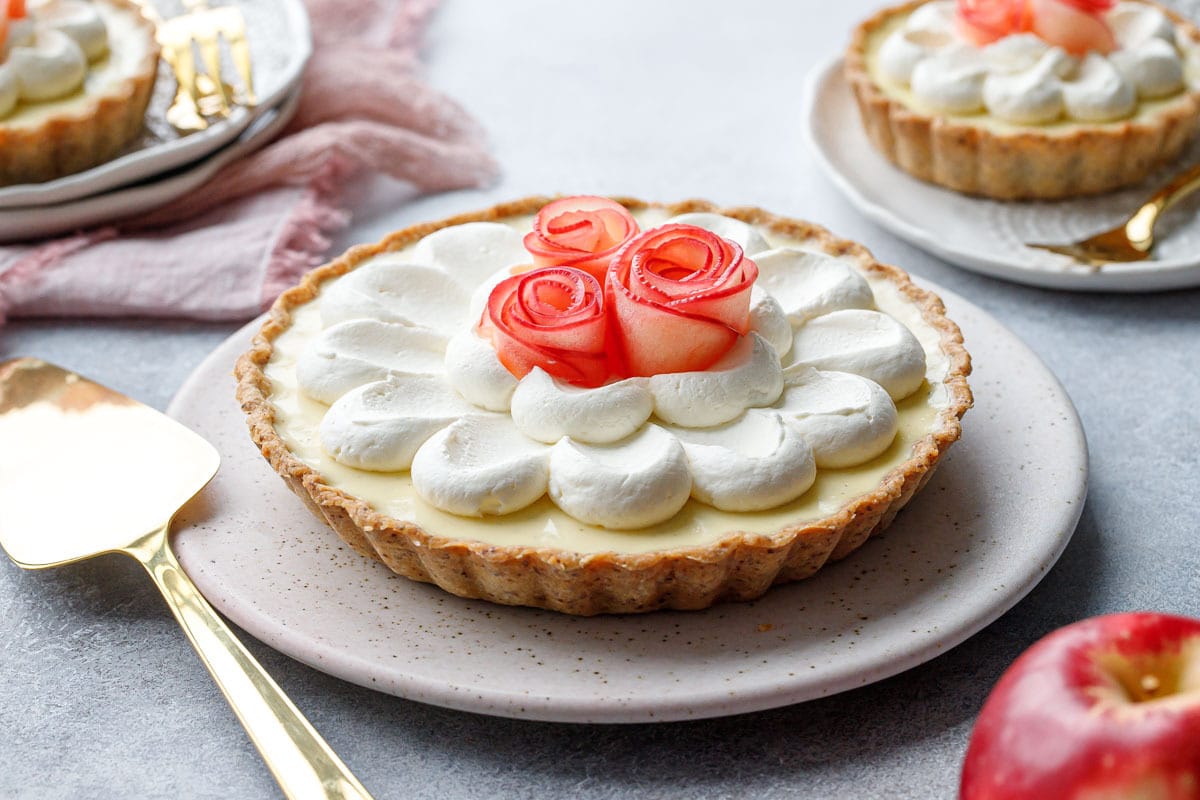
This dazzling fall dessert features flavor-packed layers of spiced salted caramel, tart apple, sultry vanilla and elegant almond; topped with a mascarpone whipped cream and gorgeous roses made from thinly sliced apple.
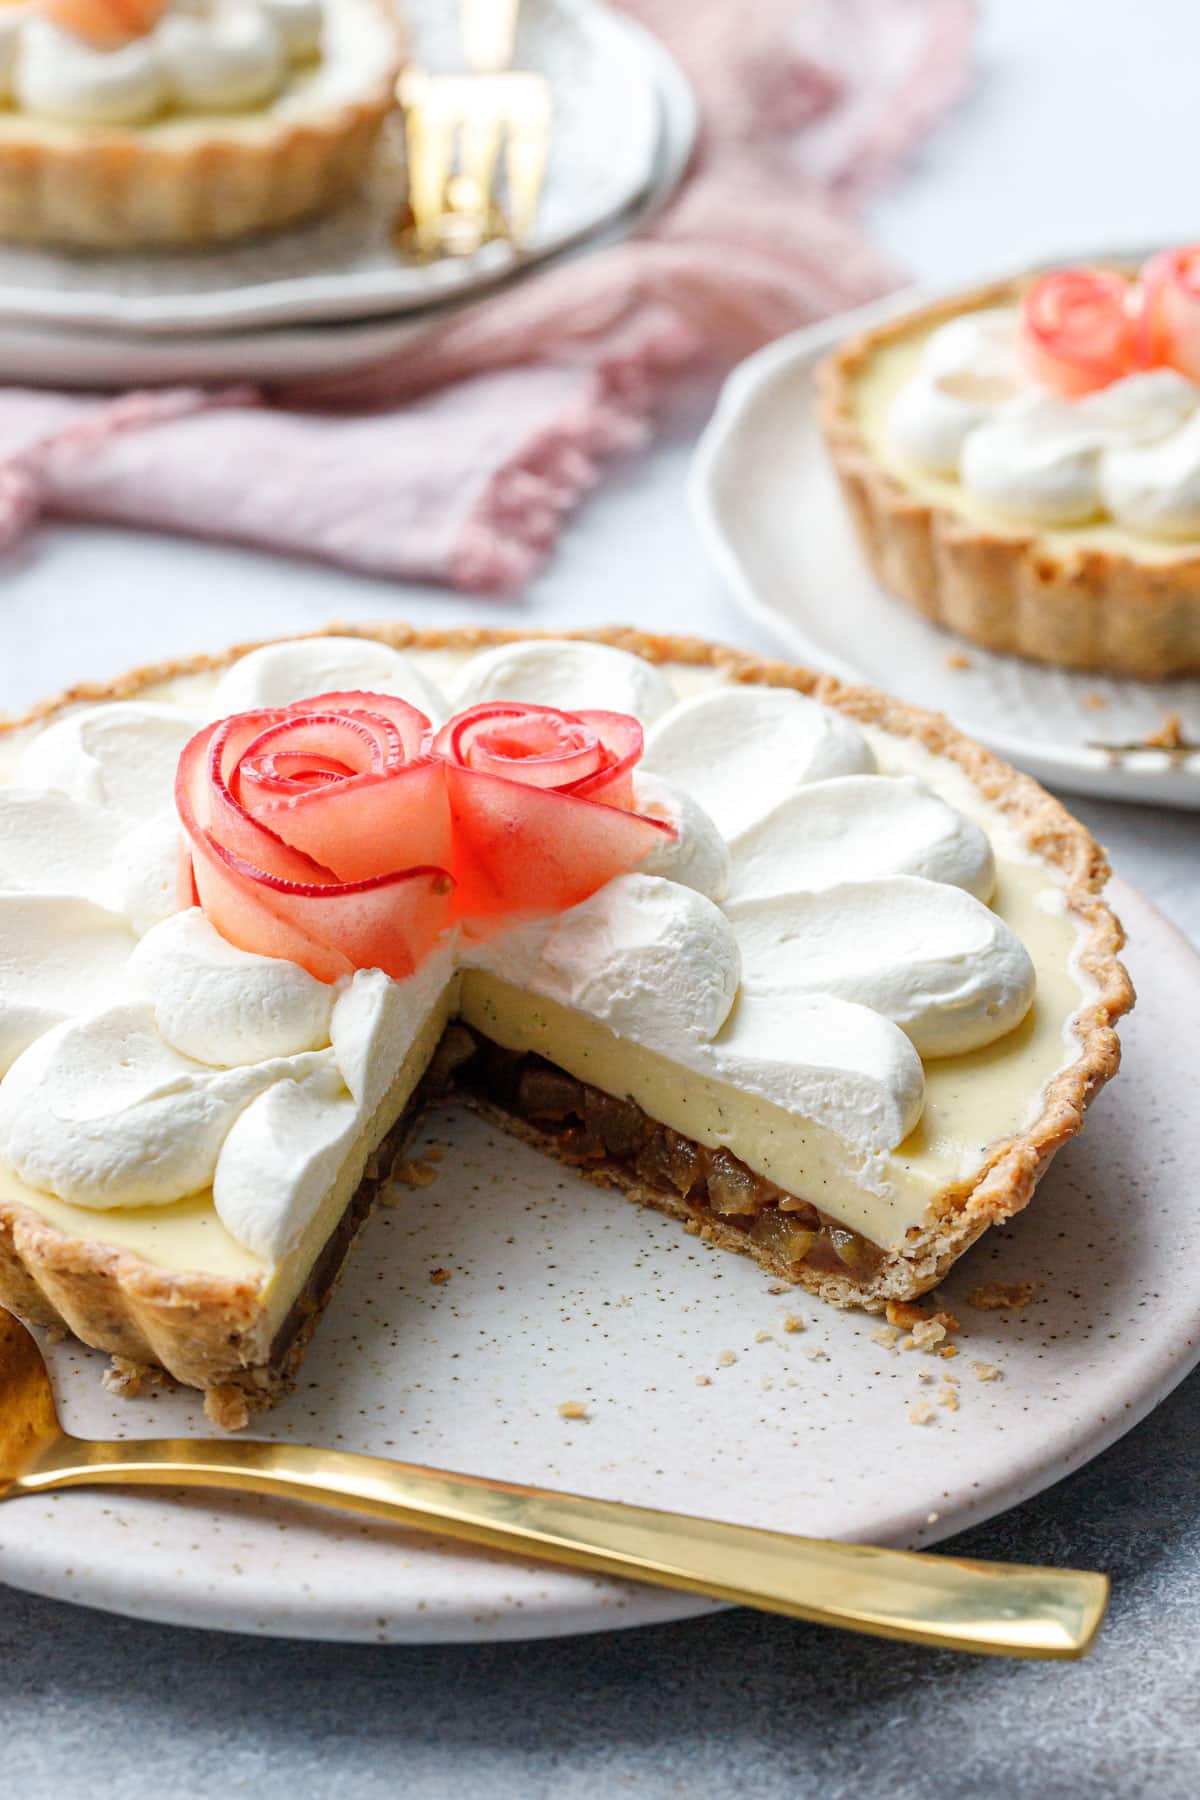
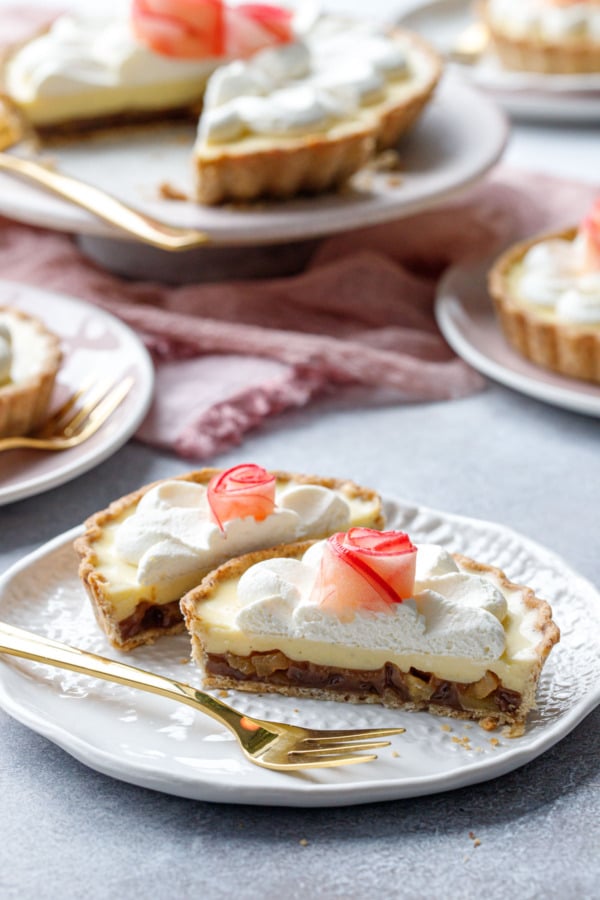
With distinct layers of spiced apple caramel, vanilla almond crémeux, and mascarpone whipped cream all in a sweet and salty almond shortcrust, this stunning caramel apple tart will surely be the talk of the table!
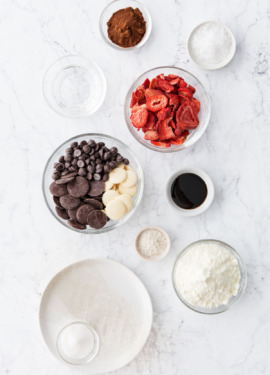
Save this recipe for later!
Phew. This recipe almost did me in. Turns out adding bits of apple to chewy caramel resulted in a runny, weepy mess every time, no matter how firm the caramel was to begin with. And drying out the apples enough to avoid this wasn’t nearly as pleasant in terms of texture and flavor.
In the end, the answer to this pomme puzzle was, in fact, gelatin. A little bit added to the caramel/apple mixture took care of any excess moisture and resulted in a perfectly soft and chewy caramel texture without any ooze. Success!
Once I worked out all the kinks, this really is a gorgeous and delicious apple tart that’s not terribly difficult to prepare. There are a number of components, yes, but each one is pretty straightforward. And the final result is stunning, so I think the effort is well worth it.
Meet the layers:
Almond shortcrust. The crust falls somewhere in between a traditional pie crust and a shortbread cookie. It’s tender and buttery and delightfully crisp, with a bit of almond flour for added texture and flavor, and a pinch of salt to balance out the sweetness of the filling.
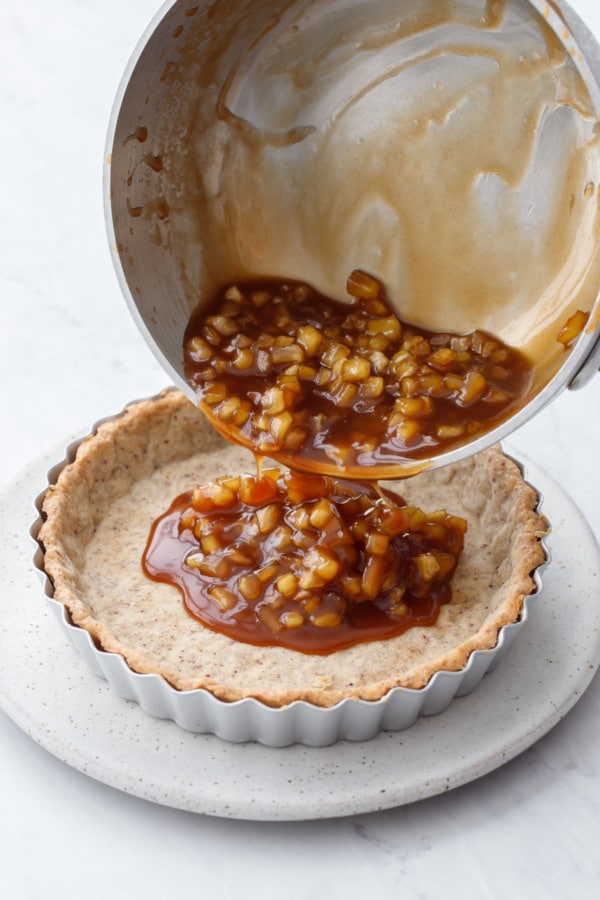
Gooey spiced apple caramel. Chunks of brightly flavored apple swimming in a salty caramel sea, and infused with cinnamon and cardamom. A bit of gelatin helps the base to set up firmly and hold its shape even when sliced.
Vanilla almond crémeux. Somewhere in between a panna cotta and a creme brûlée custard, a crémeux is a creamy gelatin-set custard made from mainly egg yolks, dairy, and chocolate (in this case, white chocolate). I find the taste and texture similar to an ice cream base!
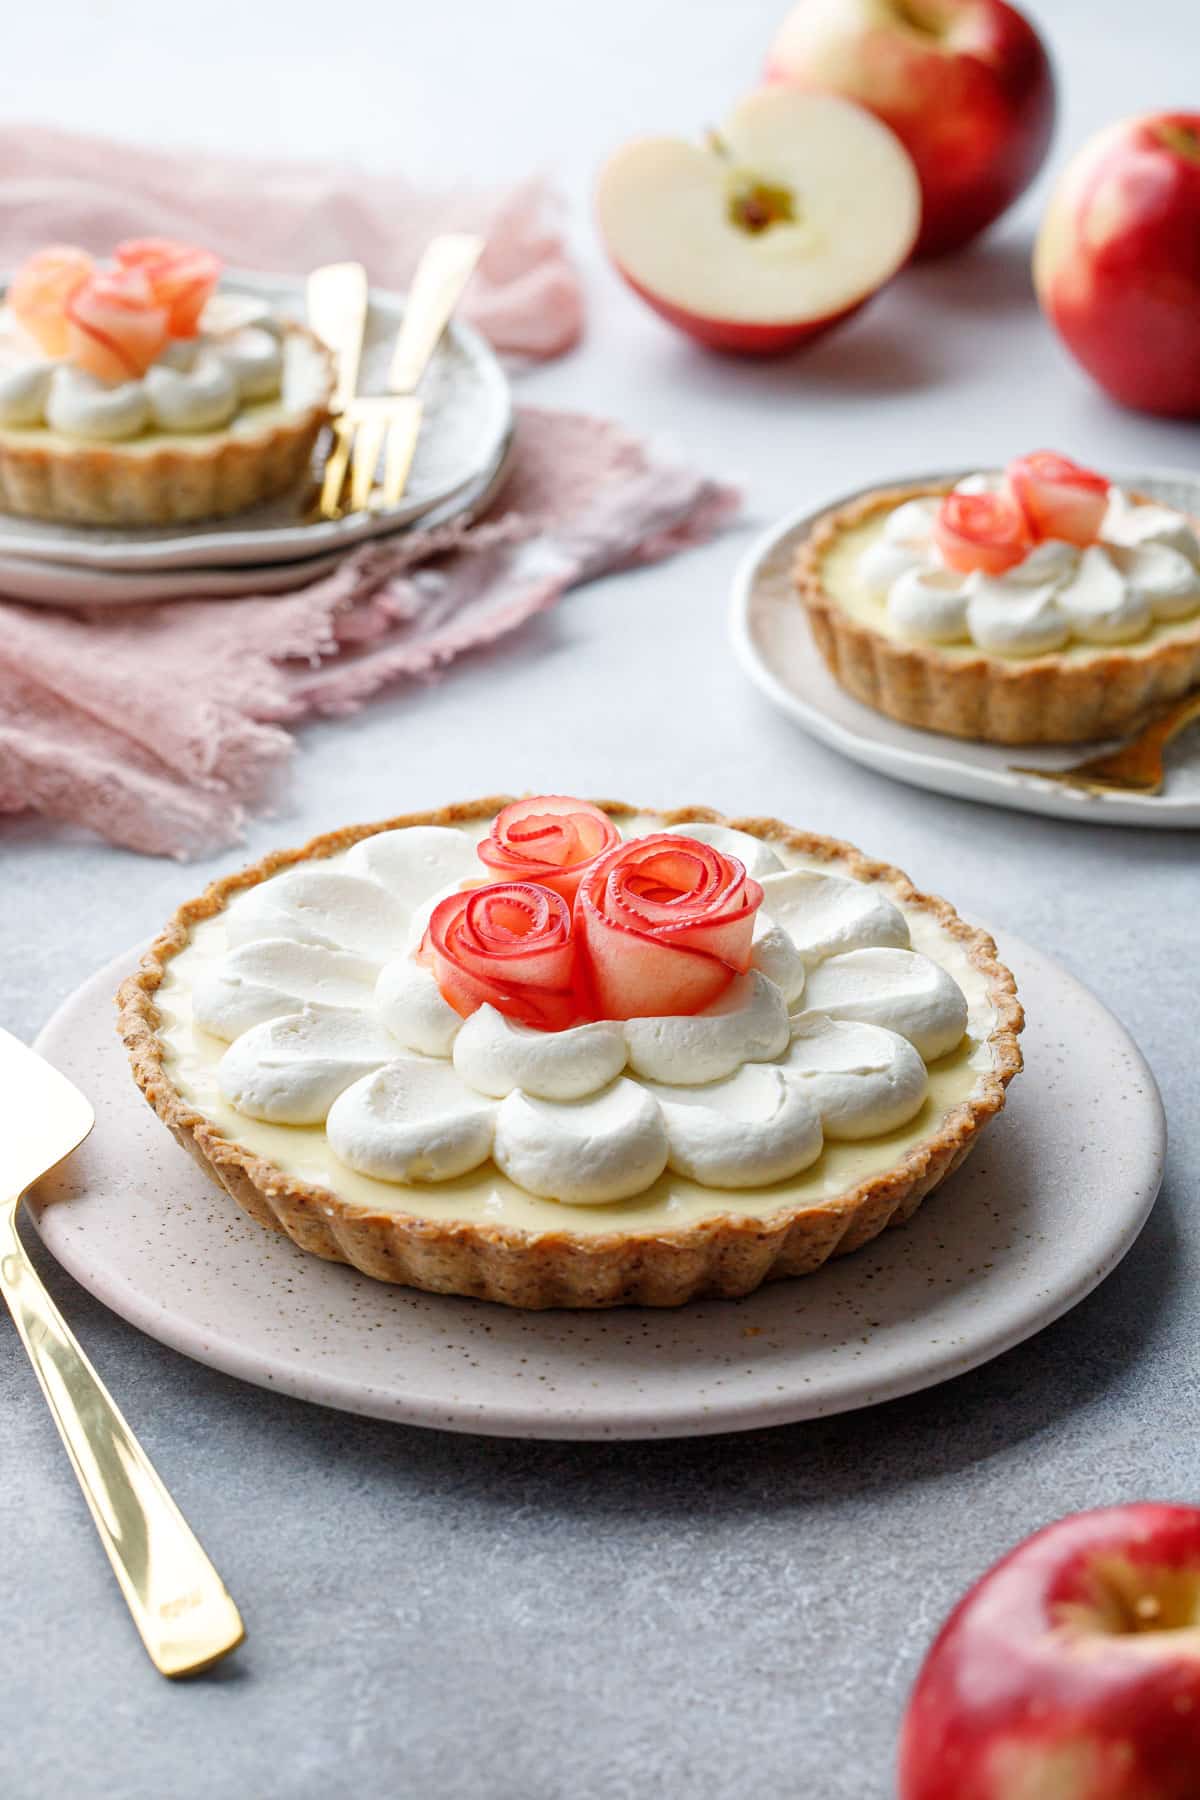
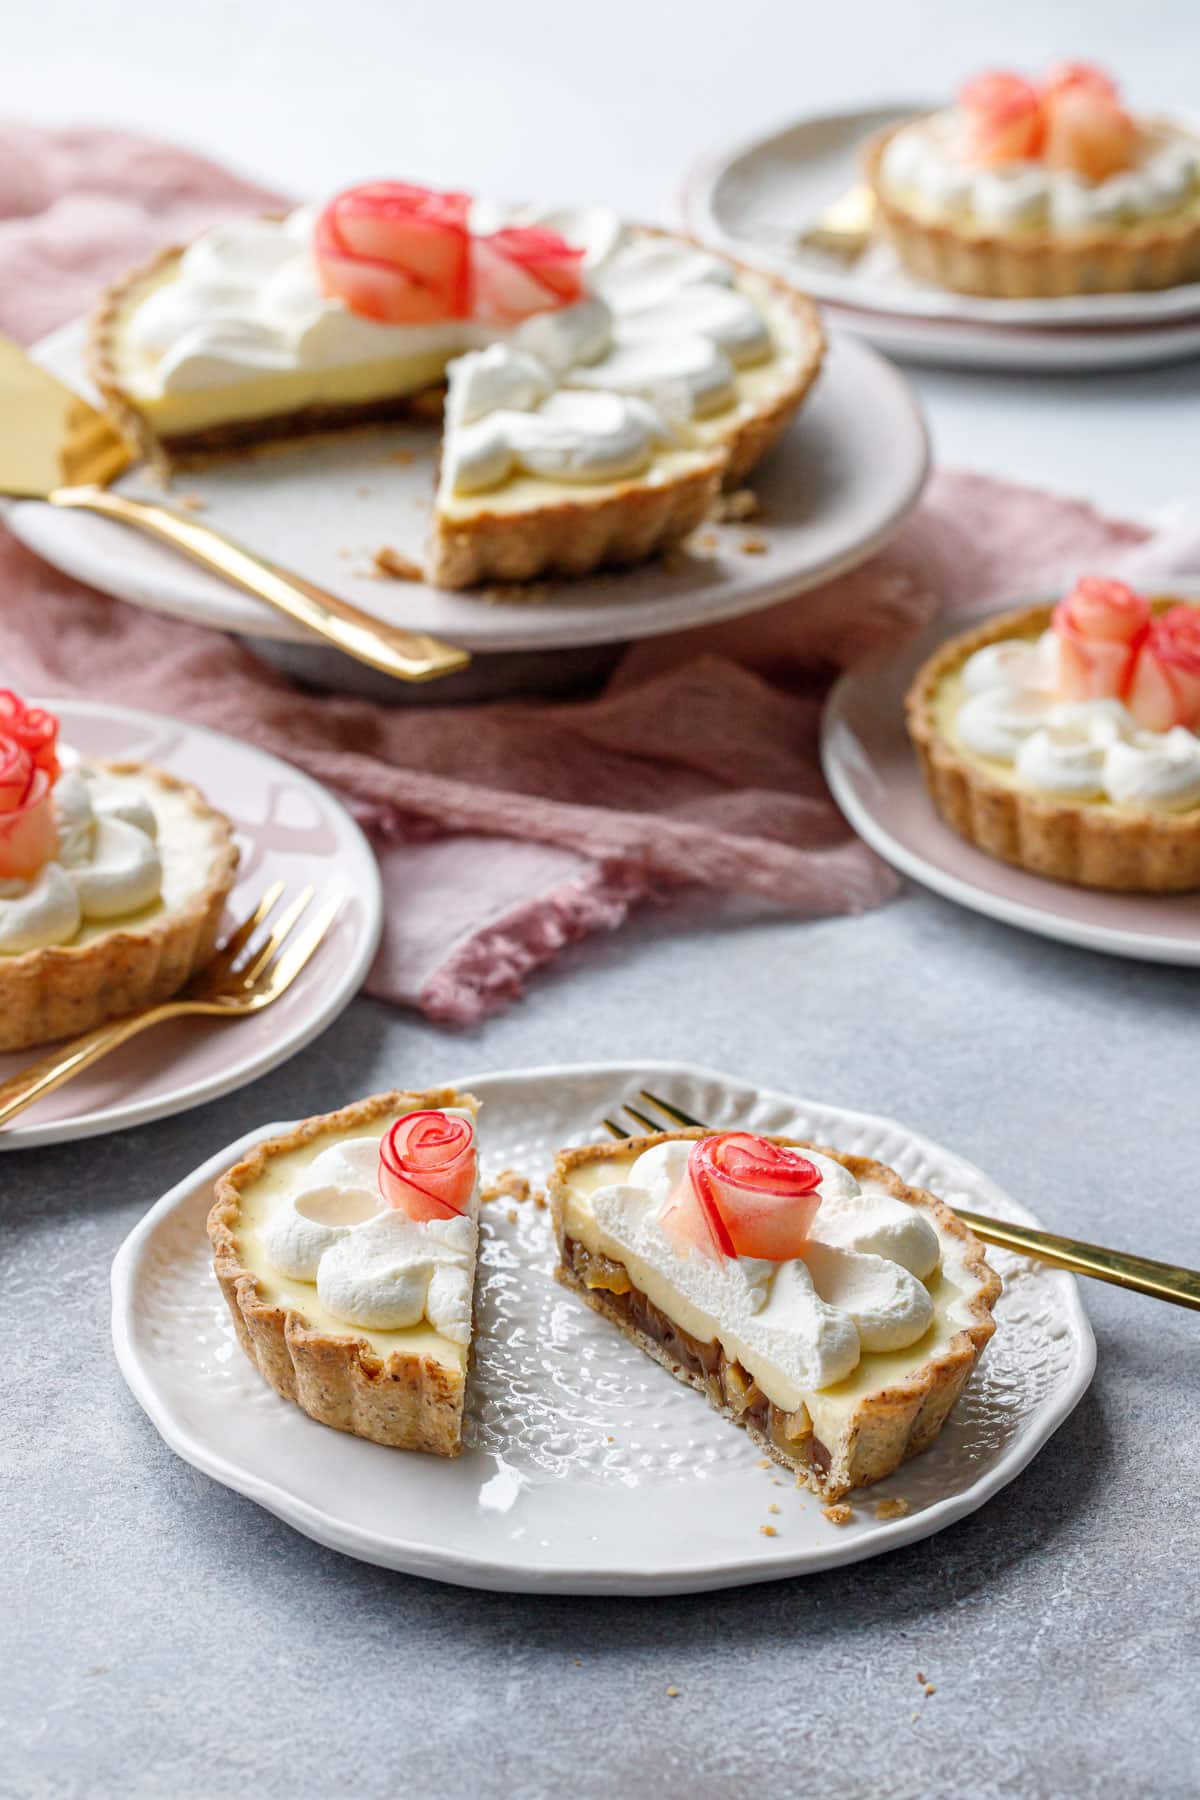
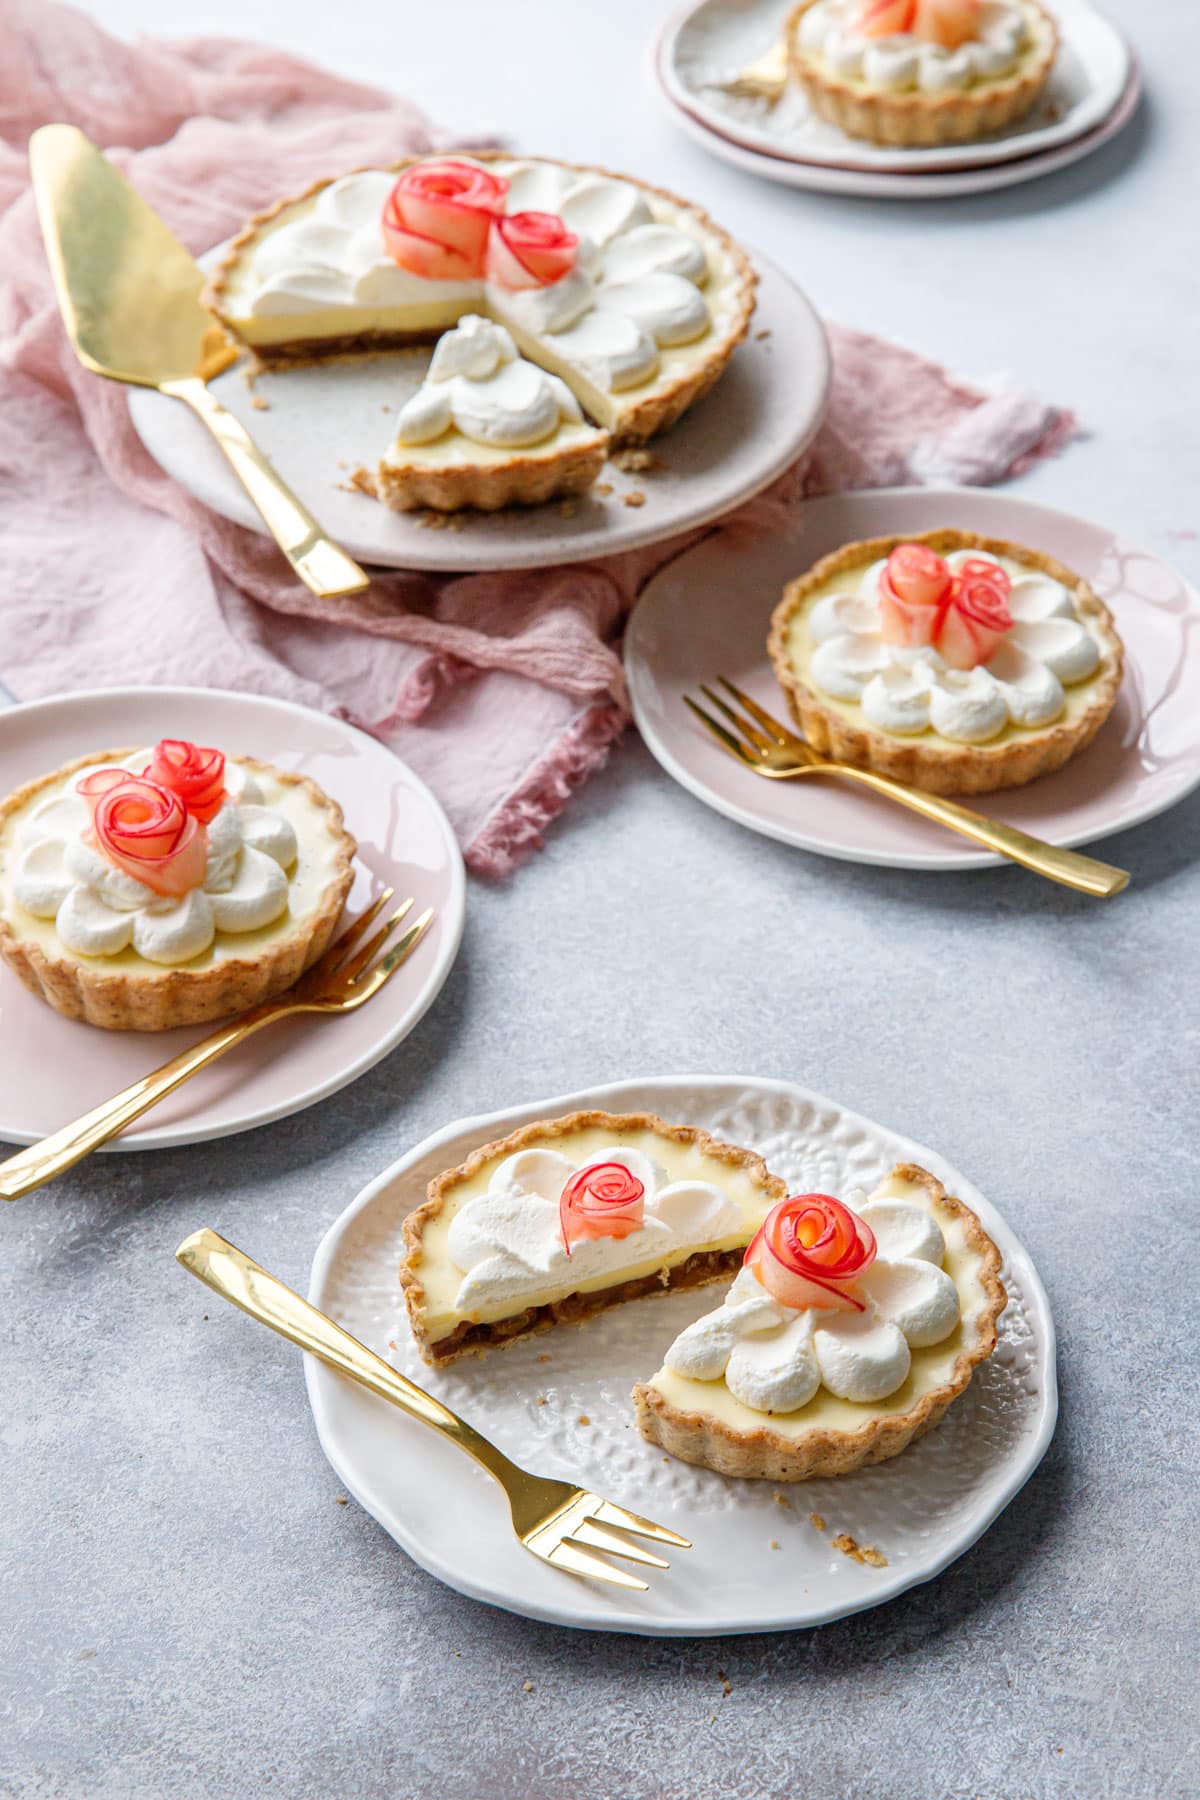
Mascarpone whipped cream topping. For a bit of lightness, this fluffy whipped cream is stabilized with a bit of mascarpone for added body and flavor, then piped on top in a gorgeous apple blossom design.
Apple roses. Garnishes like these serve two purposes: to make the dessert drop-dead-gorgeous (obviously), but also to hint at the flavors within. Because without the apples on top, how will you know that the tart is filled with apple-y goodness inside?
Like whipped cream on a pumpkin pie, the whipped cream topping really finishes off the flavors and textures beautifully.
To achieve the apple blossom design, pipe round dollops of cream evenly around the circumference using a 1/2-inch round piping tip. Then, using the back of a small spoon, swoop in towards the center. I find it helps to dip the spoon in hot water first, then pat dry (the warm metal will slide easier over the cream compared with a cold spoon). Wipe off between each swipe. Repeat the dollop and swoop in a second row (or three rows for a larger tart). Leave the center empty for the apple flowers.
The mascarpone whipped cream layer can also be simply piled on, with some nice swoops and swirls for a more rustic finish.
Since the tart itself is not baked (like a traditional apple pie), the tart shell needs to be fully baked beforehand.
The almond shortcrust pastry is particularly easy to work with; it’s not super crumbly like pie dough can be, nor does it shrink very much as it bakes.
When you drape the rolled dough into the pan, be sure you aren’t stretching the dough, rather letting gravity naturally ease the dough into the corners and crevices of the pan.
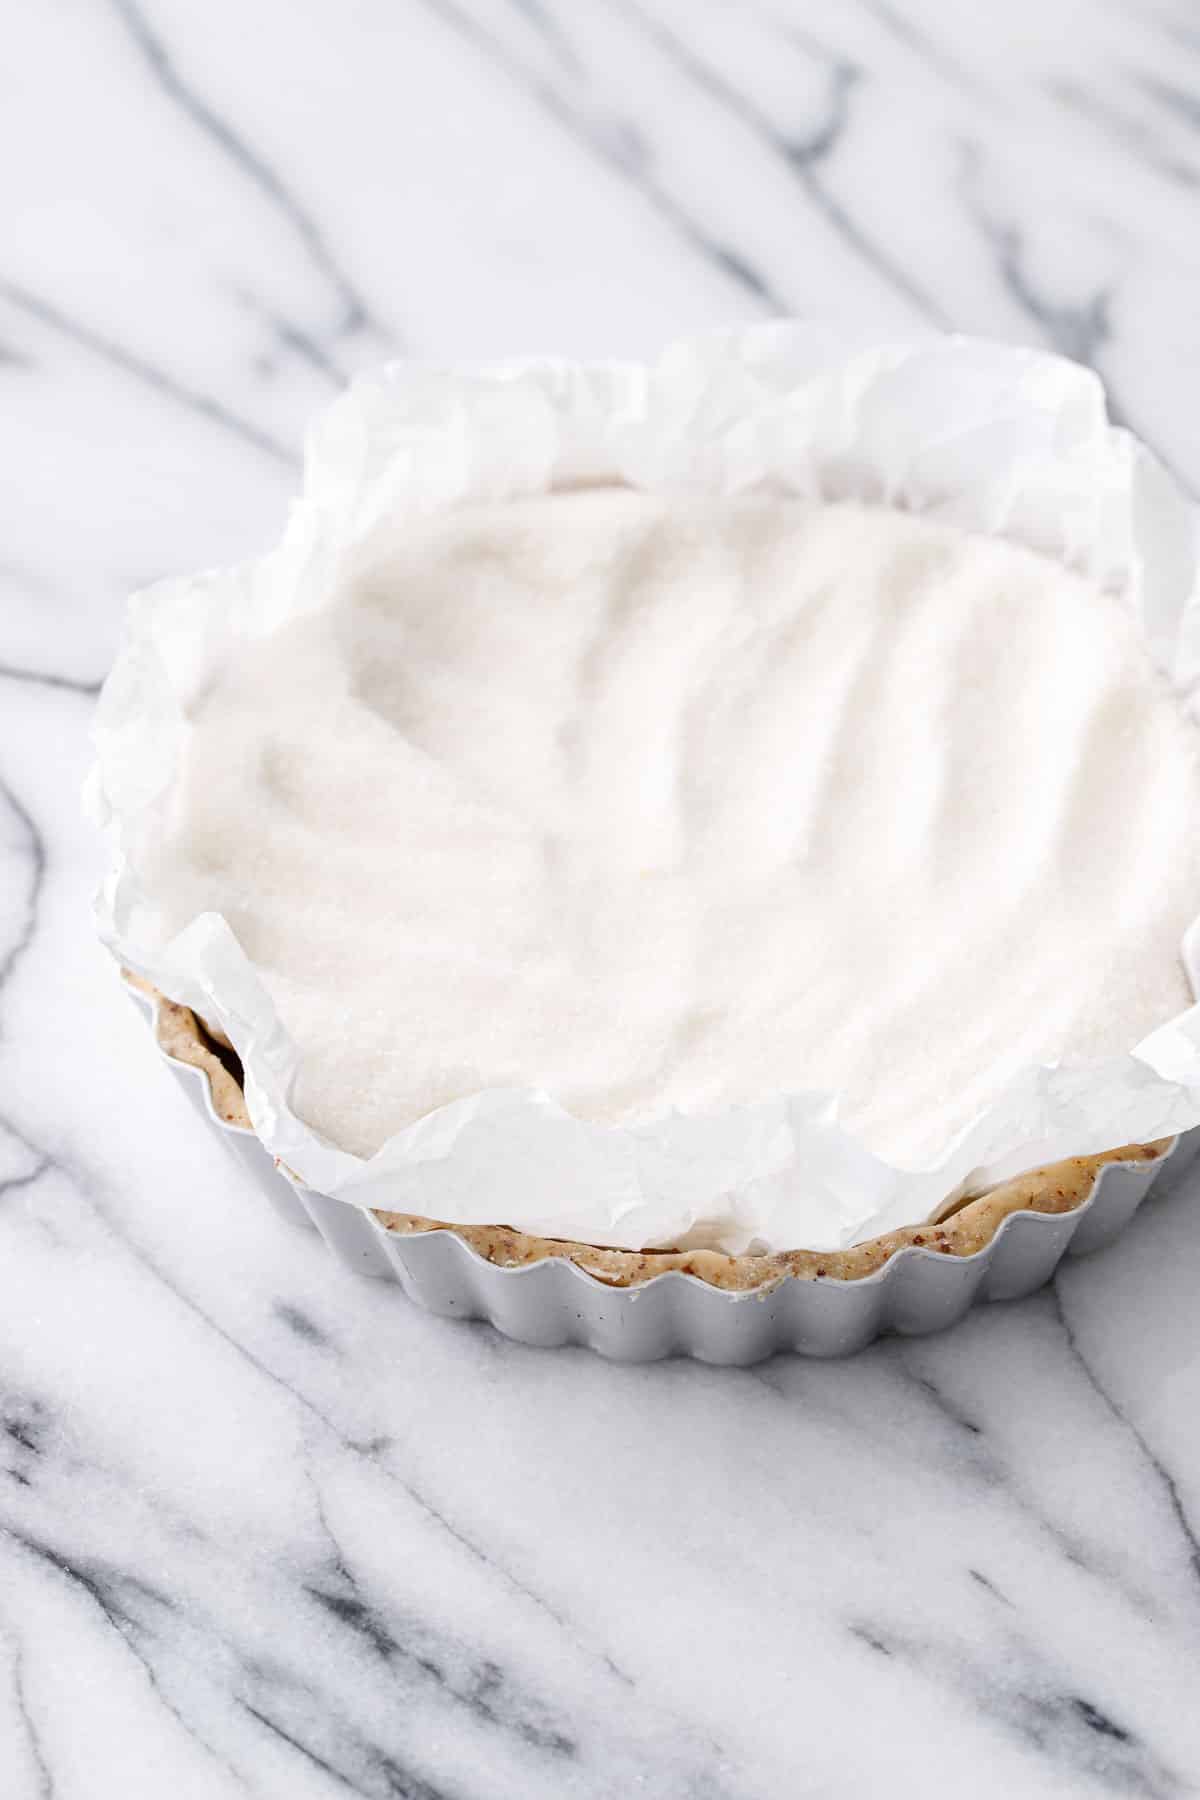
Once trimmed, freeze the unbaked tart shell for 15 to 30 minutes, then line with a crumbled up piece of parchment (the crumples help it fit into the corners without large creases). Then fill the parchment with sugar or weight of some sort, and bake for 15 to 20 minutes (slightly more for a larger tart, tartlets will only need 10-15.) Remove the parchment and weight from the crust, and return to the oven for a few more minutes to dry it out.
Baking Tip: Skip the pie weights, and use regular old sugar to fill your parchment-lined crust! I learned this trick from Bravetart years ago and have never looked back.
The sugar can be reused multiple times, plus it gets nice and toasty in flavor and you can use it to add extra depth and dimension to your baked goods! The toasted sugar is particularly good in simple vanilla-forward recipes like ice cream and creme brulee.
Make Ahead, Bake Ahead Schedule
Because the various layers of this tart need to set fully before adding the next, I recommend preparing it 1 to 2 days before you plan to serve it. For that reason it’s a great option for a make ahead dessert!
The crust dough can be made a few days ahead of time, and the tart shell can be shaped and baked a day or two beforehand (you can also roll, shape, and freeze the unbaked tart shell for up to a month ahead of time).
The caramel apple and creméux layers can be made a day ahead of time. Give the apple layer an hour or two to set in the fridge before pouring the creméux on top, then pop it in the fridge overnight to fully set.
Add the mascarpone whip and finish with the apple flowers the day of, though it’ll keep quite well in the fridge until you’re ready to serve it. If you skip the mascarpone in the cream topping it won’t be nearly as stable, in which case I’d recommend making it no more than 2 hours ahead of time. But with the mascarpone, the cream will keep fairly well in the fridge for a day or two.
I think the apple flowers look best fresh, but if necessary they can be made a day ahead of time; just note that, especially with deep red apples, the longer they sit the more the color of the skins will bleed into the white flesh (I had a few that sat in the fridge for a week and started to look more like pickled red onions than apples, lol).

How to Make Apple Roses
For the apple flowers, you want to find a red apple variety that’s on the soft side. Too crisp (like granny smith) and the apple slices won’t bend very well and won’t hold the flower shape without toothpicks. Gala apples, for example, were the softest and easiest to shape. I also had decent luck with Envy apples, which have a gorgeous gradated red skin and pink-tinged flesh that made for beautiful roses. They needed a bit more softening than the Galas, but the result was downright lovely.
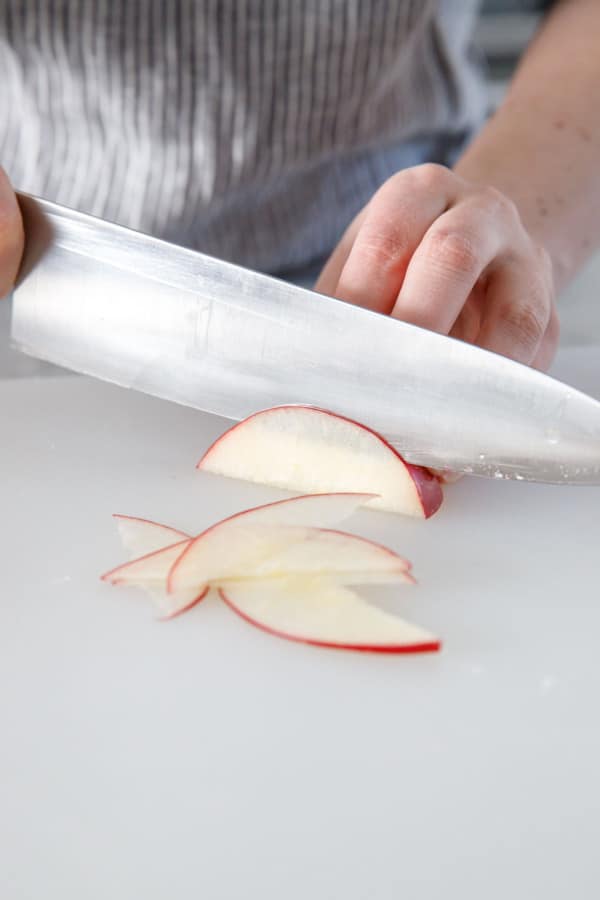
The key to making apple flowers is to thinly slice the apples. I’m talking SUPER thin. If you have a mandoline and know how to use it (please use protection), that’d be perfect here. Otherwise, grab your sharpest knife and shave off the thinnest slices you can manage.
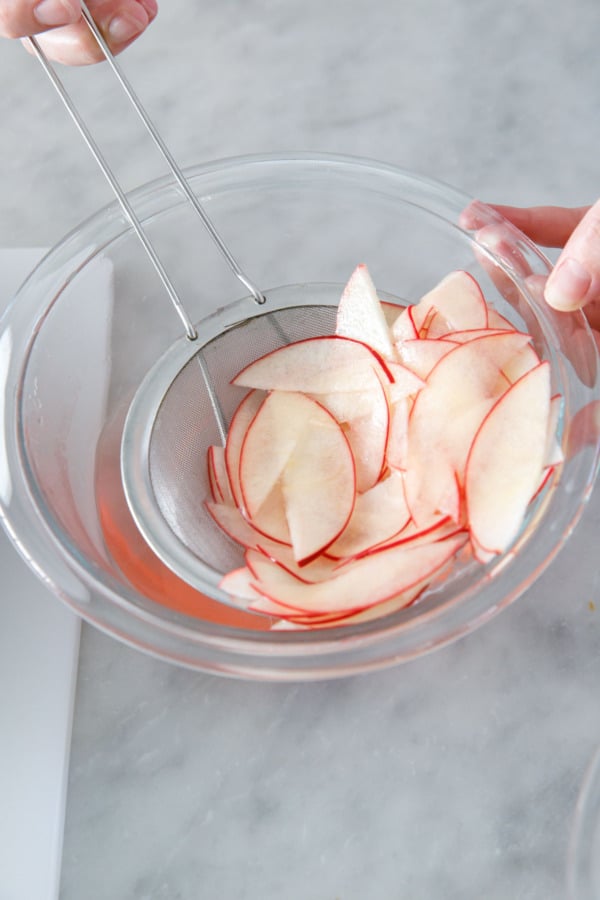
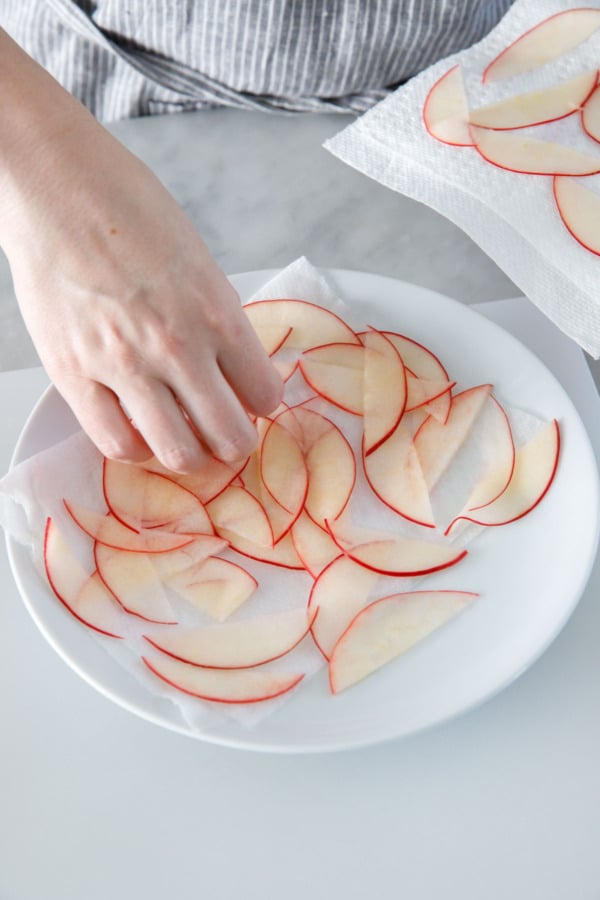
Soften the slices in a brine of hot water, sugar, salt, and citric acid. The heat helps soften the apples and make them more bendable, while the salt and citric acid will prevent the apples from oxidizing and turning brown.
Depending on how thin you were able to slice your apple, and the type of apple you used, the slices might need anywhere from 1 to 10 minutes in the warm brine until they are sufficiently soft. Keep in mind that the longer they steep, the more the color will bleed out from the skins.
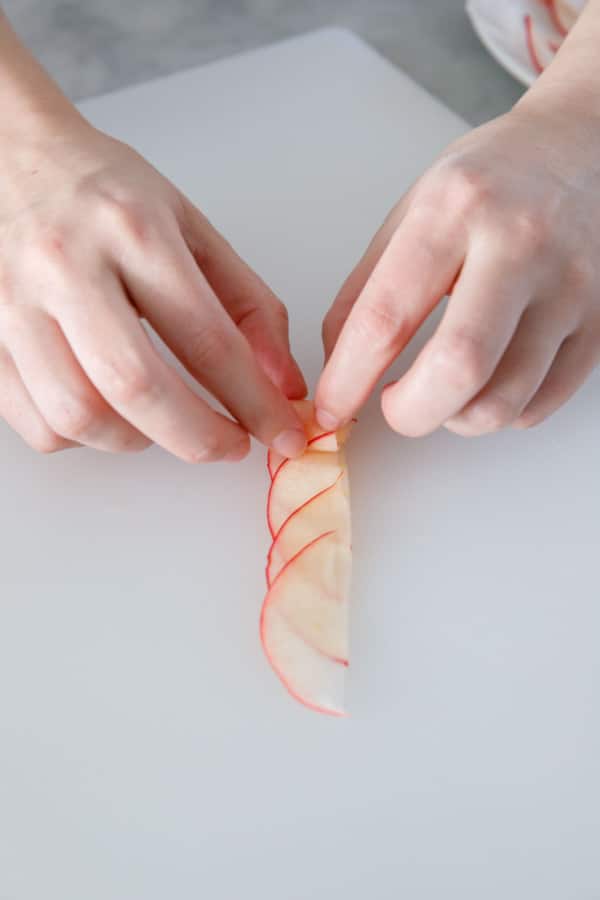
Once the slices are soft and bendable, drain onto paper towels and pat dry. Arrange a row of overlapping slices on your work surface and then roll up as tightly as you can without breaking. Softer apples will keep their shape, or you can secure the rose with a toothpick (just remember to remove them before eating).
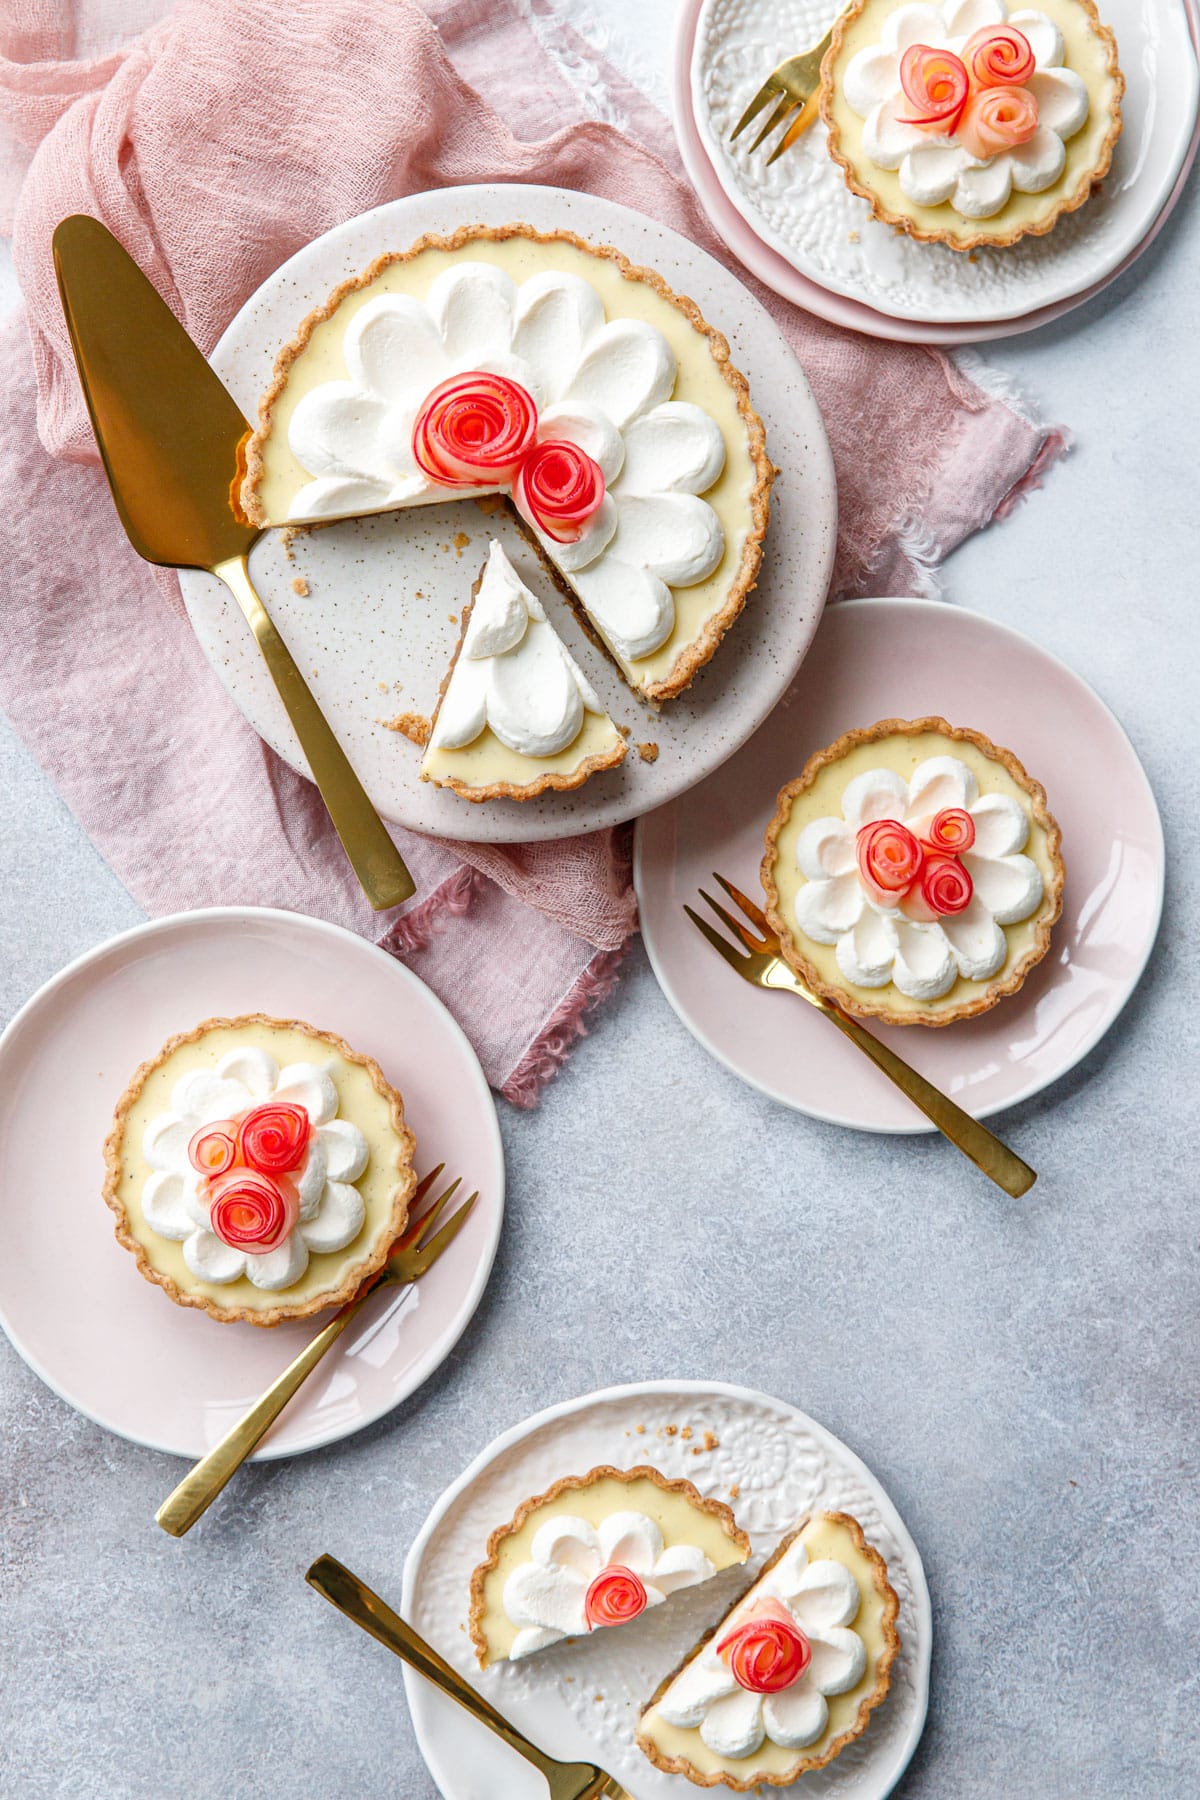
You can vary the size and shape of the roses by adding more or less slices to each rose. More, larger slices will make bigger flowers. I used less of the smaller slices to make some smaller accent roses, as I loved the look of 2-3 roses of variable sizes in the middle of the tarts.

Tart Pan Size Conversions
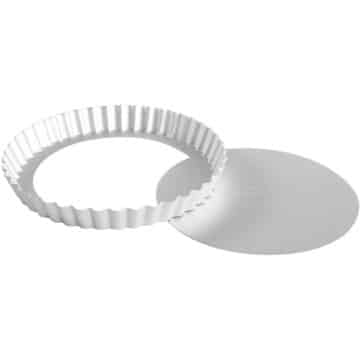
This recipe is written for a standard 9-inch round tart or a 14-by-4.5-inch rectangle tart.
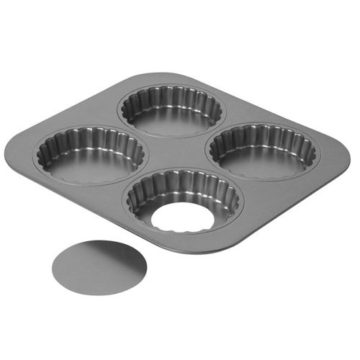
It’ll also make two 6-inch round tarts or eight adorable 3.5-inch tartlets.
Or, if you don’t have duplicate pans, you can mix and match and make one 6-inch tart and four mini tarlets (this is what I did, and what is pictured throughout this post).
If you want to halve the recipe (and just make one 6-inch tart, for example), things do get a little bit tricky as it’s really hard to measure out half and egg, for example. But it’s certainly doable (I recommend a kitchen scale, tare the weight of a small bowl and crack the egg into it. Whisk slightly, then measure out half by weight). You can also halve everything but the crust to avoid splitting eggs, in which case the leftover crust can be refrigerated for up to a week or even frozen for later use.
If you’re unsure about your tart pan size/volume, I find filling it with water to be easier than trying to math your way to a solution. Simply fill your pan with water and you can approximate the volume of filling you need.
For reference, the recipe as written will make about 250mL/1 cup of apple filling and 350mL/1.5 cups of crémeux. Be sure to account for the space the crust will take up as well in your estimations, and you’re not going to fill it to the tippy top either.
Swaps & Substitutions:
Apples: For the apples in the filling, I used a combo of Granny Smith and Gala and/or another slightly softer red apple. This provides a nice balance in the filling. For the apple roses, you definitely want a softer apple, which will be easier to bend and shape than something super-crisp like granny smith.
As a flavor alternative, I do think the filling would be lovely with pears too!
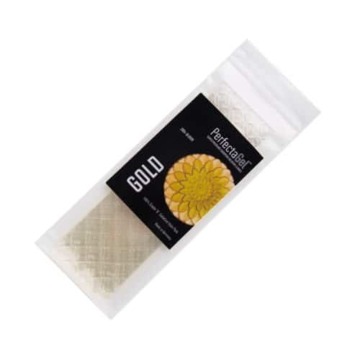
Gelatin: I prefer leaf gelatin in most situations, as it is clearer in appearance and has a cleaner flavor than powdered. I used Perfecta Gold in this recipe.
To substitute powdered gelatin, use 1 teaspoon powdered gelatin per 1 sheet as called for. Bloom the powdered gelatin in 1-2 tablespoons cold water for at least 5 minutes, then just before you need it, melt it in the microwave for 5 to 10 seconds, then incorporate as instructed.
I have not tested this particular recipe with a vegan gelatin alternative (like agar), so I cannot advise as to its suitability here.
White Chocolate: the white chocolate in the crémeux adds structure and sweetness (but you really can’t taste it). Use a good quality white chocolate (not white baking chips). I used Callebaut white chocolate, which comes in callets and doesn’t need to be chopped. Caramelized white chocolate would be lovely here (either homemade, or you can use a product like Valrhona Dulcey). Valrhona’s Inspiration almond-flavored feves (basically almond-flavored white chocolate) would work beautifully (omit the almond extract if you do this).
In theory this would also work with milk or dark chocolate, although you’d end up with a much different flavor profile.
Almond Meal: The crust is made with a portion of almond meal to give it a light almond flavor and coarser texture. I used whole-almond meal (with the skins), so the appearance is darker and more speckled. Bleached almond meal or almond flour works here too, as will any other nut flour (like pistachio or hazelnut). In a pinch, you can sub whole wheat flour in its place (you may need a tiny bit more water to bring the crust together).
Almond Extract: The almond extract in the crémeux layer can be omitted, or replaced with any other extract to taste. You can also add up to 1 tablespoon of any liqueur (like amaretto, or apple brandy would be lovely here) for a boozy flavor twist.
Mascarpone: Mascarpone is an Italian soft cheese. The flavor is more mild than cream cheese, for that reason I do not recommend swapping one for the other though they may seem similar. You can also use just plain heavy cream in the topping, just know that the whipped cream will not be as stable and won’t hold up as well to piping.
Caramel Apple & Almond Cream Entremet Tart
Ingredients
For Crust:
- 1½ cups / 190 g all-purpose flour
- ½ cup / 50 g almond meal or almond flour
- 2 tablespoons / 12 g powdered sugar
- ¼ teaspoon fine sea salt
- ½ cup / 113 g unsalted butter (1 stick), cold and cut into cubes
- 1 large egg, cold
- 2-3 teaspoons water, as needed
For Caramel Apple layer:
- 2 large apples (about 12oz or 340g), peeled, cored, and cut into small 3/8-inch cubes (I recommend one granny smith and one softer, sweeter variety like Gala)
- 2 teaspoons lemon juice
- 1 sheet leaf gelatin* (gold strength), cut into strips and softened in cold water for at least 5 minutes
- ½ cup / 100 g granulated sugar
- 2 tablespoons / 42 g corn syrup
- 2 tablespoons water
- ¼ cup / 60 g heavy cream, at room temperature
- 2 tablespoons butter, at room temperature
- ¼ teaspoon fleur de sel
- ½ teaspoon ground cinnamon
- ⅛ teaspoon ground cardamom
For Vanilla-Almond Crémeux:
- 2 sheets leaf gelatin* (gold strength), cut into strips and softened in cold water for at least 5 minutes
- ½ cup / 120 g heavy cream
- ½ cup / 120 g whole milk
- 1 vanilla bean, split and seeds scraped out (or substitute 1 teaspoon vanilla bean paste or extract—add at the end with the almond)
- 3 large egg yolks, at room temperature
- 3.5 oz / 100 g good quality white chocolate, finely chopped
- ½ teaspoon almond extract
For Mascarpone Whipped Cream:
- ¾ cup heavy whipping cream
- 2 tablespoons / 12 g powdered sugar
- 2 tablespoons mascarpone, let sit at room temperature for no longer than 15 minutes
For Apple Garnish:
- 1 apple, I recommend a softer red variety like Gala, very thinly sliced
- 1 cup water
- 1 tablespoon sugar
- ½ teaspoon salt
- ¼ teaspoon citric acid, or use 2 teaspoons lemon juice
Instructions
For Crust:
- Combine flour, almond meal, sugar, and salt in the bowl of a food processor; pulse once or twice to combine. Sprinkle over cubed butter and pulse a few more times until butter is broken up into pea-sized pieces. Add egg and pulse a few more times until evenly moistened and dough sticks together when pinched between your fingers. If necessary, add 2-3 teaspoons of water and pulse to combine.
- Dump crumbly dough out onto a clean tea towel; gather up the edges and twist to tighten. This should bring the dough together into a cohesive ball. If making 6-inch tarts or tartlets, split into two balls, then flatten slightly into a disk, then wrap tightly in plastic wrap and refrigerate for at least an hour.
- On a lightly floured surface or pastry cloth, roll out dough to an even 3-4mm thickness (2-3mm for tartlets). Gently drape into a tart pan with removable bottom. Take care not to stretch the dough, rather easing the sides into the pan. Trim off edges. Freeze for 15 to 30 minutes until firm (shaped crust can also be frozen for up to a month).
- While shell is chilling, preheat oven to 400 degrees F.
- Crumple up a piece of parchment paper and place into frozen crust; fill with granulated sugar or another weight like rice or beans.
- Bake for about 15 to 18 minutes (smaller tartlets will need less time), or until edges are just starting to color. Carefully lift out the parchment and weights and set aside to cool. Return unlined tart shell to oven for 3 to 5 minutes more or until edges and bottoms are lightly browned. Set on a wire rack to cool completely while you prepare the other layers.
For Caramel Apple layer:
- Peel and core apples and cut into a fine (1/4 to 3/8-inch) dice. Toss cut apple in a bowl with lemon juice as you go, this will prevent browning. You should have 2 cups of diced apple. Set aside.
- Cut gelatin sheet into 1-inch strips and place in a bowl of cool water to soften. If using powdered gelatin, sprinkle over a tablespoon or so of cool water and let it bloom for at least 5 minutes.
- In a small, heavy-bottomed saucepan, add sugar, corn syrup, and water. Set over medium/medium-high heat and gently stir until sugar is dissolved. Once the sugar mixture starts to boil, do not stir it again. Brush down any stray sugar crystals on the side of pan with a pastry brush dipped in water. Continue to cook, swirling the pan here and there (no stirring!) until it caramelizes and turns a light amber brown. Watch it carefully as once it starts to caramelize it will go from perfect to burnt in seconds.
- Remove from heat and immediately add butter, whisking until melted. Add cream and continue to whisk (careful as it will sputter and steam quite a bit) until smooth.
- Return to medium-high heat and add in apple cubes. Bring back to a simmer. If you have a candy thermometer, position it on the side of the pan now, ensuring the tip doesn't touch the bottom. Continue to cook, stirring occasionally, until it reaches 250-235 degrees F.
- Remove from heat and let it cool until it goes below 200 degrees F. Pick softened gelatin up out of the water, squeezing out as much excess water as you can, and stir into caramel apple mixture. (If using powdered gelatin, microwave the bloomed gelatin for 5 to 10 seconds until fully melted, then add to saucepan.) Stir until gelatin is fully melted and incorporated, then pour into tart shell. Refrigerate for at least 1 hour or until fully set.
For Vanilla-Almond Crémeux:
- Cut gelatin sheet into 1-inch strips and place in a bowl of cool water to soften. If using powdered gelatin, sprinkle over a two tablespoons of cool water and let it bloom for at least 5 minutes.
- Place chopped white chocolate in a heat proof bowl or 2-cup-capacity glass measuring cup and set aside.
- Combine milk and cream in a medium saucepan set over medium heat. Add scrapped vanilla bean seeds. Let it warm until the mixture starts to steam and barely bubble around the edges (do not let it boil).
- Whisk egg yolks in a bowl until just lightened in color. Ladle in about half of the warm milk mixture, 1/4 cup at a time, whisking constantly, until egg mixture is warm to the touch. Pour back into to saucepan and set over medium heat, stirring regularly, until the custard thickens slightly and coats the back of a spoon (it should measure 175 degrees F).
- Squeeze water out of softened gelatin (or microwave 5-10 seconds if using powdered), then add to warm custard, stirring until gelatin is fully melted and incorporated.
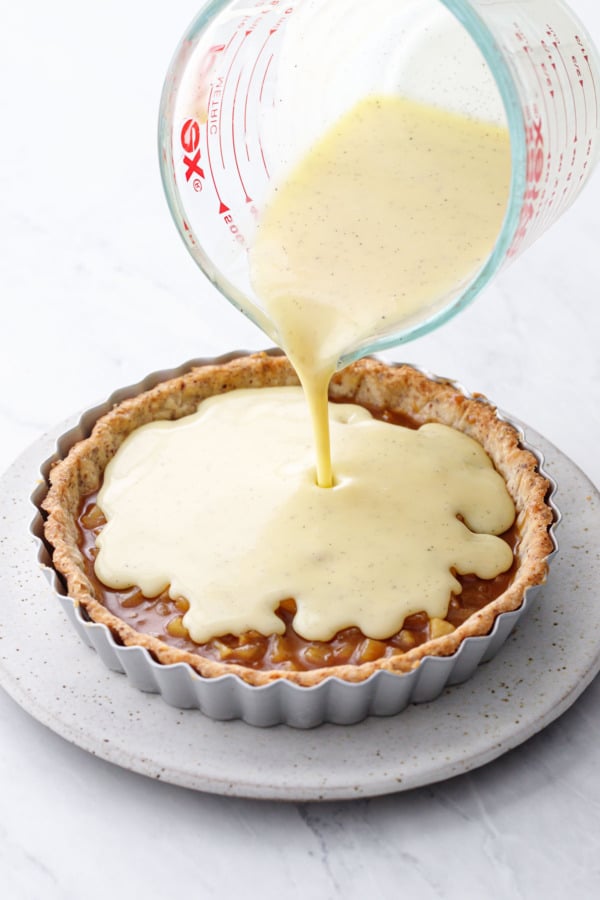
- Pour still-warm mixture through a fine mesh sieve set over bowl of white chocolate (this will remove any stray solids or bits of egg that may have gotten over cooked). Gently stir until white chocolate is completely melted and mixture is smooth. Stir in almond extract.
- Pour into tart shell on top of the set caramel layer, filling it as full as you can make it without overflowing. It may be hard to move when it is this full, so I recommend letting it sit for 30 minutes or so (it will start to set up), then transfer to the fridge to set completely, at least 2 hours or overnight.
For Mascarpone Whipped Cream:
- Place cold cream in the bowl of a stand mixer (chilled if you want) fitted with the whisk attachment. Add powdered sugar and whip until it starts to thicken and hold soft folds.
- Add mascarpone, then increase speed to medium high and continue to whip until it holds medium soft peaks. Take care not to overwhip or you'll end up with butter!
- You can spoon the whipped cream on top of the tart, swirling with the back of a spoon for a more rustic appearance, or transfer it to a piping bag fitted with a 1/2-inch-round tip. Pipe circles of cream around the circumference of the tart, then using the back of a small spoon (dip in hot water and pat dry), swipe the cream towards the center of the tart. Wipe spoon between each swipe and rewarm in water as needed. Repeat with a second row, or a third for larger tarts as needed, leaving the center open for the garnish (if desired).
For Apple Roses:
- Combine water, sugar, salt and citric acid in a small saucepan. Bring to a simmer over medium heat.
- Cut off two 'cheeks' from the apple, then slice as thin as possible (use a super sharp knife, or a mandoline if you are comfortable using one). Place apple slices in hot brine and let soak for a minute or two. Take out a slice and test its 'bendiness'... if it breaks when you try to roll it up, give it a few more minutes.
- When soft, drain slices and place on a paper towel-lined plate to drain. I find it's easiest to work with the slices when they are still warm, so if you want to keep the brine over low heat, you can re-warm the apples as needed as you go, or work in batches.
- Place one softened apple slice down on your work surface. Add another slice on top, lining up the cut edges and overlapping about half of the slice with the one underneath. Repeat with about 6 to 8 slices of apple per flower (more slices will make a bigger flower). I also like to match up the sizes of the slices, using the smaller slices from the ends for smaller roses, and the bigger middle slices for the bigger ones. If you are making smaller tartlets you may opt for more smaller flowers and vice versa.
- Starting with the first slice you laid down, roll up the entire row as tightly as you can without breaking them. If the apples were sufficiently soft they should hold their shape, but you can also use a toothpick to secure the slices in place (just remember to remove it before eating). Trim off the uneven bottoms as needed, then arrange on top of the tart as desired.
Serving & Storage:
- Slice and serve chilled or at cool room temperature. Leftover tart will keep in an airtight container in the fridge for a few days (the tart itself will keep longer, but the whipped cream and apple roses may start to get a bit weepy after some time).
Notes
- *To substitute powdered gelatin, 1 teaspoon powdered gelatin=1 sheet. To bloom, sprinkle over cool water (1 tablespoon for every teaspoon powder), let soften for at least 5 minutes. Then melt in the microwave for 5-10 seconds before incorporating into the recipe as specified.


I made this over the weekend and it was SOO good! I didn’t have time to get mascarpone, so I just used sweetened whipped cream. The caramel and the crémeux compliment each other so perfectly! I’ll definitely make this again. Thanks so much for sharing the recipe!
sounds like a lot of research and development for this tart! much appreciated, seems like a good December baking project to try, and beautiful technique with the thinly sliced apple roses!