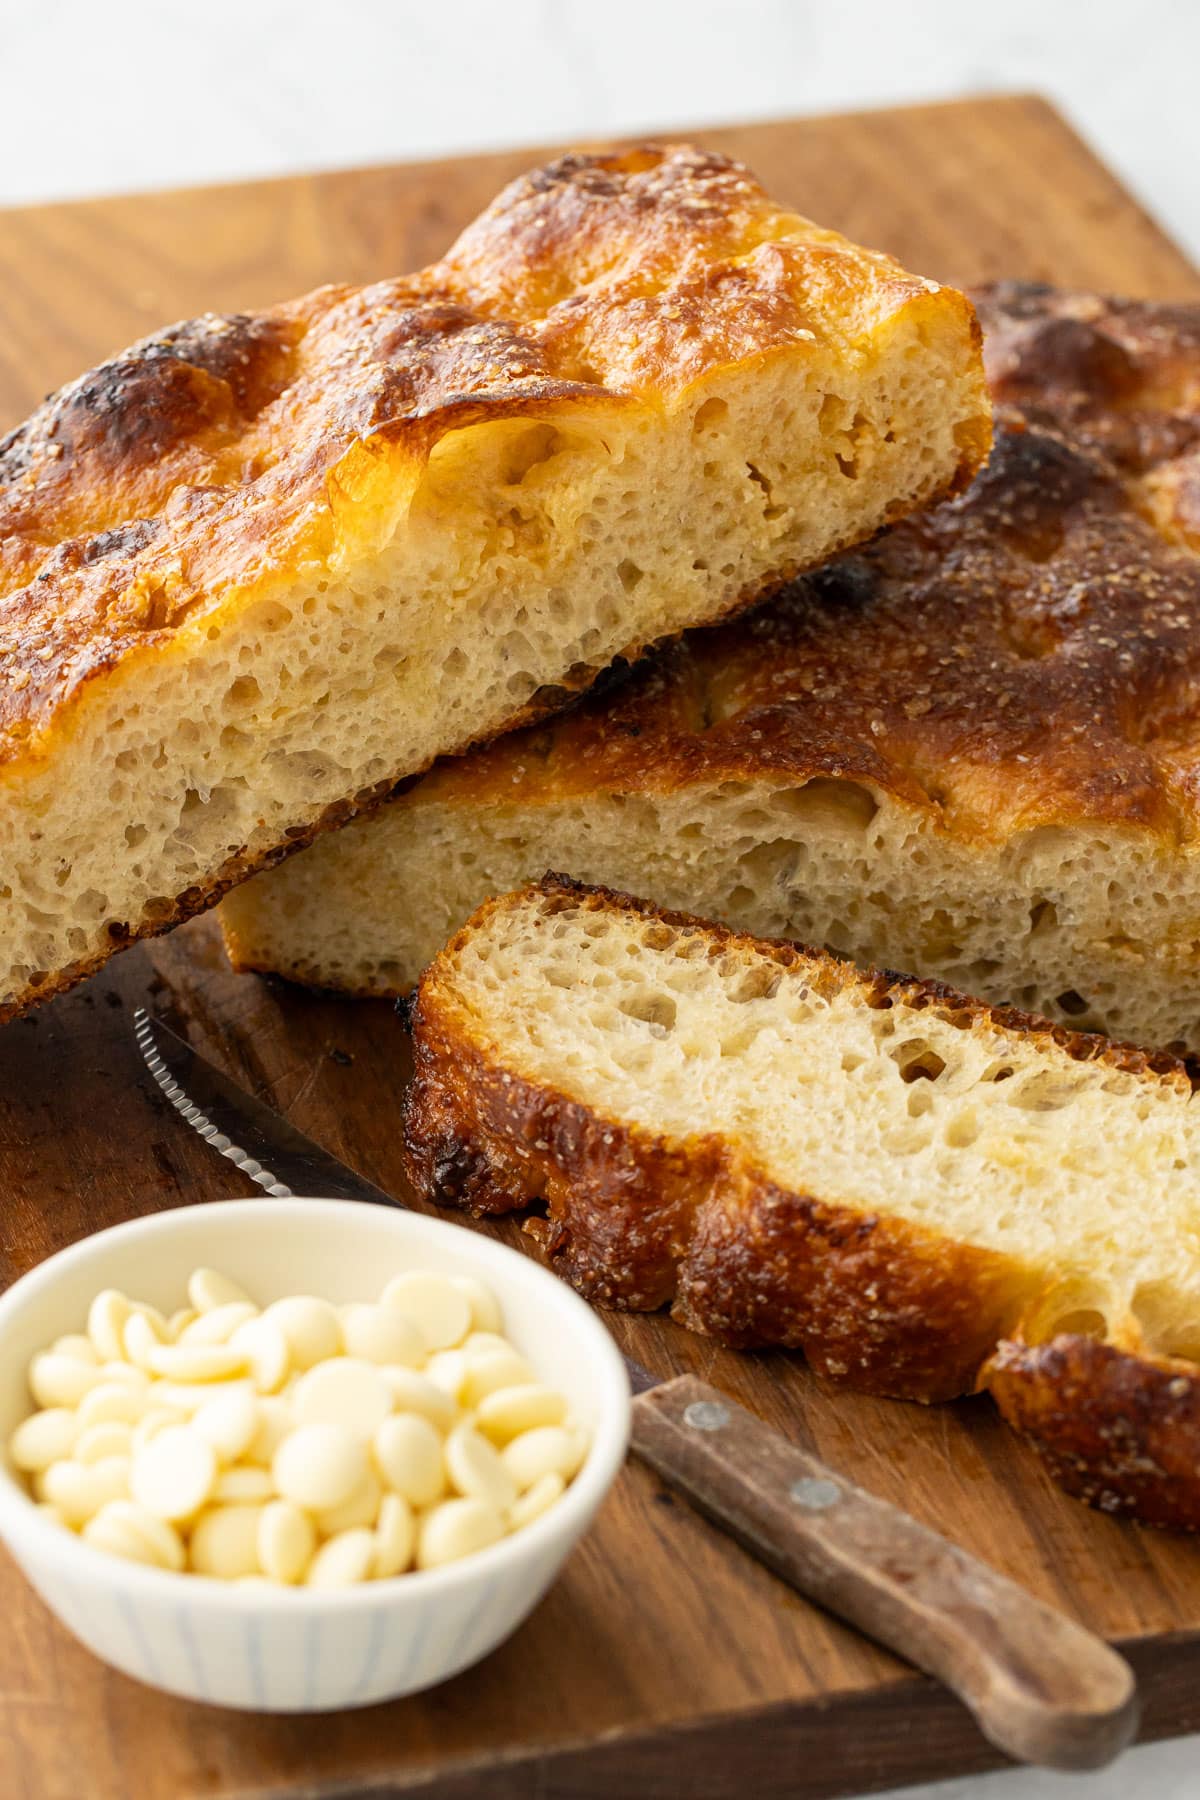
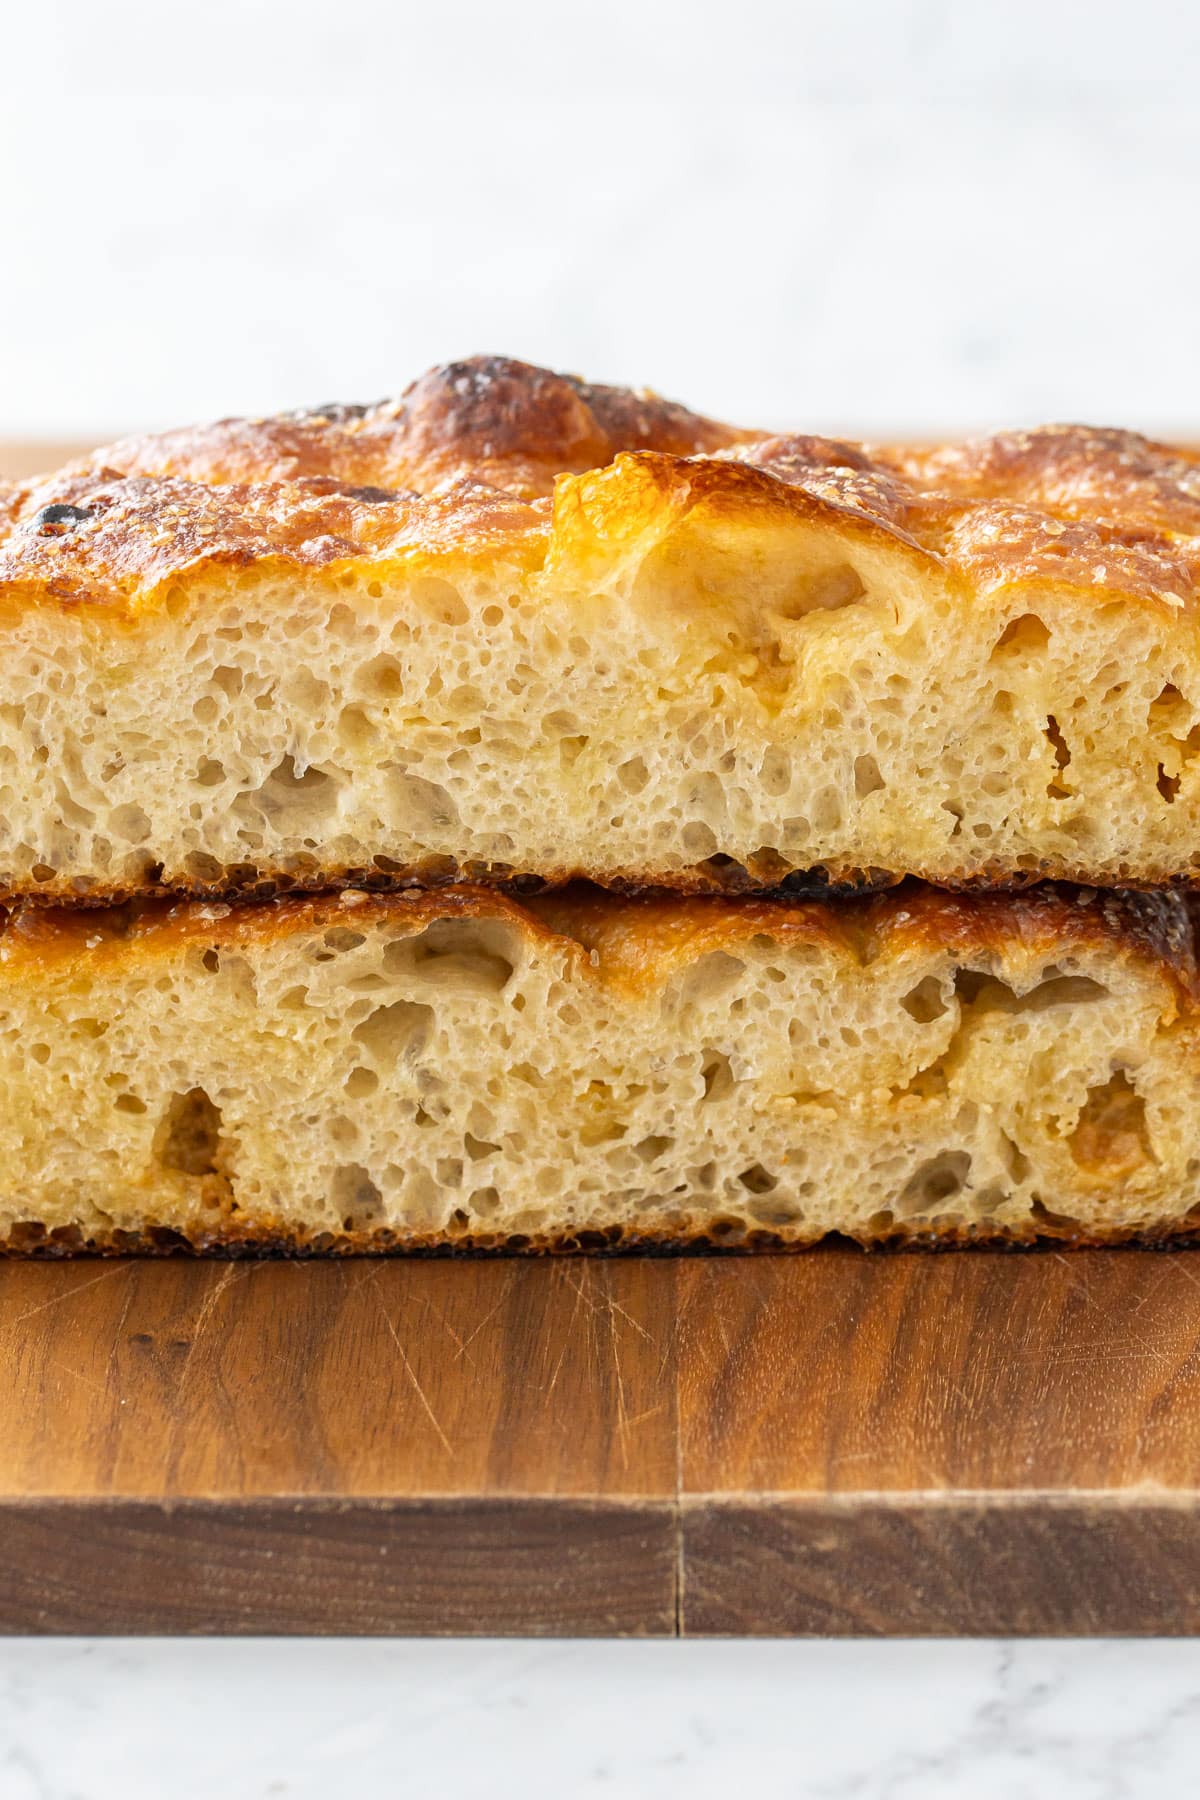
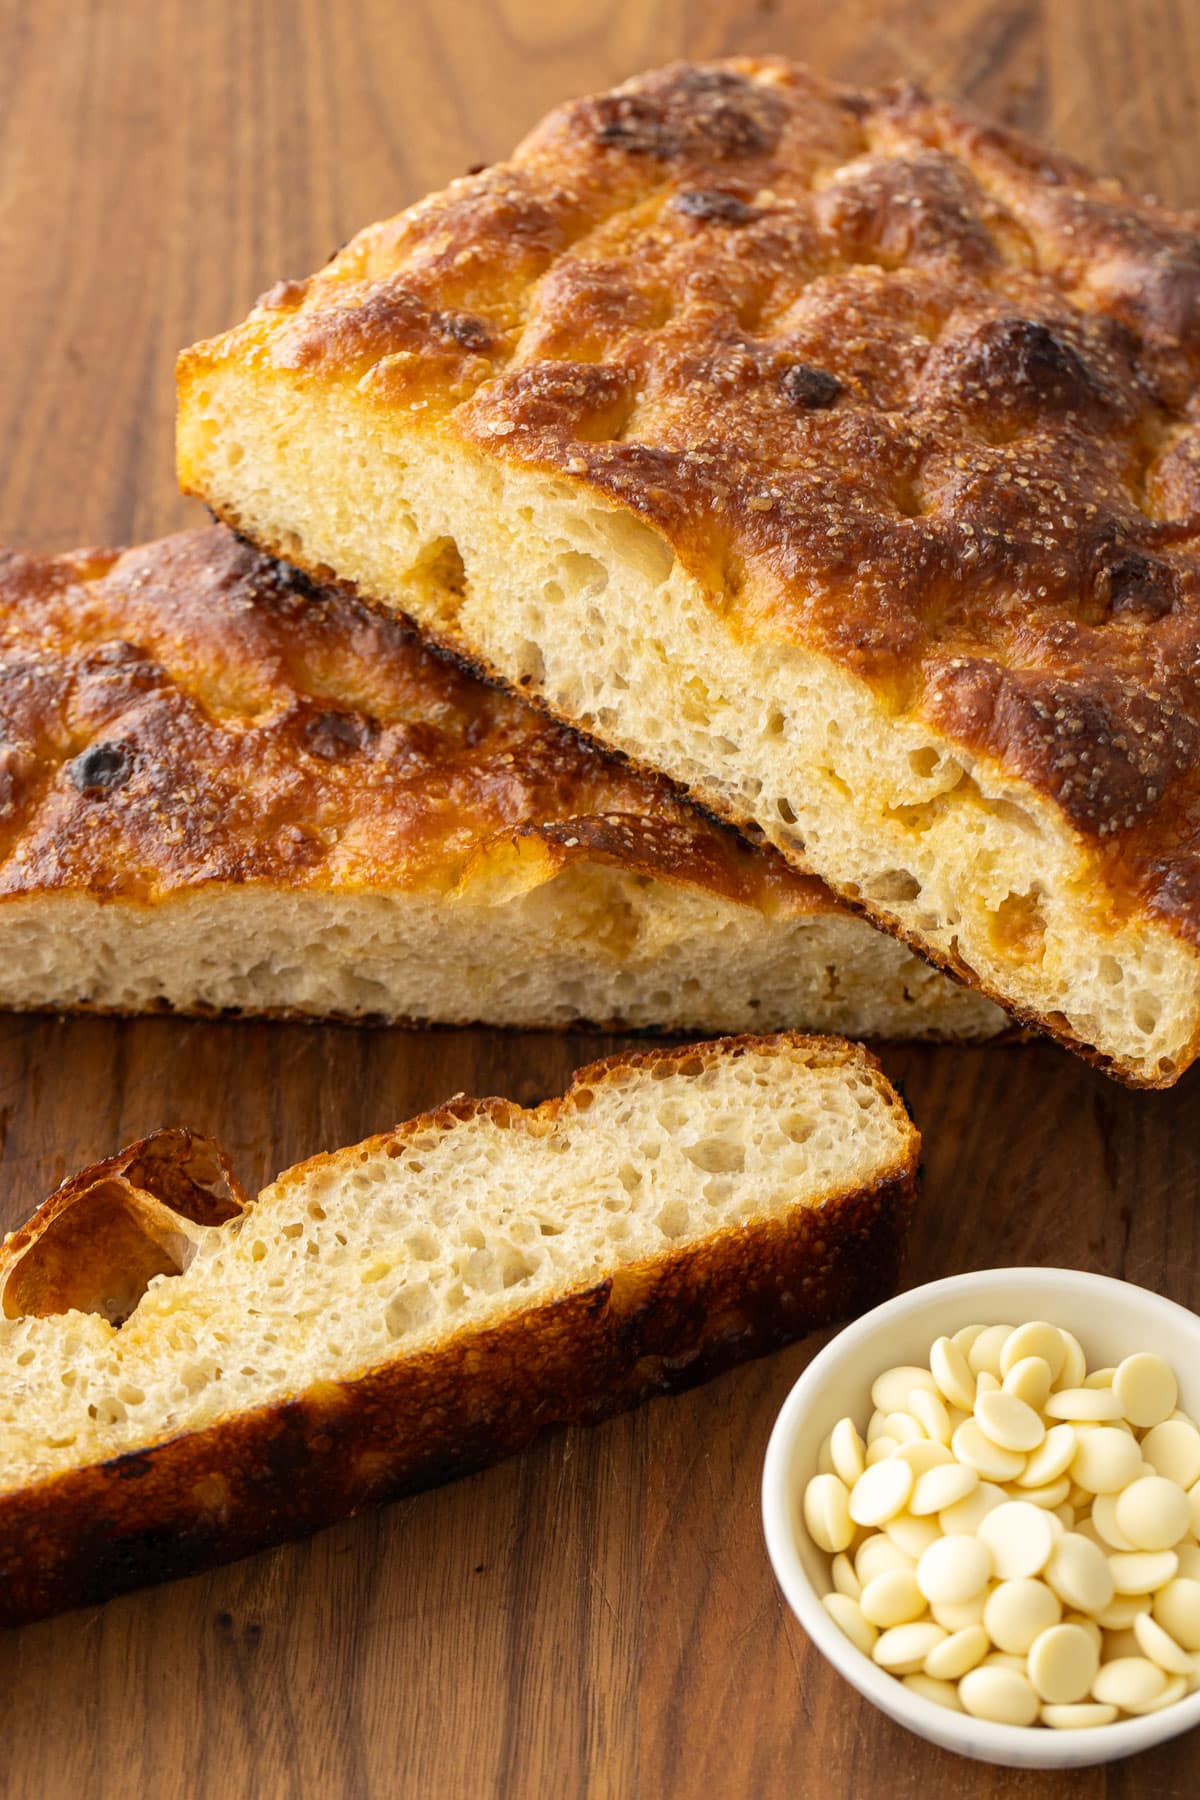
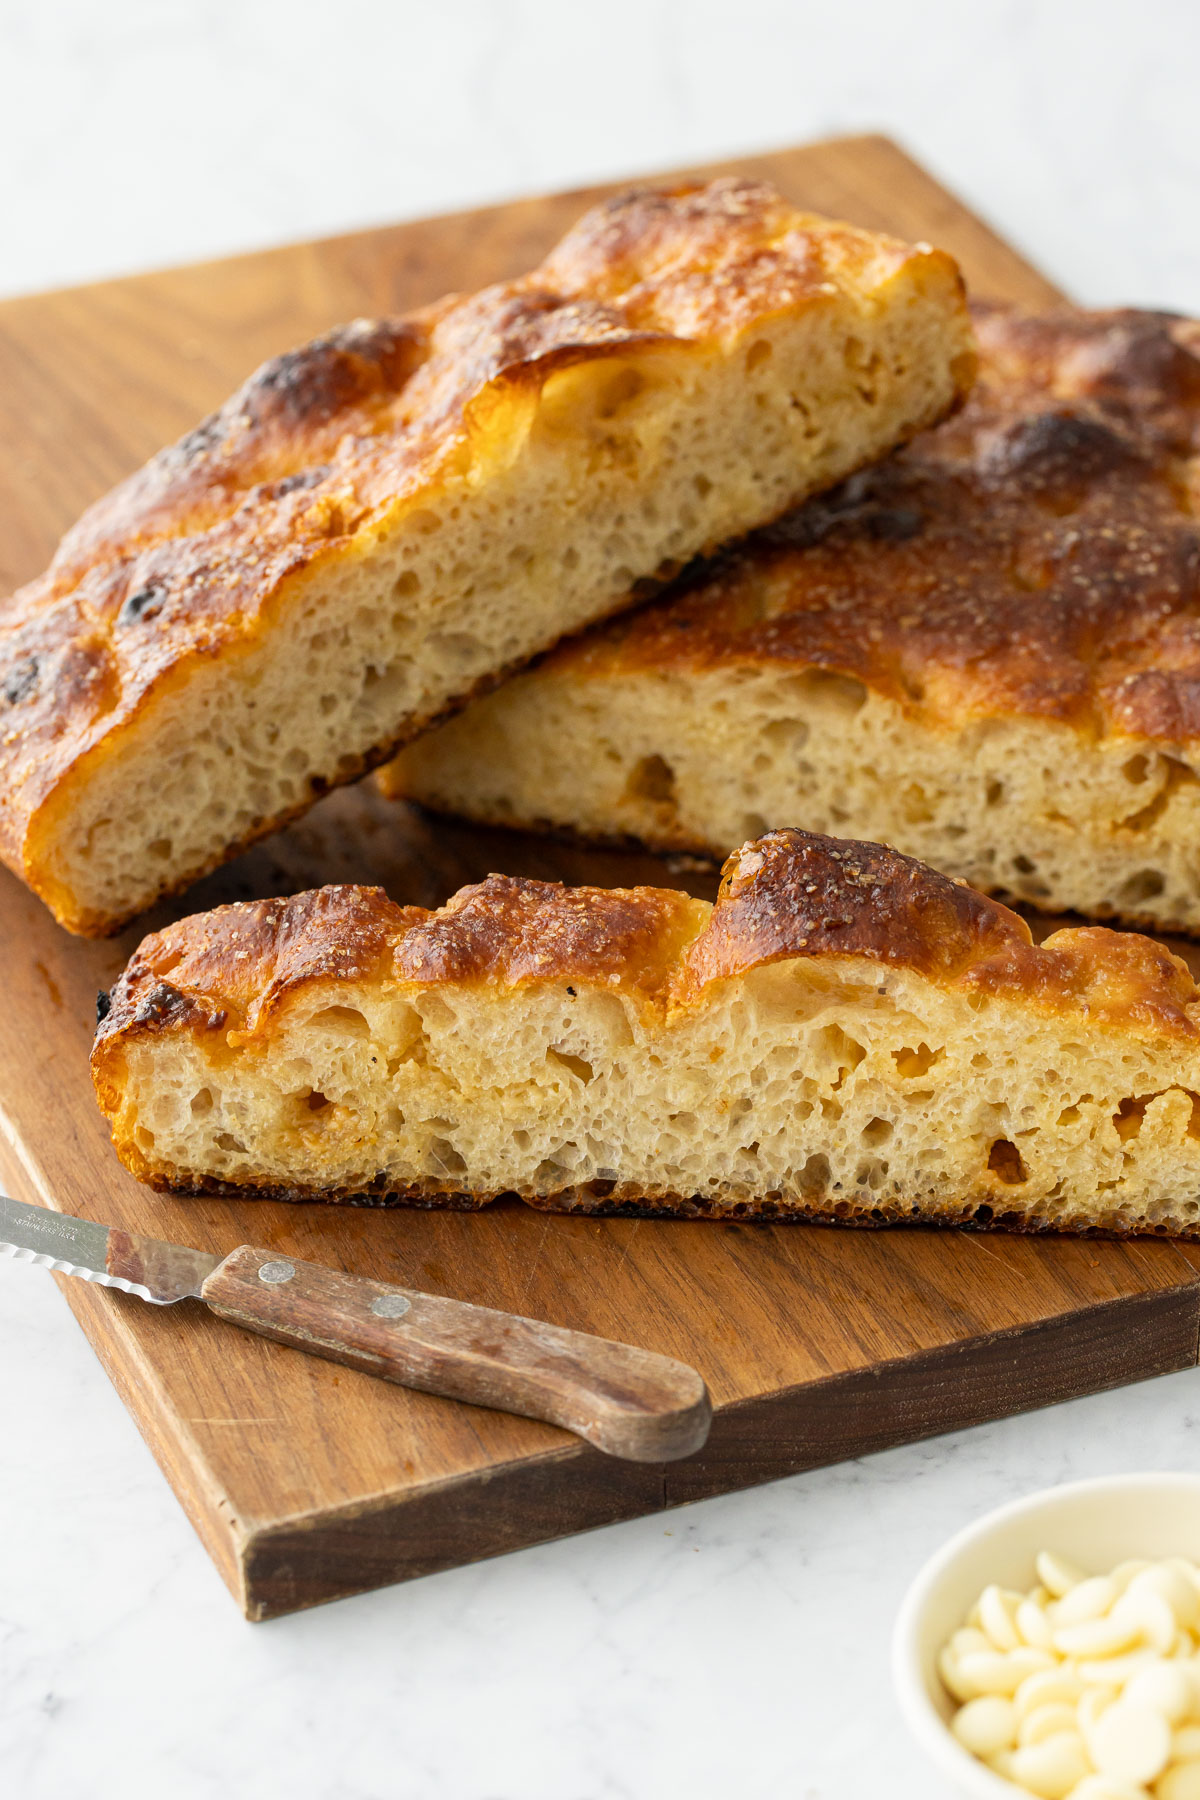
This sweet and salty twist on a classic Italian focaccia features hidden pockets of white chocolate infused into the tender crumb and a bubbly, golden brown crust topped with flaky sea salt and crunchy turbinado sugar. It’s made over the course of 3 days/48 hours for a full flavor and extra bubbly crust, but with only 45 minutes of hands-on time required.
This unique focaccia can be made with instant yeast or sourdough (the method is nearly identical), and bakes into a crisp, bubbly, and golden brown focaccia with a sweet surprise hidden inside: pockets of molten white chocolate that almost caramelize in the high heat of the oven, melding with the tender crumb of the bread. It’s a sweet, salty, and sensational twist on focaccia that you won’t soon forget!
Save this recipe for later!
My sister and I have long been obsessed with this magical white chocolate bread we had at ClubMed in the 90s. You know how some flavor memories are seared into your brain? That bread is one of those things.
I made a regular loaf version of it based on the official ClubMed recipe a few years back, and haven’t thought much about it since. Until my sister fell head first into her own sourdough obsession (you’re only 6 years late, Robs) and set about making a sourdough loaf studded with white chocolate chips (in short: yum).
I’ve been leaning hard into focaccia lately, maybe because it feels like lazy-girl’s sourdough since you don’t have to deal with shaping or scoring or be overly concerned with proofing times. Despite making over a dozen loaves in the last few months, I’ve mainly stuck to basic flavors so far (dried fennel seed is my favorite focaccia flavoring, another throwback to our favorite date night restaurant in college). But I digress.
Despite baking so many loaves, I don’t have a solid go-to focaccia recipe just yet; it’s something I tweak and change pretty much every time I make it, and likely will continue to do so for some time. While I’ve shared same-day focaccia recipes in the past (this peach and thyme focaccia is a particular favorite), I’ve decided that I prefer the more complex flavors, exaggerated bubbles, and crusty exterior I get from an extended timeline.
So taking into account my focaccia fixation and my sister’s forays into white chocolate sourdough, you can see how the idea of white chocolate focaccia came to be. And it turned out fabulous if I do say so myself (not that I’d be sharing it if it didn’t, but still).

Live. Laugh. Loaf.
Bread lovers, this one’s for you! Get your Live Laugh Loaf tee, tea towel, or sticker (plus tote bags and apronns!) from Fresh Baked Puns.
This sweet adaptation is not that different from regular focaccia with white chocolate pieces folded into the dough; the only other change I really made was adding a little bit more honey for sweetness to the dough itself, and finishing it with a sprinkle of turbinado sugar in addition to flaky sea salt. It’s the combination of sweet and salty that makes this focaccia so irresistible.
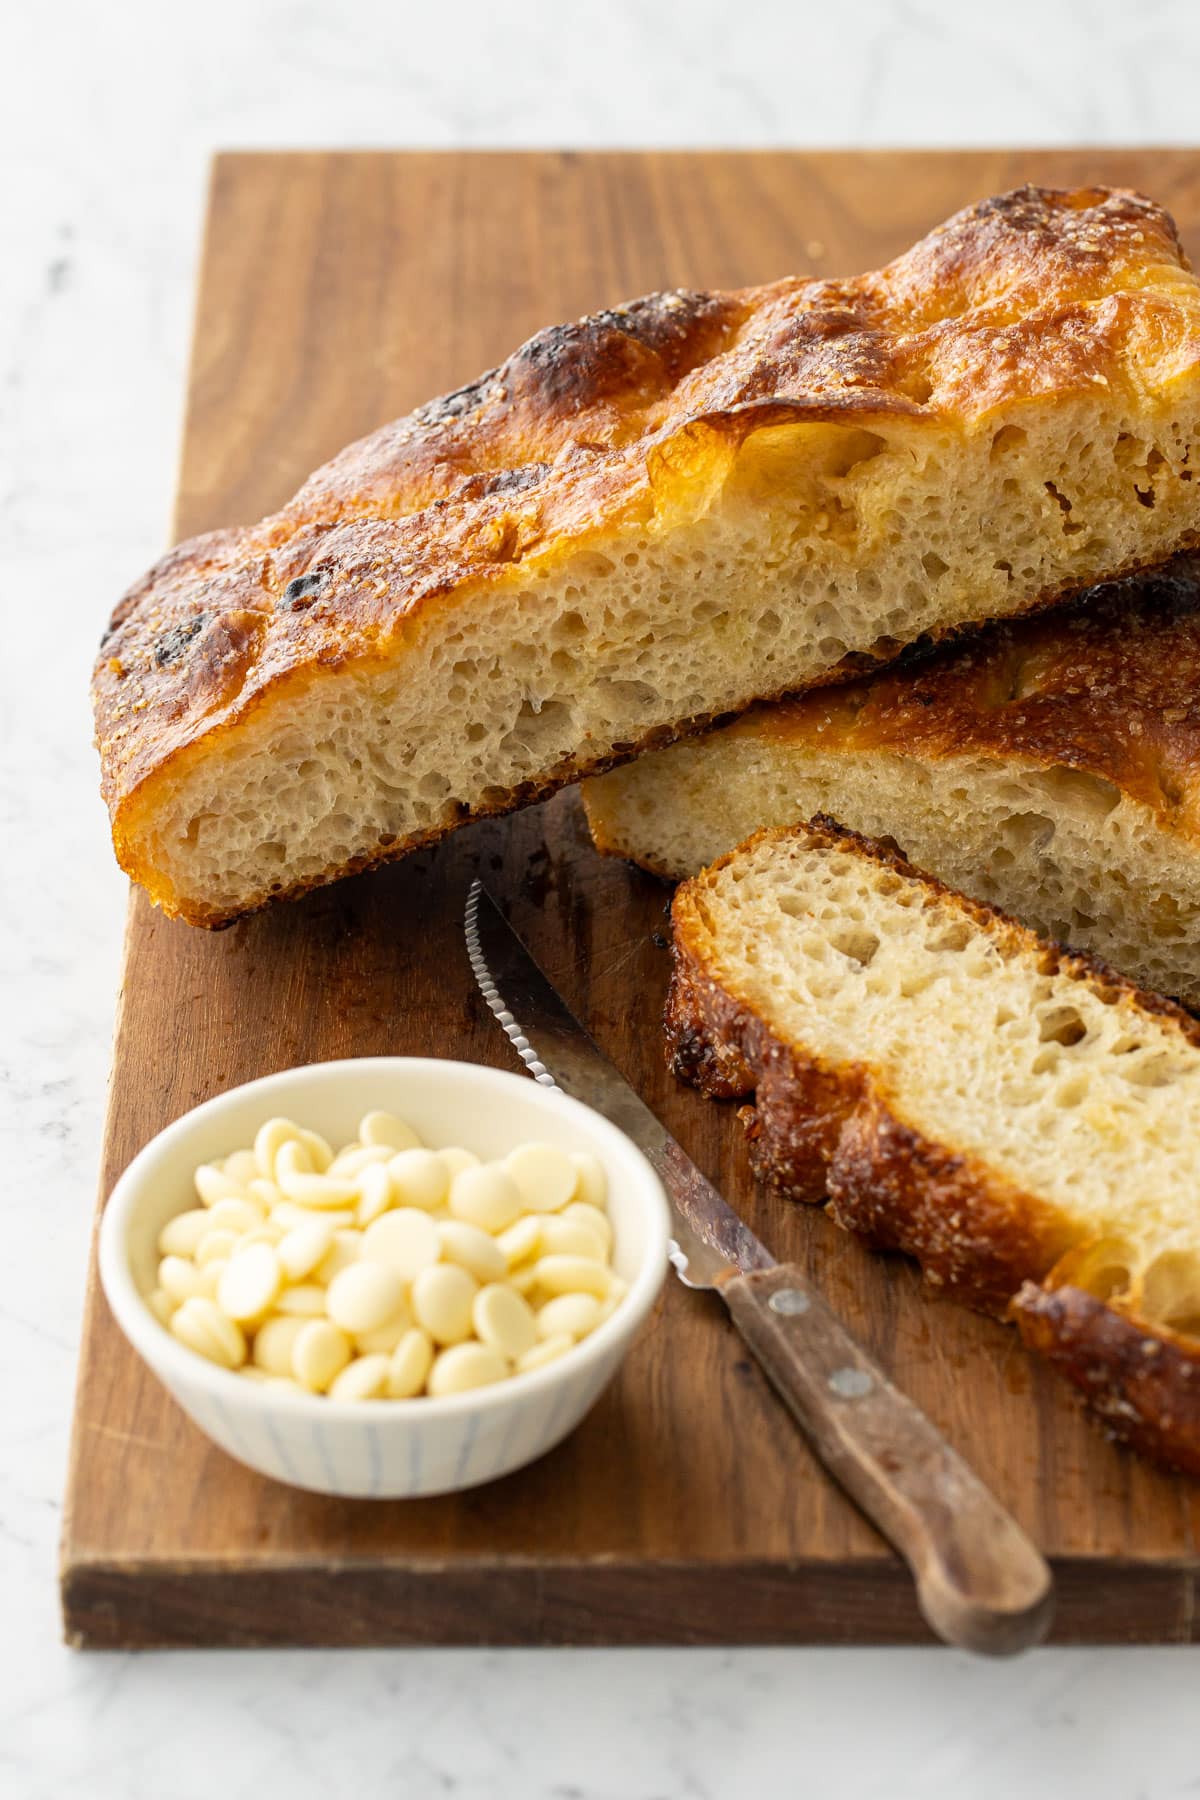
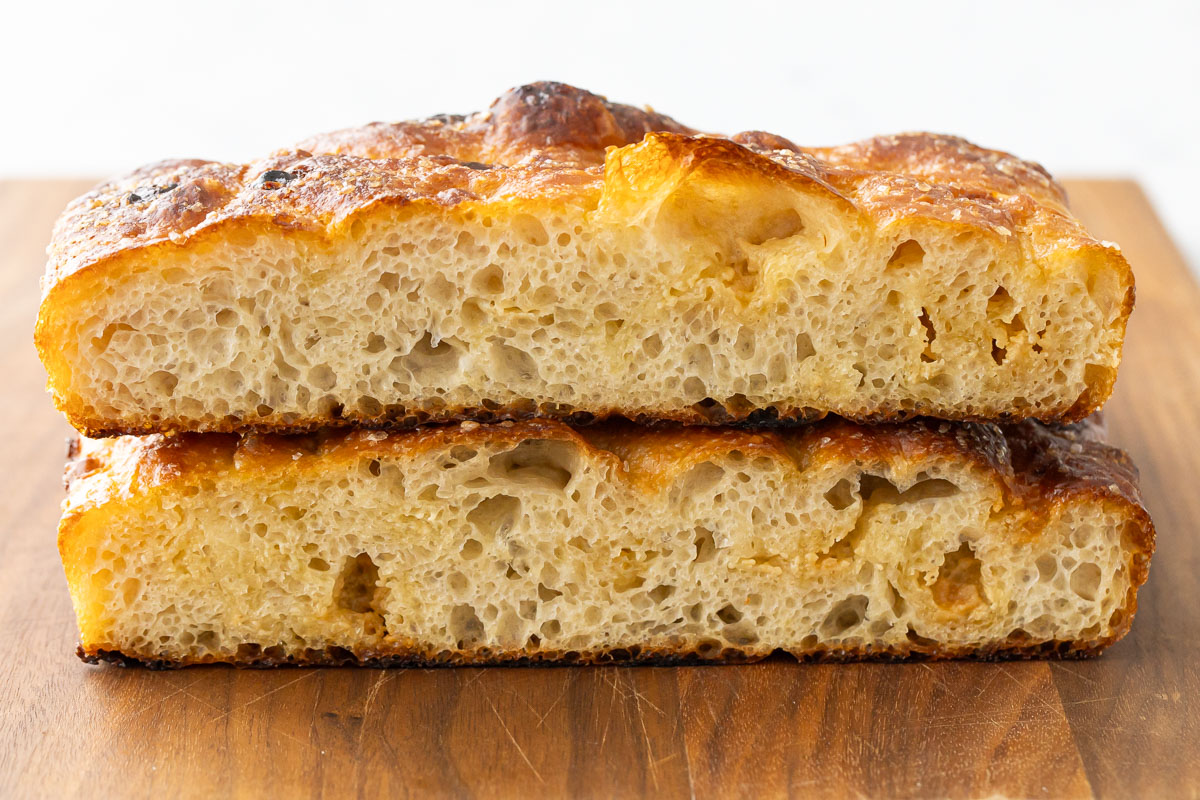
The high heat of the oven produces a deeply golden brown crust, and almost caramelizes the pieces of white chocolate inside, melding and fusing them into the very crumb of the bread. So you won’t get obvious white chocolate ‘chips’ in the bread like if you were baking cookies, rather the flavor and sweetness of the white chocolate almost disappears into the bread itself, leaving pockets of intensely caramelized white chocolate flavor. It’s kind of magical.
(Of course the behavior of the white chocolate does depend on what kind of white chocolate you use: white baking chips have hydrogenated oils and stabilizers and aren’t really going to melt much. In contrast, high quality white chocolate made with pure cacao butter will melt and caramelize and give you the delicious molten pockets I’m describing. Just look for cocoa/cacao butter as the first ingredient and you should be golden! Literally.)
More Time = More Flavor (but not necessarily more work!)
This recipe is considered a 48-hour focaccia, but you’ll have a little bit of work to do on 3 separate days with two overnight rests. So if you want to serve your focaccia for dinner on Sunday night: start it Friday, shape on Saturday, and bake on Sunday.
I went back and forth on whether or not to call it a 2 day or 3 day focaccia, as it technically takes a total of 48 hours from when you first start mixing to when you actually sit down and eat it, but that work is spread over 3 different days (since I’m assuming you’re not going to start baking at midnight). All this timey-wimey stuff is giving me a headache (where’s the Doctor when you need him?)
The specific timing for each step is very flexible, however, and the two overnight rests can be as little as 10 hours up to 24 hours (I mean, probably even longer, though I haven’t tested it), so you can truly work around your schedule.
While 48-hour focaccia may sound like a lot of work, know that it’s less than 45 minutes of actual, hands-on active time spread over the course of three days. Totally manageable, easy even. I promise!
Day One
On the first day, it takes mere minutes to mix together the ingredients, then you just sit back and let the yeast do its job overnight. This step is called a pre-ferment or poolish: the same technique I use in my overnight pizza dough recipe to develop a more complex flavor. Basically, giving the yeast more time to do its thing will lead to more flavor in the final bake.
If you have an active sourdough starter, you can use it in this step! Just replace the 1/8 teaspoon of instant yeast with 10 grams of your starter. Everything else about the recipe and process (including the instant yeast required on day 2) is identical from there. If your starter has been napping in the fridge, no need to wake it up or feed it first, just add 10g to your pre-ferment mixture and let it do it’s thing!
In sourdough-speak, the pre-ferment step is basically a regular feeding. So if you have 200g of freshly fed, 100% hydration sourdough starter (fed within the last 8-12 hours or so), measure out 200g and skip straight to day 2.
Day Two


Day two is probably the most time intensive day, and you’ll want to plan for a 2 hour chunk of time where you will be available; this could be anytime over the course of the day. But let me reiterate again that you’re not actually working for 2 solid hours. Not even close! After mixing, the dough simply needs three sets of stretch and folds over that 2 hour period. And then? Into the fridge it goes for another overnight rest. Again: more time, more flavor (sense a theme here?)
Day Three


Finally, the third day is for shaping (including the signature focaccia dimples) and baking. And eating, of course (this bread is truly at its best the same day it’s made though I’ve certainly enjoyed it days later too).
For a more condensed timeline, you can skip this pre-ferment step and instead just mix all the dough ingredients together at once (so that’s 500g total flour and 400g water with about 10g of instant yeast). You won’t have quite as complex a flavor or as bubbly a texture though; the pre-ferment step really and truly does make a difference! But the overnight rise will give you a more developed flavor than a same-day focaccia would.
I have also experimented with letting the dough rise overnight in the fridge in the baking pan instead of a bowl; this allows us to stretch the dough into the rectangular baking pan on day 2 before it has risen, making for lovely large bubbles that we don’t have to worry about deflating when we transfer the dough to the pan. Instead, after an overnight rise in the pan in the fridge, let it come to room temperature for about an hour or so before dimpling and baking. Keep in mind that the bread is more prone to sticking this way, so be sure you line your pan with parchment paper if you want to try this method.
Sourdough vs Instant yeast
How do the sourdough and yeasted versions compare, anyhow?the internal temperature is at least 200°FI made two loaves at the same time to test just that. The only difference was one used 1/8 teaspoon of instant yeast in the pre-ferment, the other used 10g of sourdough starter. Everything else was identical.
Visually, the breads looked almost the same. The sourdough version had a few more big bubbles if you’re being nitpicky, but it’s really a negligible difference.
Flavor-wise, if you’re comparing them side by side, you can definitely taste a difference, but good luck describing exactly what that difference is. The sourdough version is probably just a little more complex? Which is so totally vague, considering I’ve been writing about food and baking for going on 19 years now (😳) I should be able to find more descriptive words.
Yes, you can taste a slightly more sour flavor with the sourdough version, which is a really nice contrast with the sweetness of the white chocolate. But the overnight pre-ferment with instant yeast really does an excellent job at developing a complex, yeasty flavor, even without an active sourdough starter. I was astonished at how close the two loaves were in flavor and appearance!
The yeast-only version is ever so slightly softer and more tender (which, if you think about a regular loaf of yeasted country bread versus a sourdough boule, the sourdough is going to have a stronger texture and a thicker crust and that’s true here too).
Ingredient Notes & Substitutions
Bread flour or 00 flour: using a higher-protein bread flour or 00 flour allows the focaccia to develop a stronger gluten network and hold a higher hydration than a lower-protein flour would.
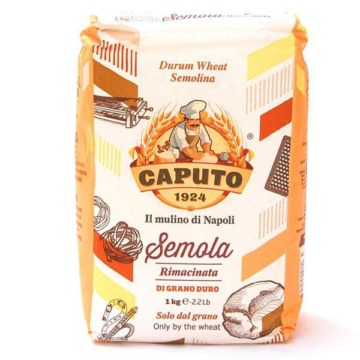
Semolina rimacinata flour: This is a finely milled durham wheat flour, often used in pasta making. Don’t confuse it with plain old semolina flour which is coarse like cornmeal.
While I love the texture and flavor that comes from using a blend of flours, you can use all bread/00 flour instead and still get great results! Just swap it for an additional 100g of bread flour (an equal amount by weight, not volume; semolina is much heaver than regular flour). You can also play with different combinations of flour; focaccia really is flexible like that and is a great canvas for experimentation!
Instant yeast: I used instant yeast here (SAF red label yeast to be exact), but any yeast labeled instant yeast should work (double check it’s not expired). You’ll need this even if you are making the sourdough variation of this recipe which still calls for instant yeast in addition to the sourdough (all sourdough focaccia doesn’t get the same soft, tender crumb or thin, crackly crust, so using instant yeast in addition to the sourdough starter helps with that.)
Note that active dry yeast is not the same as instant yeast. If you’re using active dry yeast, you’ll want to whisk it with a little bit—1/4 cup or so—of the lukewarm water first; let it sit and get foamy for 5 minutes or so (if it doesn’t get foamy, it’s dead; toss it and buy fresh yeast), then proceed with the recipe as instructed. This extra step helps to wake up and activate the yeast. Instant yeast is formulated in such a way that this extra step is unnecessary.
White chocolate: I used white chocolate callets, which are the perfect size already for leaving nice little pockets of white chocolate goodness throughout. If you have a white chocolate bar, chop it up into pea-sized pieces.
I am personally not a fan of white baking chips (legally they can’t be called white chocolate as they don’t contain cocoa butter). Check the ingredients on your bag, if cocoa butter is listed as the first ingredient, that means you’ve got a good quality product.
For a standard savory focaccia, follow the recipe and method as written, just leave out the white chocolate and turbinado sugar (you can halve the honey too). Feel free to play around with other fun mix-ins—the sky’s the limit!
Butter: you just need a little bit of butter to grease the pan; this is in addition to olive oil and just helps keep the bread from sticking. You can also use a bit of shortening.
Salt: you’ll need two kinds of salt for this recipe, regular kosher salt (I use Diamond Crystal brand), and a flaky finishing salt like Maldon.
If you swap a different brand or kind of salt, like Morton or fine sea salt, use an equivalent weight. Morton kosher salt, for example, is denser than Diamond, so 11g will be more like 2ish teaspoons rather than a full tablespoon. Same for fine sea salt. I do not recommend using iodized table salt for this recipe.
White Chocolate Focaccia Bread
Ingredients
For Pre-Ferment:
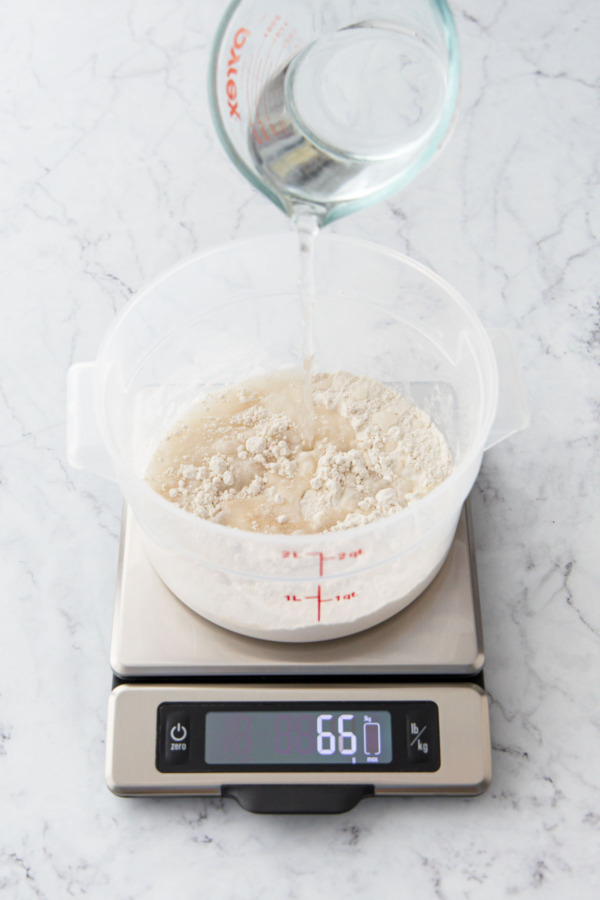
- ¾ cup / 100 g bread flour
- 3 ½ fl. oz. / 100 g lukewarm water, about 80-90ºF
- ⅛ teaspoon / 1.5 g instant yeast, OR 10g active sourdough starter
For Focaccia Dough:
- 1 ¼ cups / 300 g lukewarm water, about 80-90ºF
- 2 tablespoons / 40 g honey
- ¾ teaspoon / 9 g instant yeast
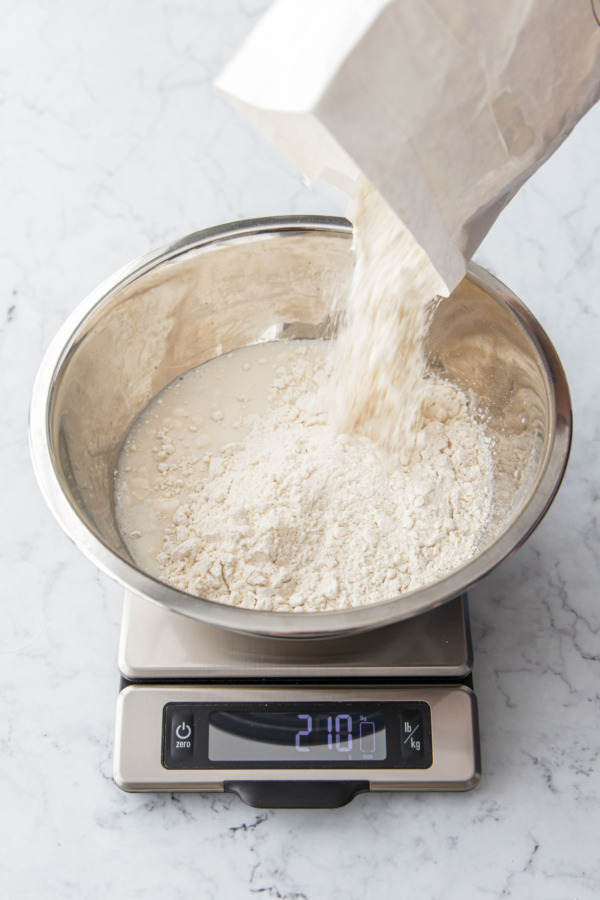
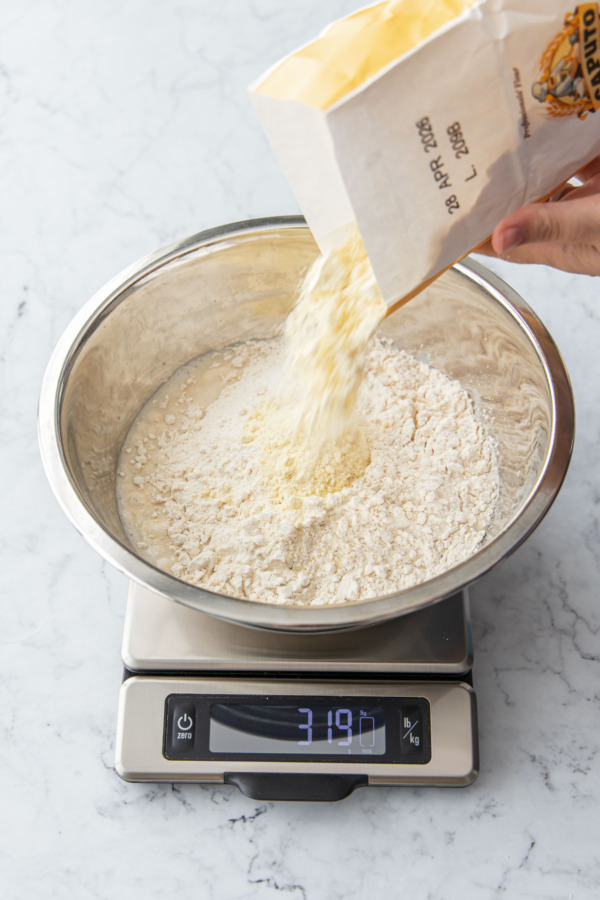
- 2 ⅓ cups / 300 g bread or 00 flour
- ⅔ cup / 100 g semolina rimacinata flour*, or replace with an equal amount BY WEIGHT of bread/00 flour
- 1 tablespoon / 11 g kosher salt
- 1 tablespoon / 14 g olive oil, plus more for oiling the pan and for topping
- ¾ cup / 125 g white chocolate chips or chopped white chocolate
- butter, for greasing the pan
- 1 tablespoon turbinado sugar, for topping
- flaky sea salt, for topping
Instructions
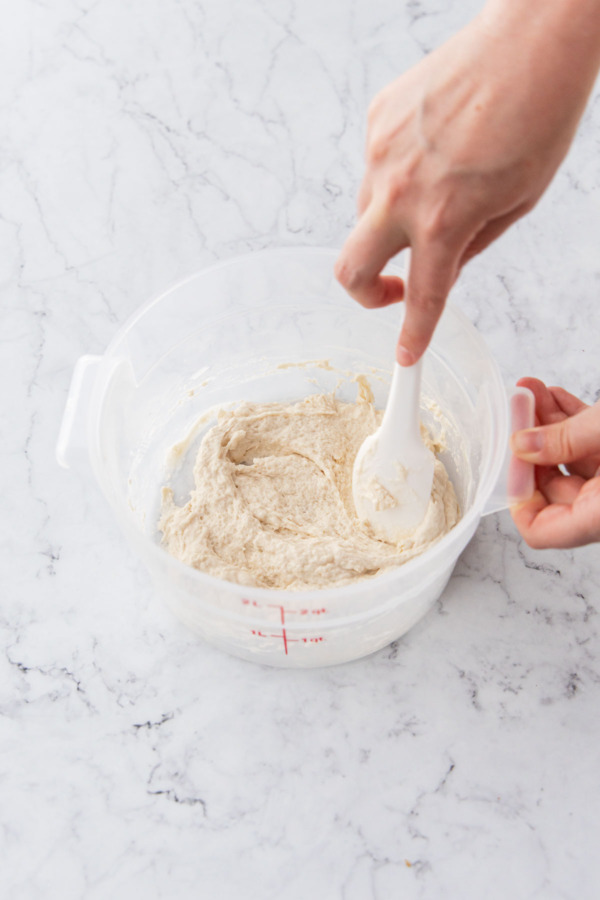
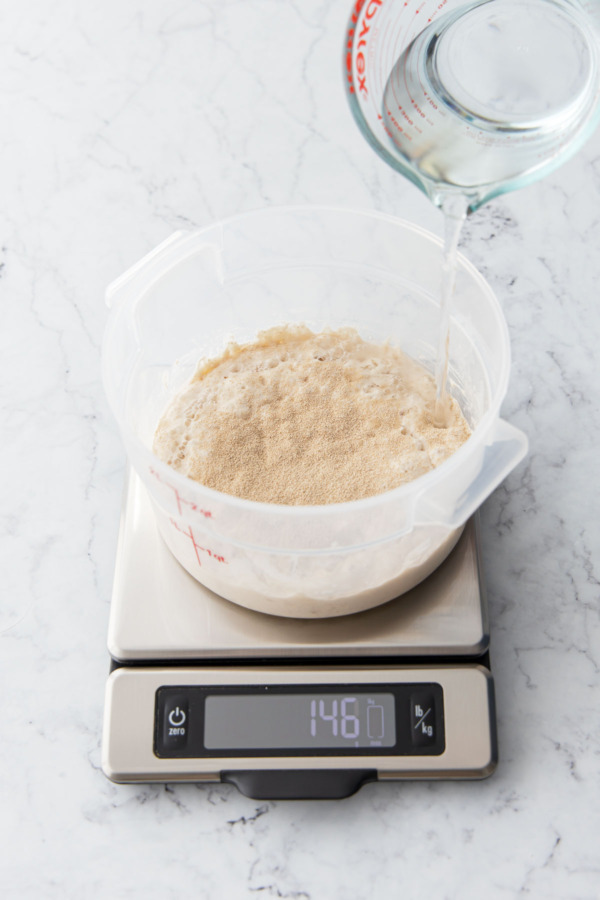
- Day 1: Prepare Pre-Ferment: combine flour, water, and yeast or active sourdough starter in a bowl or container, stirring until incorporated and no dry streaks of flour remain. Lightly cover and set aside at room temperature for 12 hours or overnight, until doubled in size and very bubbly.
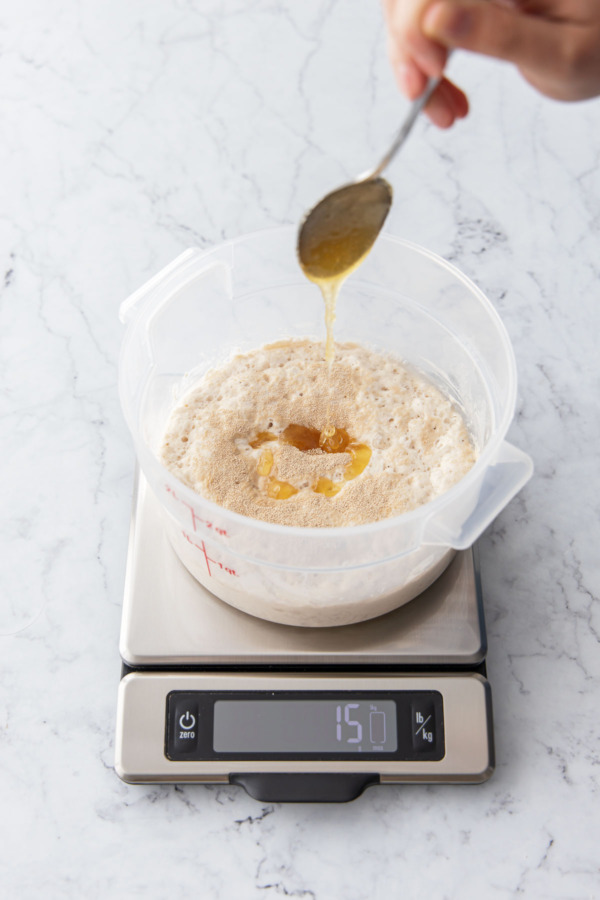
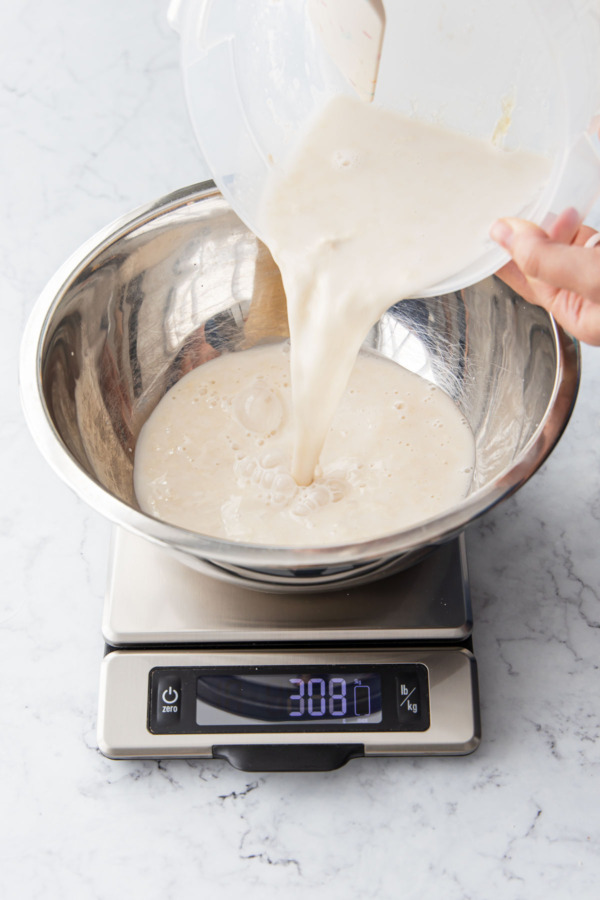
- Day 2: Make Dough: Add lukewarm water to container with pre-ferment, along with honey and instant yeast (yeast is needed in this step regardless of whether you used yeast or sourdough in step 1). Stir to combine, then transfer to a large mixing bowl or 4 quart container.
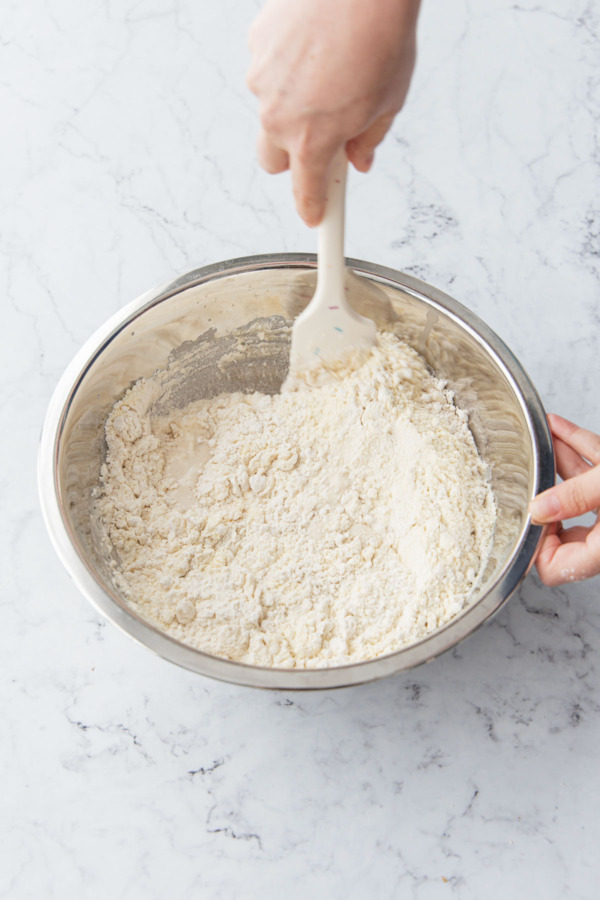
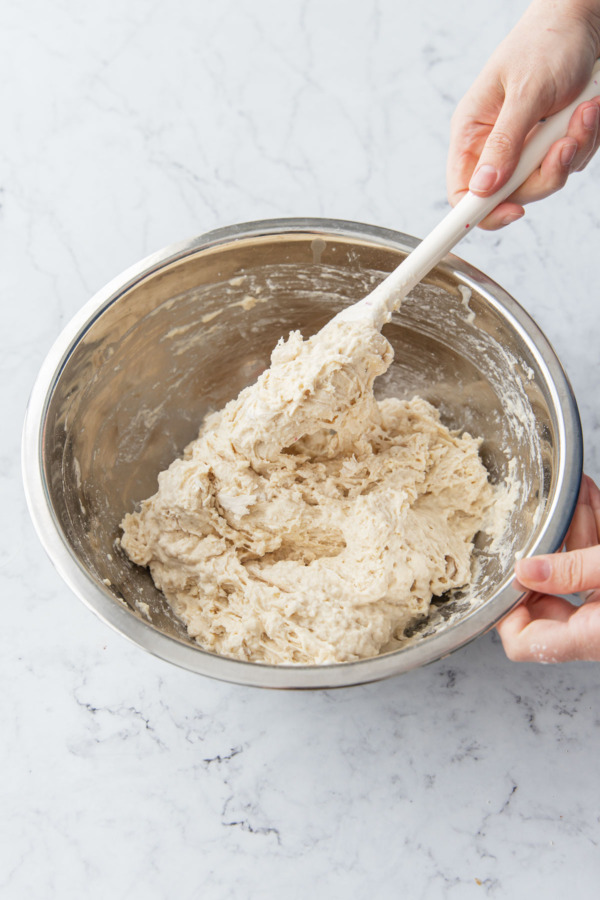
- Add flours to wet ingredients and mix with a spatula or your hands until it comes together into a shaggy, sticky dough. Lightly cover and set aside for 30 minutes.
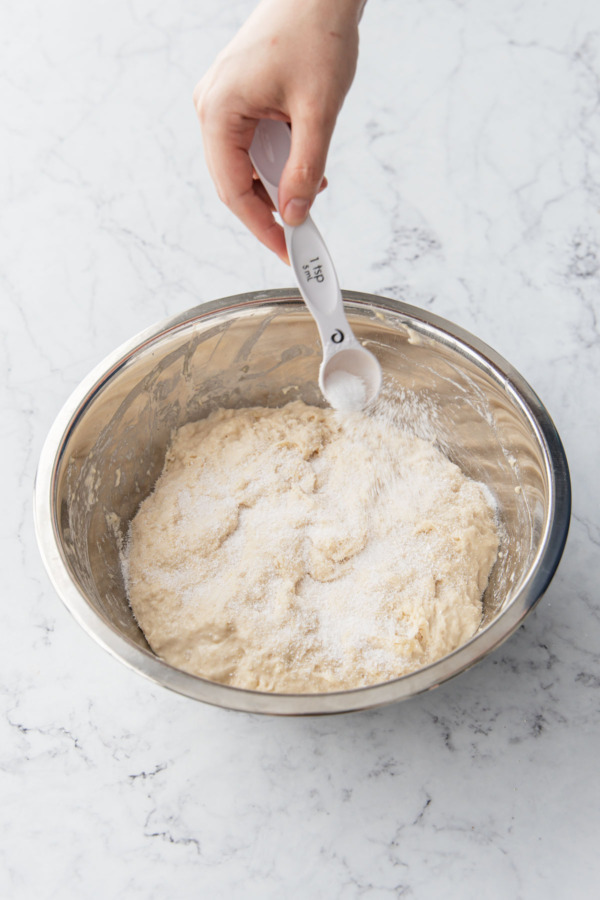
- After 30 minutes, add salt and use the pincer method to incorporate salt (reach your thumb and forefinger around the dough, then squeeze and pinch the dough between your fingers which will almost split the dough in half. Fold dough over itself, rotate the bowl a quarter turn, then pinch and slice again. Repeat until salt is fully integrated).
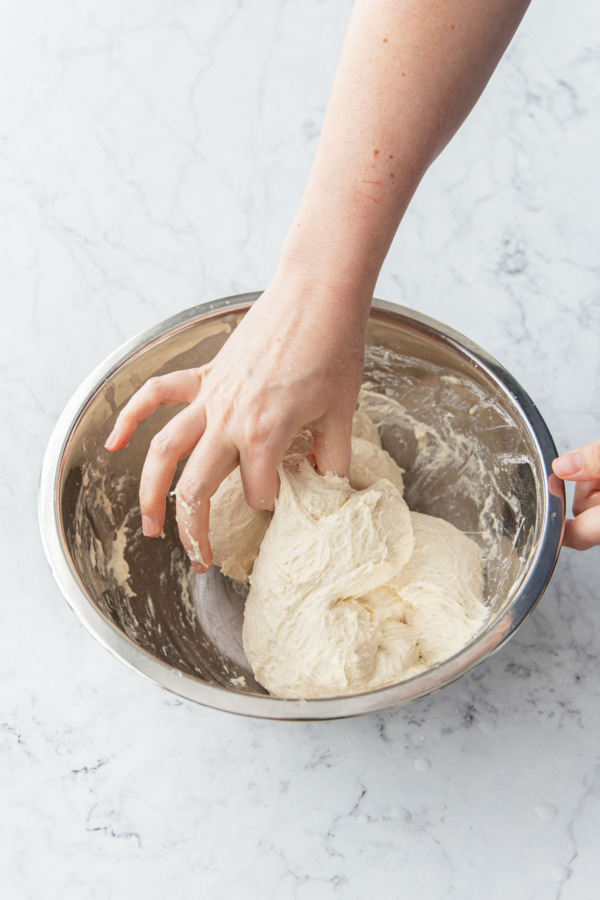
- Lightly cover bowl and set aside for 30 minutes. Drizzle 1 tablespoon olive oil on top of the dough, then then stretch and fold the top portion of the dough over itself, tucking it into the bottom. Rotate the bowl a quarter turn (90º) and stretch and fold again. Repeat twice more until you've completed 4 stretch and folds.
- Cover and set aside for 30 more minutes, then do another set of stretch and folds; this will help continue to build structure in the dough without kneading. Cover and set aside for one more 30 minute interval.
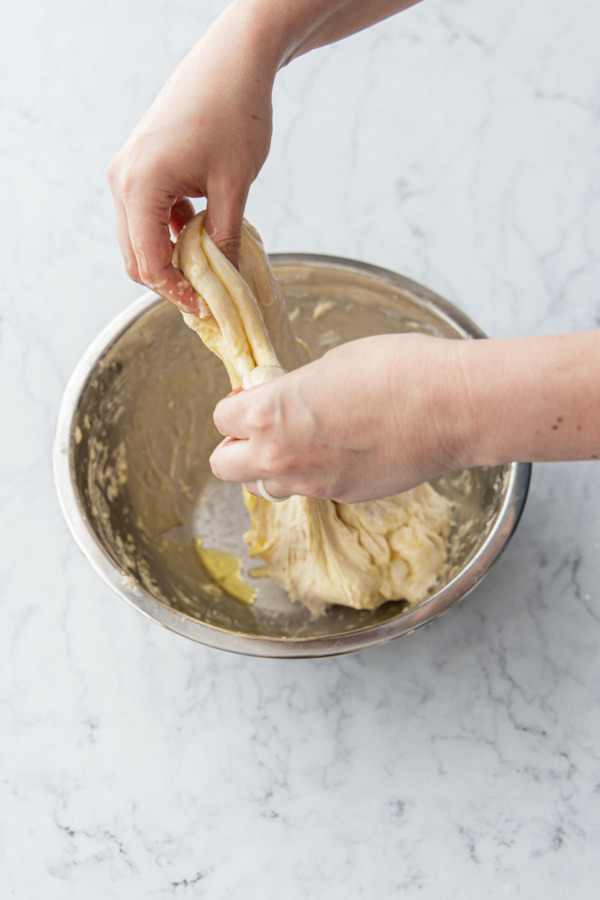
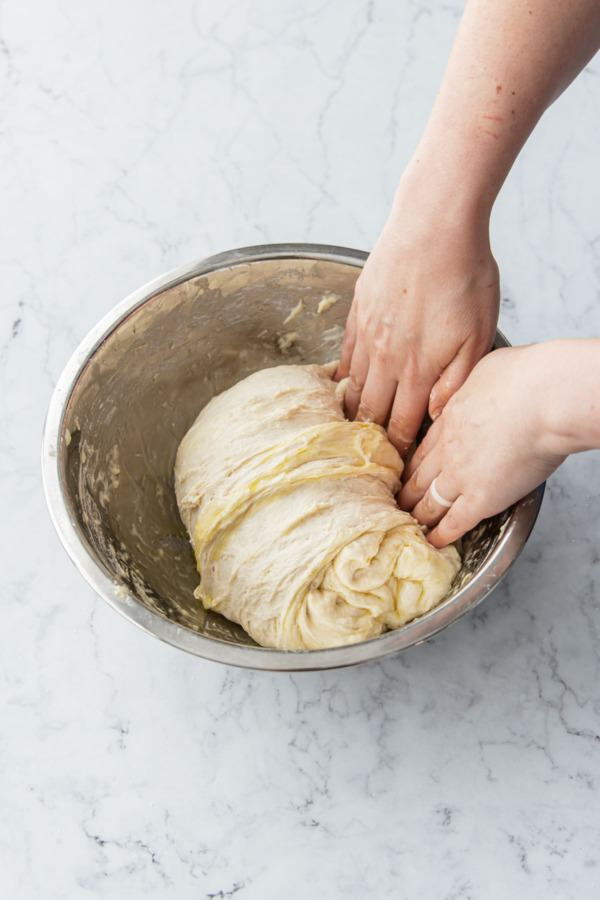
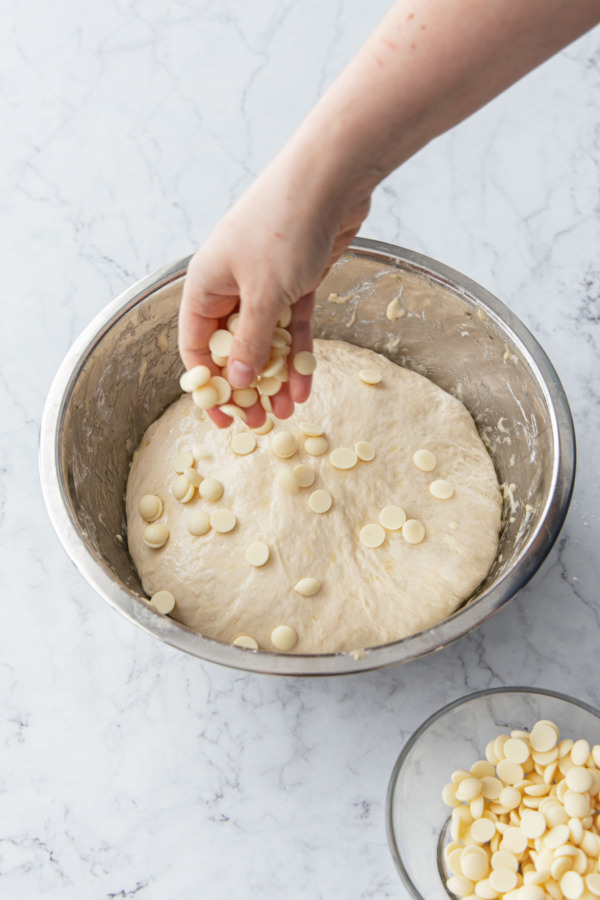
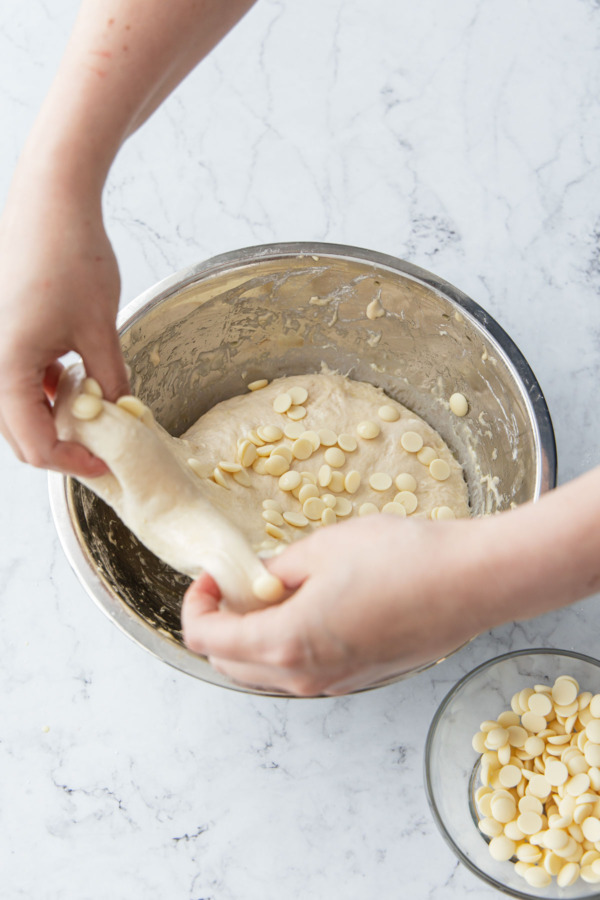
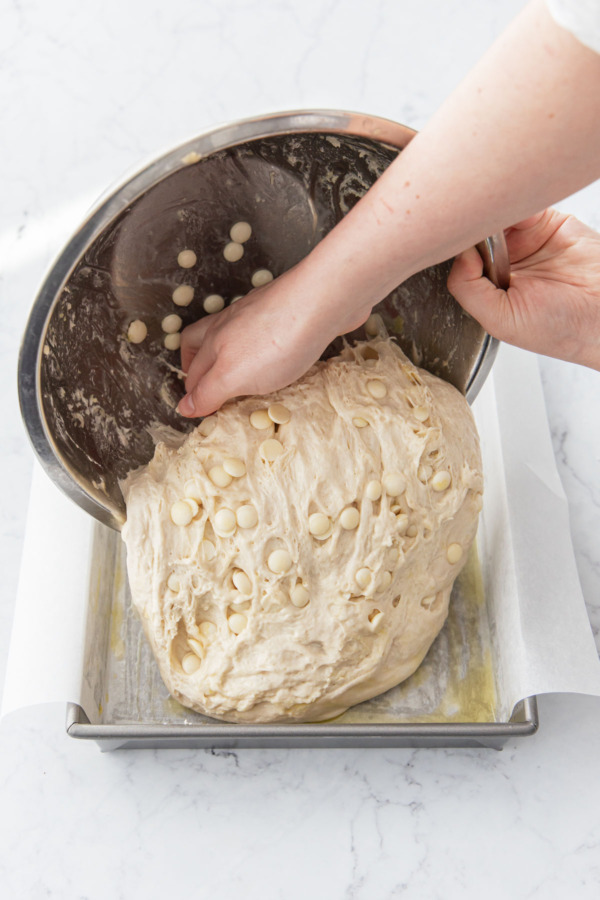
- During the last set of stretch and folds, incorporate the white chocolate chips. Sprinkle 1/4 of the chips over the surface of the dough, then stretch and fold the top portion over itself and the chips. Rotate the bowl a quarter turn, sprinkle another quarter of chips over top, and stretch and fold again. Repeat twice more until all the chips are incorporated. Some may fall out and that's ok, but most should be tucked up inside the dough.
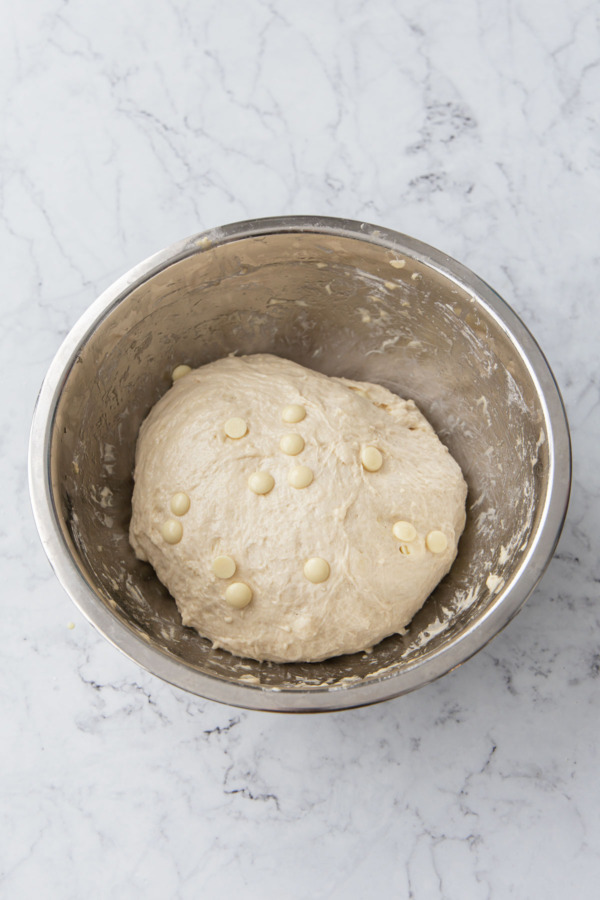
- Lightly cover the dough with plastic wrap (leaving plenty of slack for it to double in size), and then place in the refrigerator for at least 10 hours or overnight.
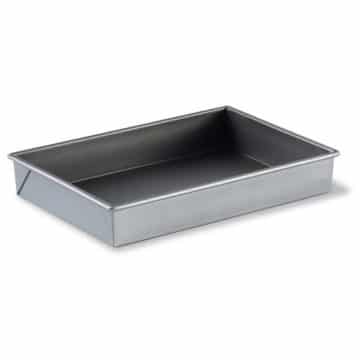
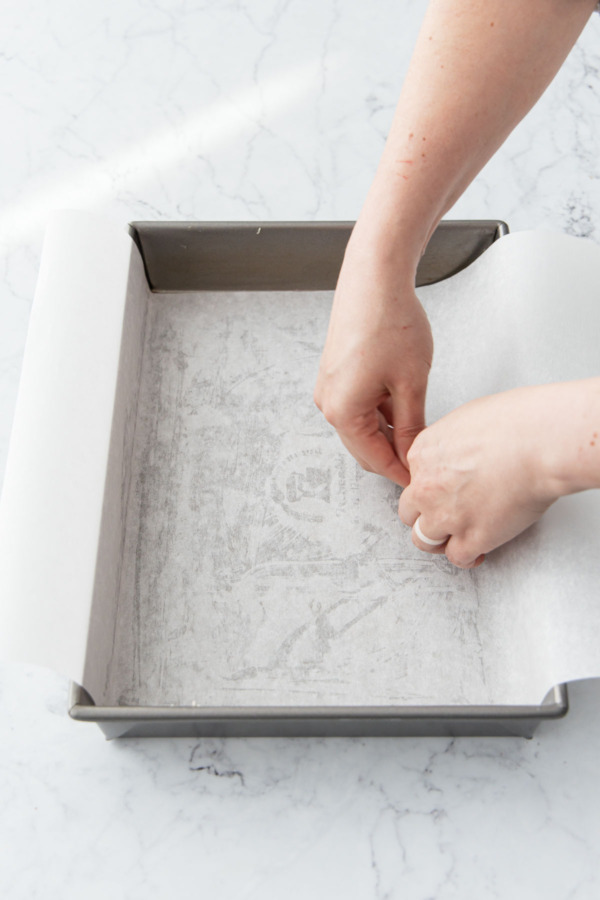
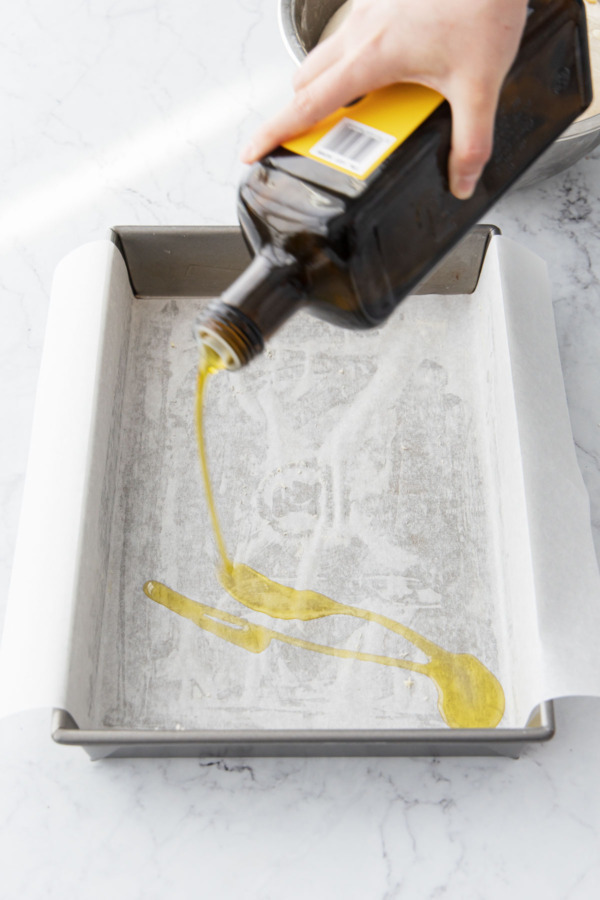
- Day 3: Shape and Bake: Butter and line a 13-by-9-inch light or medium colored metal baking pan with parchment paper; butter parchment, then rub a layer of olive oil over the entire surface, into the corners and up the sides.
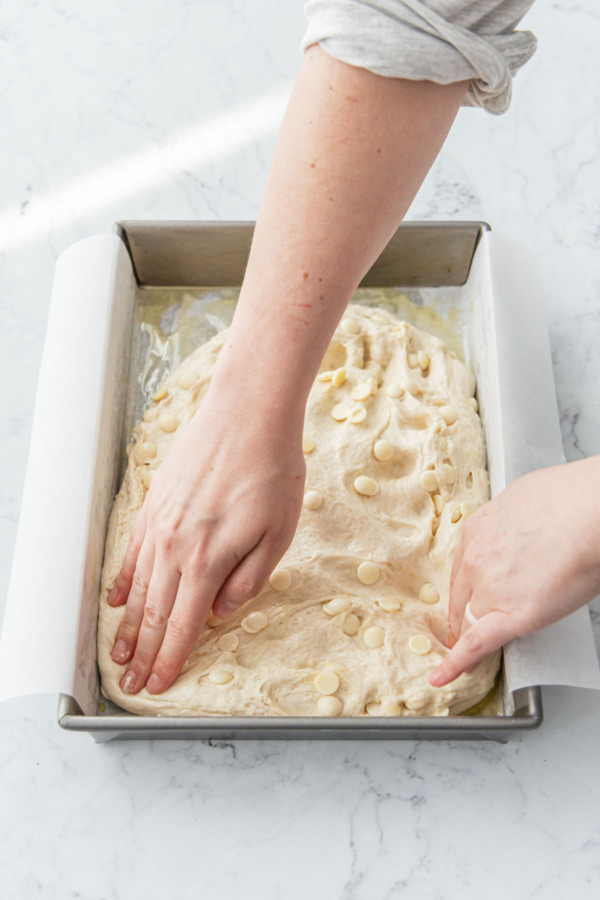
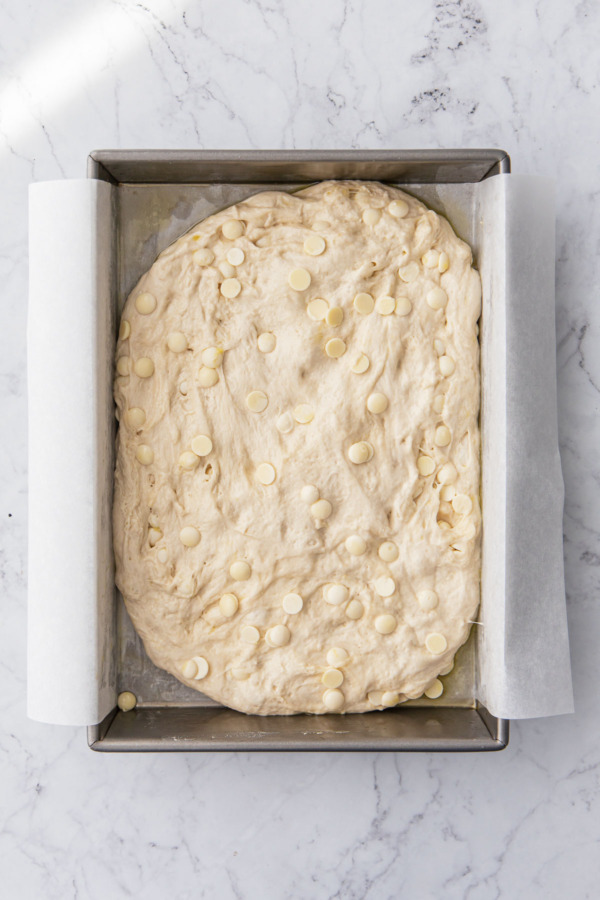
- Tip the chilled dough into the prepared baking pan, gently pressing and stretching the dough until it mostly fills the pan to the corners (it's pretty bouncy at this point, but just do the best you can). Drape pan with a clean kitchen towel or lightly oiled plastic wrap and set aside in a warm spot to rise (I like to use my oven with the light on).
- After 1 ½ to 3 hours, the dough should be doubled in size, noticeably bubbly, and very jiggly when you shimmy the pan.
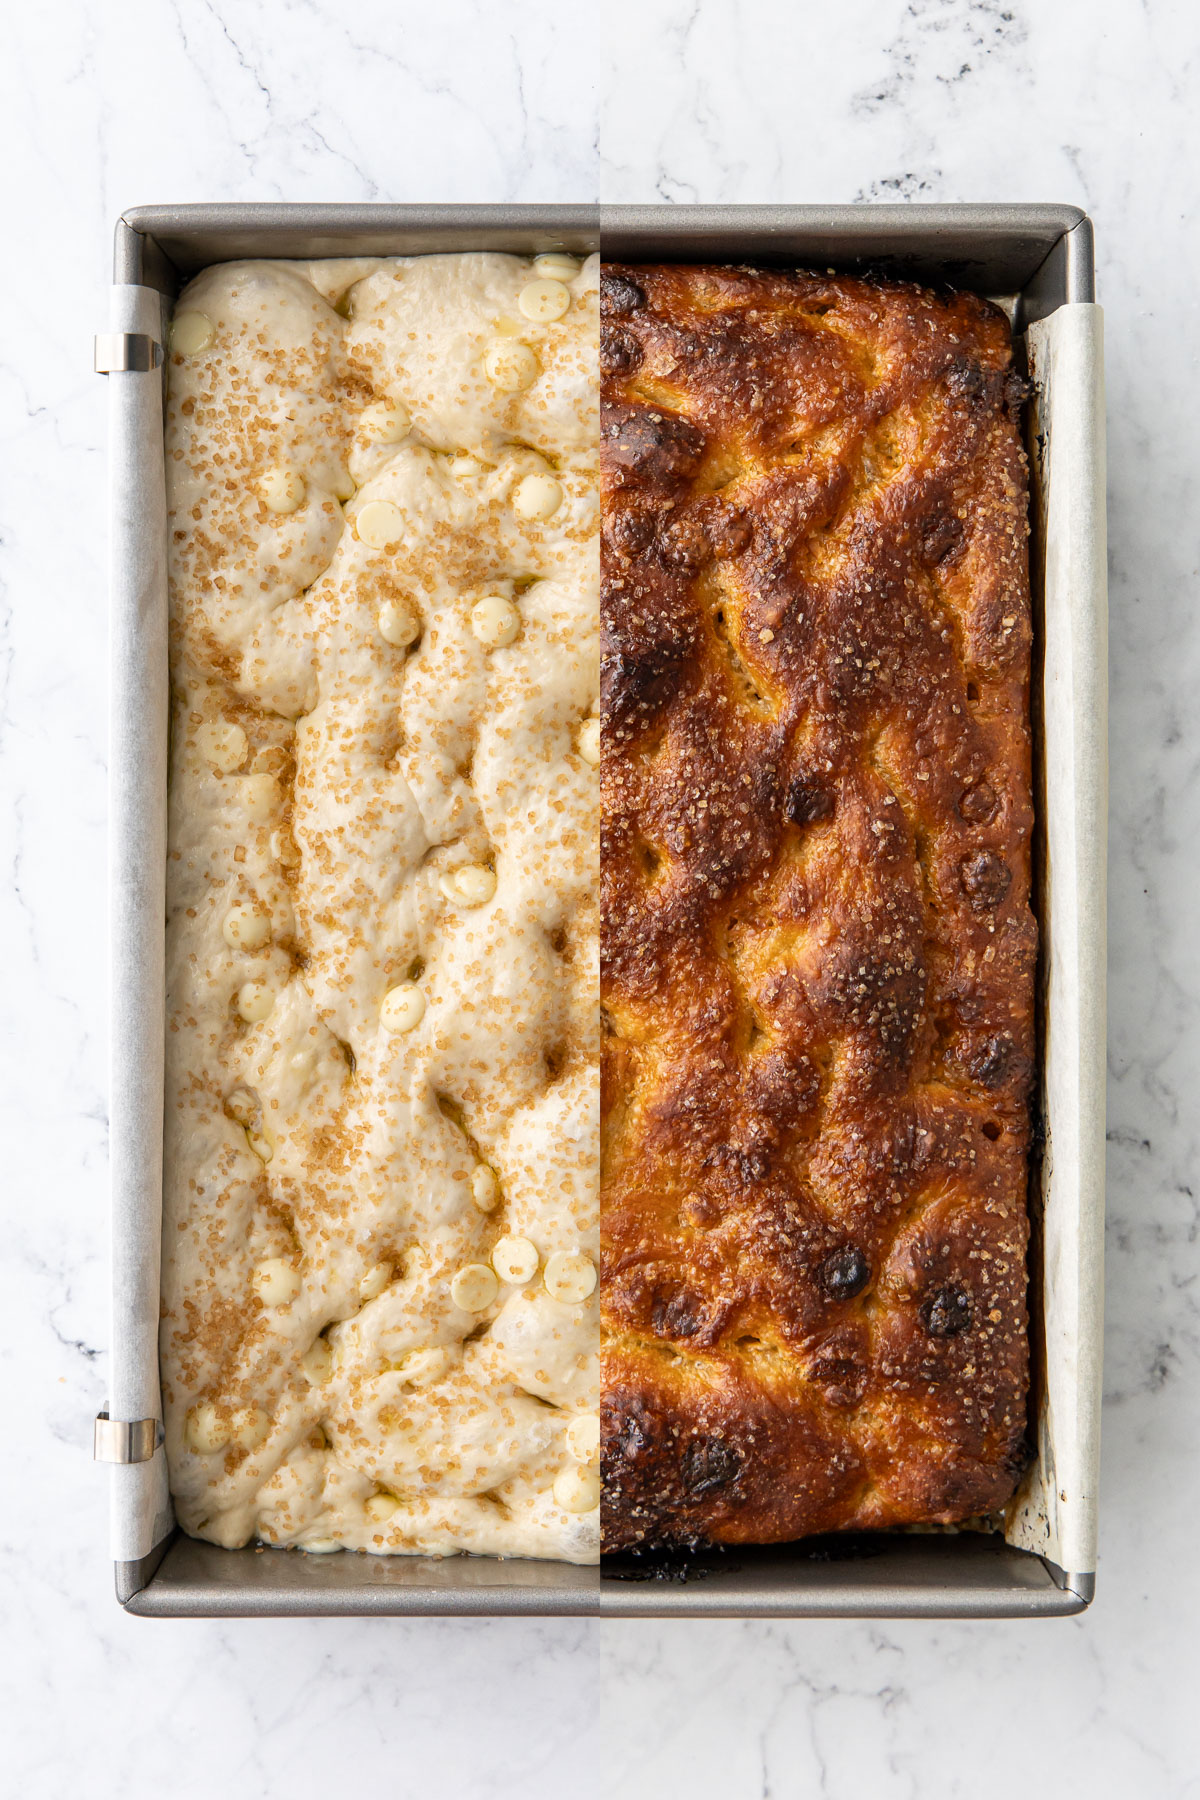
- Drizzle a tablespoon of olive oil over the top of the dough, and oil your fingertips as well. Press your fingers down into the dough over the whole surface, pressing it into the corners and forming the signature focaccia dimples. You want to go pretty deep with the dimples, to the bottom but not breaking through, and preserving the bubbles as best you can (you don't want to deflate the dough, just dimple it).
- Let the dough sit and rest for another 20 to 30 minutes while you preheat your oven to 425 degrees F.
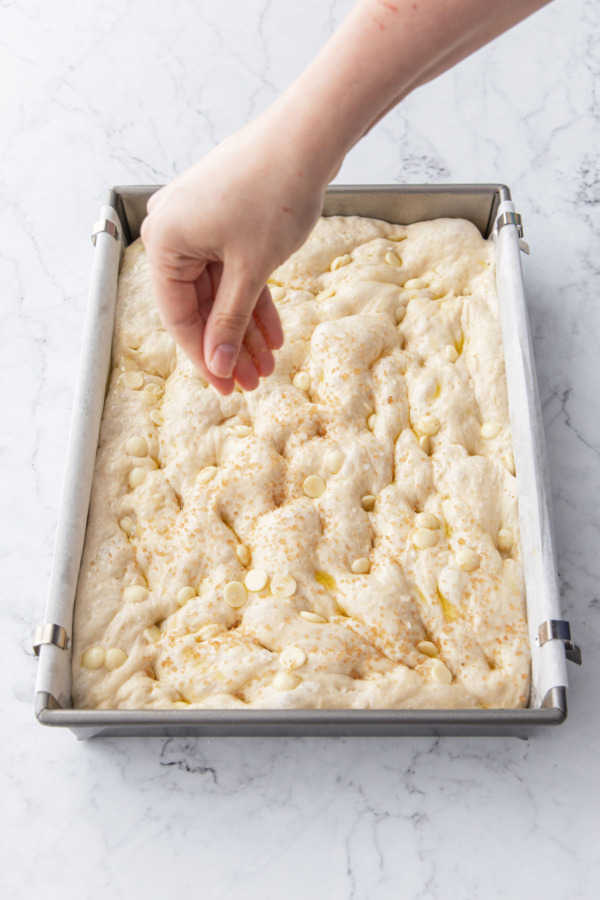
- Just before baking, sprinkle top of focaccia with flaky sea salt and about a tablespoon of turbinado sugar.
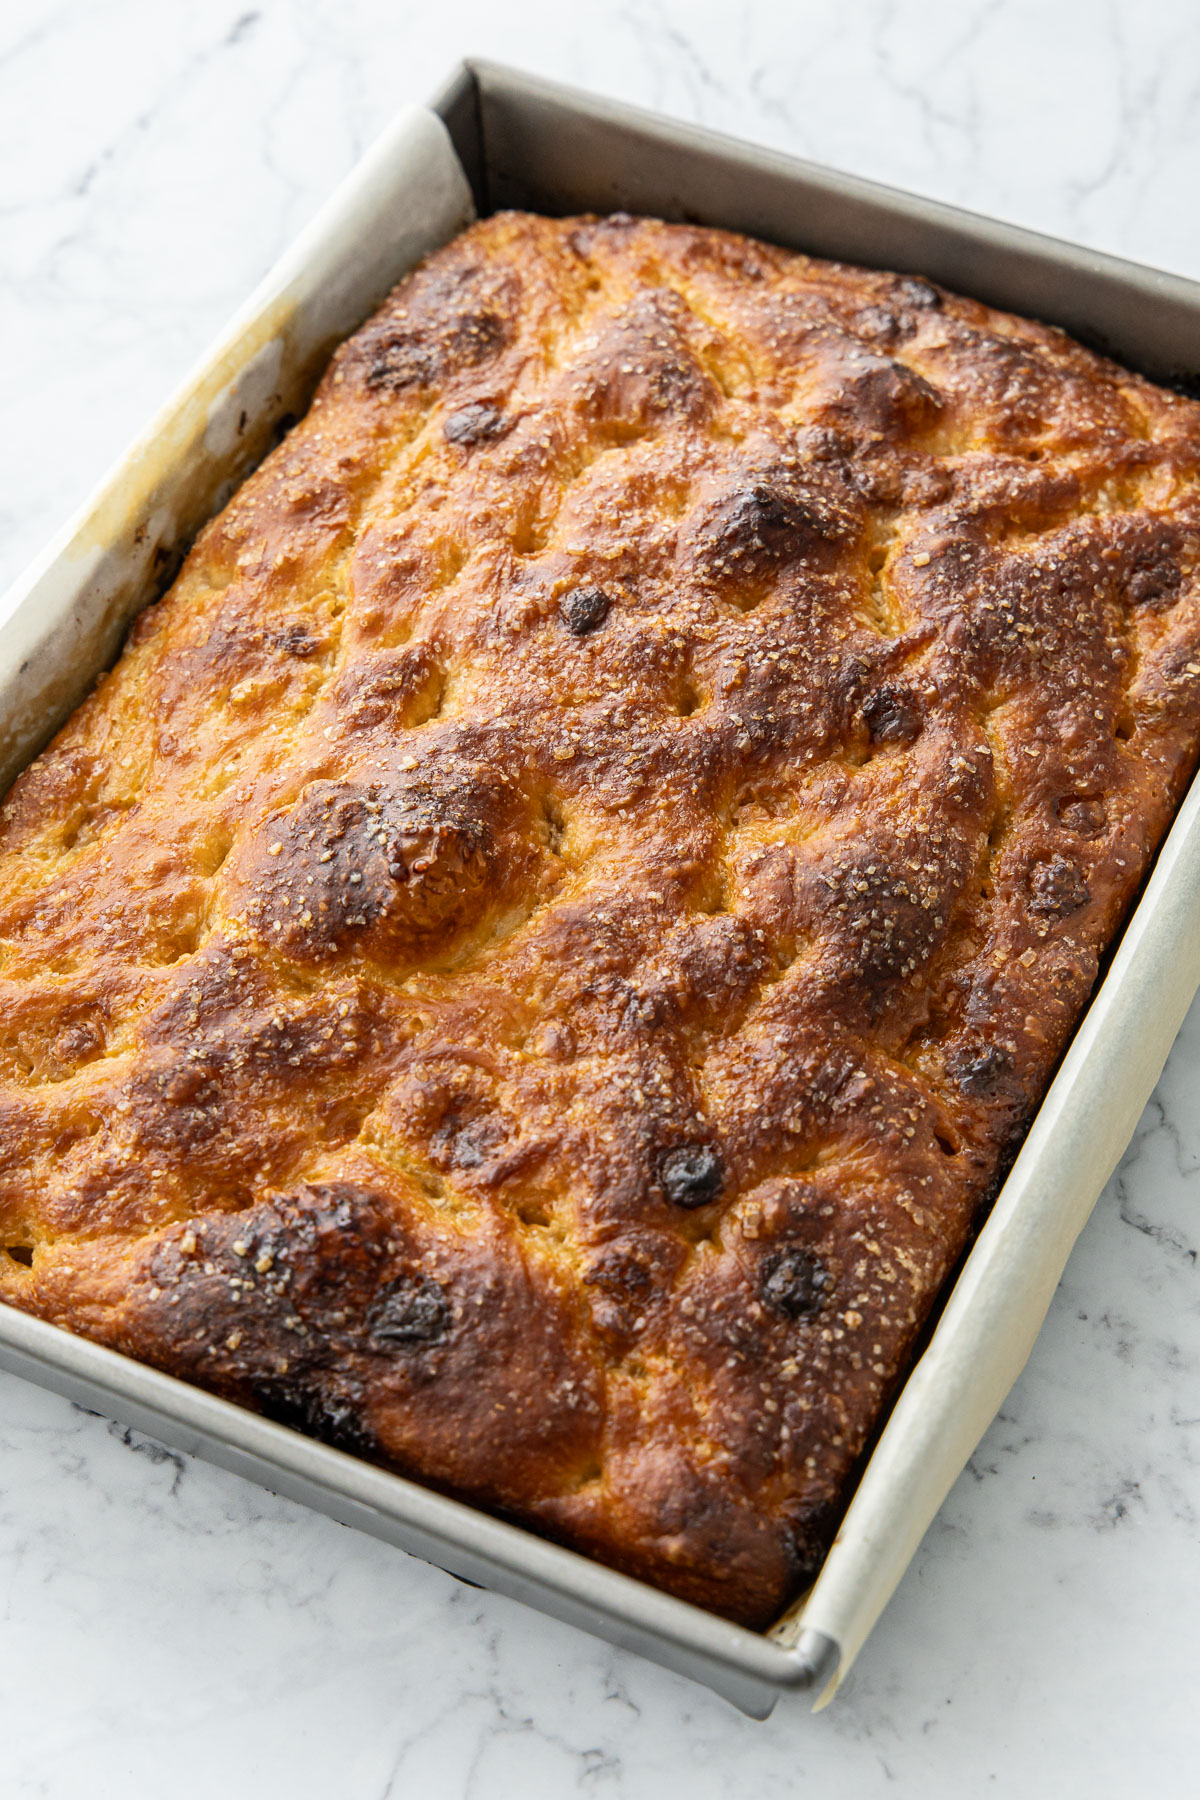
- Bake for 15 minutes, rotate the pan, then bake for an additional 10 to 15 minutes or until top is deeply golden brown and the edges are crisp (for an extra brown crust you can give it a second brush of olive oil in this interval). The internal temperature should be at least 200-205°F when done.
- Remove from oven and let cool for at least 45 minutes before slicing and serving warm or at room temperature.
- Leftover bread keeps well, loosely covered at room temperature, though it will loose its crispy crust overnight, particularly if it's humid. I like to rewarm it slightly before serving (about 5 minutes in a 350º oven should do it, or slightly longer/hotter if you want to bring back some of the crisp crust).
Notes
- Semolina rimacinata flour is a fine semolina flour often used in pasta making. It gives the bread a lovely authentic texture and subtle yellow color. You can replace it with an equal amount by weight of bread or 00 flour instead (100g is about 3/4 cup of bread flour; semolina is heavier which is why the volume is not equal).