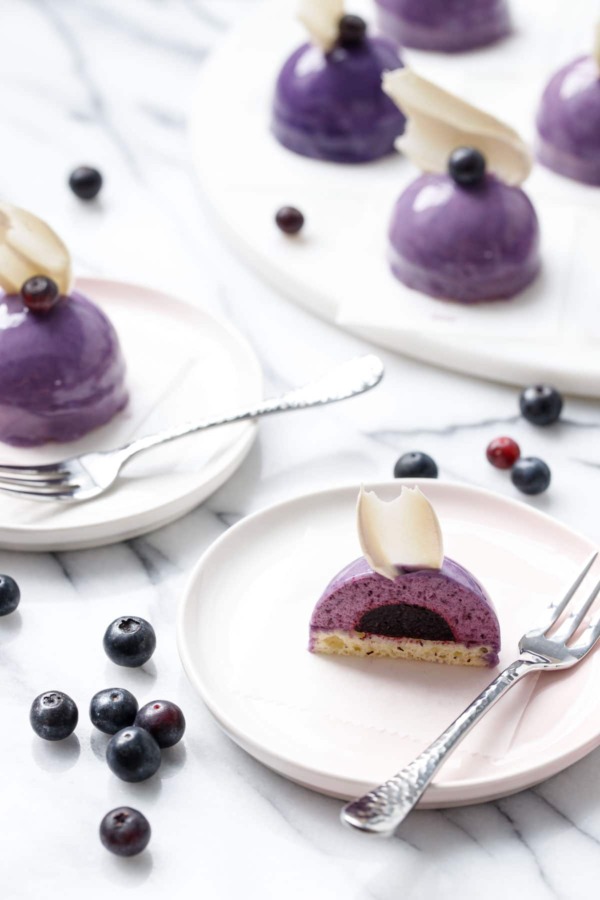
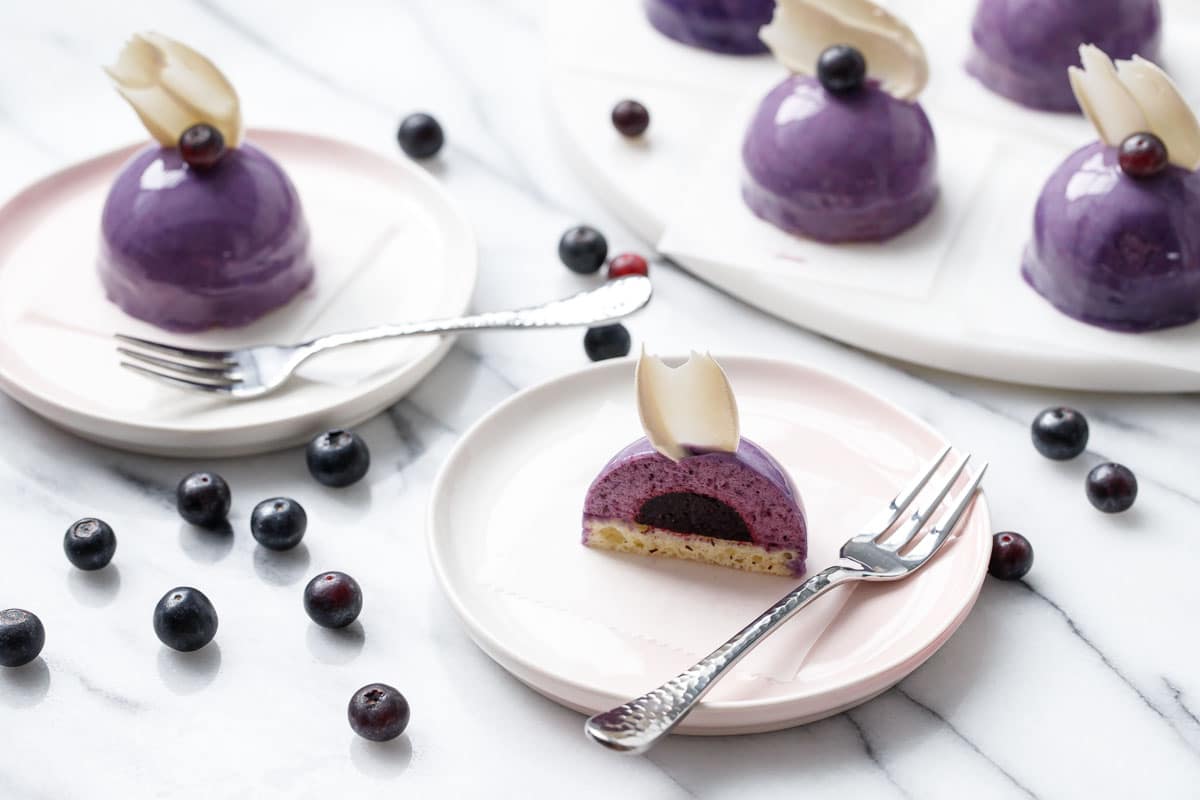
These impressive little cakes feature a fluffy blueberry mascarpone mousse surrounding a half-dome of intense blueberry gelée, with a layer of soft almond sponge cake and a gorgeously shiny mirror glaze to top it all off.
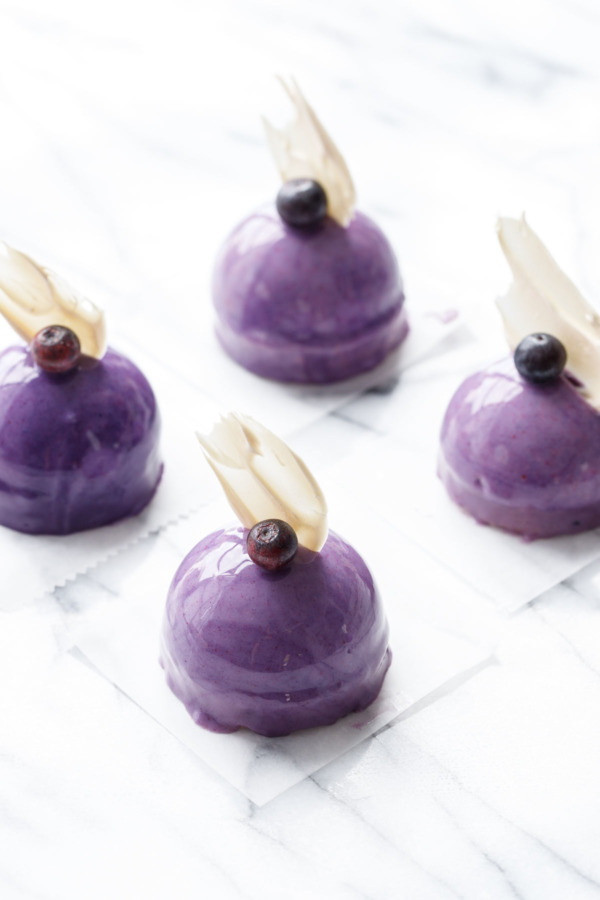
These blueberry mousse cakes might be small, but they are immensely impressive, mainly due to the perfectly shiny layer of vibrant purple mirror glaze that enrobes them. It’s a pretty time-consuming process, but split over a few days it is more than manageable.
I’ve had a set of silicone half-sphere molds for over 3 years now, having picked them up at E.Dehillerin in Paris. I used the mini size for truffles once, but otherwise they’ve just been sitting in the cabinet, waiting to be used. (I also picked up a set of cool but completely impractical triangle cake pans which I haven’t found a use for yet either.)
So when I found myself facing two tubs full of freshly-picked blueberries, making a fancy blueberry dessert worthy of a Parisian pastry shop seemed like just the ticket.
In my experience (and by experience I mean eating fancy desserts in every city I visit) I’ve learned that the fancier the dessert, the more layers it is likely to have. If you want to pretend to be a pro pastry chef, you need at least 4 different concoctions making up a single dessert. Yes, it takes some time to make and assemble all these different components (these cakes pretty much devoured an entire weekend before I devoured them) but the final result, as I think you’ll agree, is well worth it.
In technical terms, this is called an entremet cake, or a multi-layered mousse-based cake with various complementary flavors and textures. The recipe itself is quite similar to the Sakura Matcha Mousse cake I made this spring, with an airy mascarpone mousse and a tender sponge cake as the base.
Here I went with a subtle almond-scented cake, with a blueberry mousse and then a center of intense blueberry gelée (aka fancy jello) to really max out the blueberry flavor. But where it really gets fancy is the glaze – a luscious mirror glaze that gets its name from the gorgeous mirror-like sheen.
Now, my cakes certainly are not perfect by any means. This whole mirror glaze thing is definitely a technique that one needs to master, although it’s still pretty darn cool even when it’s less than perfect.
I’ve made lots of notes for myself about how I can improve things next time (like adding some sort of decorative edging to the base, like coconut or sprinkles, to hide the mess down there). I’m also not too keen on the transition from the mousse to the cake not being perfectly smooth, and feel it might work better to have the cake layer smaller and down inside the mousse rather than sitting on top of it.
And my attempt at a swirled glaze effect? My two tone purples weren’t different enough and so you can’t really tell there are two colors at all. Note to self: next time, make the colors more distinct.
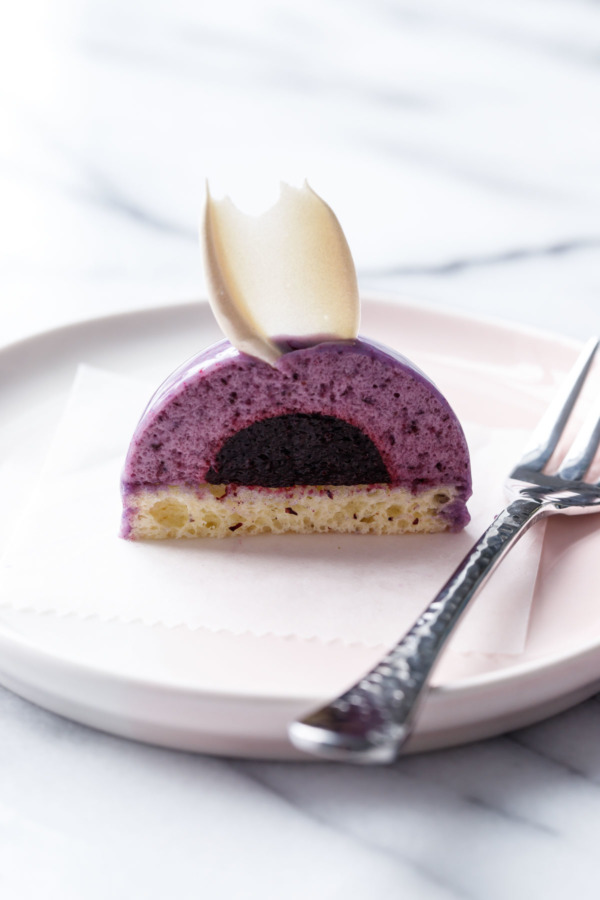
If the shiny exterior is impressive, then the cross-section is even cooler!
I played with both half-domes and coins of gelée: the later being easier to make if you don’t happen to have a mini semi-sphere mold. Simply pour your liquid gelée into a baking pan (lined with parchment with a handle overhang for easy removal) or, even better, a silicone cake pan (silicone is gelatin’s best friend). Let set, then cut out circles of the gelée with a cookie cutter. Otherwise, it’s the same process as the half-domes and looks equally cool when bisected.
For these cakes I used sheet gelatin, which I’ve recently discovered and feel is vastly better than the powdered stuff. You’ll need quite a bit of it, 10 1/2 sheets in total for this recipe, as every component but the cake uses gelatin for stability. And the mirror glaze only works because of gelatin. I’ve included notes in the recipe below if you’d like to use powdered gelatin instead (as a general rule, 1 sheet equals one teaspoon of powdered).
The cakes use these small half-dome molds which are about 1.6″ in diameter (and the gelée is molded with the mini size). You could also use a larger semi-sphere mold for your cakes (and I admit, these are definitely less than a single serving worth). If you use a different size, just choose an appropriate sized circle cutter so your rounds of cake match the diameter of the molds exactly and you should be good to go.
If you prefer to make a single large cake instead, follow the process used for my Sakura Matcha Mousse cake made in a 6″ cake ring (but a 6″ silicone cake mold or springform pan would work too). The quantities here should be just right for one 6-inch cake.
After freezing overnight, the cakes will pop out of the molds cleanly and easily. Aren’t they precious?
This freezing step is critical – don’t skip it! The cakes need to be completely frozen solid in order to come out of the molds cleanly and offer a solid base for the glaze. I recommend working in batches, glazing half your cakes while the other half chills out in the freezer.

Mirror Glaze Tips & Tricks
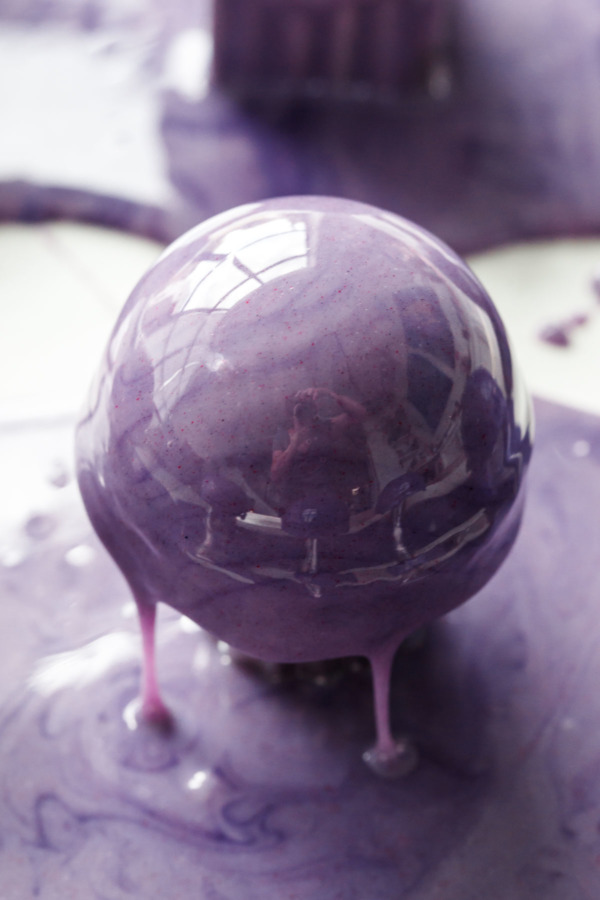
Let’s talk about this mirror glaze (which, you can see in the photo above why it’s called that – you can easily see yours truly reflected in the glaze). It’s something I’ve been wanting to try it ever since I saw Phillip’s mirror glazed cake (in fact, I almost considered bribing him to come over and help me). It is a little bit tricky at first, although I wouldn’t necessarily call it hard, so don’t be daunted by the lengthy instructions. Just read it thoroughly, get your setup right, and you should have no issues whatsoever.
With a mirror glaze the key is the proper temperature. You want it to be around 90 degrees F when you pour it. Any warmer and it won’t make a nice thick layer, any cooler and it won’t flow smoothly enough to fully coat the cake. Mine took around 45 minutes to fully cool. (According to Phillip you can also make the glaze ahead of time, then rewarm it very gently until it reaches the desired 90 degrees).
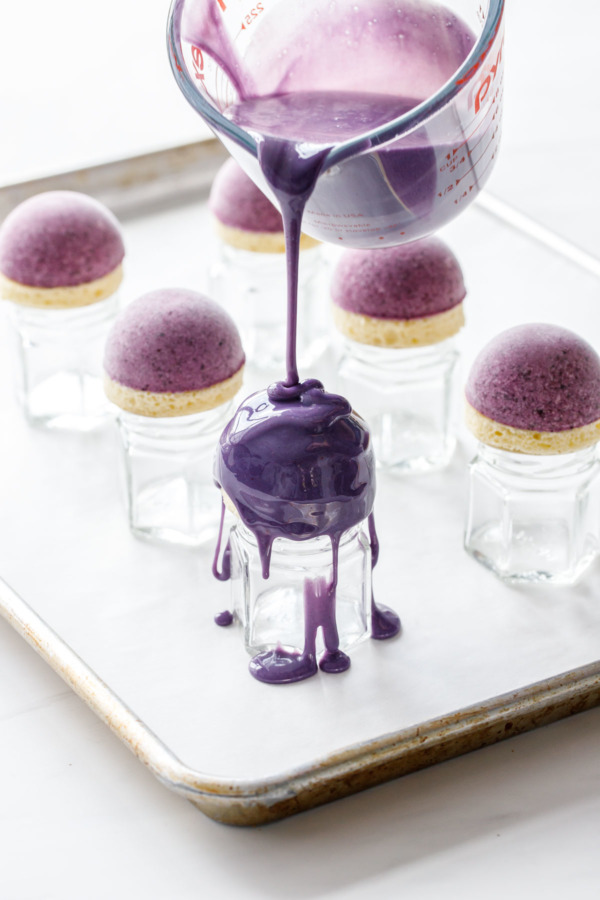
Arrange your frozen cakes on a lined-sheet pan (trust me, it’ll make cleanup so much easier). Use some small jars or other washable bits to raise the cakes up off the pan. Ideally these bits will be smaller in diameter than the cakes themselves, so the glaze can drip off the edges freely. I used some small 2oz canning jars I had, and then some various small cookie cutters for the second batch.
I also cut out rounds of cardboard from an old bakery box exactly the size of the base of the cakes. This gave the cakes a nice stable base and made them easier to move around. After glazing, ideally I would have had some small cake boards to serve as their final resting place (I just used squares of parchment).
I attempted to create a swirl effect with light and dark purples, but the colors weren’t distinct enough so the swirl sort of gets lost. The purple color is still darn pretty though (and I really think that darker, richer colored mirror glazes are much more striking than pastel ones).
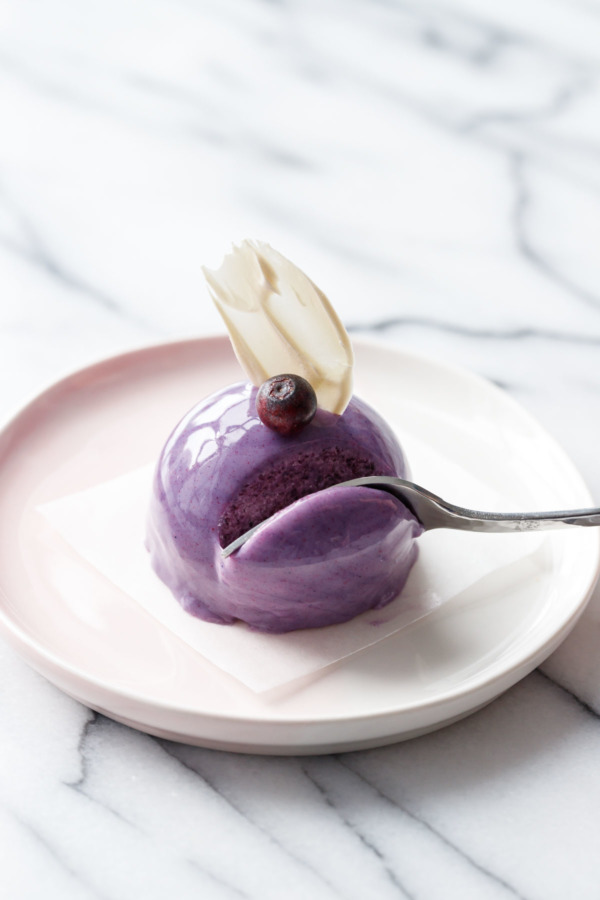
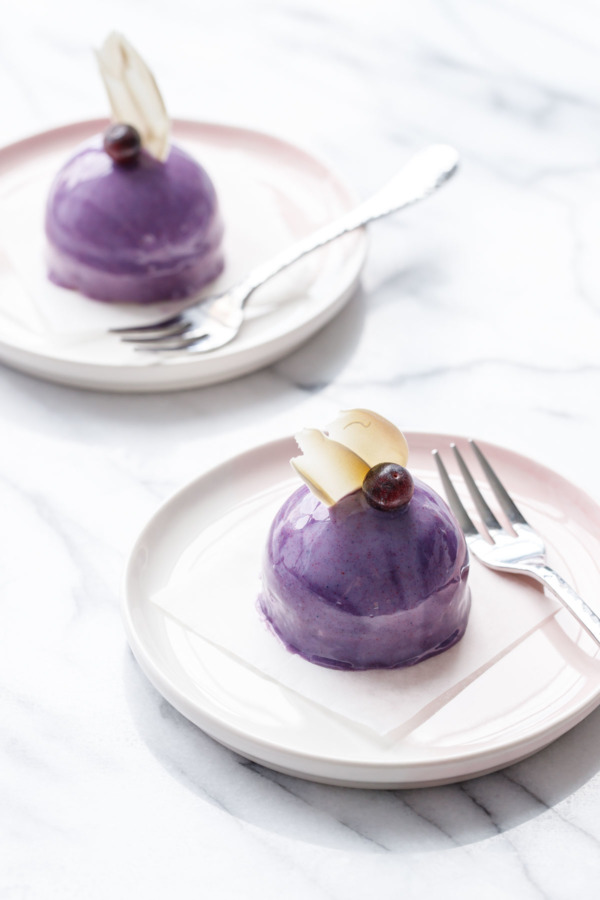
I topped my cakes with a swash of white chocolate (use a small offset spatula to spread some white chocolate or white candy coating on parchment paper, let set then peel off) and a fresh blueberry dusted with iridescent powder.
I think it makes for an artful presentation without too much fuss.
Ok, maybe just a little fuss. :)
Scheduling Your Time
In terms of timing, you need at least 3 days for this whole process, or you can spread it out even longer, which makes it much more manageable than tackling it all in one go. While the gelee and mousse steps need at least an overnight freeze, they are totally fine freezing longer than that, so plan your time accordingly.
My ideal schedule is 3 days: make the blueberry puree and gelée on day 1, the cake and the mousse on day 2, freeze overnight and then glaze them on day 3. But you could stretch out the entire process over 5, 6 or even 7 days, focusing on one single component each day.
The glazed cakes also keep surprisingly well, so you can easily finish them a day or two before you plan to serve. Keep them refrigerated if you do make them ahead of time, although I recommend letting them come back to room temperature prior to serving (the mousse’s cloud-like texture really shines when it’s not too cold).
You can also freeze the finished glazed cakes (arrange them in an airtight container so they are not touching since they’ll stick to each other). Let them come to room temperature for 30-45 minutes before serving. The glaze won’t be quite as shiny as freshly glazed cakes, but it’ll still be perfectly delicious!
Size & Scaling
This recipe as written will make approximately fifteen 1.6-inch domes, twelve 2.5-inch domes or ten 3-inch domes (all with 1-inch gelee centers), and can easily be halved or doubled (assuming you have enough dome molds for a double batch).
If you use a different size mold, be sure to choose an appropriate sized circle cutter so your rounds of cake match the diameter of the molds exactly and you should be good to go.
If you prefer to make a single large cake instead, the quantities here should be just right for one 6 or 8-inch cake (use a round silicone pan, or a cake ring or springform pan lined with acetate. The assembly process will be similar to my Nutella Mousse Cake, just swap the brownie for the blueberry gelee). The quantities here should be just right for one 6-inch cake, or a thinner 8-inch cake (maybe increase the mousse portion of the recipe by 1.5x if you’re doing an 8-inch cake; the other components should be fine as is).
(Note: this recipe was updated in July 2023 to include ingredient weights; also, the the blueberry mousse method was rewritten so chilled mascarpone is whipped in with the heavy cream, then folded into the blueberry puree. In our experience this made the mousse smoother and not as prone to a ‘curdled’ appearance as the previous method.)
Mini Blueberry Mousse Cakes with Mirror Glaze
Ingredients
For Blueberry Gelée:
- 8 oz / 226 g (1 1/2 cups) fresh or frozen blueberries
- ¼ cup / 50 g granulated sugar, divided
- 3 teaspoons / 15 g lemon juice, divided
- 1 ½ sheets leaf gelatin*
- 2 tablespoons / 30 g water, plus more for blooming gelatin
For Cake:
- 2 large eggs, separated, at room temperature
- ¼ cup / 50 g granulated sugar, divided
- 1 tablespoon / 15 g milk
- ¼ teaspoon almond extract
- 6 tablespoons / 40 g cake flour
- 2 tablespoons / 15 g almond flour
- ¼ teaspoon fine sea salt
For Mousse:
- 3 sheets leaf gelatin
- ½ cup / 75 g blueberry purée
- ½ cup / 112 g mascarpone cheese, chilled
- ¼ cup / 50 g powdered sugar
- ¾ cup / 180 g whipping cream, chilled
- ½ teaspoon vanilla extract
- ¼ teaspoon almond extract
- pinch fine sea salt
For Mirror Glaze:
- 6 sheets leaf gelatin*
- 1 cup / 200 g sugar
- ⅔ cup / 226 g corn syrup or glucose syrup
- ½ cup / 120 g water
- ½ cup / 163 g sweetened condensed milk
- 7 ounces / 200 g good quality white chocolate, finely chopped
Instructions
To make the blueberry purée and gelée:
- Combine blueberries, 2 tablespoons sugar, and 1 1/2 teaspoons lemon juice in a small saucepan. Bring to a simmer over medium heat, smashing berries slightly as you stir, until blueberries are softened and bursting.
- Transfer to a blender or food processor (take caution when blending hot liquids) and purée until completely smooth. You should have 1 cup of blueberry purée.
- Measure out 1/2 cup of purée and place back into saucepan. Put the remainder in a jar or airtight container and refrigerate it for later (you will need it for the blueberry mousse).
- Cut gelatin sheets into 1-inch strips and submerge in cool water for at least 5 minutes to soften. If using powdered gelatin, sprinkle 1 1/2 teaspoons over 2 tablespoons of cool water.
- Add remaining 2 tablespoons sugar and 1 1/2 teaspoons lemon juice, along with 2 tablespoons water to saucepan with purée. Heat until it just barely begins to bubble.
- Wring out softened gelatin with your hands, squeezing out as much water as you can (for powdered gelatin, just add it straight to the pan, liquid and all). Add to saucepan with warm blueberry mixture and whisk until completely dissolved.
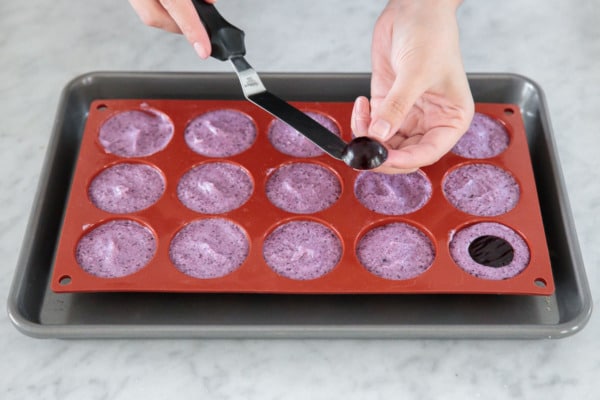
- Pour blueberry mixture into 1-inch silicone sphere molds. Alternatively, you can use a parchment-lined cake or baking pan (about 8 inches in size). Line with parchment, leaving handles overhanging the sides to allow for easy removal of the set gelatin. You'll cut 'coins' of gelée out of this larger piece, instead of using small half-spheres in your cakes.
- Refrigerate overnight until completely set, then gently remove from molds (it might help to freeze for 20 or 30 minutes to make the spheres easier to remove).
To make the sponge cake:
- Preheat oven to 350 degrees F. Line a quarter sheet pan (approximately 13-by-9-inches in size) with aluminum foil or a silicone baking mat; grease or butter foil (parchment works as well, though I found it wrinkled the cake a bit).
- Place egg yolks in a bowl; vigorously whisk with 3 tablespoons of sugar until lightened in color. Whisk in milk and almond extract.
- Sift in the cake flour and almond flour; add salt and fold until just incorporated.
- In a clean bowl, whip egg whites until frothy. Add remaining 1 tablespoon sugar and beat until whites hold medium peaks. Fold 1/3 of whites into batter mixture to lighten, then scrape the batter mixture into the bowl with the whites, folding until just incorporated and no pure white streaks remain.
- Pour batter into prepared sheet pan, spread into a thin, even layer. Bake for 9 to 11 minutes or until cake is spongy to the touch and just barely starting to darken around the edges. Let cool completely.
For the blueberry mousse:
- Cut gelatin into 1-inch strips and submerge in cool water to soften.
- Meanwhile, rewarm reserved 1/2 cup blueberry purée in a saucepan over medium heat until it is once again smooth (whisk it vigorously to break up any remaining chunks left after refrigeration). Wring out water from softened gelatin and add to warm blueberry purée; whisk until smooth. Set aside and let cool to lukewarm.
- In a clean bowl or the bowl of a stand mixer, beat heavy cream until frothy, then slowly add powdered sugar. Add mascarpone, then continue to whip until it holds soft peaks. Add almond and vanilla extract, then fold in cooled blueberry mixture until fully incorporated.
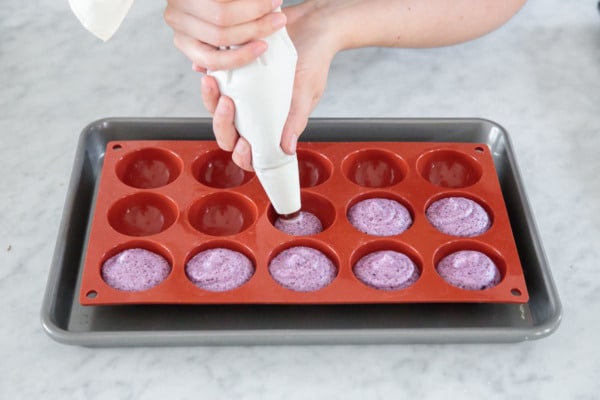
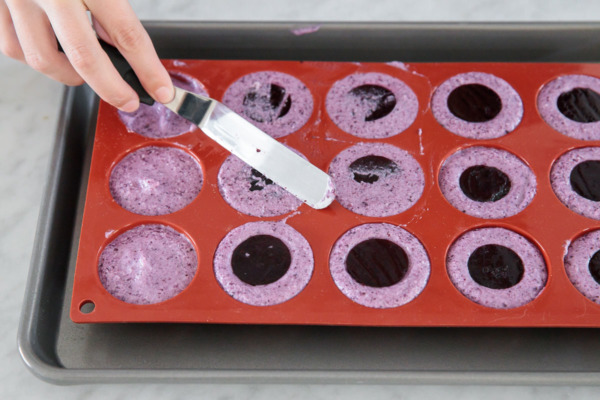
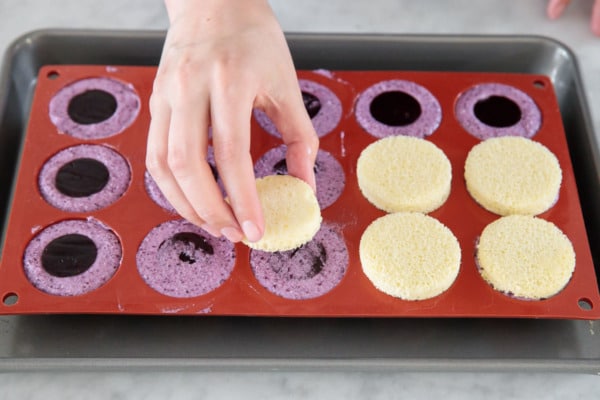
- To assemble your cakes, spoon or pipe the mousse into silicone molds, not quite all the way full. Gently press a gelée sphere, curved side down, into the top of each mousse-filled mold. Scrape with an offset spatula to make the top perfectly level with the top of the mold. Finally, cut out rounds of sponge cake exactly the same size as the base of the molds and press onto the top of the mousse. Freeze at least 3 hours or overnight until completely firm.
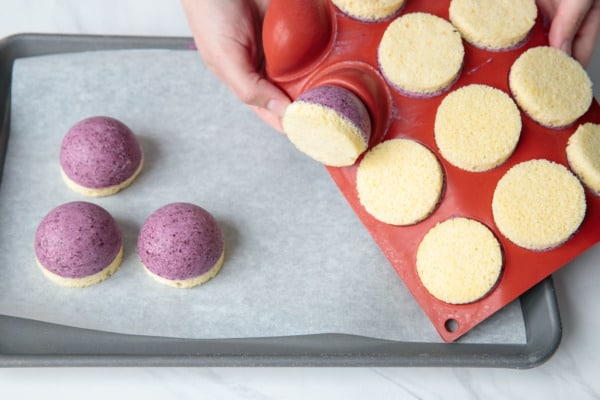
- Before you make the glaze, remove cakes from molds and place on a frozen cookie sheet lined with parchment paper. Return to freezer until just before glazing.
For Mirror Glaze:
- Cut gelatin into 1-inch strips and submerge in cool water for at least 5 minutes to soften. Place white chocolate in a heat-proof bowl and set aside.
- Combine sugar, corn syrup, and water in a saucepan and bring to a boil over medium heat until sugar is completely dissolved and mixture is clear.
- Remove from heat, then add gelatin (squeeze out as much water as possible first) and whisk until dissolved. Whisk in sweetened condensed milk. Pour hot mixture over chopped white chocolate and let sit for 30 seconds, then stir until chocolate is completely melted and mixture is smooth (you can also use an immersion blender if you have one to expedite this process, just try not to mix air bubbles into the glaze if possible).
- Let glaze cool, stirring occasionally, until glaze reaches approximately 95 degrees F on an instant-read thermometer. The glaze needs to be the correct temperature or it will not form a thick enough layer on the outside of the cakes.
- When the glaze reaches 95-96 degrees, add powder or gel food coloring as desired. Darker colors tend to look particularly striking with this glaze technique. You can also divide your glaze up into multiple colors and then swirl them if you'd like.
- Remove cakes from freezer and place on a parchment lined cookie sheet, elevated off the sheet using small jars or cookie cutters (ideally something smaller in diameter than the cake itself so the glaze can drip off). You may also want to cut out small rounds of cardboard (I used an old bakery box) to place under each cake to make them easier to transfer. If you have more than 6 or 8 individual cakes, I recommend working in two batches. You can always rewarm the glaze if it gets too cool (do so gently over a double boiler or in very short intervals in the microwave).
- Pour glaze generously over cakes, taking care to ensure there are no bare spots left. Allow the excess glaze to drip off for 5 or 10 minutes, then gently scrape the edges to remove any remaining drops. Carefully transfer cakes using a small offset spatula to cardboard cake rounds or small pieces of parchment paper for easy movement. Any leftover glaze can be scraped up and refrigerated in an airtight container for later use.
- Glazed cakes will keep in the refrigerator for up to 5 days. Let come to room temperature before serving.
Notes
- * To substitute powdered gelatin, use 1 teaspoon of powdered gelatin per 1 sheet of leaf gelatin called for in this recipe. Instead of softening the gelatin in cold water and then wringing it out, you'll need to sprinkle the gelatin over a few tablespoons of cool water to allow it to soften, then add the whole mixture to the hot liquid to dissolve.