When it comes to bake sales, not all baked goods are created equal. You want something sturdy enough to be transported, stable enough to survive without refrigeration, and something that will taste just as good after a week than the day it was made.
Homemade Oreos, as it turns out, are the perfect bake sale treat, their crispy texture is still great days later and they keep quite well at room temperature (though I recommend refrigerating the cookie dough-filled ones long-term since that filling doesn’t set up quite as firmly as the original). They’d also be great cookies for holiday care packages or cookie swaps for similar reasons.
They are also the kind of treat that will fly out the door with surprising speed (I really should’ve baked more!) I brought 20 packages of cookies and they sold out within an hour (apologies to those who came later and missed out… I’d encourage you to try making them yourself!)
These chocolate sandwich cookies were my contribution to the Sweet Relief Bake Sale this past Saturday, which raised over $1,200 for hurricane relief efforts in Houston (WOW!)
After deciding to put on another bake sale, I decided pretty quickly what I wanted to bake, having just received the newly released Bravetart cookbook and falling hard for the gorgeous homemade Oreos that grace the cover.
(I was also planning to bake a pan of my famous cookie dough brownies… but a slight, er, mishap when transferring them to the fridge proved the buttered toast principle also applies to brownies: when dropped, they will always land upside down. So much for that plan.)
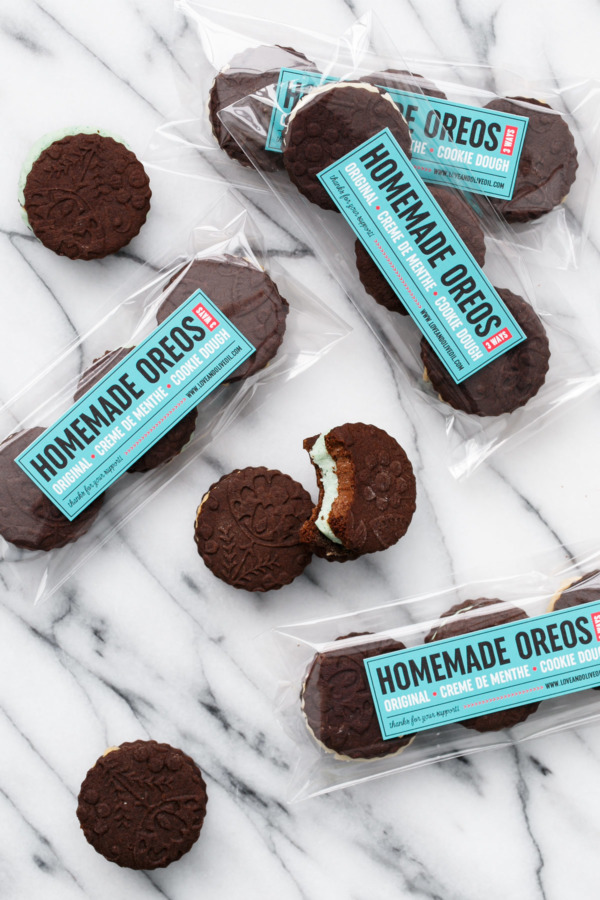
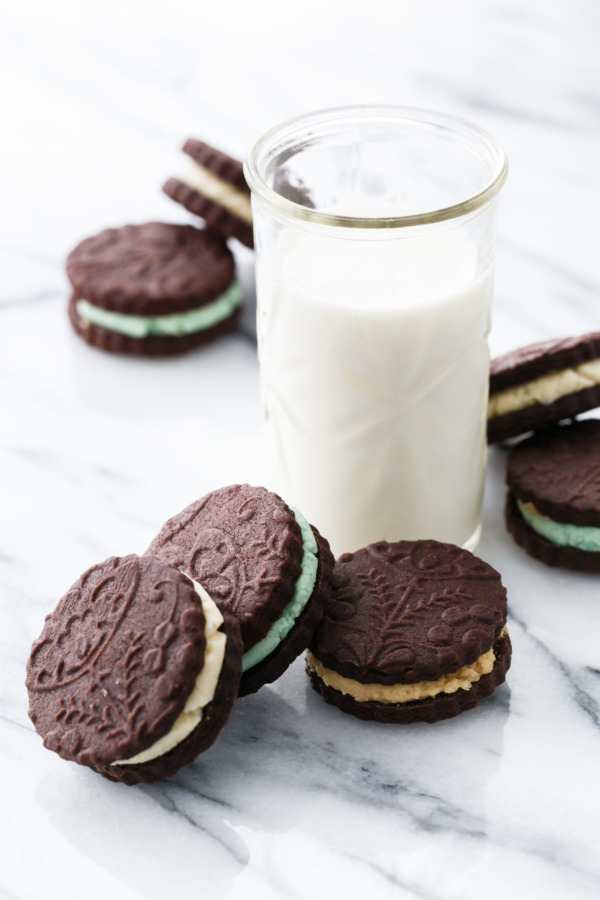
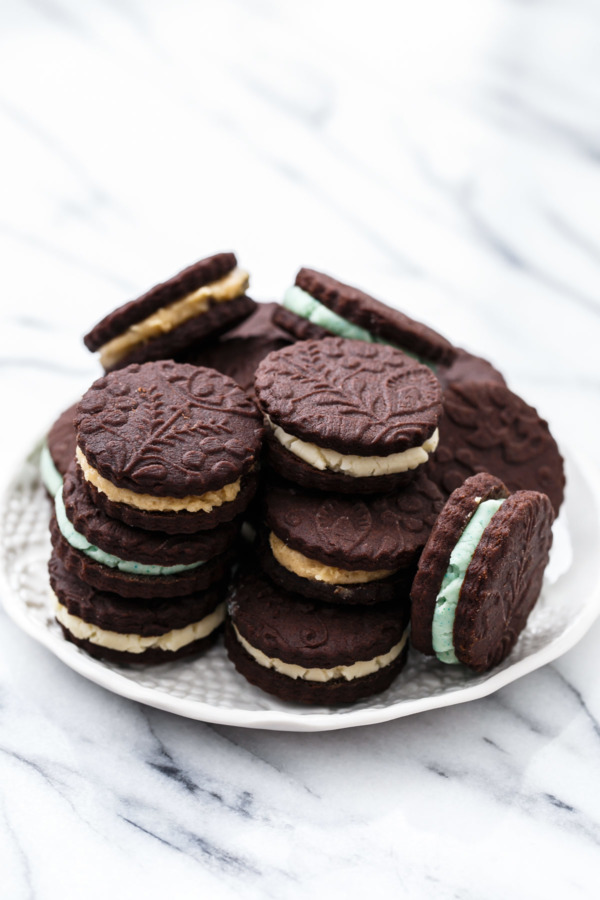
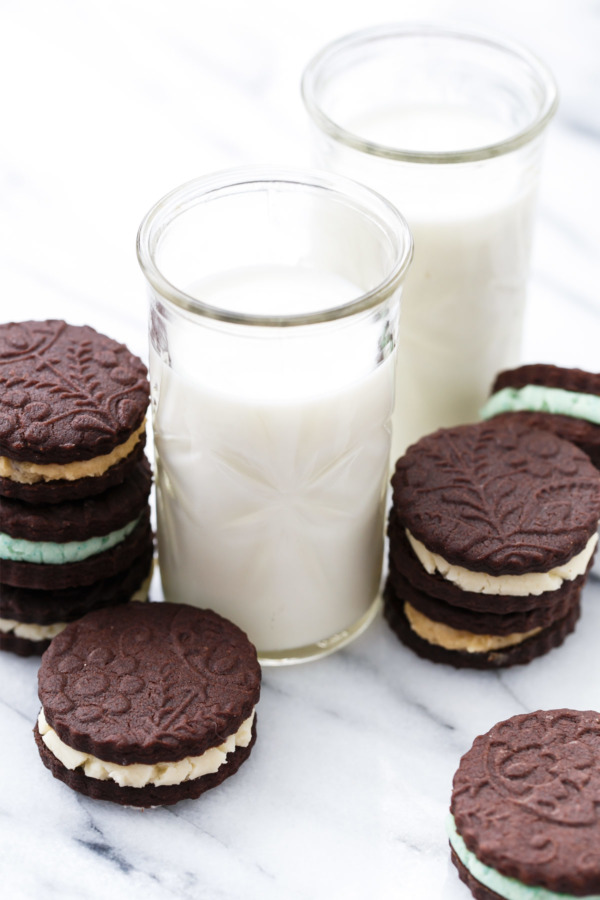
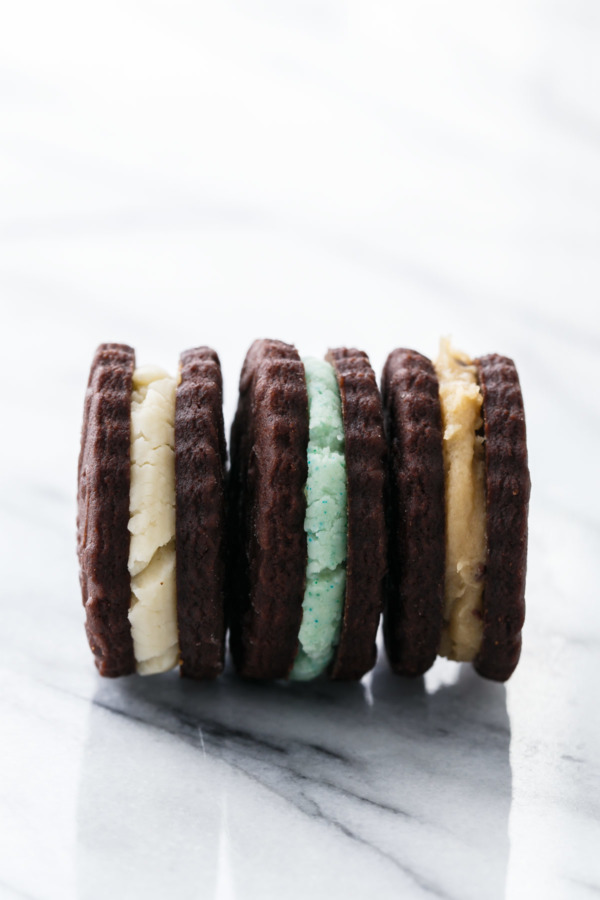
I opted to package my cookies in sets of 3, an Oreo threesome if you will, with an original, creme de menthe, and cookie dough in each package.
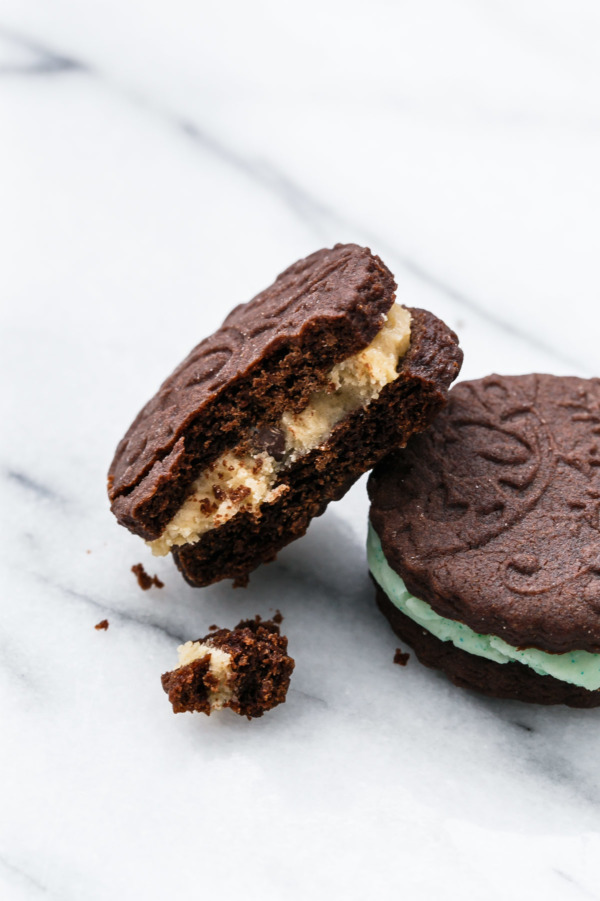
I’ve made Cookie Dough Oreos before, and used the same filling recipe here but with Stella’s cookie base. The original and creme de menthe flavors used the filling recipe from the book (for creme de menthe, leave out the vanilla and add 4-5 drops of creme de menthe flavoring oil as well as a drop of green and a drop of turquoise gel food coloring).
The cream filling is different from every other Oreo cookie recipe I’ve seen, and while it isn’t an exact match to the flavor of the commercial cookies (a taste you really can’t acheive without a bunch of artificial crap) it’s really quite close. Keep in mind the filling must be used immediately (it should still feel warm when you’re piping it) as it sets up very firm and very fast. Have your cookies baked and cooled and arranged (I had half of my cookies flipped over already before I even started making the filling).
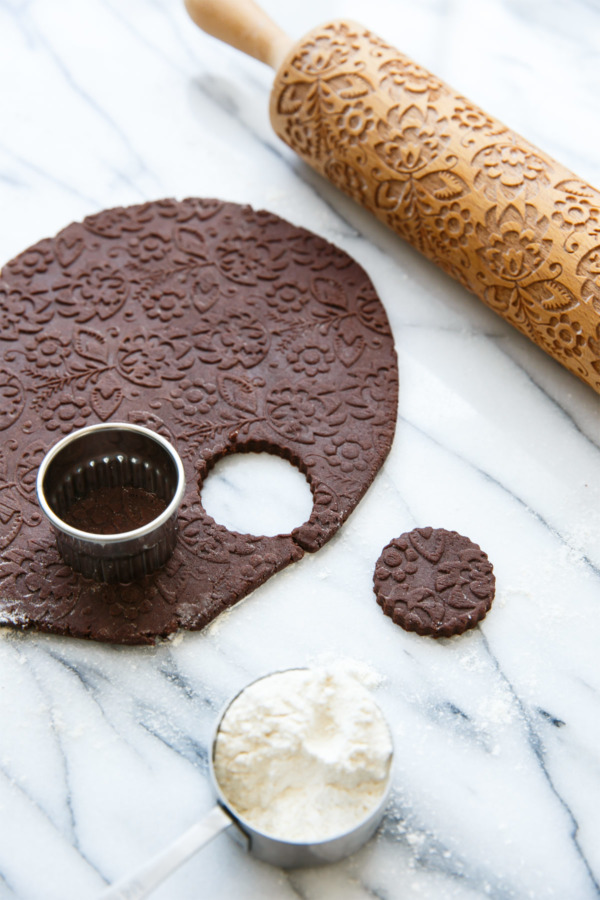
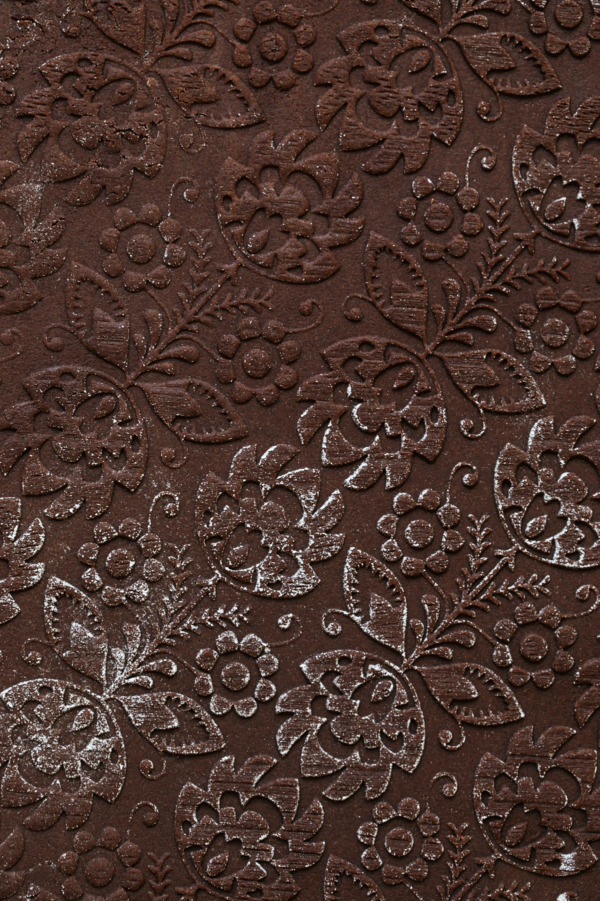
I used an embossed rolling pin I bought on Etsy a while back and had yet to use. It really makes for a stunning presentation, although my designs didn’t come out quite as defined as the cookies on the book cover. I have another rolling pin with cats on it (because, why wouldn’t I buy such a thing?) but it was a shallower embossing and didn’t show up quite as well on the final baked cookies.
My cookies are a little bit thicker and didn’t darken quite as much as those in the book. Regardless, keep an eye on the bake time. The first batch I baked for 15 minutes as specified in the book was thoroughly burnt. For me, with my oven and preferred baking sheets, 12 minutes was spot on.
The recipe is pretty specific about a few ingredients, and I chose to heed such recommendations, including purchasing organic powdered sugar (from Whole Foods), Diamond kosher salt, and Lyle’s golden syrup just for this recipe. The book explains why these particular ingredients are recommended, which I appreciated. The only thing I didn’t use was the coconut extract, which I want to try next time as it supposedly adds a more authentic Oreo flavor.
An interesting note about salt: the Diamond Crystal kosher salt Stella recommends is one of the few 100-percent-pure salts on the market (other salts likely have additives or anti-caking agents). However, the flaky texture of this salt means it is lighter than other brands of kosher salt and thus requires more volume for the same saltiness, so adjust accordingly, or just measure your salt by weight and use an equal amount in grams no matter what brand or type of salt you are using.
9 grams = 3 teaspoons of Diamond Crystal = 2 1/4 teaspoons of Mortons = 1 1/2 teaspoons table salt.
I’ve always used Mortons out of habit/availability (and humidity), but I think I’m quickly becoming a Diamond Crystal convert. :)
Here’s a great article on why the different kinds of salts are so vastly different. For recipes using a very small amount of salt like this one, the difference likely won’t be noticeable, but in larger quantities you definitely want to pay attention to the type of salt called for and adjust accordingly.
Speaking of weights… if you don’t have a kitchen scale, get one now. Technical bakers will love the precision and ease of baking with a kitchen scale. I have myself realized that baking by weight is, despite what you might think, actually way easier. Instead of counting cups of flour, I just dump it all in a bowl until it hits the magic number, and don’t need to worry about inconsistencies or mis-measurements. Plus, as an added bonus, you don’t have a bunch of measuring cups to wash.
I’ve been making a habit of developing my recipes with weights as well as cup measurements as of late, which accurately reflects the way my own baking style has changed over the years. It also makes it far easier to halve or double recipes (if you’ve ever tried to halve a 1/3 cup you’ll know what I mean).

Homemade Oreos
Homemade Oreo cookies are a true classic and a perfect bake sale recipe. Try making them with different flavored fillings!

Ingredients:
For Cookies:
- 1 stick (1/2 cup) unsalted butter, at room temperature
- 1/2 cup (3.5 ounces) granulated sugar
- 3 tablespoons (2 ounces) golden syrup or light corn syrup
- 1/2 teaspoon baking soda
- 1/4 teaspoon kosher salt or 1/8 teaspoon fine table salt
- 1/4 teaspoon coconut extract (optional)
- 1 1/4 cups (5.75 ounces) all purpose flour
- 1/3 cup plus 1 tablespoon (1.25 ounces) Dutch-process cocoa powder
For Filling:
- 1 1/2 sticks (6 ounces) unsalted butter
- 1 teaspoon vanilla extract (or, for creme de menthe flavor, replace with 4-5 drops of flavoring oil and food coloring as desired)
- 1/8 teaspoon kosher salt or pinch fine sea salt
- 2 cups (8.5 ounces) organic powdered sugar, sifted
Directions:
- Combine butter, sugar, golden syrup, baking soda, salt, and coconut extract (if using) in a large mixing bowl or the bowl of a stand mixer fitted with the paddle attachment. Mix on low speed to moisten, then increase to medium speed and beat until light and fluffy, about 5 minutes, scraping down the sides of the bowl as needed.
- In a separate bowl, sift together flour and cocoa powder. With the mixer on low speed, slowly sprinkle in dry ingredients until it forms a stiff dough. Knead against the sides of the bowl to form into a smooth ball, then divide in half and flatten into discs. Use immediately or wrap tightly in plastic wrap and refrigerate for up to 1 week; soften to room temperature before using.
- Preheat oven to 350 degrees F. Line baking sheet with parchment paper or a silicone baking mat.
- On a lightly floured (or cocoa-dusted) surface, roll out one disc of dough to 1/4-inch thick. Generously dust with cocoa or flour and pass an embossed rolling pin over dough, thinning it to 1/8-inch (or roll to 1/8-inch with a plain rolling pin). Brush away excess cocoa.
- Cut out rounds using a 1 1/2-inch round fluted cutter. Using an offset spatula, gently transfer rounds to prepared baking sheet, leaving 1/4-inch of space between them. Gather, knead, and re-roll scraps. Repeat with remaining dough.
- Bake until firm and dry, 12 to 15 minutes. Cool completely on baking sheets. Turn half of the wafers upside down so they are ready for filling.
- For filling, melt butter in a saucepan over medium-low heat. Bring to a simmer, stirring occasionally. The simmering butter will hiss and pop. If butter starts to brown, reduce heat to low. Continue stirring until the butter falls silent; strain through a fine mesh sieve into the bowl of a stand mixer.
- Add vanilla and salt, followed by sifted powdered sugar (with organic sugar especially, do not skip the sifting!) Mix on low speed to moisten, then increase to medium until creamy and soft, about 5 minutes. Transfer to a pastry bag fitted with a 1/2-inch plain tip and pipe a dollop of filling (about 1 tablespoon worth) in the center of each upside down wafer. Place a second wafer on top and gently press until filling spreads to edges.
- Place cookies in an airtight container, where they will keep for up to 1 week at room temperature or 1 month in the refrigerator. Serve at room temperature.
Recipe from Bravetart: Iconic American Desserts.
All images and text ©Lindsay Landis / Love & Olive OilDid you make this recipe?
Let us know what you think!
Leave a Comment below or share a photo and tag me on Instagram with the hashtag #loveandoliveoil.