When I travel, I tend to let my stomach do the walking, popping into shops and sampling random treats (sweets, mainly) along the way, even without actually knowing what they are. This was certainly the case in Japan (where probably 2/3 of what I ate was a mystery to me until it hit my tongue, and a good portion remained mysterious even after I had devoured it).
In Kyoto, the Nishiki market was one of our favorite spots, filled with kitchen shops and food sellers galore (and yes, I know I haven’t gotten my Japan posts up, soon, I promise!) As we wandered up and down the covered arcade, snacking on seafood skewers and toasted soy beans and sesame soft serve, I spotted the Snoopy store and its colorful dessert counter. Not one to pass up a sweet snack, especially a cute one, I picked out a bright yellow mochi decorated to look like Charlie Brown’s shirt (I mean, how could I not?) We sat on a bench, took a few pictures (I am a food blogger after all and no food shall go unphotographed), and then bit in.
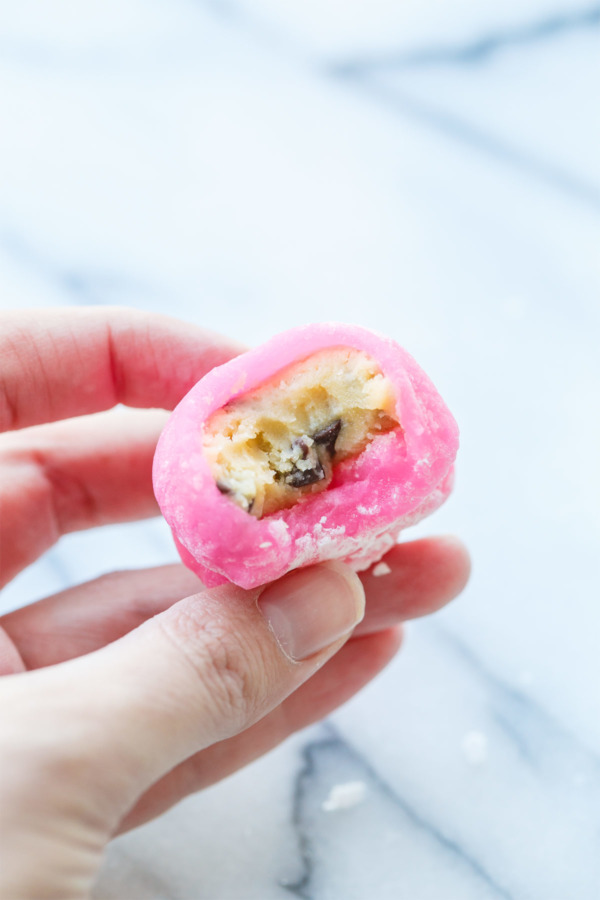
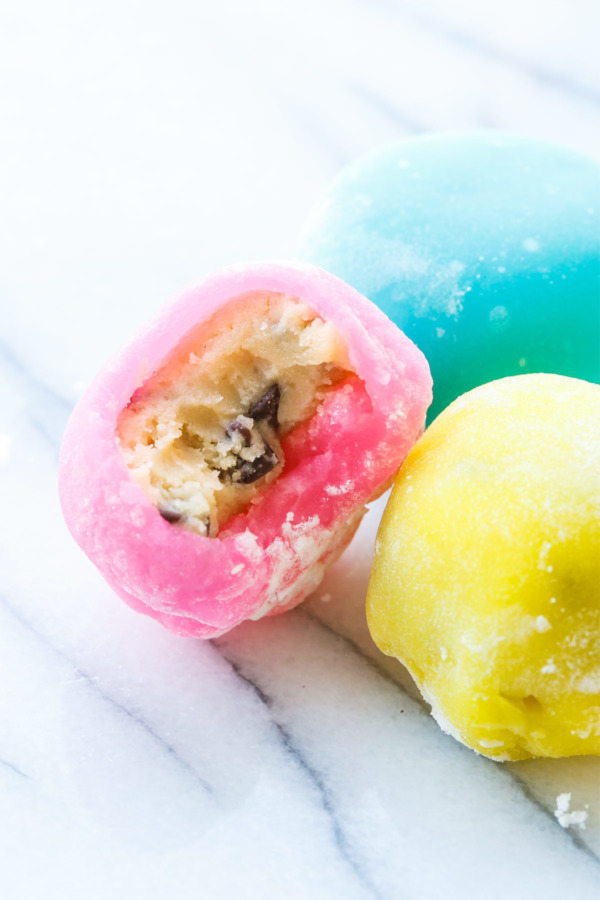
As the realization hit me, my eyes lit up, and I practically screamed at Taylor, “OMFG it’s filled with cookie dough” as I gobbled down the rest (ok, maybe I shared a bite with him. Just a bite though.) It was so good we went back two days later and got a few more to take back to our hotel room.
Considering I wrote the book on cookie dough, the fact that I randomly found probably the only cookie-dough-filled mochi in all of Japan seemed like pure fate to me. (Also, can you believe it’s been 5 years today since my first cookbook was published? Time flies, but clearly not all that much has changed!)
Needless to say, this delightful discovery went on the top of my ‘to re-create’ list once we got home.
If you want to make mochi the traditional way, you’d need a carved out wood stump and a giant hammer and someone really brave with fast hands. I didn’t exactly have any of those necessary tools, but luckily, with a few simple ingredients and a microwave, you can make something *almost* as good at home.
Basically, traditional mochi is made from sweet glutinous rice that is steamed, and then pounded until it is silky smooth.
The ‘cheater’ way to do it is essentially the opposite, taking sweet glutinous rice flour (or raw rice that’s already been pounded) mixing it with water and then ‘steaming’ it in the microwave. Pound and steam instead of steam and pound.
It’s not quite as exquisitely smooth as the mochi in Japan, it’s a bit doughier and not quite as silky, but for how easy it is to make a batch of homemade mochi, I’ll take it.
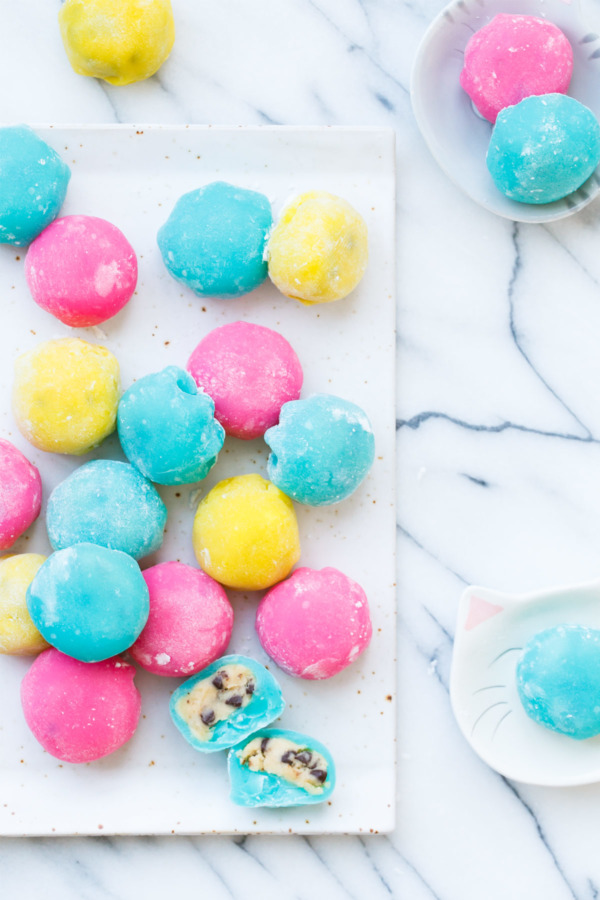
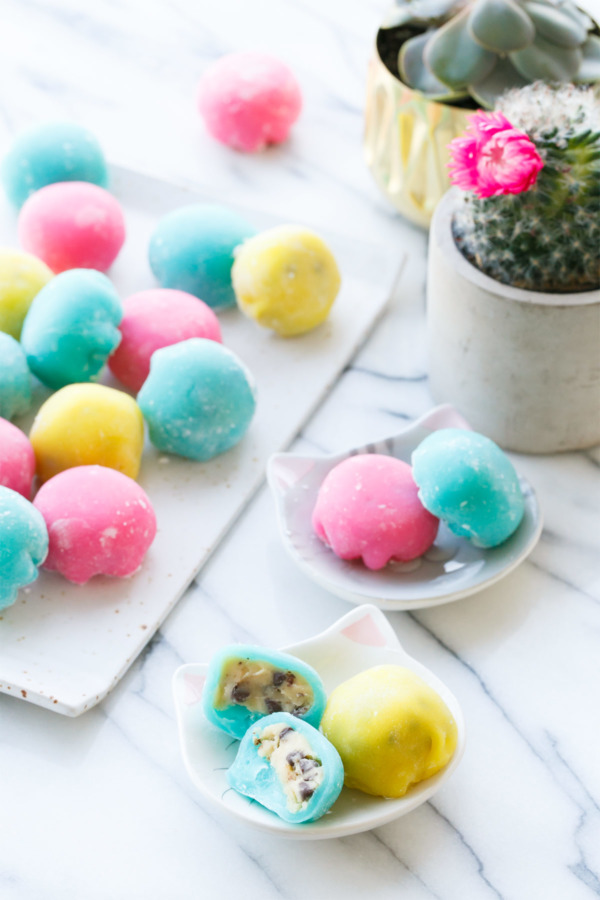
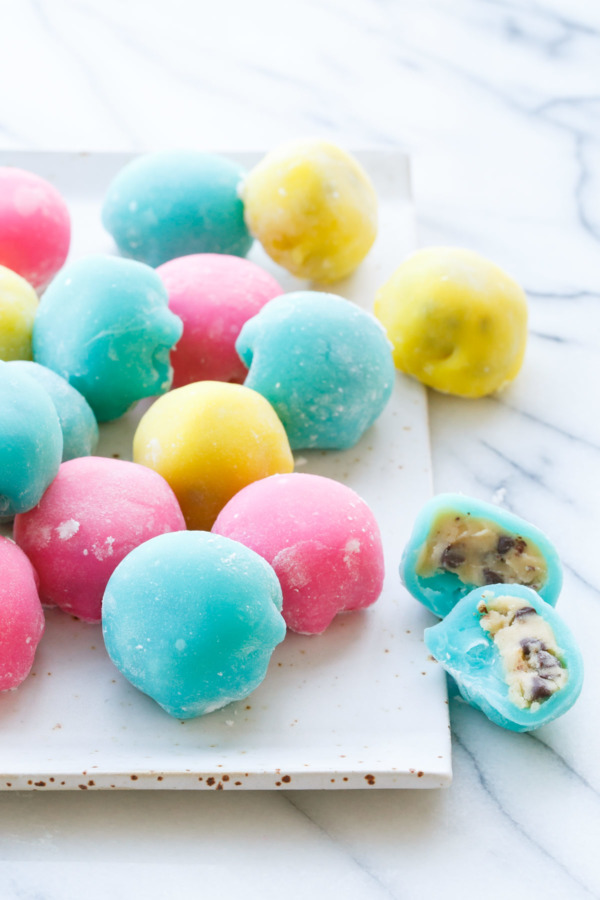
I filled my mochi with my classic eggless cookie dough instead, just with rice flour instead of wheat (that’s right, these babies are 100% gluten free!) The mochi I ate in Kyoto had a creamier filling, but I couldn’t quite work out or recall exactly what might have gone in it, and the few tests I did were mediocre at best, so I just stuck with my tried and true.
The great part of this recipe is that once you get your mochi technique down (it took me a few batches before I was able to shape nice round ones) you can fill them with just about anything. Adzuki bean is the traditional daifuku mochi filling (Daifuku mochi is mochi that’s been filled with a sweet filling, like a mochi dumpling, basically) but really, you could fill these with just about anything, from fresh fruit to flavored custard to ice cream.

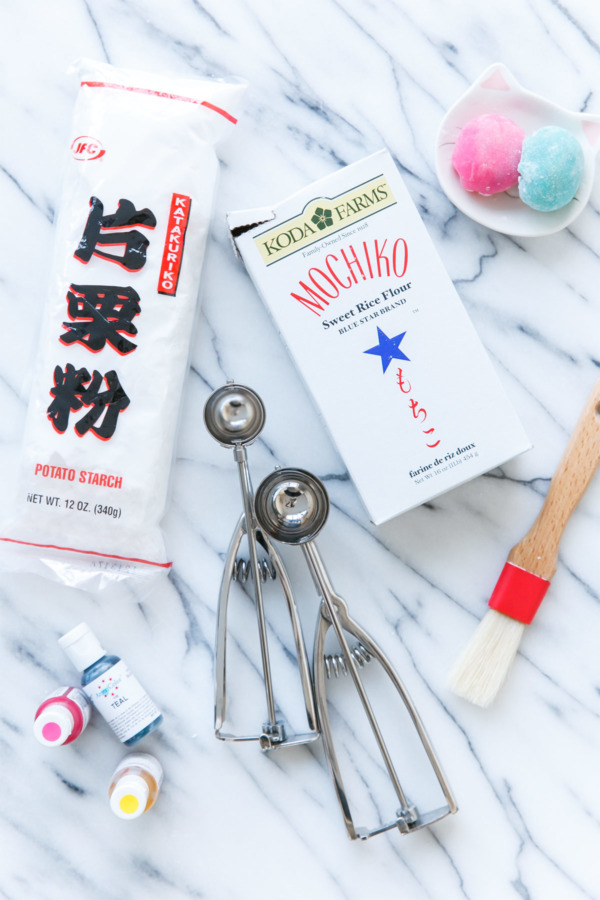
This is one of those recipes that does require a few specific ingredients and tools. For the rice flour especially, you have to get the right stuff. Regular rice flour will not work here, you must have sweet glutinous rice flour… it’s essential. The other tools just make things a bit easier.
You will need:
Glutinous Rice Flour – sweet glutinous rice flour is, despite the name, completely gluten free. The name just refers to the high starch content of this short-grain rice, which is what produces the sticky, stretchy texture of mochi. DO NOT substitute regular rice flour here, it will not work. I used Mochiko brand, which is specially processed for quick cooking. You can use other kinds of glutinous rice flour, such as Shiratamako, which supposedly creates a better textured mochi (though I haven’t tried it personally, I plan to!) Find it at Asian markets or online.
Potato Starch – Not to be confused with potato flour (which is totally different, make sure you are getting the starch!) Technically you can use cornstarch, but I really disliked the flavor it imparted. If you’re going out of your way to get mochiko flour anyway, you might as well get some potato starch too. Trust me.
Roul’Pat – I found this extra large silicone work surface to be the perfect surface on which to prepare mochi. With a light coating of potato starch the mochi didn’t stick at all.
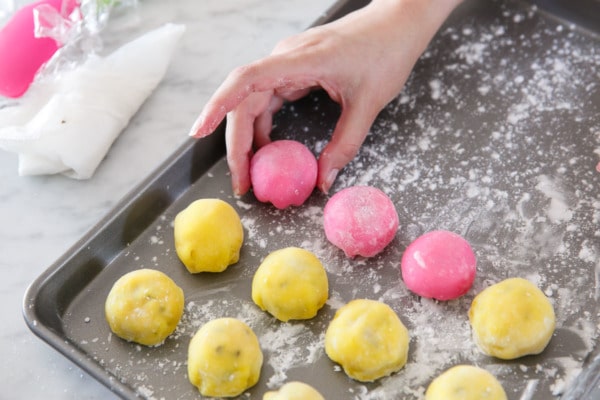
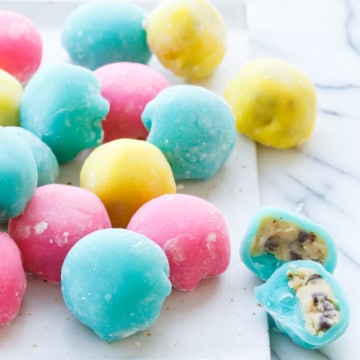
Food coloring – Optional, but it makes the mochi so much more fun. :) I like Americolor gel food coloring, but any water-soluble food coloring here will do. I doubled the mochi recipe, then split it up into 3 even batches, dying each a differen tcolor.
Microwave safe bowls – I love this pyrex set. They also come with lids and area great for leftovers!
Cookie scoops – One of my most versatile kitchen tools. Use the small scoop for perfectly portioned cookie dough filling and the medium one for the mochi outside.
Pastry brush – Helpful for dusting off that excess starch. Natural bristles work better here than the silicone ones.
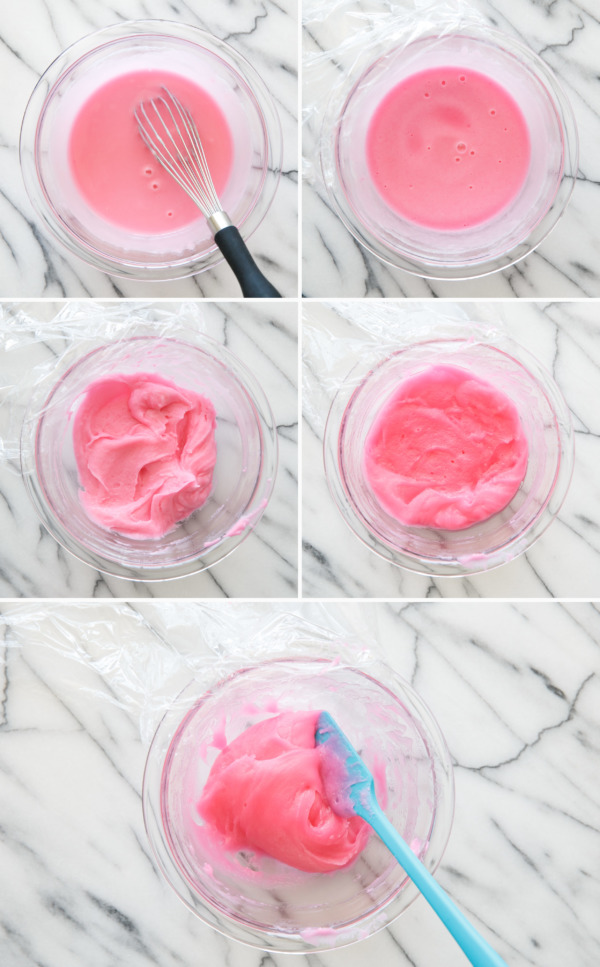
To steam your mochi, combine the flour and sugar in a microwave safe bowl, then whisk in water and food coloring (top left). Loosely cover it with plastic wrap, then microwave on high for 1 minute. You can see how after 1 minute of cooking (top right) there are some darker spots in the mochi. Give it a stir and you’ll feel these spots are quite a bit firmer and stickier than the ligher spots. Stir it until it’s even in color (middle left), then microwave for another minute. After this second cooking (middle right) the color should be pretty evenly dark, and the mochi almost slightly translucent. Give it another good stir, and if it’s nice and elastic and super sticky throughout, it’s done. Or, depending on your batch size and microwave, cover and cook for additional 30 second intervals until it’s done. When I made half batches I didn’t need this extra time, but the full batch size needed 30-45 seconds extra.
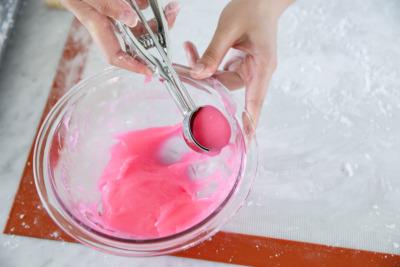

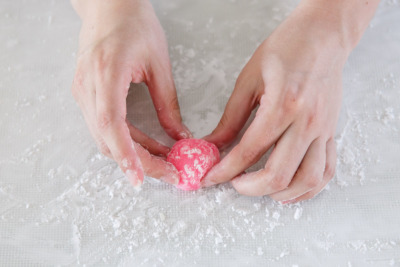
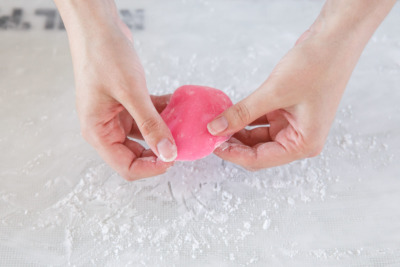
Dip your cookie scoop in water to prevent it from sticking, then scoop out a scant scoop of mochi onto your starched surface. Coat your hands with starch too (seriously, this stuff is incredibly sticky if you are un-starched).
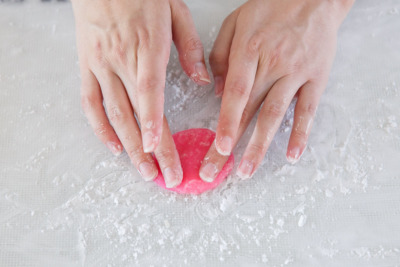
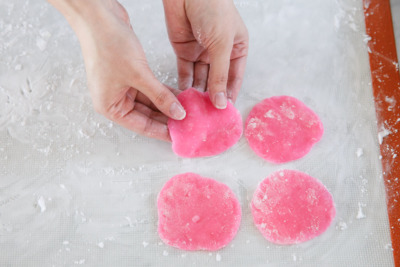
Roll into a ball and then flatten that ball into a disk. Continue to work the disk, focusing on the edges. Essentially, you want a disk about 3″ wide and 1/4-3/8″ thick, the center of your disk slightly thicker and then thinning at the edges. Work fairly quickly as the warm mochi is easier to shape than when it has cooled.
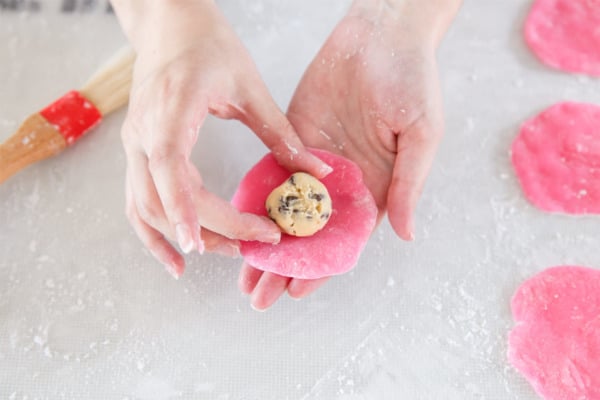
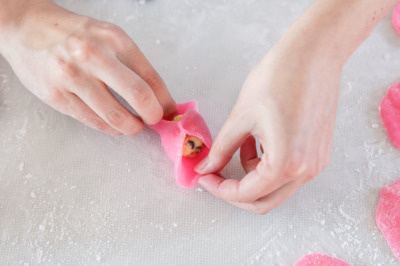
Once you’ve got your disks, put a ball of chilled cookie dough in the center (you should make these first and refrigerate until the mochi is ready).
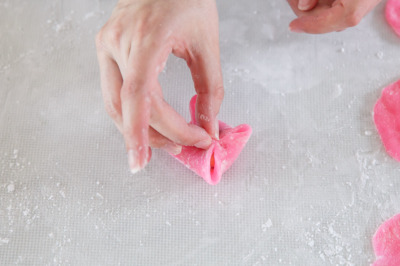
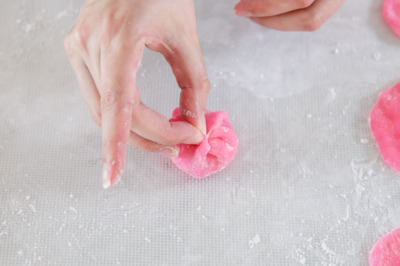
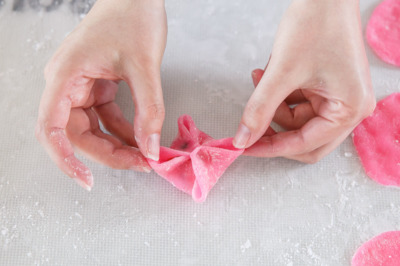
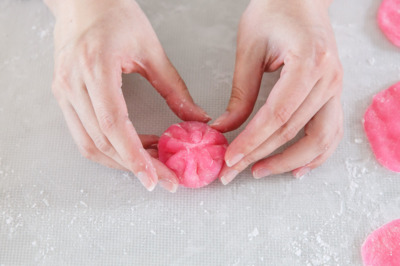
Now, pretend you are making dumplings. Or wrapping a gift basket. Whatever metaphor works for you. Bring the opposite corners of the mochi together, pinching to seal. Repeat and repeat again until all the lose edges are sealed together. Flip it pinched site down and roll it a bit on the starched surface to round out the shape, then arrange on a starch-dusted cookie sheet.
When you make these, I do not recommend doubling a single batch. Instead, make two separate batches (an opportunity for multiple colors!) and form each one before moving on and microwaving the other. The mochi is really so much easier to work with when it’s warm, a double batch would take too long to shape and the mochi would be too stiff towards the end.
Another argument for not doubling the batch: mochi does not last long. After a day or two, even in an airtight container, it’ll start to get a bit hard. That’s just the nature of mochi: it’s best enjoyed fresh.
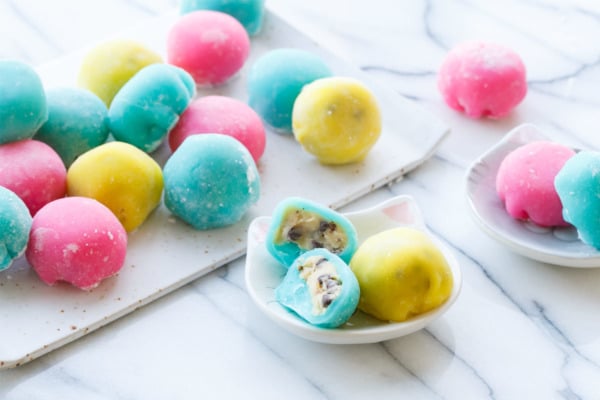
Cookie Dough Daifuku Mochi
Easy microwave daifuku mochi with a raw (egg-free and gluten free!) cookie dough filling.
Ingredients:
For Cookie Dough Filling:
- 1/4 cup unsalted butter, room temperature
- 1/4 cup packed light brown sugar
- 1/4 cup mochiko glutinous sweet rice flour
- 2 tablespoons whole milk or cream
- 1/2 teaspoon vanilla extract
- pinch fine sea salt
- 1/4 cup mini semisweet chocolate chips
For Mochi:
- 3/4 cup mochika glutinous rice flour*
- 1/4 cup granulated sugar
- 3/4 cup filtered or spring water
- food coloring (optional)
- potato starch, for rolling (you can also use cornstarch)
Directions:
- To prepare filling, beat butter and sugar together with an electric mixer for 2-3 minutes or until light and fluffy. Add flour and combine. Add milk, vanilla and salt and mix to incorporate. Stir in mini chocolate chips.
- Scoop filling into 1″ balls (I used this small cookie scoop) and arrange on a parchment-lined tray. Refrigerate for 30 minutes while you prepare the mochi.
- To make the mochi, whisk mochiko flour with sugar in a microwave-safe bowl. Add water and whisk until smooth and no lumps remain. Add a drop or two of food coloring, if desired, or leave white. If you want multiple colors, make a batch (or a half batch) of each color, one at a time, as the mochi is easiest to work with while it is still warm (so I do not recommend doubling this recipe in a single batch).
- Loosely cover with plastic wrap and microwave for 1 minute on high. You should see some darker spots begin to appear. Stir well until uniformly paste-like in texture and even in color. Loosely cover again and microwave for another minute. Stir again. Continue to microwave and stir in 30 second intervals until mochi is evenly darkened in color and slightly transparent, and very stretchy and sticky. This will vary depending on your microwave, bowl, etc. I only needed one final 30 second burst for my mochi to be fully cooked. Note that smaller batches won’t take quite as long to cook.
- Dust a silpat (if you have one) or other non-stick surface with a layer of potato starch.
- Dip a medium cookie scoop in water, then scoop out a 2-inch ball of warm mochi and place it on your starched surface, rolling to form a ball and coating evenly with starch.
- Start to flatten the ball into a disk-shape (careful as the first few you make will still be quite warm). If you start to stick, just dust the mochi and your fingers with more starch.
- Continue to flatten the disk, focusing mainly around the edges, until you have an approximately 3-inch circle. Set aside on a lightly-dusted surface. Repeat with remaining mochi.
- Get your cookie dough balls out of the fridge. They should be firmer, but not solid.
- Working with starch-dusted hands, lay one mochi disk in your palm, and place the cookie dough ball in the center. Bring opposite edges (at 12 and 6 oclock) together, pinching the mochi together to seal. Then bring the 3 and 9 oclock edges together, pinching to seal once again. You will now have 4 remaining ‘points’ sticking out; bring each one to the center and pinch together with its direct opposite, ultimately forming a dumpling-like ball.
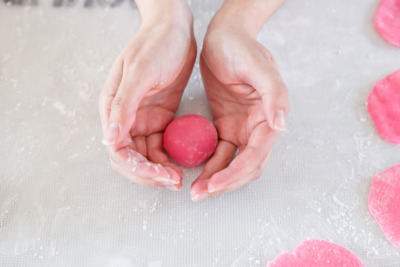
- Place pinched side down on starched surface and roll between your palms until perfectly round. Set on a lightly starched and parchment-lined tray. Repeat with remaining mochi.
- Mochi will keep, refrigerated in an airtight container, for 1 to 2 days, though they are definitely better the first day. Let come to room temperature for a bit prior to serving.
*Mochiko flour is a sweet glutenous rice flour. Do not substitute regular rice flour here, it will not work. You can use other kinds of glutinous rice flour, such as Shiratamako, which supposedly creates a better textured mochi (though I haven’t tried it personally, I plan to!)
Did you make this recipe?
Let us know what you think!
Leave a Comment below or share a photo and tag me on Instagram with the hashtag #loveandoliveoil.