
I really love making cakes. I jump at any celebration or occasion that calls for cake. Which makes the fact that most of our family lives on the other side of the country rather hard: I see it as a lot of birthdays and missed opportunities for cake. Sure you can mail cards and gifts, but cake? Not so much.
So when my parents happened to be in town for a visit on my Dad’s birthday, well, let’s just say I’ve been planning this cake since July.
I told you I like cake.

The cake itself is a chocolate stout cake, made using an entire bottle of stout beer. But even the beer-adverse (myself included) will love this cake, which has a slight hint of malty flavor, but mostly just comes across as rich, chocolatey, and incredibly dense and delicious, almost brownie-like.

I elected to add a layer of gooey dulce de leche in between the buttercream, hoping to accent the caramel notes in the beer and provide a rich contrast to the chocolate and vanilla. It worked. And my Dad commented that the dulce de leche really elevated the cake to extraordinary heights (well, to be fair, his precise words were more like, “Is this dulce de leche? It really… mmmm… nomnomnom… yeah”). Yep. I agree.

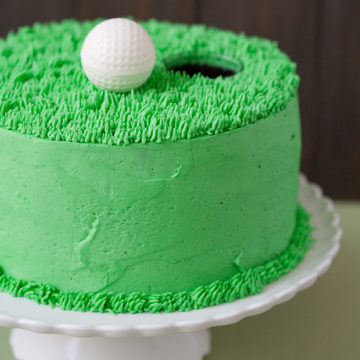
This is one cake where the outside is as charming as the inside is delightful. Frosted with green buttercream turf, and topped with an edible golf ball made of white chocolate. The hole is actually a shot glass sunk deep into the layers of the cake. It’s a novelty theme cake that’s cute and classy without being kitschy.
It went over quite well. I mean, how could it not? It incorporates beer and golf, two of his favorite things, together in one cake. The only way it made sense, really, since a grass-flavored cake in the shape of a beer bottle wouldn’t have been nearly as appealing.
Chocolate Stout Cake with Dulce de Leche and Vanilla Bean Buttercream
Even the beer-adverse (myself included) will love this cake, which has a slight hint of malty flavor from the stout, but mostly just comes across as rich, chocolatey, and incredibly delicious—almost brownie-like—with layers of gooey dulce de leche inside.
Ingredients:
For Cake:
1 1/2 cups (1 bottle) stout or dark beer
1 1/2 cups unsalted butter, cut into cubes
1 cup dark or dutch-process cocoa powder, sifted
3 cups all-purpose flour
3 cups granulated sugar
2 1/4 teaspoons baking powder
1 teaspoon salt
3 large eggs, at room temperature
2/3 cup sour cream, at room temperature
For Filling & Frosting:
2 cups (4 sticks) unsalted butter, softened and cut into cubes
3 3/4 cups powdered sugar, sifted
1/4 cup heavy cream
1 vanilla bean, scraped
2 teaspoons vanilla extract
pinch of salt
3/4 cup dulce de leche, room temperature
Directions:
Preheat oven to 350°F. Butter three 8-inch round cake pans or two 9-inch round cake pans. Line bottoms with parchment paper circles, then butter parchment. Set aside.
Place the stout and butter in a large, heavy saucepan over medium heat, stirring occasionally until the butter melts. Remove from the heat, and whisk in the sifted cocoa powder until smooth. Pour into a heatproof bowl and let cool.
In a medium bowl, whisk together flour, sugar, baking powder and salt. Set aside.
In a large mixing bowl or the bowl of a stand mixer fitted with the paddle attachment, beat the eggs and sour cream on medium speed until smooth, about 3 minutes. Pour in the cooled cocoa mixture, and mix on medium speed until combined, about 1 minute.
Slowly add the dry ingredients, a little bit at a time, and mix on low speed until incorporated, scraping the sides and bottom of bowl to be sure that all the dry ingredients are incorporated.
Divide batter evenly among prepared pans, using a kitchen scale if possible to be sure the layers are even. Place cake pans on middle oven rack about 2? apart (if using three pans space over two racks in the upper and lower thirds of the oven), and bake until toothpick inserted into center comes out clean, about 35 to 40 minutes.
Remove from oven and place on a wire rack until cool enough to handle. Run a small knife around the edges of each pan, then gently invert onto wire racks. Cakes should come out cleanly. Allow to cool completely. At this point, the cakes can be frozen until ready to use, up to 1 month. Simply wrap each layer individually in a double layer of plastic wrap and then store inside a large zip top bag. Personally, I always make my cakes a few days in advance and freeze them. I find the frozen cake to be much easier to level and frost than fresh cakes.
To prepare frosting, in the bowl of a stand mixer fitted with the paddle attachment, beat butter for on medium speed until very pale & creamy, about 8 minutes. Add powdered sugar, a little at a time, mixing well after each addition. Add cream, vanilla bean, and vanilla extract and beat until light, creamy, and fluffy, about 6 minutes more.
To assemble, level each cake layer by cutting of the domed top with a long serrated knife. Leveling the cakes is an important step for creating a beautiful layer cake. Not to mention eating the scraps is the best part.
Place one layer, flat side down, on a cake stand or serving platter. To keep the platter clean while frosting, place 4 small strips of parchment or waxed paper just under the edges of the cake. This will allow you to frost the cake and then remove these strips cleanly later.
Spread half of the dulce de leche evenly over top of layer, followed approximately 1/2 cup of buttercream. Position second layer on top and press to adhere. Repeat with remaining dulce de leche, another 1/2 cup of buttercream, and final cake layer, flat side up.
Cover the entire cake with a thin layer of buttercream. This “crumb coat” will make frosting the cake easier. Refrigerate for about 15 minutes to allow this crumb coat to set. At this point if you will be coloring the remaining buttercream, add your food coloring to the mixing bowl and beat until color is smooth and uniform.
Remove cake from refrigerator and frost with remaining buttercream, reserving some if necessary for piping decorative details or grass if desired.
Adapted from King Arthur Flour via Sweetapolita.
All images and text ©Lindsay Landis / Love & Olive OilDid you make this recipe?
Let us know what you think!
Leave a Comment below or share a photo and tag me on Instagram with the hashtag #loveandoliveoil.