
Already getting a good start tackling my baking resolutions (and it’s not even the new year)… I’ve moved from macarons to fondant. I stumbled upon a fondant cake decorating class in our area, and immediately jumped at the opportunity to get my hands dirty. My first attempt (solo – stupid!) failed so miserably, I realized that just watching people decorating cakes on TV was not a suitable learning tool.
The supply list for this class included a cake. Which makes sense, I guess, it’d be pretty ridiculous if they provided cake for everyone. So Friday night before the class I got to work baking a cake.
I’m sure if this was Taylor taking the class (which, that alone is very unlikely anyway), he would have just thrown together a box mix cake. It’s just practicing after all, why spend the time baking a real cake from scratch. But you know me, a box mix just will not do. I won’t even settle for a homemade cake and quick plain buttercream. Nope. I spent as much time thinking about the inside of the cake as I did decorating the outside.
The result was a delicious yellow cake, filled with a coffee-flavored swiss meringue buttercream and a layer of chocolate ganache. Tasty! The end result reminded me a lot of Tiramisu – the creamy meringue buttercream spiked with coffee, the rich vanilla buttermilk cake… with a chocolaty twist.

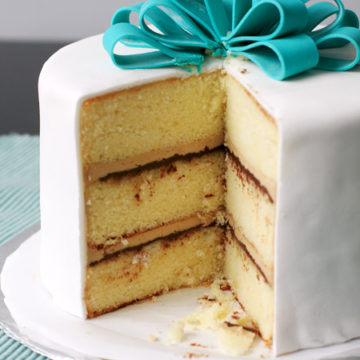
The actual decorating was quite a success as well. Actually seeing a cake covered in fondant step by step makes a huge difference. And I could barely believe how easy the bow was. Aside from a few small blips and tears, I think it looks pretty darned nice!
What I need to find are some miniature cake pans. Like, figure out what exactly half of an 8 inch 3-layer-cake recipe would yield (5″? 6″? Math geniuses, help me out!) With a smaller cake I could bake them more often and wouldn’t feel so guilty about just the two of us eating the entire thing. Practice my decorating skills without needing a special occasion as an excuse!

Though, as pretty as the outside looks, I do have to say that the inside just might be the prettiest part. :)
Vanilla Cake with Tiramisu Buttercream and Bittersweet Ganache Filling
Makes one three-layer 9-inch round cake, or a three-layer 8-inch round cake and 6 cupcakes.
Cake recipe adapted from Sky High: Irresistible Triple-Layer Cakes. Buttercream adapted from Martha Stewart.
Ingredients:
Cake:
3 3/4 cups cake flour
2 1/2 cups sugar
1 tablespoon plus 2 3/4 teaspoons baking powder
1/2 teaspoon salt
2 1/2 sticks (10 ounces) unsalted butter, at room temperature
1 1/4 cups plus 1/3 cup buttermilk
5 whole eggs
2 egg yolks
2 1/2 teaspoons vanilla extract
Buttercream: (halve this recipe if you will be covering the cake with fondant)
6 large egg whites
1 1/2 cups sugar
1 teaspoon pure vanilla extract
1 1/4 pounds (5 sticks) unsalted butter, softened
2 tablespoons warm water
1 tablespoon instant coffee
Ganache:
1/3 cup heavy cream
3 ounces bittersweet chocolate, chopped
Directions:
Preheat the oven to 325°F. Butter three 9-inch round cake pans. Line the bottom of each pan with a round of parchment or waxed paper and butter the paper.
Combine the cake flour, sugar, baking powder, and salt in a large mixer bowl. With the mixer on low speed, blend for 30 seconds. Add the butter and 1 1/4 cup of the buttermilk. Mix on low speed briefly to blend; then raise the speed to medium and beat until light and fluffy, 2 to 3 minutes.
In a smaller bowl, whisk together the whole eggs, egg yolks, vanilla, and the remaining 1/3 cup buttermilk until well blended. Pour one-third of the egg mixture into the cake batter at a time, folding it in completely after each addition. There will be 9 cups of batter; our 3 cups batter into each pan.
Bake for 26 to 28 minutes, or until a cake tester or wooden toothpick inserted in the center comes out clean.
Turn the layers out onto wire racks by placing a rack on top of a pan, inverting it, and lifting off the pan. Peel off the paper liners and let cool completely. When the layers have cooled, place a cardboard cake board on top of a layer, invert again, and lift off the rack. To make the layers easier to handle, wrap them on their boards completely in plastic, so they don’t dry out, and refrigerate them.
To make buttercream, combine the sugar and egg whites in a large heatproof bowl over a saucepan of simmering water and whisk constantly, keeping the mixture over the heat, until it feels hot to the touch, about 5 minutes. The sugar should be dissolved, and the mixture will look like marshmallow cream. Remove from heat and transfer to the bowl of a stand mixer, and whisk on high speed until mixture is completely cooled and stiff peaks form, about 6 minutes. Beat in vanilla. Add butter, 2 tablespoons at a time, on low speed, mixing well after each addition. Beat until smooth, about 3 minutes.
Stir instant coffee into warm water until dissolved. Add, 1 teaspoon at a time, to buttercream, mixing well after each addition, until you’re satisfied with the strength of the coffee flavor (I added about 1 tablespoon).
To make ganche, place chopped chocolate in a heat proof bowl. In a heavy saucepan set over medium heat, bring the heavy cream to a boil. Remove from the stove and pour over chopped chocolate. Let stand 2 minutes and then stir until fully combined. Let cool until just firm enough to spread onto cake layers.
After leveling cake layers as necessary, place one cake layer on a cake board, flat side up. Brush with sugar syrup (if desired, it will help keep the cake moist). Spread half of the ganache evenly over the top, followed by approximately 3/4 cup of the buttercream. Repeat with the second cake layer, by first brushing on some sugar syrup, followed by more ganache and buttercream. Top the cake with the third layer. Lightly crumb coat the the cake with more buttercream. At this point you can either cover the cake with fondant, or frost it with a thick layer of buttercream.
Did you make this recipe?
Let us know what you think!
Leave a Comment below or share a photo and tag me on Instagram with the hashtag #loveandoliveoil.