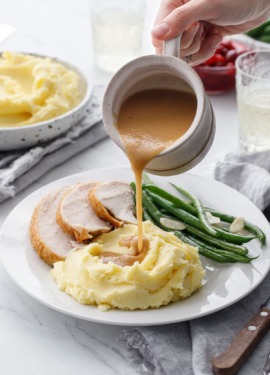
Thanksgiving Turkey Gravy
If you're brining your turkey this Thanksgiving, use this thick and flavorful gravy recipe to ensure your gravy is perfectly seasoned and not overly salty. You can use store-bought stock or make your own (add 2-4 hours to give that plenty of time to simmer if so).
Yield: 6 cups (12-18 servings)
Ingredients
For Turkey Stock (optional, can also use store bought)
- 2 pounds turkey or chicken wings
- turkey giblets from 1 turkey, neck, heart and gizard only
- 2 tablespoons olive oil
- 1 large onion, coarsely chopped
- 2 medium carrots, coarsely chopped
- 2 stalks celery, coarsely chopped
- 3 large garlic cloves, smashed
- ½ cup Madiera wine
- 16 cups filtered water
- 1 teaspoon whole black peppercorns
- 2 whole bay leaves
- 1 teaspoon dried parsley
- 1 teaspoon dried thyme
- ½ teaspoon dried rosemary
For Roux:
- ¾ cup unsalted butter
- ¾ cup 94g all-purpose flour
For Gravy:
- 5 cups homemade or store-bought turkey stock
- 1 batch roux, more or less as needed
- 1 to 2 cups turkey drippings, more or less to taste
Instructions
To make turkey stock:
- Preheat oven to 450 degrees F. Line a baking sheet with foil; spray with cooking spray or brush with oil. Arrange chicken wings and turkey giblets on baking sheet in a single layer. Bake for about 45 minutes or until wings are golden brown and crispy.
- Heat olive oil in a large stock pot over medium-high heat. Add onion, carrot, celery and garlic and sauté until softened and fragrant, about 5 to 7 minutes.
- Add Madiera wine, stirring and scraping up as many brown bits from the bottom of the pan as possible.
- Add water along with dried spices. Transfer chicken wings and giblets to saucepan as well as any liquid drippings you can recover from the baking sheet.
- Bring to a simmer, then reduce heat to medium-low. Continue to gently simmer, stirring occasionally, until liquid has reduced by half, about 2 to 3 hours.
- Pour through a strainer or sieve to remove any solids. You should have about 7-8 cups of stock.
- Turkey stock can be made 1-2 days ahead of time; refrigerate in a covered container until ready to use. Skim off any excess fat that has solidified on the top of the stock before using.
To make roux:
- Melt butter in a large, high-sided skillet or medium saucepan over medium heat.
- Once butter is melted and frothy, sprinkle half of flour over surface of butter, whisking constantly until incorporated. Sprinkle remaining flour and whisk until you have a smooth paste.
- Continue to cook, whisking frequently, until roux has darkened to the color of peanut butter, about 10 minutes.
- Transfer to a heat-proof container and let cool, then cover and refrigerate until ready to use (up to 2 days). It will solidify as it chills. Before using, rewarm the roux in the microwave in 15 second intervals, or in a small saucepan over medium-low heat until melted and smooth again.
To make final gravy:
- As soon as your turkey comes out of the oven, carefully (it's very hot!) dump out any liquid from the cavity of the bird into the roasting pan. Transfer turkey to a carving board; tent with foil and let rest for 30 to 45 minutes.
- Pour off all the drippings left in the roasting pan, straining through a mesh sieve to remove any solid bits. Pour into a gravy separator if you have one. Let sit for 5-10 minutes until the fat starts to separate. Pour or spoon off as much fat as possible.
- Pour 5 cups turkey stock into a large high-sided skillet or saucepan set over medium heat. Whisk in 1/2 cup of turkey drippings. Taste, then continue to add drippings, 1/4 to 1/2 cup at a time, until desired flavor and saltiness is achieved. You may not use all the drippings depending on how concentrated they are. Taste as you go: you can always add more drippings, but you cannot add less (although, if you have extra stock, if you happen to overdo the drippings and your gravy is too salty, you can add more unsalted stock to hopefully bring it back to a good level; just note if you add more liquid you might need more roux to thicken accordingly).
- Bring stock mixture to a simmer. Add 1/2 cup of warmed roux, whisking until completely incorporated. Return to a boil. Continue adding spoonfuls of roux, whisking and returning to a boil between each addition (the roux won't thicken until it reaches a boil). When desired thickness has been achieved (keep in mind the gravy will continue to thicken as it cools), taste once more and add any additional salt and pepper if needed. Transfer to a serving bowl or pitcher and enjoy!
- Leftover gravy can be stored in an airtight container in the refrigerator for up to 2 days. Rewarm just the amount you need (try not to reheat gravy multiple times if possible) on the stovetop or in the microwave in short intervals. Reheated gravy will be noticeably thicker than fresh gravy.