Remember way back when I shared that awesome Toasted Marshmallow Ice Cream? And I said I had ‘grand plans’ for it? Well, it may have taken me a bit longer than anticipated to realize those plans, but I think the result is worth the wait.
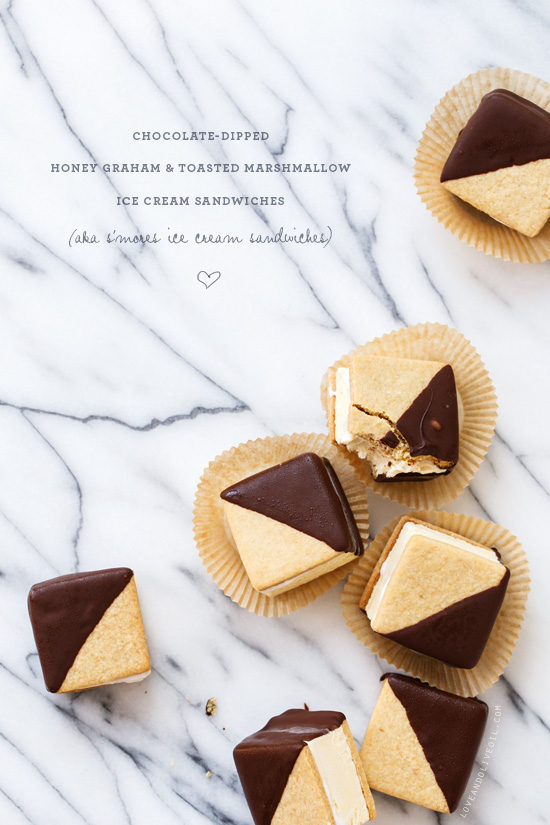
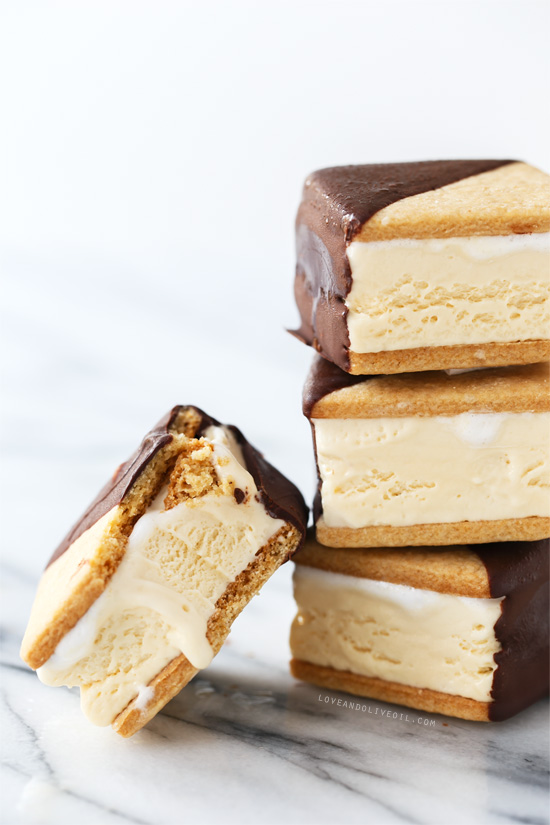
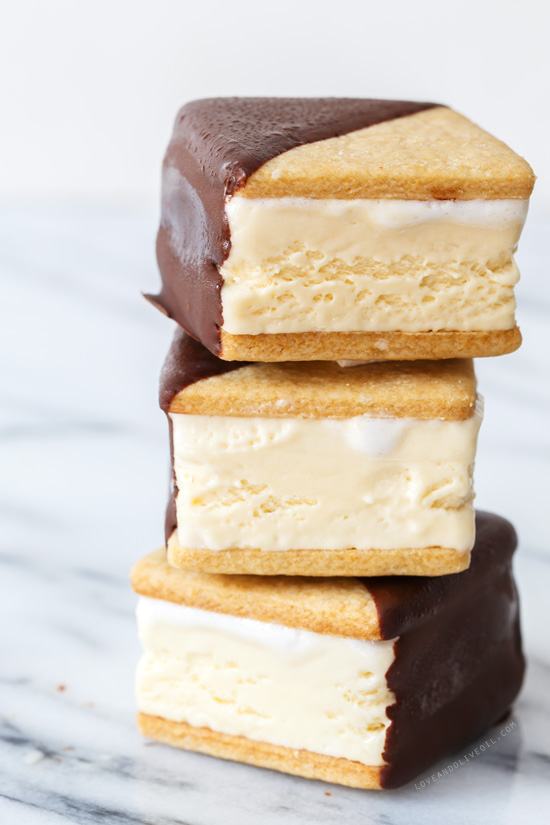
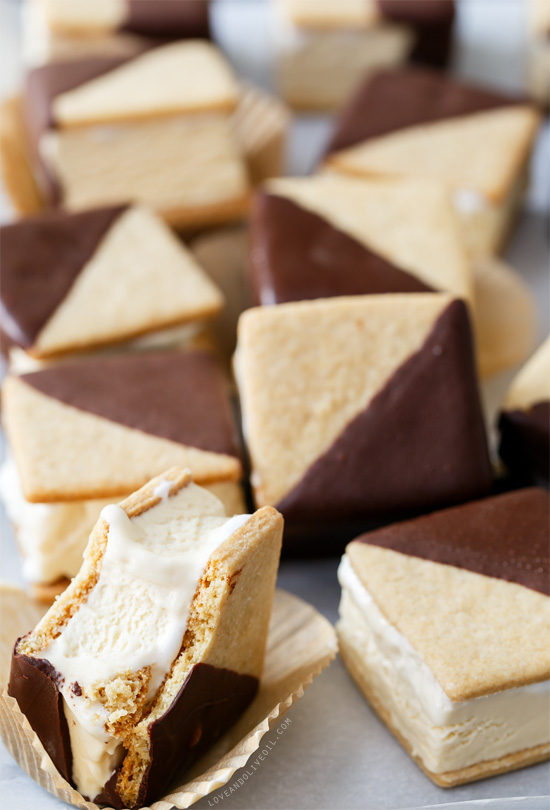
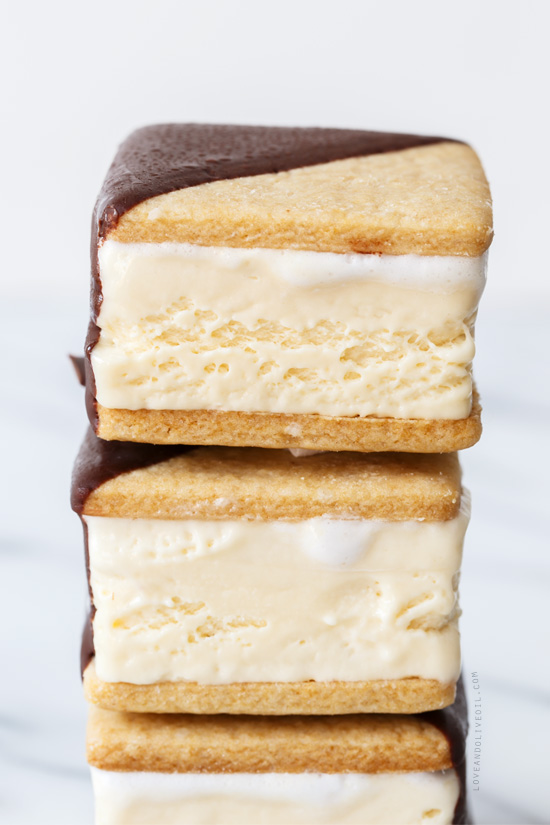
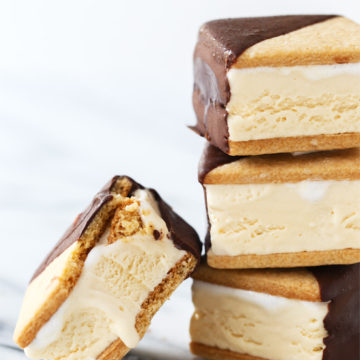
Initially inspired by Mallomar cookies, but sort of a s’more too, that’s been frozen and sandwiched and dipped in chocolate. On a hot summer day they soften into a perfect mess of a dessert, dewy and melty and oozing liquid marshmallow (so have a napkin handy).
Granted, this is not a ‘throw together’ kind of dessert, and does require a bit of advance planning. But your effort will be rewarded with 16 perfectly sized sandwiches, which, if you ration them right (meaning hiding them in the way back of the freezer and refusing to share) will last you quite a while. Or not. Regardless, it’s not like other crazy complicated ice cream sandwich recipes that give you maybe 6 sandwiches. All that time for a day or two’s worth of desserts is (despite all the freezing) not cool.
But this recipe is sized to perfection, each sandwich measuring about 2 1/4 inches square. What they lack in proportion they make up for in flavor, and I think you’ll find the size to be more than satisfying.
It took me a few tries to get the cookie just right, not too crispy or crumbly or heavy with molasses flavor. I’d describe them as somewhere between a traditional graham cracker and shortbread cookie, the perfect amount of tenderness and flavor to compliment the ice cream without overpowering it.
I suggest you start the process a solid 3 or 4 days before you’re going to need them. I myself took almost 7 days to complete a single batch. Which is perfectly fine because each element needs to be frozen in between steps, so it’s not like your hard work will go to waste. Remember when we talked about baking on your own schedule? This is a prime example.
Day 1: Toast the marshmallows and make the ice cream base. Chill it overnight.
Day 2: Churn the ice cream, and spread it in the baking pan and freeze it overnight. Bake the cookies too and freeze those overnight as well.
Day 3: Cut up the ice cream and assemble the sandwiches. Freeze them overnight or until they are really good and frozen solid.
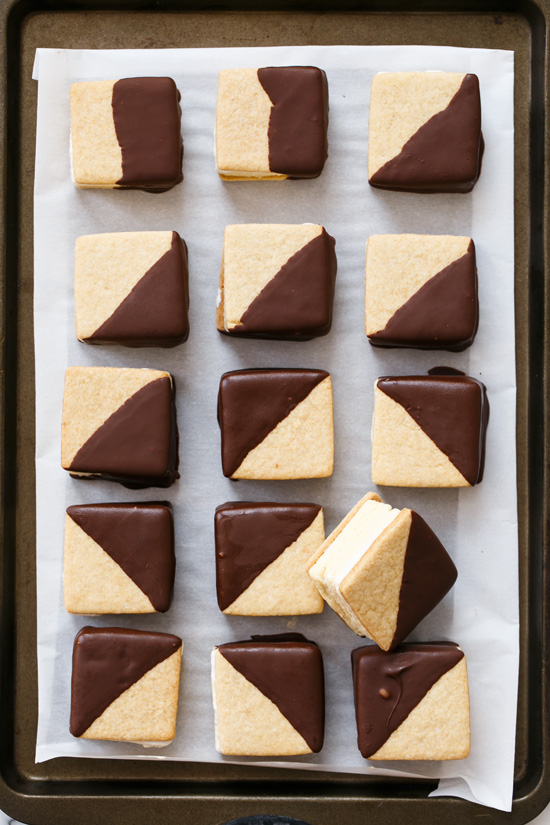
Day 4: Dip in chocolate. And freeze again until ready to serve.
So while it might SEEM like a lot of work, when your active time is interspersed with lengthy periods of required chill time (required both for you and the sandwiches, to be clear), it’s quite manageable.
S'Mores Ice Cream Sandwiches
Ingredients:
For Cookies:
- 1 1/4 cups all-purpose flour
- 1 tablespoon cornstarch
- 1/2 teaspoon baking soda
- 1/2 teaspoon salt
- 6 tablespoons (3/4 stick) unsalted butter, room temperature
- 1/4 cup light brown sugar
- 2 tablespoons granulated sugar
- 1 tablespoon honey
- 1/2 teaspoon vanilla extract
- 2 tablespoons whole milk
For Sandwiches:
- 1 batch toasted marshmallow ice cream
- 1/3 cup marshmallow topping
- 8 ounces semi-sweet or dark chocolate or chocolate coverture, finely chopped
Directions:
- Line a 9-by-9-inch baking pan with parchment paper or aluminum foil. Prepare the toasted marshmallow ice cream as specified in the recipe, churning according to manufacturer’s directions. Spread churned ice cream into prepared baking pan. Drizzle with marshmallow topping (if desired), and swirl slightly into the ice cream with a knife or small spatula. Cover with foil or plastic wrap and freeze overnight until completely firm.
- For cookies, preheat oven to 350 degrees F. Line two baking sheets with parchment paper or silicone baking mats. In a bowl, whisk together the flour, cornstartch, baking soda, and salt and set aside.
- In a large bowl or the bowl of a stand mixer, beat butter on medium-high speed until creamy, 1 to 2 minutes. Add sugars, honey, and vanilla and beat until light and fluffy. Add half of the dry ingredients and mix on low speed until mostly incorporated. Add milk and continue to mix until incorporated, followed by remaining dry ingredients until dough comes together.
- On a lightly floured work surface, roll out the dough to a 1/4-inch thickness. Cut into 2 1/4-inch (approximately) squares. I’d recommend measuring the baking pan used for the ice cream, and cutting the cookies to the precise size you’ll need so as not to waste any ice cream. I had a 9-by-9-inch baking pan, which worked perfectly with a 2 1/4-inch square cookie cutter, but you can use a ruler and knife or pizza cutter as well.
- Transfer cut squares to prepared baking sheets, leaving about 1 inch of space between cookies. Re-roll the scraps and cut again until no dough remains. You should end up with about 32 cookies.
- Bake for 10 to 12 minutes or until just barely starting to color; the edges and bottoms will not be noticeably brown. Do not overbake. Remove from oven and let cool on baking sheets, then transfer to a zip-top bag and freeze until ready to use.
- To assemble sandwiches, arrange half of cookies, bottom side up, on a baking sheet. Remove ice cream from freezer and lift out the entire block of frozen ice cream. Working quickly, cut into 16 even squares (the same size as your cookies). Place a square of ice cream on each upside-down cookie, then top with remaining cookies, pressing lightly to adhere. Return entire tray to freezer and freeze until completely solid once again.
- Prepare a second baking sheet by lining with parchment paper. Place in freezer for at least 15 minutes to thoroughly chill. Meanwhile, gently melt chocolate in a double boiler or in the microwave (heat in 15 second intervals at medium heat, stirring well between each interval). Working quickly in batches of 2-3, dip sandwiches half-way into chocolate and place on baking sheet in the freezer. You want to work quickly here to avoid melting as much as possible, so place each freshly dipped sandwich directly on the baking sheet in the freezer. Having a second set of hands to help open and close the freezer is always helpful. Once chocolate is set, you can wrap each sandwich in foil or plastic wrap, and store in a zip-top bag for up to 2 months.
Cookies adapted from Leite’s Culinaria.
All images and text ©Lindsay Landis / Love & Olive OilDid you make this recipe?
Let us know what you think!
Leave a Comment below or share a photo and tag me on Instagram with the hashtag #loveandoliveoil.