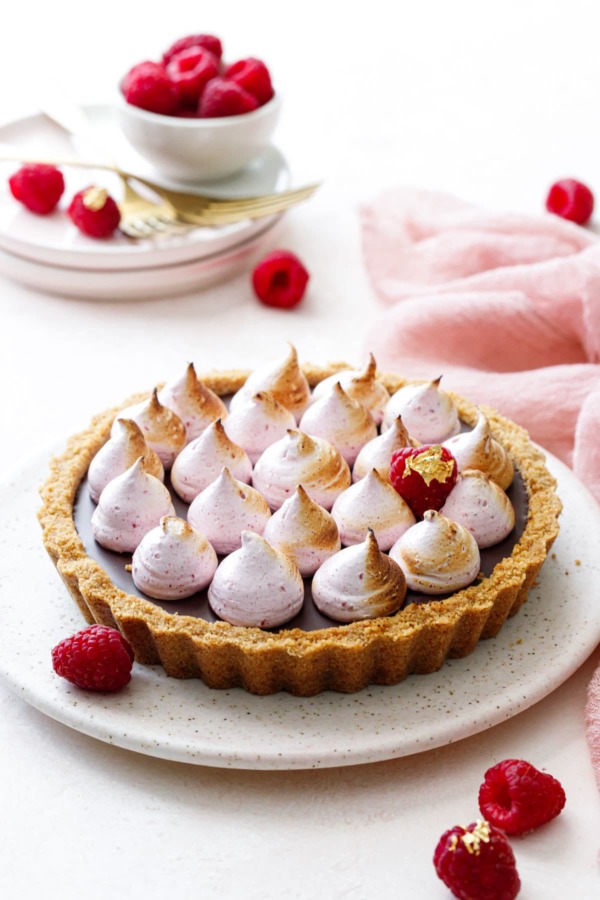
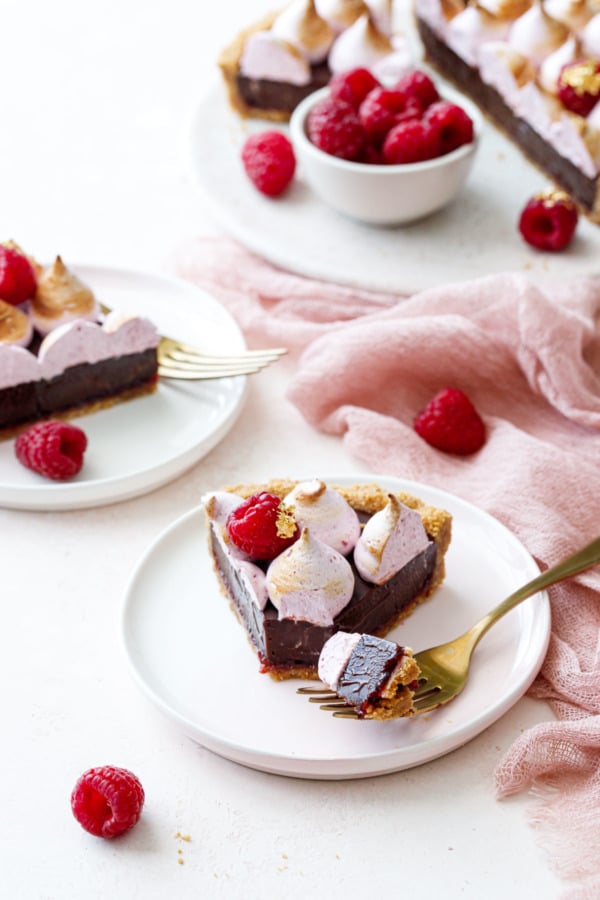
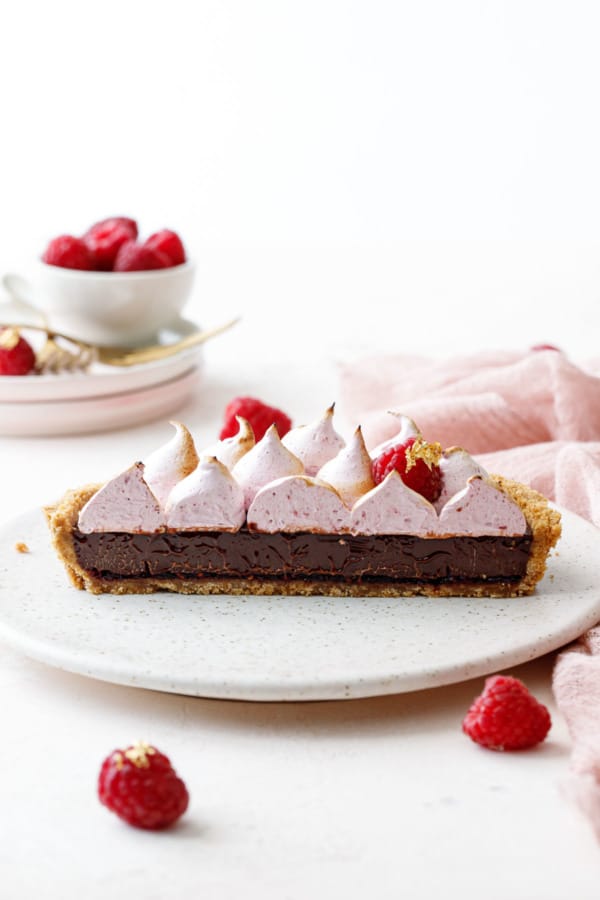
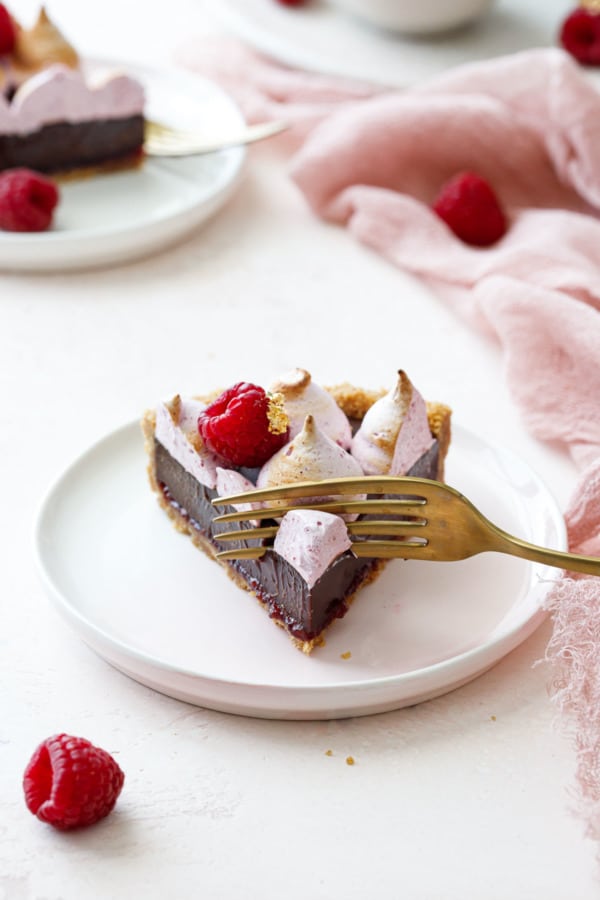
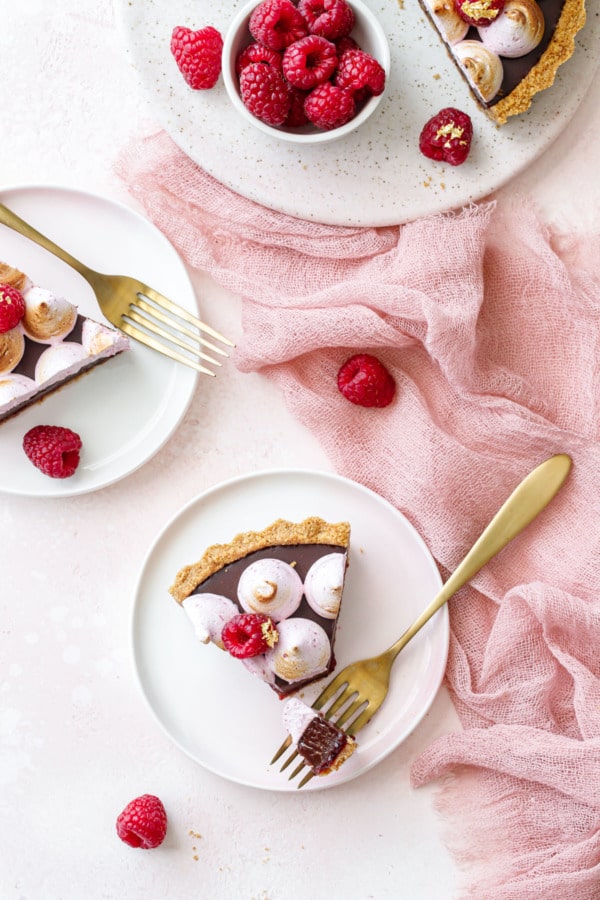
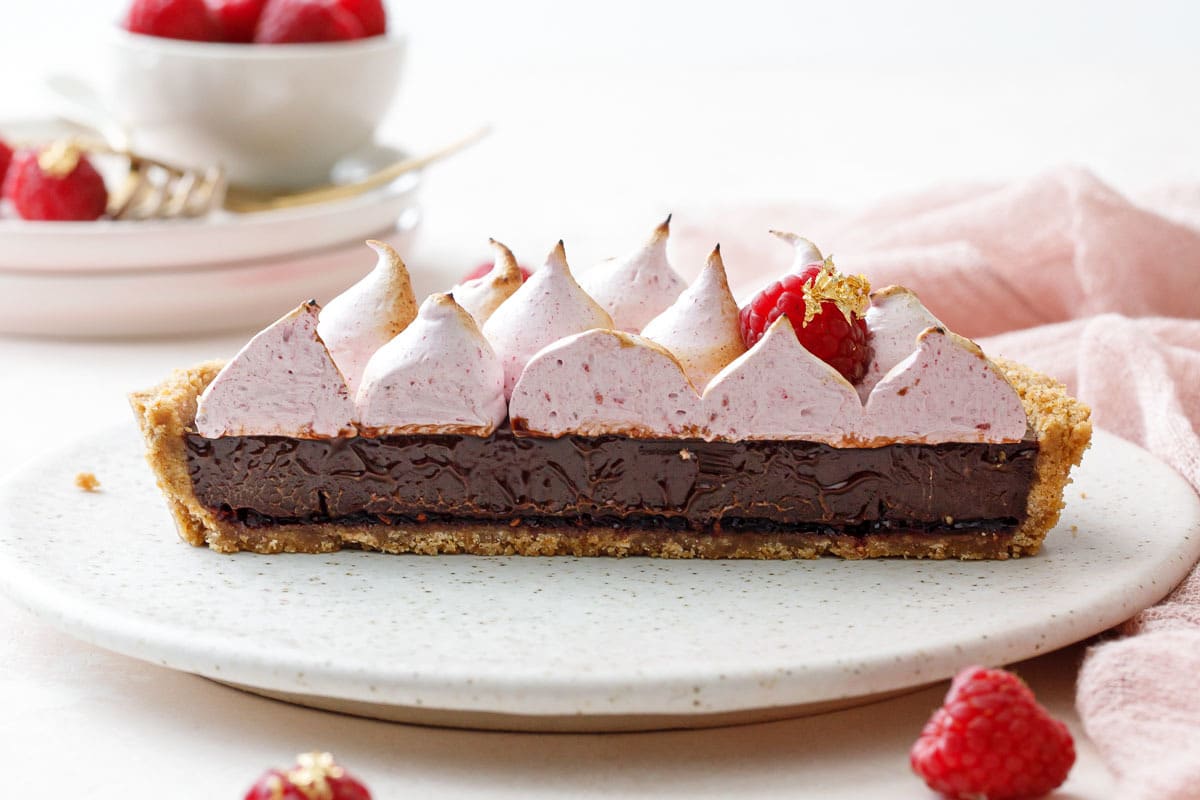
Talk about the perfect dessert, this stunning tart is basically a giant raspberry-flavored s’more with a silky chocolate ganache and fluffy, pink-tinged marshmallow meringue topping flavored with freeze-dried raspberries.
Chocolate, raspberry, graham cracker, and marshmallow: not sure about you, but that’s what my dreams are made of. But this surprisingly simple tart is no dream: it’s a rich, decadent reality.
What do you get when you combine a classic milk chocolate s’more with fresh and fruity raspberry flavor? Something gosh darn delicious, that’s what.
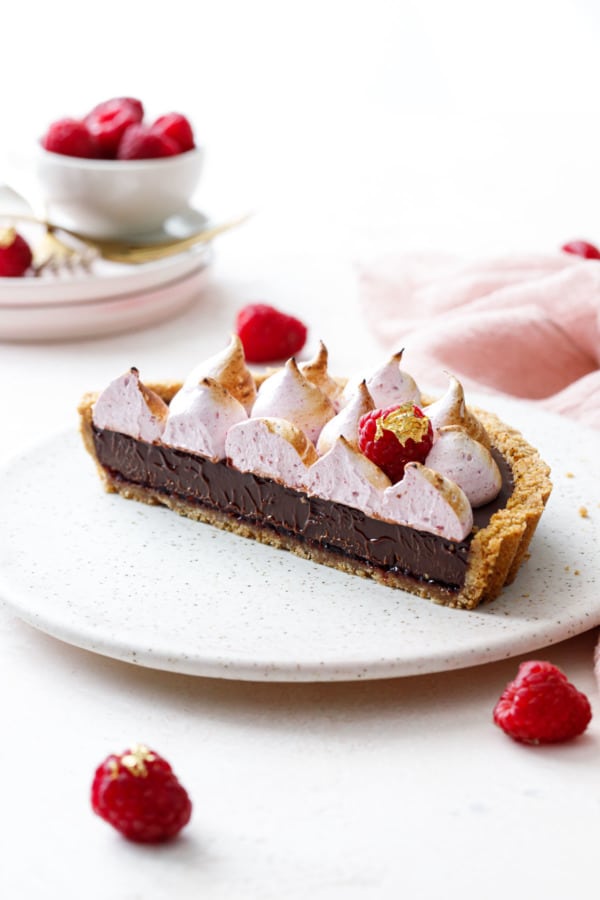
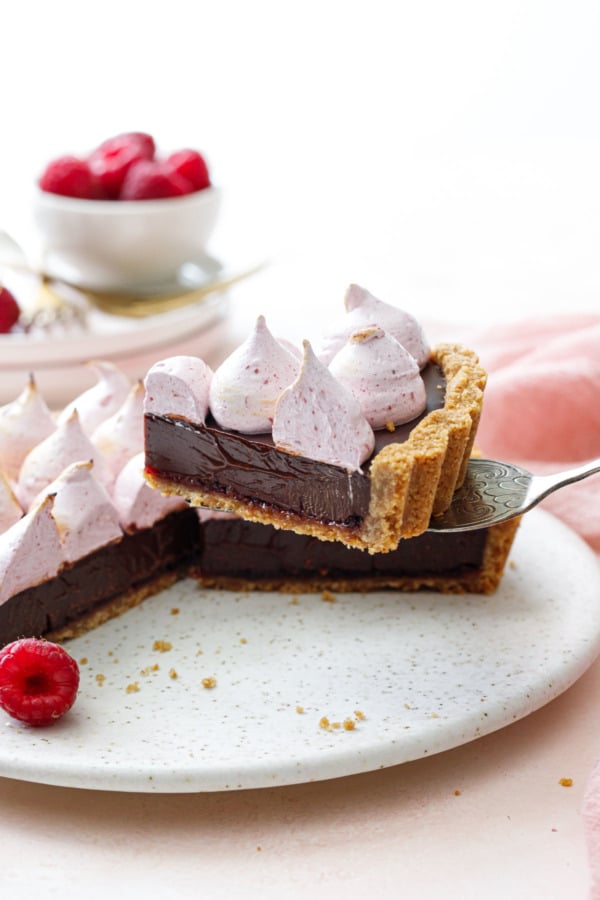
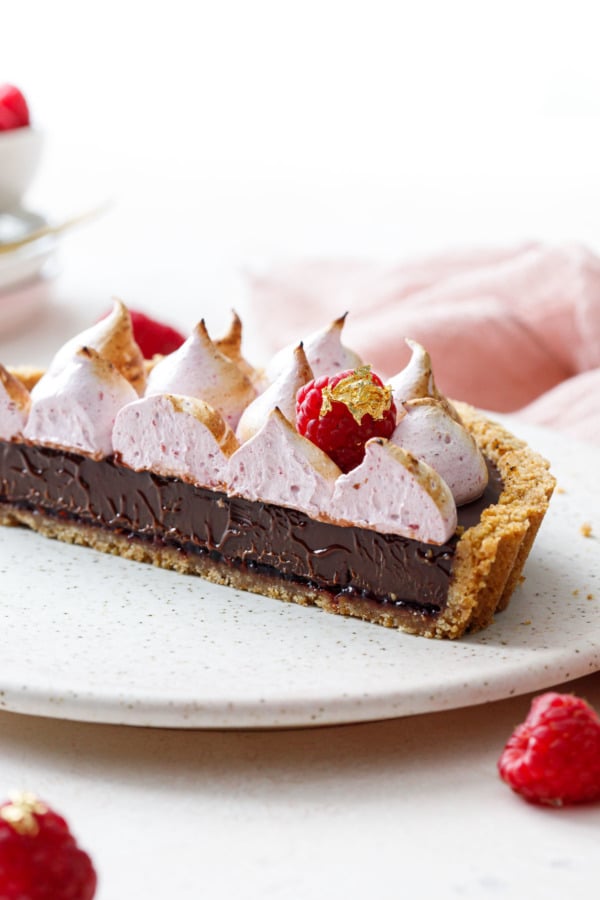
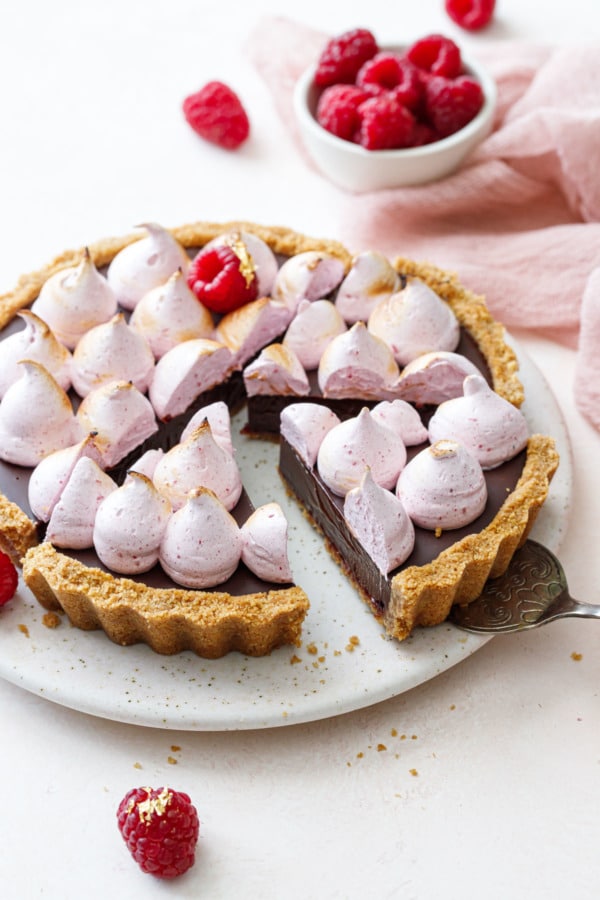
This tart has everything: a sweet and salty graham cracker crust, bold raspberry jam, a silky smooth chocolate ganache, and a fluffy, raspberry-scented toasted marshmallow meringue to top it all off.
For as impressive as it is, it’s surprisingly simple.
I call this recipe nearly no-bake, because the crust does need a few minutes in the oven. If you truly can’t stand the thought of turning on your oven in the summer heat, you can set the crust in the fridge or freezer before adding the jam and ganache. However it might be a little less cohesive and slightly more crumbly when you cut into it.
The topping is a light and fluffy marshmallow meringue, flavored with freeze dried raspberries.
I was originally aiming for a more s’mores-y flavor, so at first I attempted a true marshmallow topping (it was basically going to be a raspberry-flavored version of my micro s’mores tartlets recipe from a decade ago). I’m not sure if it was the humidity or if my candy thermometer was running a few degrees cooler, but the marshmallow failed to properly set up into a pipe-able consistency. It. Was. A. Mess.
For batch two, I made a simpler marshmallow meringue, which is much less finicky (no gelatin, just egg whites for fluff and flavor) and whips up into cloud-like perfection despite any residual humidity. With a bit of freeze-dried raspberry mixed in, it takes on a gorgeous pale pink hue and a surprising hit of raspberry flavor.
That said, my first test tart didn’t include the jam layer. And while we both agreed that the raspberry meringue was lovely on its own, the chocolate flavor overpowered it entirely. The addition of the jam brought the raspberry and chocolate flavors into much better balance of flavors, packing each bite with just as much fruit as chocolate.
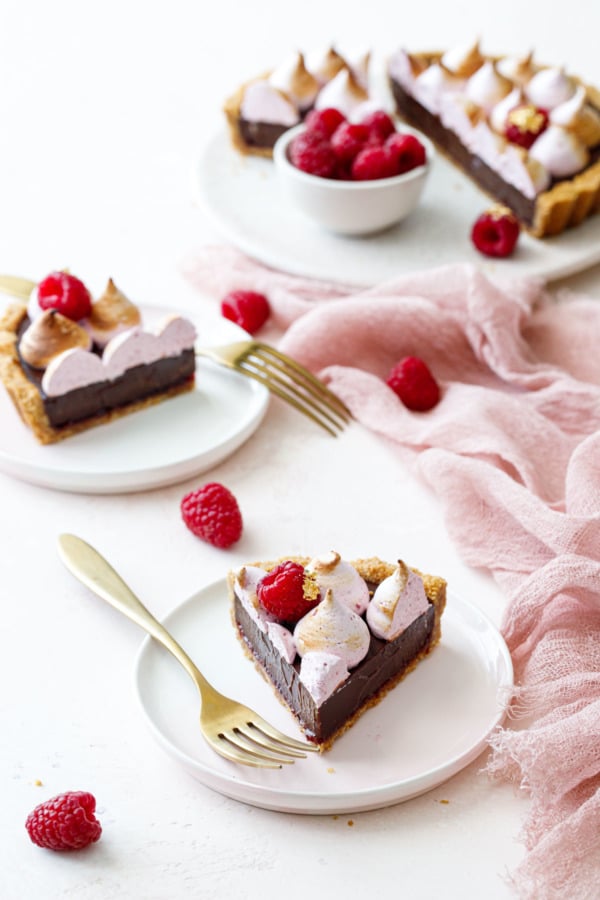
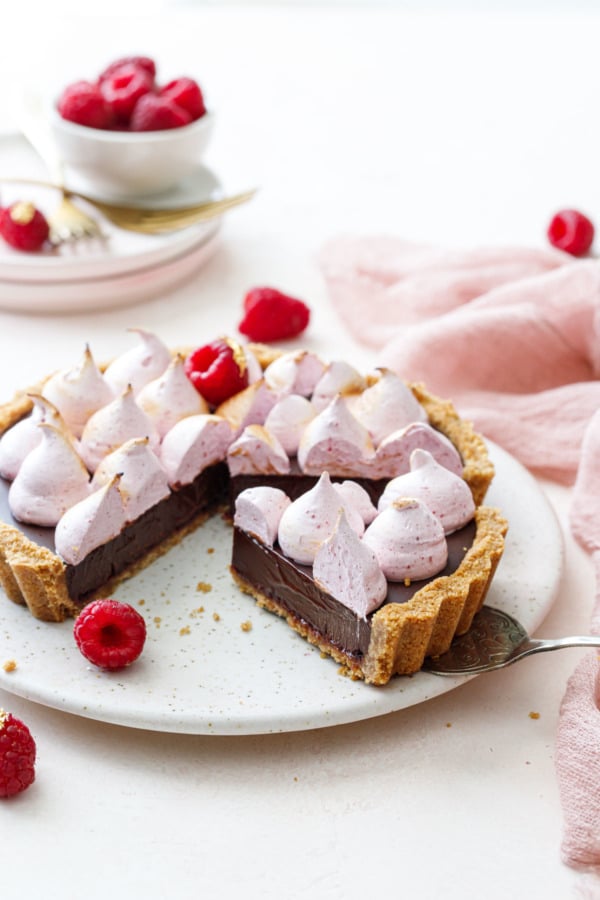
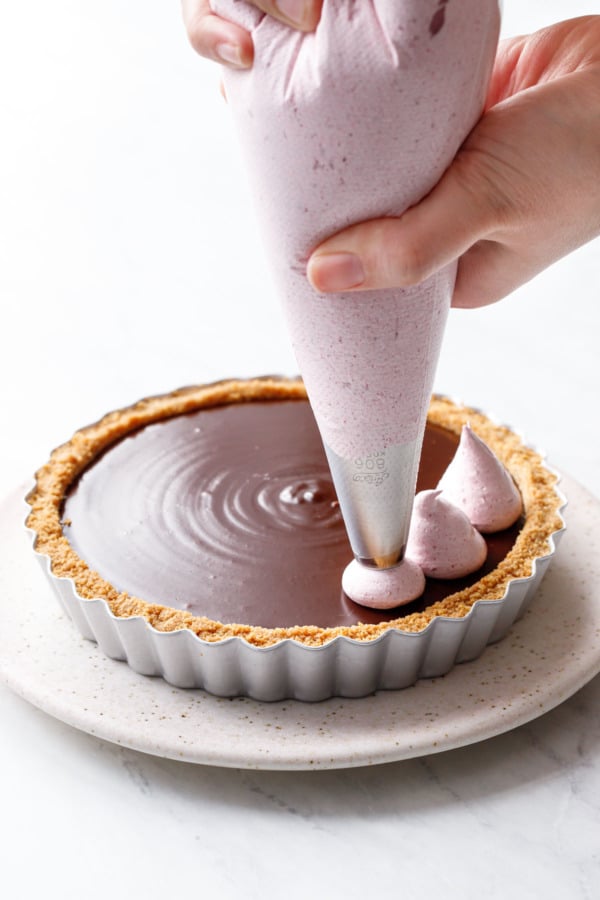
If you opt to pipe the meringue like I did (using a 1/2-inch round piping tip), you may not use all of the meringue. In lieu of piping, you can also pile it on top into a big swoopy mound if you prefer a more rustic (and meringue heavy) approach.
Both the meringue and the ganache are best after they’ve had a little time to set, so I recommend planning to finish your tart at least a few hours before serving. I wanted really clean slices, so I let it chill overnight.
For the cleanest cuts, use a hot knife (I pour a bit of hot water from a kettle over the blade). Pat dry, and then lightly rub with a bit of butter or oil. The meringue is rather sticky, so the little bit of butter will help the knife glide smoothly through all the layers. Also, clean off the blade between each cut (re-heat and re-butter as necessary).
I first tested this recipe using biscoff cookies in the crust, which, while undeniably tasty, don’t have the right texture to make a structurally sound tart crust. Biscoff cookies don’t grind as finely as graham crackers do, making for a crust that’s more coarse and crumbly and doesn’t quite stick together as well as graham crackers.
That said, you can use other kinds of cookies in the crust if you like. Chocolate wafer cookies, for example, are one of my favorite cookies with which to make tart/pie/cheesecake crusts. You can use Biscoff cookies too, just accept that they will be rather crumbly when cut.

Oh My Ganache.
There were a few years, back during the cookbook days, where I struggled with ganache. You’ll notice some of the recipes in the Cookie Dough Lovers’ Cookbook should probably be ganache, but instead I did more of a chocolate-and-butter-glaze. The reason for that was, for the longest time, I could not get a smooth, shiny ganache. It would always break on me, turning into a greasy, separated mess.
I can finally say I’ve conquered ganache, and the main reason for that is… patience. Take it from experience, you can’t rush ganache. Spend the extra time chopping your chocolate very finely, and don’t get overzealous when heating the cream either.
Use good chocolate. Chocolate chips are made with stabilizers and other additives to prevent them from melting. And you want the chocolate to melt smoothly.
I also find that using a small proportion of milk chocolate helps the final ganache to be smoother and shinier (most likely due to the emulsifiers present in milk chocolate, it’s already somewhat of an emulsion which will incorporate with the cream more easily)
Chop it finely. The smaller the pieces of chocolate, the more quickly and evenly they’ll melt. Many of my ganache failures resulted from trying to re-warm the ganache and melt any bigger pieces of chocolate that hadn’t fully melted. If it’d just spent more time chopping the chocolate into smaller pieces, it wouldn’t have been an issue.
Don’t overheat it. The cream should be hot and steamy but not scalding. If chocolate gets too hot it will most certainly break into a greasy mess. This is related to the above point in that the chocolate needs to be chopped fine enough so the hot-but-not-boiling cream will melt it. If you find yourself with big chunks of unmelted chocolate in your ganache, the solution isn’t hotter cream, it’s to chop the chocolate even smaller.
* That said, if you find your ganache isn’t completely melted, do not put it back on the stove or try to microwave it. You’ll only succeed in overheating and thus breaking the emulsion. Instead, either fish out the stray pieces of unmelted chocolate, or use a double boiler to very (very!) gently warm the ganache until it’s fully melted.
Whisk gently. Whisking too vigorously can break the fragile emulsion. I start whisking very gently in the center until an emulsion forms, then slowly work in concentric circles out towards the edge. You may also find a spoon works better than a whisk for gentle stirring. That said, people swear by using immersion blenders for ganache. I’ve never tried it, but if the pros do it, there must be a reason.
Don’t wait. You want to pour your ganache into the tart crust immediately after the butter is fully melted and the ganache is still warm and will flow into a smooth, shiny layer in the crust. If the ganache is allowed to cool, then gets stirred again, it is much more likely to break.
Freeze-Dried Flavor
Freeze-dried fruit is one of my favorite flavoring methods, since it can be added to any confection without causing consistency issues from extra moisture like fresh fruit or jam would.
I buy whole freeze-dried raspberries (Trader Joe’s has them, but you can also find them online), then grind it up in a (clean!) coffee grinder until it is a fine powder. They do make freeze-dried raspberry powder, however I think this is made from juice as opposed to whole fruit so the flavor might not be as bright.
Especially in humid climates, the powder will clump almost immediately when exposed to humid air, so don’t grind your freeze-dried fruit until just before you are ready to use it.
Tart Math
This recipe is written for one 6-inch tart.
Double the recipe for a standard-sized 9-inch tart. If you opt to pipe the meringue like I did, you probably don’t need to double that part of the recipe as a smaller batch is more than enough.
You can also make about three 4-inch mini tartlets from the same recipe, or even more micro tartlets in a mini muffin tin.
Sometimes when I’m unsure about the yield of a recipe, I use water to measure the relative volume of the various size pans. This recipe makes about 275mL of ganache, which is just about right for a 6-inch tart pan, and almost exactly half the 550mL needed for a 9-inch tart. Sure you can do the same thing with some basic geometry and cylinder area calculations, but water seems like a far easier method to me.
Substitutions and Variations
You can make the marshmallow meringue without the freeze-dried raspberry. Just don’t try to use fresh fruit or jam to flavor the meringue; the excess moisture will negatively affect the consistency. Stick to powders and extracts for flavoring.
The crust can be made with just about any kind of cookie (including gluten-free cookies!) Graham crackers provide the best structure in my opinion, but chocolate wafer cookies would work quite well here too.
Skip the raspberry jam and omit the raspberry flavoring in the meringue for a classic s’mores tart that will hold its own.
While the milk chocolate in the ganache provides a perfect sweetness and the extra sugar and emulsifiers helps produce a silky smooth ganache with a luscious mouthfeel, you can use all dark chocolate here if you prefer. I recommend increasing the cream by a tablespoon or two along with an extra tablespoon of butter to keep the ganache soft and supple (higher % chocolates will make for a stiffer ganache otherwise).
For a dairy free ganache, use full-fat coconut milk or coconut cream or a non-dairy creamer in place of the heavy cream. Just be very patient as it can be harder to achieve a proper emulsification with non-dairy substitutes.
Chocolate Raspberry S'mores Tart
Ingredients
For Crust:
- ¾ cup / 100 g graham cracker crumbs, from about 4 oz, or 8 double cookies
- 3 tablespoons / 42 g unsalted butter, cut into chunks
- 1 teaspoon / 10 g corn syrup, optional, but it helps to keep the crust together
- pinch fine sea salt
- 3 tablespoons / 60 g raspberry jam
For Ganache Filling:
- 3 ounces / 85 g good quality dark chocolate, 60-70%, finely chopped
- 3 ounces / 85 g good quality milk chocolate, finely chopped
- ½ cup / 120 g heavy whipping cream
- 1 tablespoon unsalted butter, at room temperature, cut into small pieces
For Raspberry Meringue Topping:
- 2 large egg whites
- ½ cup / 100 g granulated sugar
- ⅛ teaspoon cream of tartar
- 1 teaspoon vanilla
- ¼ cup / 18 g finely ground freeze-dried raspberry powder
- fresh raspberries, for decoration (optional)
Instructions
- To prepare crust, preheat oven to 350 degrees F.
- Finely chop graham crackers in a food processor. In a microwave-safe bowl, microwave butter and corn syrup for about 45 seconds or until melted. Pour into crumb mixture along with salt and fold until incorporated and crumbs are evenly moistened.
- Dump into a 6-inch round tart pan (or equivalent, such as three 4-inch mini tart pans) with a removable bottom. Press firmly onto bottom and up the sides (use a tamper or a small flat-bottomed glass to help if necessary). Bake for 5 to 7 minutes or until set. If the crust has puffed up at all, use a lightly greased flat-bottomed glass to gently press it back into place.
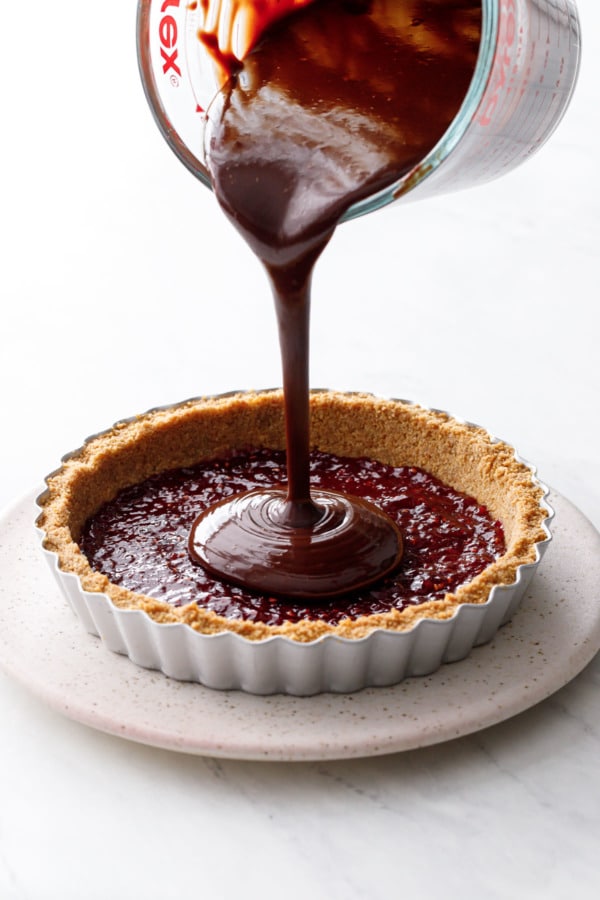
- While crust is still warm, spread a thin layer of jam into the bottom of the crust using an offset spatula. Be careful to spread the jam without lifting the crumbs from the crust; it'll be easier to spread if you to put a few smaller dollops around the whole crust as opposed to one large blob in the middle. Set aside while you prepare the ganache.
- For ganache, place chopped chocolate in a heat-proof bowl. The finer you can chop this chocolate the better.
- Heat cream in a small saucepan until it just begins to bubble (do not let it fully boil). Pour over chopped chocolate. Let sit for 30 seconds, then begin to gently whisk, making small concentric circles in the center of the bowl, until chocolate is fully melted and smooth. Add butter, 1 small chunk at a time, whisking slowly until fully incorporated.
- Immediately pour ganache into crust on top of jam. Gently tap the pan a few times on the counter to help it settle and remove air bubbles. Let sit for 1 to 2 hours at cool room temperature or refrigerate for 30 to 60 minutes just set.
- Meanwhile, to make the meringue, combine egg whites, sugar, and cream of tartar in a medium-sized heat proof bowl. Set bowl over a pan of gently simmering water. If you have an appropriately sized sauce pan, you can also use the bowl of your stand mixer. Just make sure the bottom of the bowl is not touching the water below.
- Gently whisk over the simmering water until mixture is hot to the touch and sugar is fully dissolved. It should read 170 degrees F on an instant read thermometer, and if you rub a bit between your fingertips (careful, it's hot!) you should not feel any grainy sugar. Remove from heat.
- With an electric mixer fitted with the whisk attachment, beat on high speed until meringue is thick and glossy and holds stiff peaks. It should also no longer feel warm to the touch. Add vanilla and freeze-dried raspberry and mix until evenly distributed.
- Transfer meringue to a piping bag fitted with a 1/2-inch round piping tip. Pipe on top of set ganache in a decorative pattern. Alternatively, you can dump the meringue onto the tart and spread with a large offset spatula into a swoopy mound.
- Refrigerate for 30 to 60 minutes to allow meringue to set, then lightly brown using a kitchen torch (this step is optional, just don't use a broiler or anything to try to toast the meringue as it will melt the ganache too much). Return to the refrigerator to set up again, at least 30 minutes or overnight, until ready to serve. Top with fresh raspberries for garnish, as desired.
- Lift out of tart pan using removable bottom and slice using a lightly greased knife that has been slightly warmed under hot water. Clean blade completely between each cut; re-warm and re-grease as necessary.
- Tart will keep in the refrigerator for up to 5 days.