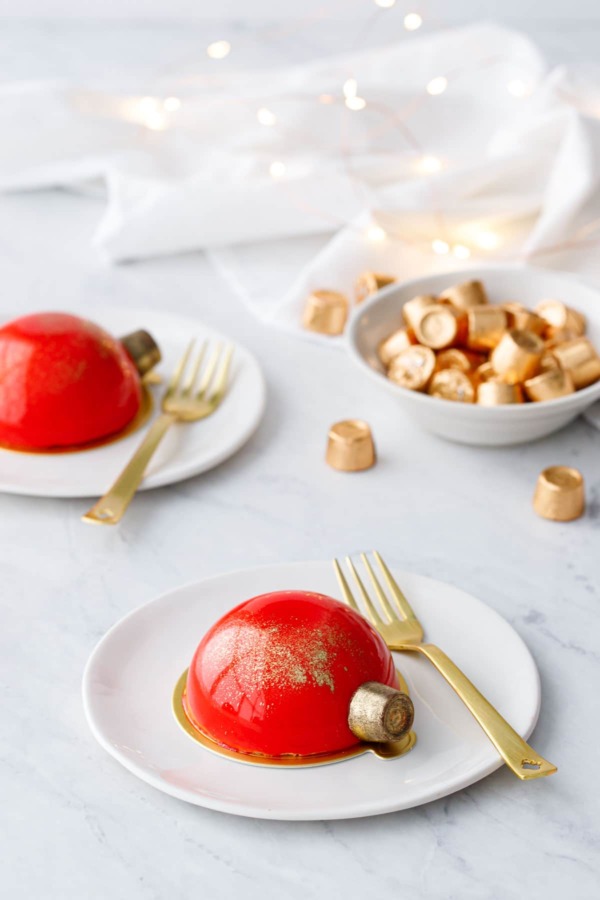
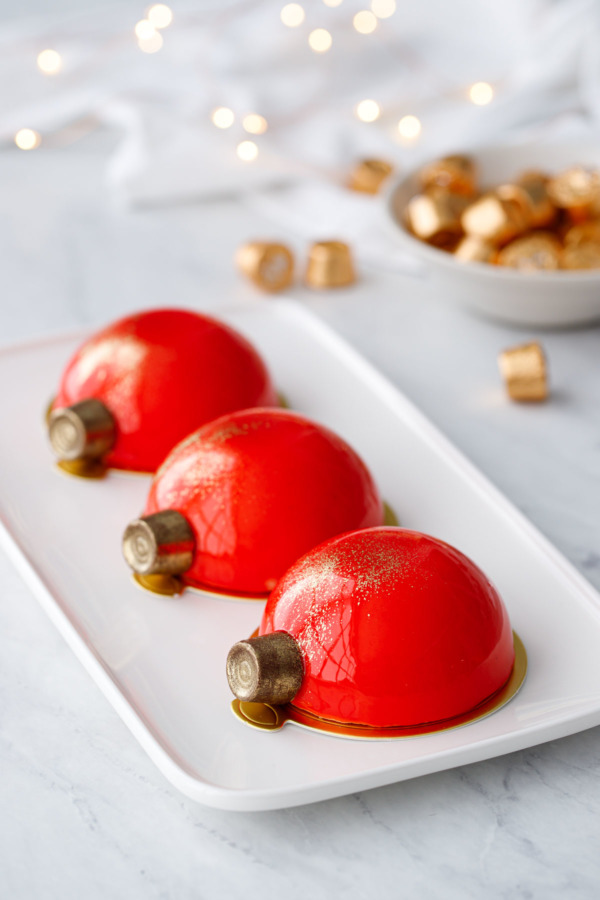
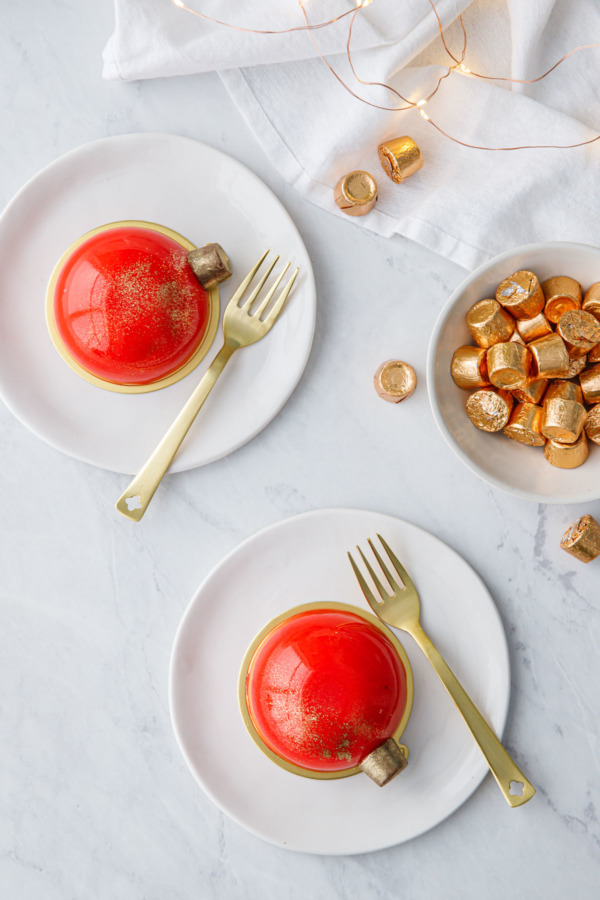
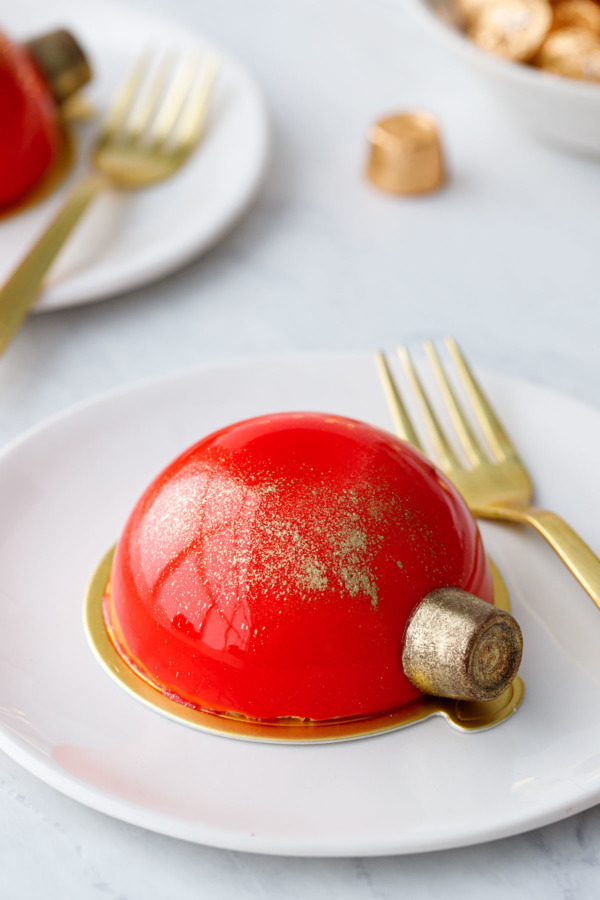
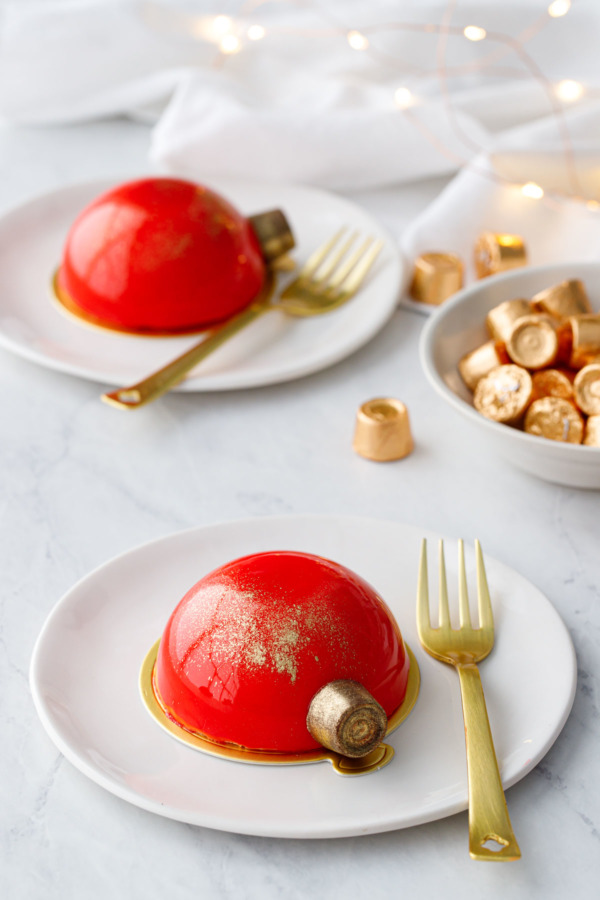
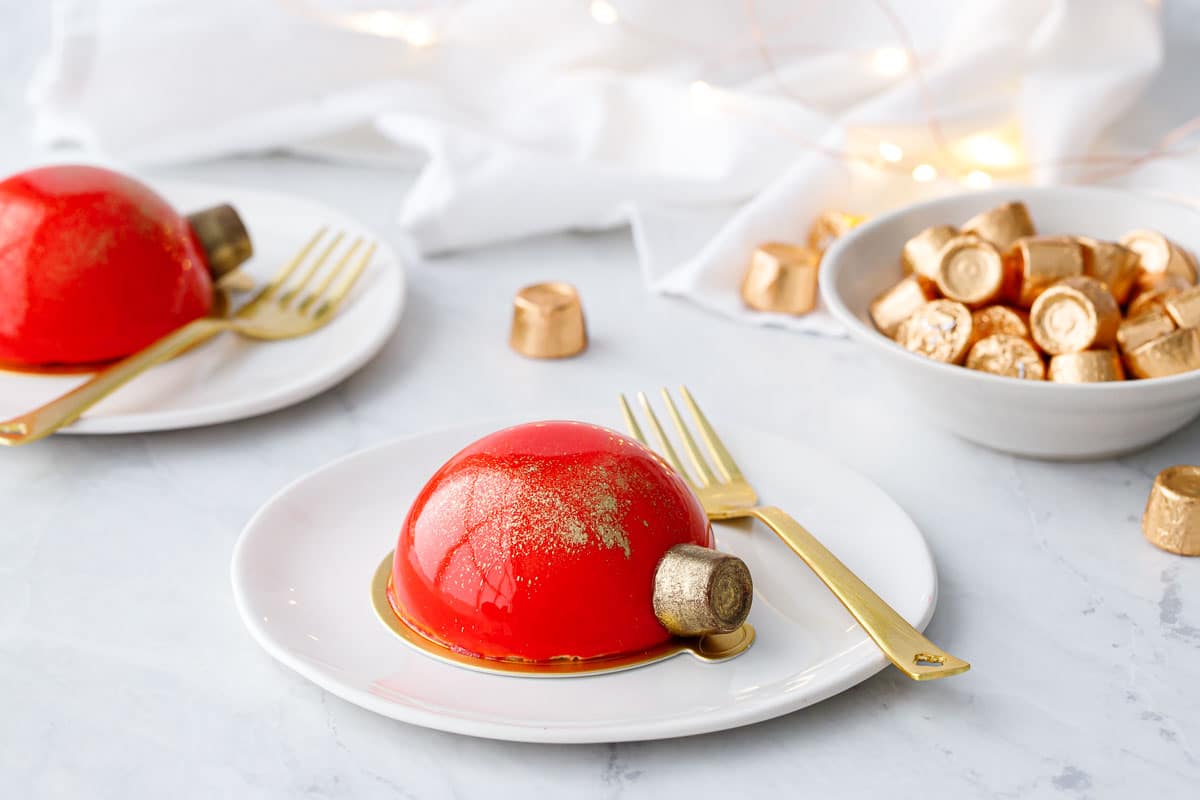
Pretty on the outside, stunning on the inside: these festive Christmas ornament entremet cakes feature flavors of chocolate and caramel enrobed in a shiny red mirror glaze.
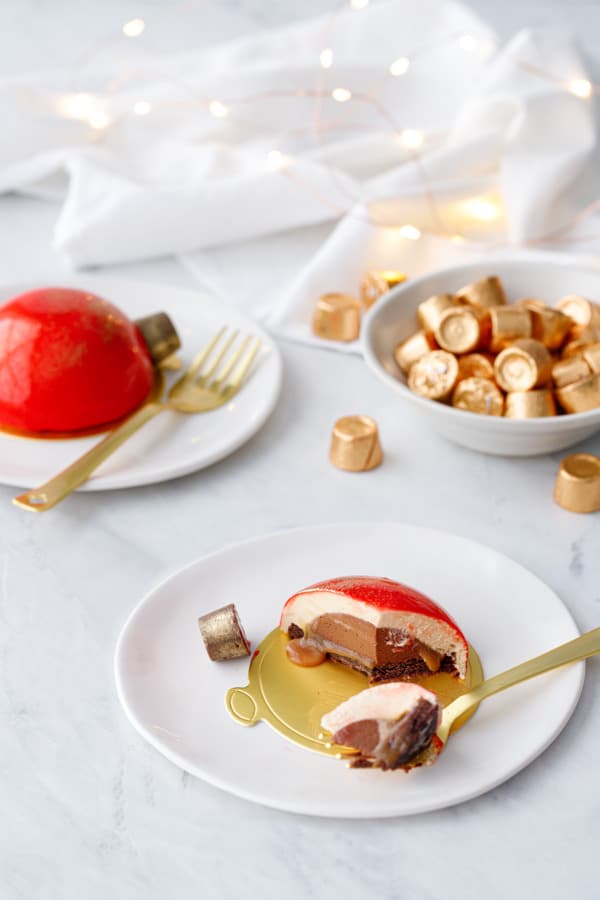
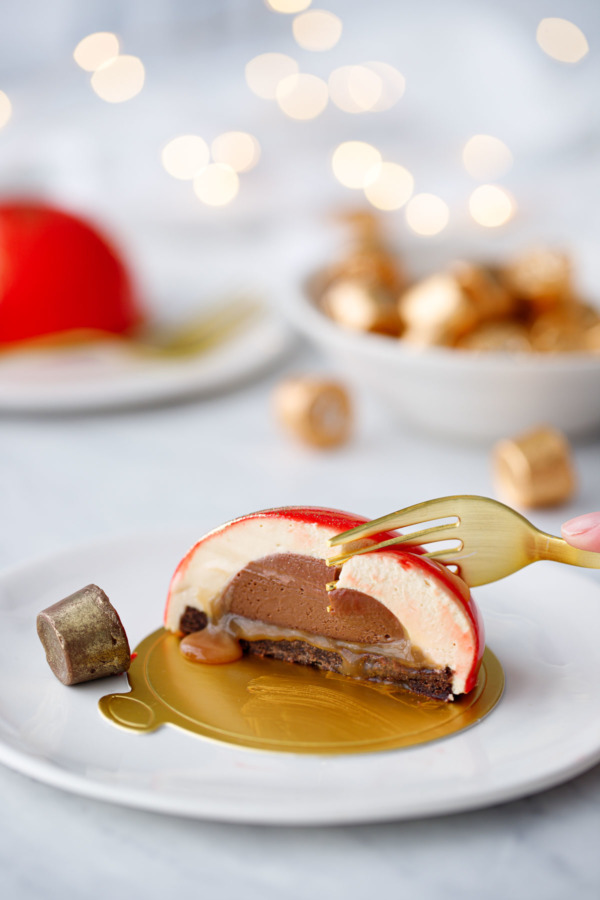
Entremet cakes are a labor of love, but the final result is downright impressive. This holiday variation incorporates a crunchy chocolate pecan crust, gooey salted caramel, creamy chocolate crémeux and a cloud-like caramel mousse.
For the last two weeks I’ve been completely and utterly consumed by this recipe. (That said, I’ve already consumed two of the finished cakes myself, so… I’d call it even in the end.)
Entremet cakes by nature have many different layers and components, and I found myself with a serious case of choice paralysis: there were simply too many options and I just couldn’t decide. I spent hours scouring the internet and pastry cookbooks, considering a multitude of options for different flavors, textures and techniques; my obsessive thoughts even finding their way into my dreams (if you’ve never had OCD recipe development dreams, are you even a food blogger?)
I knew I wanted a combination of chocolate and caramel flavors to go with the Rolo candies I’d be using for the ornament topper. But that was really the only thing I had definitively decided.
But should I do a chocolate mousse and a caramel crémeux, or a caramel mousse and a chocolate crémeux?
How about a caramel-chocolate ganache or a chocolate-caramel sauce or a regular salted caramel?
Should the base be soft sponge cake or chocolate cookie or crispy sable crust?
Should I mold the insides as domes or should I cut out rounds?
Well…
Now you see what I mean by choice paralysis?
Eventually, after testing a few components separately, I decided on a crunchy chocolate pecan cookie crust, a center of rich chocolate crémeux, a layer of simple salted caramel, and then a salted caramel and caramelized white chocolate mousse for the outer layer.
Yes, I probably obsessed over the details a bit too much, because, really, how can you go wrong with anything chocolate and caramel?
The most problematic aspect for me turned out to be the caramel—it turned out a bit thinner than I would have liked, more like a caramel sauce than a chewy caramel candy. This made assembly tricky (it never quite solidified in the freezer, so it stuck to the silicone mold). The soft caramel also didn’t stay where I put it between the crémeux and the base crust; instead it squeezed out to the edges of the crémeux dome and the slowly oozed out once the cake was cut.
Tasty, sure, but just a bit too messy for my liking.
I didn’t have time to remake the entire recipe, so I went ahead and photographed it as is with the soft caramel. BUT… I’ve adjusted the recipe below so hopefully your caramel will come out firmer than mine (the main difference is being sure you bring your caramel back up to the appropriate temperature after adding the cream). It still won’t set up completely solid like the crémeux or mousse layers, and you may still have to peel it out of the silicone mold (use a pairing knife to cut around the edge first) but it’ll be much more manageable.
You can also leave out the caramel layer entirely if you don’t want to deal with it, though you will need 3 tablespoons of caramel for the mousse itself (totally fine to use store bought caramel sauce in this case). I also think store bought dulce de leche would work well here too (it’s thicker than caramel sauce so will stay in place better if you do want the caramel layer in addition to the caramel mousse).
Now, I fully acknowledge this recipe is ridiculously long. There are a lot of different parts to this recipe that all need to be made separately and then assembled before the whole thing is smothered in a shiny red mirror glaze.
The good news is that all of the parts and pieces can be made ahead of time; so spread out your time over a couple of days and suddenly it doesn’t seem so impossible!
Even better, the fully glazed cakes themselves can also be made ahead of time! The mirror glaze holds up amazingly well (and I’d argue that a few hours in the fridge make it more stable than freshly glazed cakes). You can easily make and glaze everything 2 or even 3 days ahead of time if you so desire.
Scheduling your Time:
Each of the components of this recipe can be made ahead of time, and in fact many parts must be made ahead of time because they need to completely freeze before you can move on to the next step.
You need to plan for at least 3 days from start to serve, with full overnight freezes for the crémeux and mousse layers (although if you happen to have a blast chiller or deep freezer, you may be able to speed up the process).
Alternatively, if you want to spend the least amount of time each day, you could stretch out the entire process over 6 or even 7 days, only focusing on one single component each day. While the crémeux and mousse steps need at least an overnight freeze, they are totally fine freezing longer than that, so plan your time accordingly.
Either way, plan out your schedule before you start to make sure everything has plenty of time to fully set and freeze.
Compact schedule:
(About 1 to 2 hours of active time per day)
- Day 1 AM: Make the caramel, let cool. Make the crémeux; pour into small dome molds and freeze at least 2 hours until set.
- Day 1 PM: Add the caramel to the crémeux and freeze overnight. Make the base crust. Let dry out overnight.
- Day 2: Make the mousse and assemble the final pieces in the large dome molds. Freeze at least overnight.
- Day 3: Make the mirror glaze and glaze the final cakes (the mirror glaze can also be made on days 1 or 2 and reheated before glazing).
Extended schedule:
(about 30 to 60 minutes of active time per day)
- Day 1: Make the caramel. Refrigerate in an airtight container.
- Day 2: Make the crémeux; pour into small dome molds and freeze overnight.
- Day 3: Add the caramel to the crémeux and freeze overnight. Make the base crust. Let dry out overnight.
- Day 4: Make the mousse and assemble the final pieces in the large dome molds. Freeze at least overnight or up to 1 week.
- Day 5: Make the mirror glaze (this can be made at any point in the process as it’ll keep in an airtight container in the fridge for up to a week).
- Day 6: Glaze and serve!
Before you get started…
Before you dive in to this recipe you’ll need to make sure you have the right equipment and ingredients.
Large silicon dome mold. The final cakes are molded in a silicone dome mold measuring approximately 3-inches in diameter. The mold I used makes 5 cakes, but there are similar molds that would make 6 slightly smaller cakes.
Small silicone dome mold. The inner crémeux core is molded in a smaller dome mold, about 1 3/4-inches in diameter (I actually used the same mold I used for my blueberry mousse cakes; so if you bought one for that recipe you’re all set!) If you don’t have a smaller dome mold, you can pour the crémeux into a silicone cake pan or a cake pan that you fully line with plastic wrap; Once the crémeux is set you can cut out rounds with a cookie cutter, and drop this into the mousse.
Round cookie cutters. A set of multi-sized round cookie cutters comes in extremely handy. For the base crust, pick a cutter that is about 1/4-inch smaller than the diameter of your large dome mold so it will lie completely flush with the top of the mold. If you are cutting rounds of crémeux instead of using a smaller dome mold, use a cutter approximately 1 1/2 to 1 3/4-inches in size.
Instant read thermometer. The temperature is one of the most important parts of the mirror glaze process, so you really can’t do it without an accurate, instant read thermometer. Thermapens are my favorite, but any decent digital probe thermometer will do.
Gelatin. I used sheet gelatin (you’ll need 9 sheets total), but you can also substitute powdered (1 teaspoon per sheet) if you prefer. If using powdered gelatin, bloom first in 1 tablespoon water per 1 teaspoon powdered gelatin; sprinkle gelatin over top and let sit for 5 minutes. Microwave it for 5 to 10 seconds until melted and then stir in to the warm liquid. Sheet gelatin just needs to be covered in cold water for at least 5 minutes to soften; squeeze out as much water as you can before adding it to the hot liquid.
White chocolate. The real stuff, NOT baking chips. When in doubt, check the ingredients: cocoa butter should be the first or second ingredient. White baking chips containing palm kernel oil will NOT work for the mirror glaze.
Other chocolate. In addition to the white chocolate for the glaze, I also used a combination of dark and milk chocolates in the crémeux and caramelized white chocolate in the mousse (you can also make your own caramelized white chocolate, or substitute plain white chocolate or milk chocolate here as well).
Offset spatula. Ideally you’ll have a large offset spatula as well as a small one. These are useful for leveling off the tops of the mousse-filled molds, as well as lifting the final cakes during and after the glazing process.
Gold luster dust. I used this gold luster dust to brush the Rolos with gold, and give the tops of the final glazed cakes with a bit of sparkle.
Cake boards. These gold cake rounds make moving/transporting/serving the final mirror cakes much easier. You can also cut out your own rounds out of thin cardboard like a cereal box, but because of the sticky nature of the glaze the cakes really can’t be moved around once they’re moved to their final resting place. Just be sure the boards are the right diameter (a lot of ones I found were 3″ which would have been too small. These are 3.5″ which was perfect).


Shortcuts and Scaling:
I know many of you will take one look at the length and complexity of this recipe and go running for the hills.
But one of the nice things about this recipe is you can customize it however you’d like.
If you want the impressive outer presentation of these ornament cakes but with the least possible components, just do the base crust, the caramel mousse and the mirror glaze (skipping the caramel and the crémeux, and using store-bought caramel sauce in the mousse itself). Depending on what size your dome molds are, you may also be able to use a store-bought chocolate wafer or other kind of cookie for the base (as long as it’s slightly smaller than the diameter of your molds).
This recipe will make five 3.14-inch domes, six 3-inch domes, or fifteen 1 3/4-inch domes; to make a double batch you’ll want to double the crust, crémeux and mousse components (you’ll have plenty of caramel and glaze for a double batch).
If you want to make a full size glazed mousse cake instead of minis, the quantities as listed should work in a 6-inch silicone pan or cake ring, or, for a larger 8 or 9-inch cake, double the crémeux and mousse portions of the recipe and follow the general assembly method outlined in my Nutella Mousse Cake recipe. I tried to note the yield of each component in the recipe below, which should help you scale appropriately, no matter what size mold or pan you are using.
Components:
For scaling purposes, the yields of the various components are listed below.
- Salted Caramel: 1 cup
- Chocolate Crémeux: 2/3 cup
- Chocolate Pecan Crumb Crust: one 8-inch crust or six 3-inch crusts
- Caramel Mousse: a generous 1 cup
- Mirror Glaze: 3 cups
If you’re unsure about the capacity of your silicone molds or pan, use water to get an approximate volume measurement.

Of course, leave off the gold-dusted Rolos and you’ve got a year-round delight! Glaze them in any color you’d like, or even use a dark or milk chocolate mirror glaze for an extra dose of chocolate flavor.
Mirror Glaze Christmas Ornament Cakes
Ingredients
Salted Caramel
- ½ cup / 100 g granulated sugar
- 2 tablespoons / 42 g light corn syrup
- ¼ cup / 60 g heavy cream
- ⅛ teaspoon sea salt or fleur de sel
- 2 tablespoons / 28 g butter, cut into small pieces
- 12 g caramelized white chocolate, like Valhrona dulcey, optional
Chocolate Crémeux
- ¼ cup / 60 g heavy cream
- ¼ cup / 60 g whole milk
- 1 large egg yolk, at room temperature
- 75 g semisweet chocolate, finely chopped (I used a mix of 50g 60% dark chocolate and 25g 38% milk chocolate)
- 1 sheet leaf gelatin or 1 teaspoon powdered gelatin
Chocolate Pecan Crumb Crust
- 2 tablespoons / 25 g finely ground pecans
- ⅔ cup / 80 g all-purpose flour
- ⅓ cup / 67 g organic or demerera sugar
- 2 tablespoons / 14 g cocoa powder
- ⅛ teaspoon kosher salt
- 5 tablespoons / 70 g cold unsalted butter, cut into cubes
- 1 to 2 teaspoons whole milk, as needed
Caramel Mousse
- 1 sheet leaf gelatin or 1 teaspoon powdered gelatin
- ¼ cup / 60 g caramel, store bought or measured out from the batch you made earlier
- ¼ cup / 60 g whole milk
- 1 large egg yolk, at room temperature
- 40 g caramelized white chocolate (like Valhrona dulcey or regular white chocolate), finely chopped
- ⅔ cup / 160 g heavy whipping cream, cold
Mirror Glaze
- 6 sheets leaf gelatin or 2 tablespoons powdered gelatin
- 1 cup / 200 g granulated sugar
- ⅔ cup / 226 g corn syrup or glucose syrup
- ½ cup / 118 g water
- ½ cup / 163 g sweetened condensed milk
- 7 oz / 200 g good quality white chocolate , finely chopped
- gel or powdered food coloring
- 6 pieces Rolo candies, unwrapped and dusted with gold luster, for decoration
Instructions
For Caramel Sauce:
- Combine sugar, corn syrup, and 1 tablespoon water in a small, high-sided saucepan set over medium-high heat. Bring to a simmer, brushing down any stray sugar crystals from the side of the pan using a wet pastry brush. Stop stirring once sugar has dissolved and mixture comes to a boil.
- Continue to boil, swirling the pan occasionally to ensure even cooking, until the sugar darkens to a rich amber color.
- Add the butter and whisk until completely melted and smooth.
- Remove from heat and add the heavy cream. It will bubble violently and may appear to seize up; continue to stir until smooth and uniform. Once it's smooth again, return to medium heat and boil until it reaches 230 to 235 degrees F.
- Let cool for 5 minutes or so, then add caramelized white chocolate, stirring until melted and smooth. Let cool to room temperature before layering onto frozen cremeux. Or, if you want to store and use it later, transfer to a jar or heat-proof container, then cover and refrigerate up to 7 days until ready to use. You may need to reheat it in the microwave or stovetop until it's pourable.
For Chocolate Crémeux:
- Bloom gelatin. For leaf gelatin, cut into strips and place in a bowl with cold water for at least 5 minutes to soften. For powdered gelatin, sprinkle over 1 tablespoon of cold water and let sit for at least 5 minutes.
- Gently melt chocolate in a double boiler or a heat-proof bowl set over, but not touching, an inch or so of gently simmering water. Remove from heat and set aside.
- Combine milk and cream in a small saucepan. Heat over medium until steaming and just barely starting to bubble.
- Whisk egg yolk in a small bowl. Slowly whisk in 1/4 cup of hot milk mixture into egg yolk, whisking constantly. Continue to whisk in a bit more hot liquid at a time until egg mixture is hot to the touch. Add back to saucepan with remaining milk and return to medium heat.
- Cook, stirring constantly and scraping the bottom and sides of the pan as you go, until mixture thickens (it should read 170 degrees F on an instant read thermometer). Remove from heat.
- If using leaf gelatin, wring out as much water as possible. For powdered gelatin, microwave for 5 to 10 seconds and stir until melted. Add gelatin to hot milk mixture in the saucepan, whisking until well combined.
- Add melted chocolate and stir until completely incorporated.
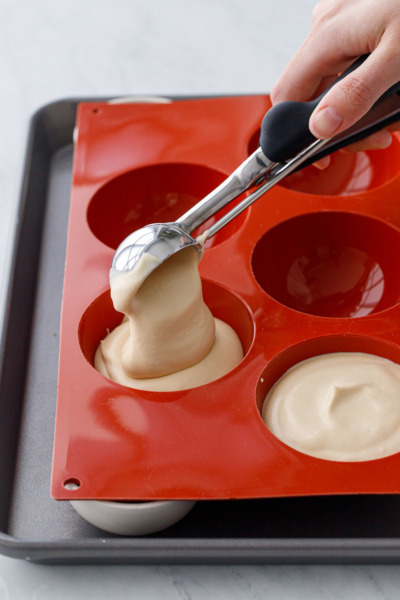
- Spoon mixture into silicone molds (approximately 1 3/4-inches in diameter), leaving about 1/4-inch of room at the top of each mold (if you are skipping the caramel layer, you can fill the molds to the top). Place mold on a flat surface like a sheet pan, and place in the freezer, making sure the mold sits level. Freeze until firm, at least 4 hours.
- Once cremeux is completely set, pour caramel on top, filling just to the top of the mold. Return to freezer and freeze overnight until firm. Reserve remaining caramel for the mousse.
For Chocolate Pecan Crust:
- Preheat oven to 350 degrees F. Line an 8-by-8-inch baking pan with parchment paper.
- In a food processor, pulse pecans until finely ground (don't go so far as to make pecan butter; a coarse crumb is fine).
- Add flour, sugar, cocoa powder and salt and pulse until evenly distributed.
- Sprinkle butter cubes over dry ingredients. Pulse until butter mixture forms coarse, dry crumbs. Pinch a bit of the mixture together between your fingers; if it sticks together, it's good to go. If not, sprinkle over a teaspoon or two of milk and pulse until evenly incorporated.
- Dump crumb mixture into prepared baking pan, and press into an even layer over the bottom of the pan.
- Bake for 15 to 18 minutes or until set. Let cool slightly, then cut out 5 or 6 rounds (use a cookie cutter that is about 1/2" smaller overall than your silicone mold). It's easier to cut cleanly while the crust is still warm.
- Place pan on a wire rack and let cool completely (ideally overnight to let it dry out and get crunchier). Use an offset spatula to transfer rounds to a baking sheet, then place in freezer until ready to use.
For Caramel Mousse:
- Bloom gelatin. For leaf gelatin, cut into strips and place in a bowl with cold water for at least 5 minutes to soften. For powdered gelatin, sprinkle over 1 tablespoon of cold water and let sit for at least 5 minutes.
- Combine caramel and milk together in a small saucepan. Heat over medium until steaming and just starting to bubble.
- Whisk egg yolk in a small bowl. Slowly whisk in 1/4 cup of hot milk mixture into egg yolk, whisking constantly. Continue to whisk in a bit more hot liquid at a time until egg mixture is hot to the touch. Add back to saucepan with remaining milk and return to medium heat.
- Cook, stirring constantly and scraping the bottom and sides of the pan as you go, until mixture thickens (it should read 170 degrees F on an instant read thermometer). Remove from heat.
- If using leaf gelatin, wring out as much water as possible. For powdered gelatin, microwave for 5 to 10 seconds and stir until melted. Add gelatin to hot milk mixture in the saucepan, whisking until well combined.
- Add white chocolate and stir until completely incorporated. Transfer to a large, heat-proof bowl and let cool completely, stirring occasionally, to about 85 degrees F.
- Once caramel mixture is cool, whip cream using the whisk attachment on a stand mixer until it forms medium-stiff peaks.
- Spoon about 1/3 of whipped cream into bowl with caramel mixture, folding to lighten. Add remaining cream and fold until completely incorporated.
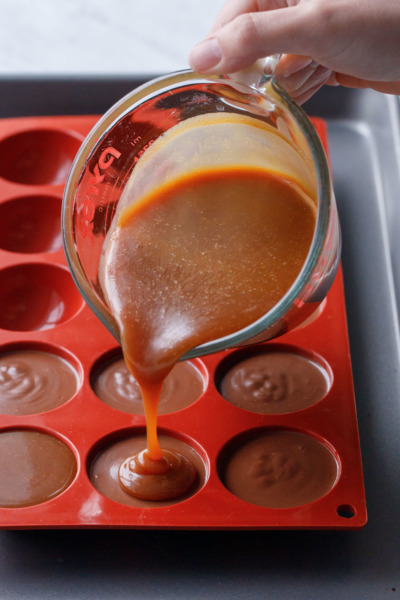
- Spoon mixture into 6 3-inch-diameter silicone molds, filling the molds about 2/3 of the way full. Place mold on a flat surface like a sheet pan to keep the mold level.
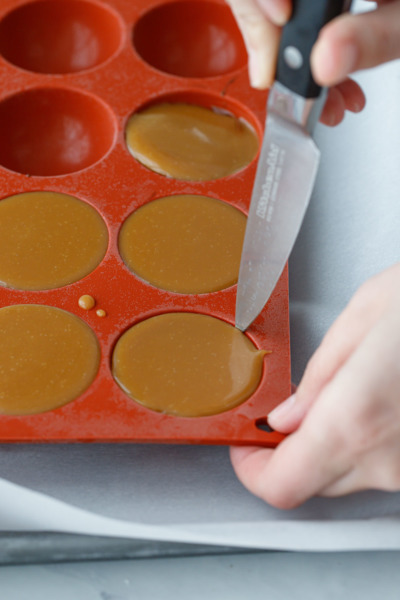
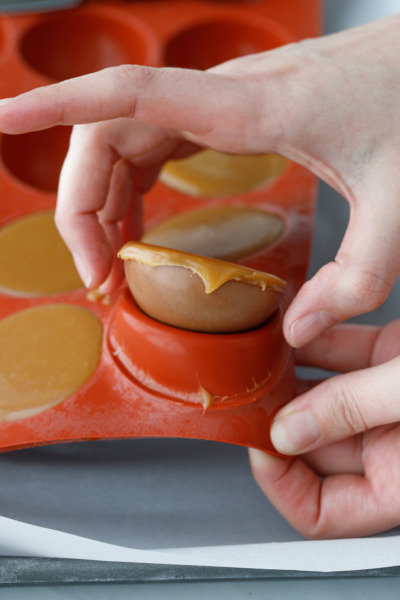
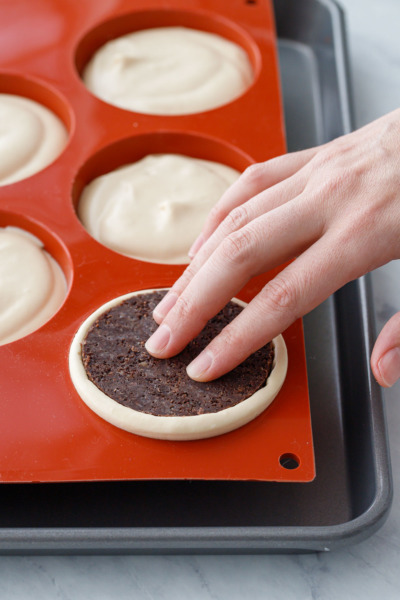
- Remove frozen crust rounds and cremeux domes from the freezer. Run a pairing knife around the top edge of the caramel layer to release it from the silcione, then press out the frozen domes. Carefully place one dome, caramel side up, into the center of each mousse-filled mold.
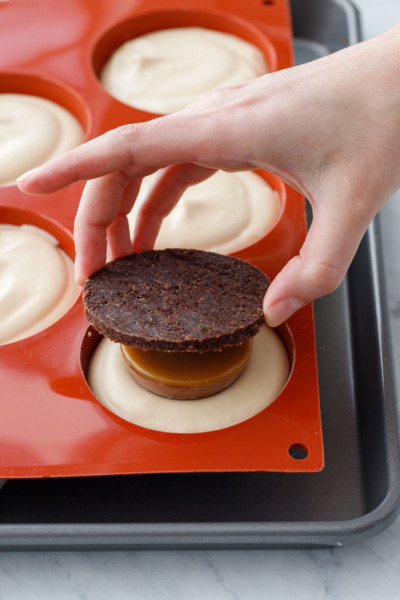
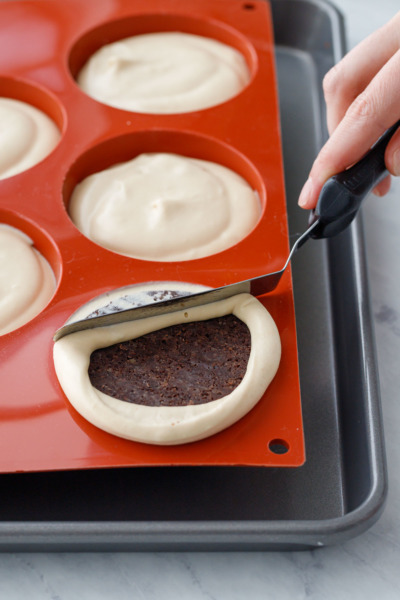
- Place a crust round directly on top of the caramel, and press until the crust is level with the top of the silicone mold. You may have some excess mousse that squeezes out, that's ok. If you underfilled your molds, you might want to put a bit of mousse in a piping bag to fill it in as needed. Scrape off the excess mousse using an offset spatula.
- Place entire tray in the freezer, making sure the mold sits level. Freeze overnight until completely solid.
For Mirror Glaze:
- Cut gelatin into 1-inch strips and submerge in cool water for at least 5 minutes to soften. Place white chocolate in a heat-proof bowl and set aside.
- Combine sugar, corn syrup, and water in a saucepan and bring to a boil over medium heat until sugar is completely dissolved and mixture is clear.
- Remove from heat and add gelatin (squeeze out as much water as possible first) and whisk until completely dissolved. Whisk in sweetened condensed milk. Pour hot mixture over chopped white chocolate and let sit for 30 seconds, then stir until chocolate is completely melted and mixture is smooth (you can also use an immersion blender if you have one to expedite this process, just try not to mix air bubbles into the glaze if possible).
- Let glaze cool, stirring occasionally, until glaze reaches approximately 90-94 degrees F on an instant-read thermometer. The glaze needs to be the correct temperature or it will not form a thick enough layer on the outside of the cakes.
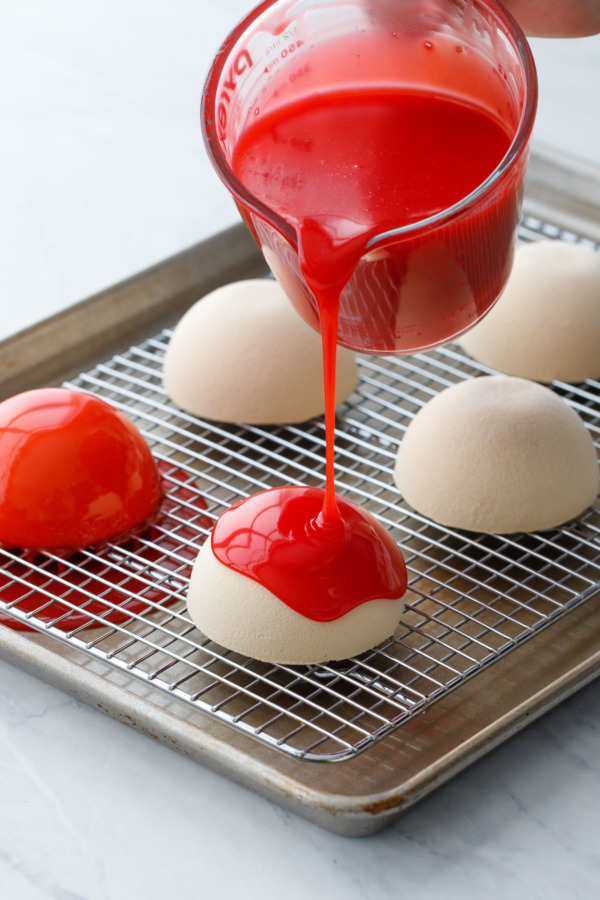
- When the glaze reaches 95-96 degrees, add powder or gel food coloring as desired (I used a generous amount of Americolor Super Red, you need quite a bit more than you think you will to get an ultra rich color). If at any point your glaze gets too cool/thick, microwave it in 10 second bursts, stirring to even out the temperature throughout.
- If you want to make the glaze ahead of time, store it tightly covered in the refrigerator until you're ready to use it. Before glazing, rewarm the glaze in the microwave in 30 second bursts, stirring well after each interval, until glaze is once again smooth and fluid. It'll likely be warming than your target temperature of 94 degrees, so let it cool, stirring occasionally, until it cools down again to the appropriate temperature.
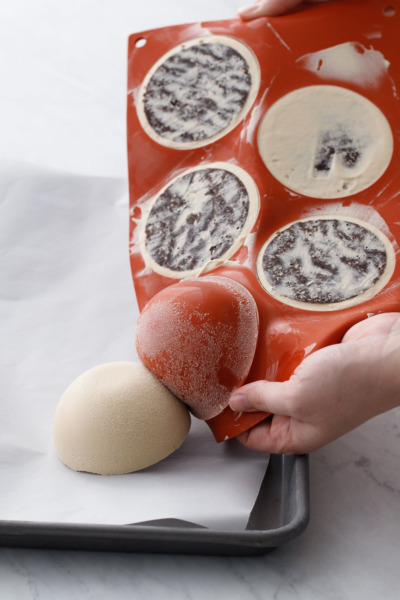
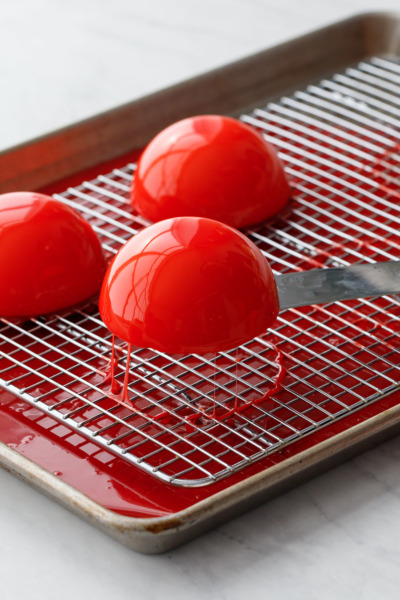
- Unmold frozen mousse cakes and place on a wire rack set inside a rimmed baking sheet to catch any excess glaze. Pour glaze generously over cakes. If your glaze seems a bit thin, you can do another layer, or let the glaze cool down a few more degrees which should give you a thicker layer. Allow the excess glaze to drip off for 5 or 10 minutes, then gently scrape the edges to remove any remaining drops. Carefully transfer cakes using an offset spatula to cardboard cake rounds or small pieces of cardboard for easy movement. Any leftover glaze can be scraped up and refrigerated in an airtight container for later use.
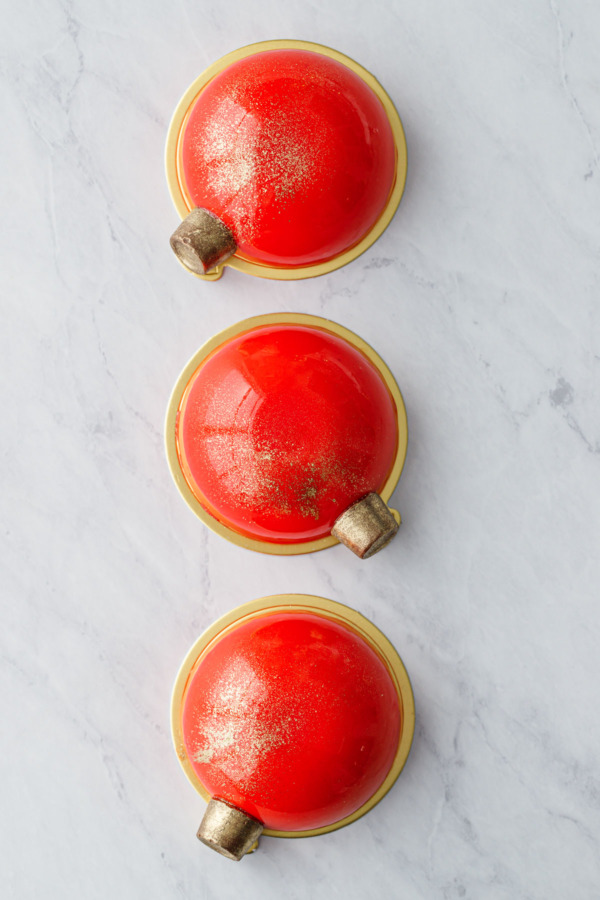
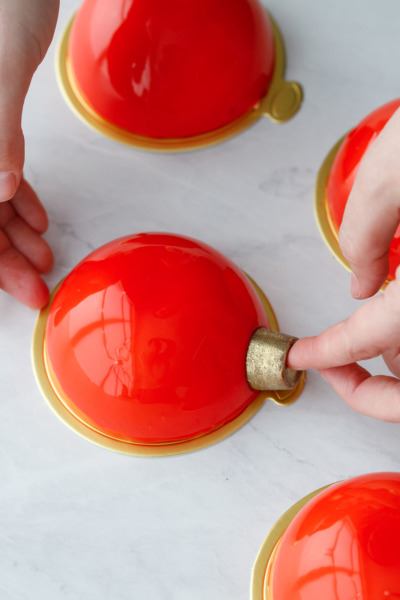
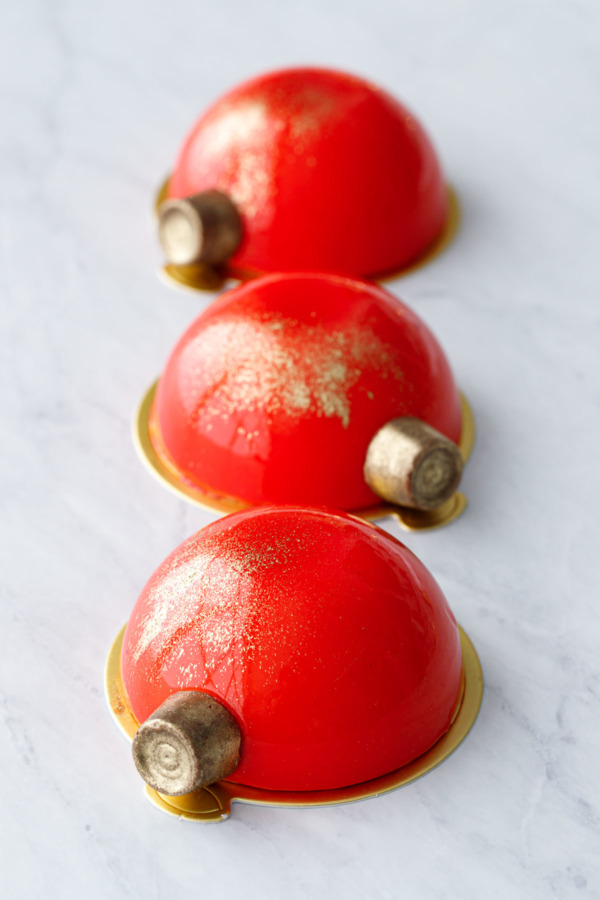
- To finish, press a gold-dusted Rolo into the side of each cake. Optionally, dip a paintbrush just barely into gold luster dust. Tap the brush with your finger over top of cakes to sprinkle a tiny bit of gold over the top of each cake.
- Glazed cakes will keep uncovered in the refrigerator for up to 5 days. Let come to room temperature 15 to 20 minutes before serving.
Notes
- To double this recipe, double the crust, crémeux and mousse components (the caramel and mirror glaze already make enough for a double batch).
- To make one large cake, use an 8-inch silicone pan and double the crémeux and mousse portions of the recipe (you may have some leftover, just eyeball the quantities as you fill your molds).